1. Introduktion
The M5Stack M5StickC PLUS2 is a compact and versatile IoT development kit, featuring the ESP32-PICO-V3-02 chip. Designed for rapid prototyping and integration into various projects, it offers robust BLE and WiFi connectivity, making it ideal for applications in IIoT, home automation, smart retail, and STEM education. This manual provides essential information for setting up, operating, and maintaining your M5StickC PLUS2 device.

Figure 1.1: M5StickC PLUS2 Development Kit with Watch Accessories. The image displays the main M5StickC Plus2 unit, a USB-C cable, a watch strap, and two types of mounting brackets (Wall and Brick).
2. Pakkens indhold
Bekræft at alle varer er til stede i din pakke:
- 1 x M5StickC PLUS2 Unit
- 1 x Watch Strap
- 1 x USB-C Cable (50cm)
- 1 x WALL Mounting Bracket
- 1 x BRICK Mounting Bracket

Figure 2.1: Detailed breakdown of M5StickC PLUS2 Watch Kit components. Labels indicate M5StickC Plus2, USB-C 50CM cable, Watch Belt, BRICK mount, WALL mount, and key internal components like ESP32-PICO-V3-02, 8M FLASH, 2M PSRAM, CH9102, MPU6886, RTC BM8563, ST7789V2-1.14" display, built-in buzzer, IR transmitter, 200mAh battery, and SPM1423-PDM MIC.
3. Opsætning
3.1 Indledende opladning
Before first use, fully charge the M5StickC PLUS2 using the provided USB-C cable. Connect the cable to the device's USB-C port and the other end to a standard USB power adapter (5V @ 500mA recommended) or a computer's USB port. The device has a 200mAh battery.
3.2 Tilslutning til en computer
To program or configure the M5StickC PLUS2, connect it to your computer using the USB-C cable. You may need to install appropriate drivers (e.g., CP210X or CH9102 drivers, depending on the specific USB-to-serial chip) for your operating system to recognize the device.
3.3 Softwareopsætning
The M5StickC PLUS2 supports various development environments, including Arduino IDE, MicroPython (UIFlow), and ESP-IDF. Refer to the official M5Stack documentation for detailed instructions on setting up your preferred development environment and flashing firmware.
- Arduino IDE: Install the ESP32 board package and M5Stack libraries.
- UIFlow (MicroPython): Use the M5Burner tool to flash the UIFlow firmware, then program via the UIFlow web IDE.
- ESP-IDF: For advanced users, follow Espressif's ESP-IDF setup guide.
4. Operating the M5StickC PLUS2
4.1 Grundlæggende betjening
The M5StickC PLUS2 features a 1.14-inch TFT screen and multiple buttons for interaction. The exact functionality of these buttons and the display will depend on the firmware loaded onto the device.
- Tænd/sluk: Typically, a long press of the main button (usually the side button) will power the device on or off.
- Navigation: Short presses of the buttons can be used for menu navigation or triggering specific functions as defined by your program.
4.2 Forbindelse
The device supports Wi-Fi and Bluetooth Low Energy (BLE) for wireless communication.
- Wi-Fi: Connect to local Wi-Fi networks to access the internet, communicate with cloud services, or create a local web server.
- Bluetooth/BLE: Establish connections with other Bluetooth-enabled devices for data exchange or control.
4.3 Wearable Use
With the included watch accessories, the M5StickC PLUS2 can be worn as a wrist device, enabling portable IoT applications and data collection.

Figure 4.1: M5StickC PLUS2 configured as a wearable device. The image shows the device attached to the orange watch strap and worn on a person's wrist, demonstrating its compact size and portability.

Figure 4.2: Wearable Devices application. This image emphasizes the M5StickC PLUS2's small size and low power consumption, making it suitable for wearable technology.
4.4 Applikationsscenarier
The M5StickC PLUS2 is versatile and can be used in various applications:
- Sports Activity Monitoring: Utilize its sensors (e.g., MPU6886 6-axis IMU) for tracking movement.
- IoT-controller: Act as a central hub or node in smart home or industrial IoT systems.
- Gør-det-selv-kreation: A flexible platform for custom electronic projects and rapid prototyping.

Figure 4.3: Scope of Application for M5StickC PLUS2. The image illustrates three primary uses: Sports Activity Monitoring (person tying shoelaces), IoT Controller (smart building), and DIY Creation (electronic components on a breadboard).
5. Vedligeholdelse
To ensure the longevity and optimal performance of your M5StickC PLUS2, follow these maintenance guidelines:
- Rensning: Brug en blød, tør klud til at rengøre enheden. Undgå at bruge væsker eller slibende rengøringsmidler.
- Opbevaring: Opbevar enheden et køligt, tørt sted væk fra direkte sollys og ekstreme temperaturer.
- Batteripleje: Do not expose the battery to high temperatures or puncture it. If the device will not be used for an extended period, charge it to about 50% before storing.
- Undgå fysisk skade: Protect the device from drops, impacts, and excessive force.
- Firmwareopdateringer: Tjek regelmæssigt den officielle M5Stack-software webwebsted for firmwareopdateringer for at sikre, at du har de nyeste funktioner og fejlrettelser.
6. Fejlfinding
If you encounter issues with your M5StickC PLUS2, try the following troubleshooting steps:
- Enheden tænder ikke:
- Ensure the battery is charged. Connect to a power source and wait a few minutes.
- Prøv et andet USB-C-kabel eller strømadapter.
- Computer Not Recognizing Device:
- Install the necessary USB-to-serial drivers (e.g., CP210X or CH9102).
- Prøv en anden USB-port på din computer.
- Ensure the USB-C cable supports data transfer, not just charging.
- Fejl i upload af firmware:
- Verify that the correct board and port are selected in your IDE.
- Sørg for, at ingen andre programmer bruger den serielle port.
- Try holding the boot button (if applicable) while initiating the upload.
- Problemer med Wi-Fi/Bluetooth-forbindelse:
- Check your code for correct Wi-Fi credentials or Bluetooth pairing procedures.
- Ensure the device is within range of the Wi-Fi router or Bluetooth device.
- Restart the M5StickC PLUS2 and the target network/device.
- Skærmen viser ikke:
- Kontroller, om enheden er tændt.
- Verify that your program is correctly initializing and writing to the display.
For more detailed troubleshooting or specific technical support, please visit the official M5Stack documentation or community forums.
7. Specifikationer

Figure 7.1: M5StickC PLUS2 Technical Specifications. This image presents a table detailing the resources and parameters of the device, including MCU, Flash, PSRAM, Power input, Buttons, MEMS, Buzzer, and Battery.
| Feature | Parameter |
|---|---|
| Mærke | M5Stack |
| Modelnavn | M5StickC Plus2 |
| MCU | ESP32-PICO-V3-02 |
| Blitz | 8 MB |
| PSRAM | 2 MB |
| Vise | 1.14-inch TFT (ST7789V2) |
| IMU | MPU6886 (6-Axis) |
| RTC | BM8563 |
| Summer | Indbygget |
| IR-sender | Ja |
| Mikrofon | SPM1423-PDM MIC |
| Batteri | 200mAh @ 3.7V (Nonstandard Battery) |
| Strømindgang | 5V @ 500mA (USB-C) |
| Forbindelse | Wi-Fi, Bluetooth, BLE, HY2.0-4P, 8P@2.54mm |
| Varens vægt | 2.39 ounce |
| Pakkedimensioner | 4.88 x 2.6 x 0.91 tommer |
| Oprindelsesland | Kina |
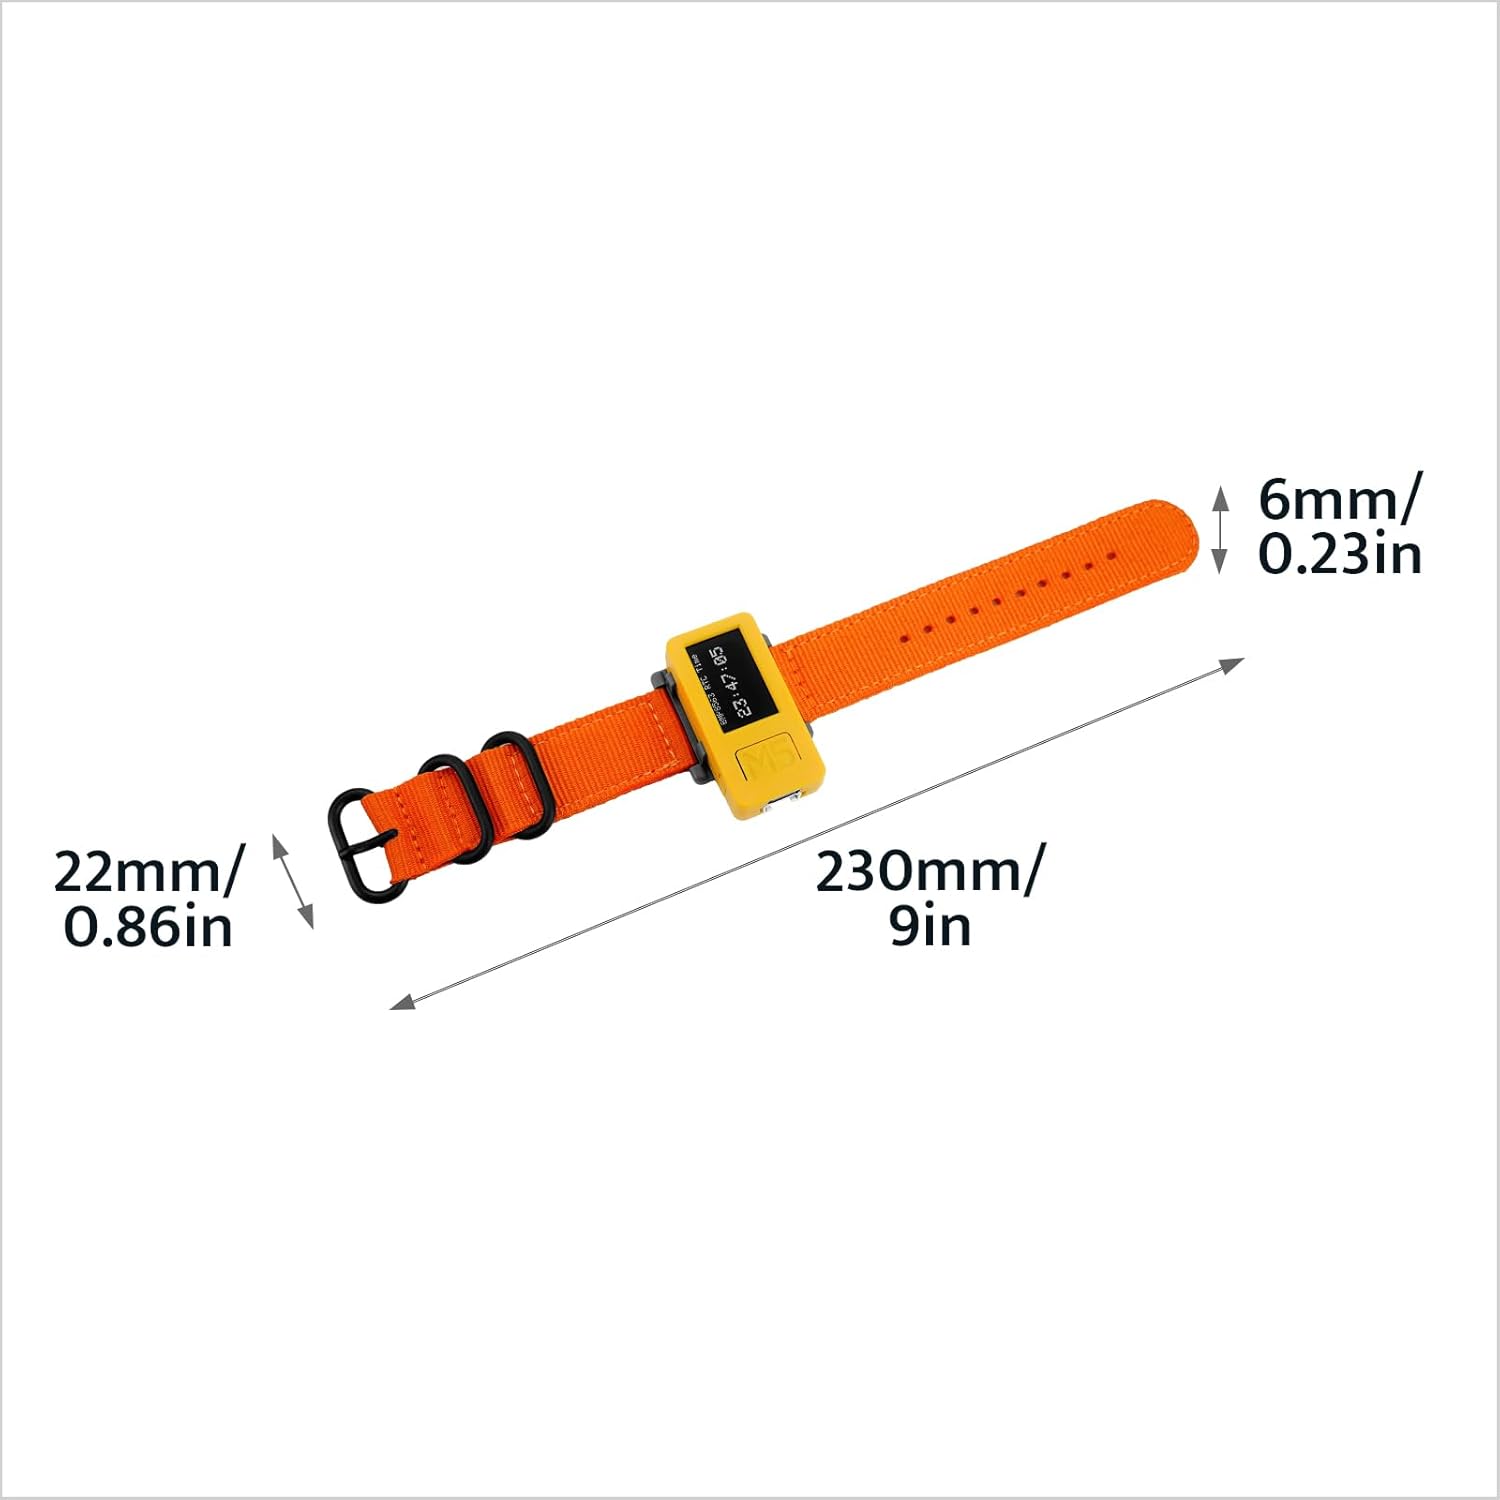
Figure 7.2: Watch Strap Dimensions. The image shows the watch strap with measurements: 6mm/0.23in width, 22mm/0.86in buckle width, and 230mm/9in total length.

Figure 7.3: M5StickC PLUS2 Weight. The device, attached to its watch strap, is shown on a digital scale displaying a weight of 28.8 grams.
8. Garanti og support
M5Stack products typically come with a standard manufacturer's warranty. For specific warranty terms and conditions, please refer to the official M5Stack webwebsted eller kontakt deres kundesupport.
For technical support, documentation, and community forums, please visit the official M5Stack resources:
- Officiel M5Stack Webwebsted: www.m5stack.com
- M5Stack Store on Amazon: Visit M5Stack Store
M5Stack is committed to providing modular, open-source IoT development solutions, empowering innovation and rapid prototyping.


