1. Introduktion
This manual provides detailed instructions for the safe and effective use of your Godox K-180A Strobe Light Kit. This kit is designed for studio and portrait photography, offering versatile lighting solutions with its 180Ws strobe lights, softboxes, and wireless trigger system. Please read this manual thoroughly before operation to ensure proper setup and functionality.
2. Hvad er der i æsken
Your Godox K-180A Strobe Light Kit includes the following components:
- 2x K-180A Studio Monolights
- 2x Honeycomb Grid Softboxes (50x70cm)
- 2x Light Stands (3.2m)
- 1x RT-16 triggersæt (sender og modtager)
- 2x 75W Modeling Lamps
- 2x strømkabler
- 1x Storage Bag (CB75cm)
- Instruction Manuals (for individual components)
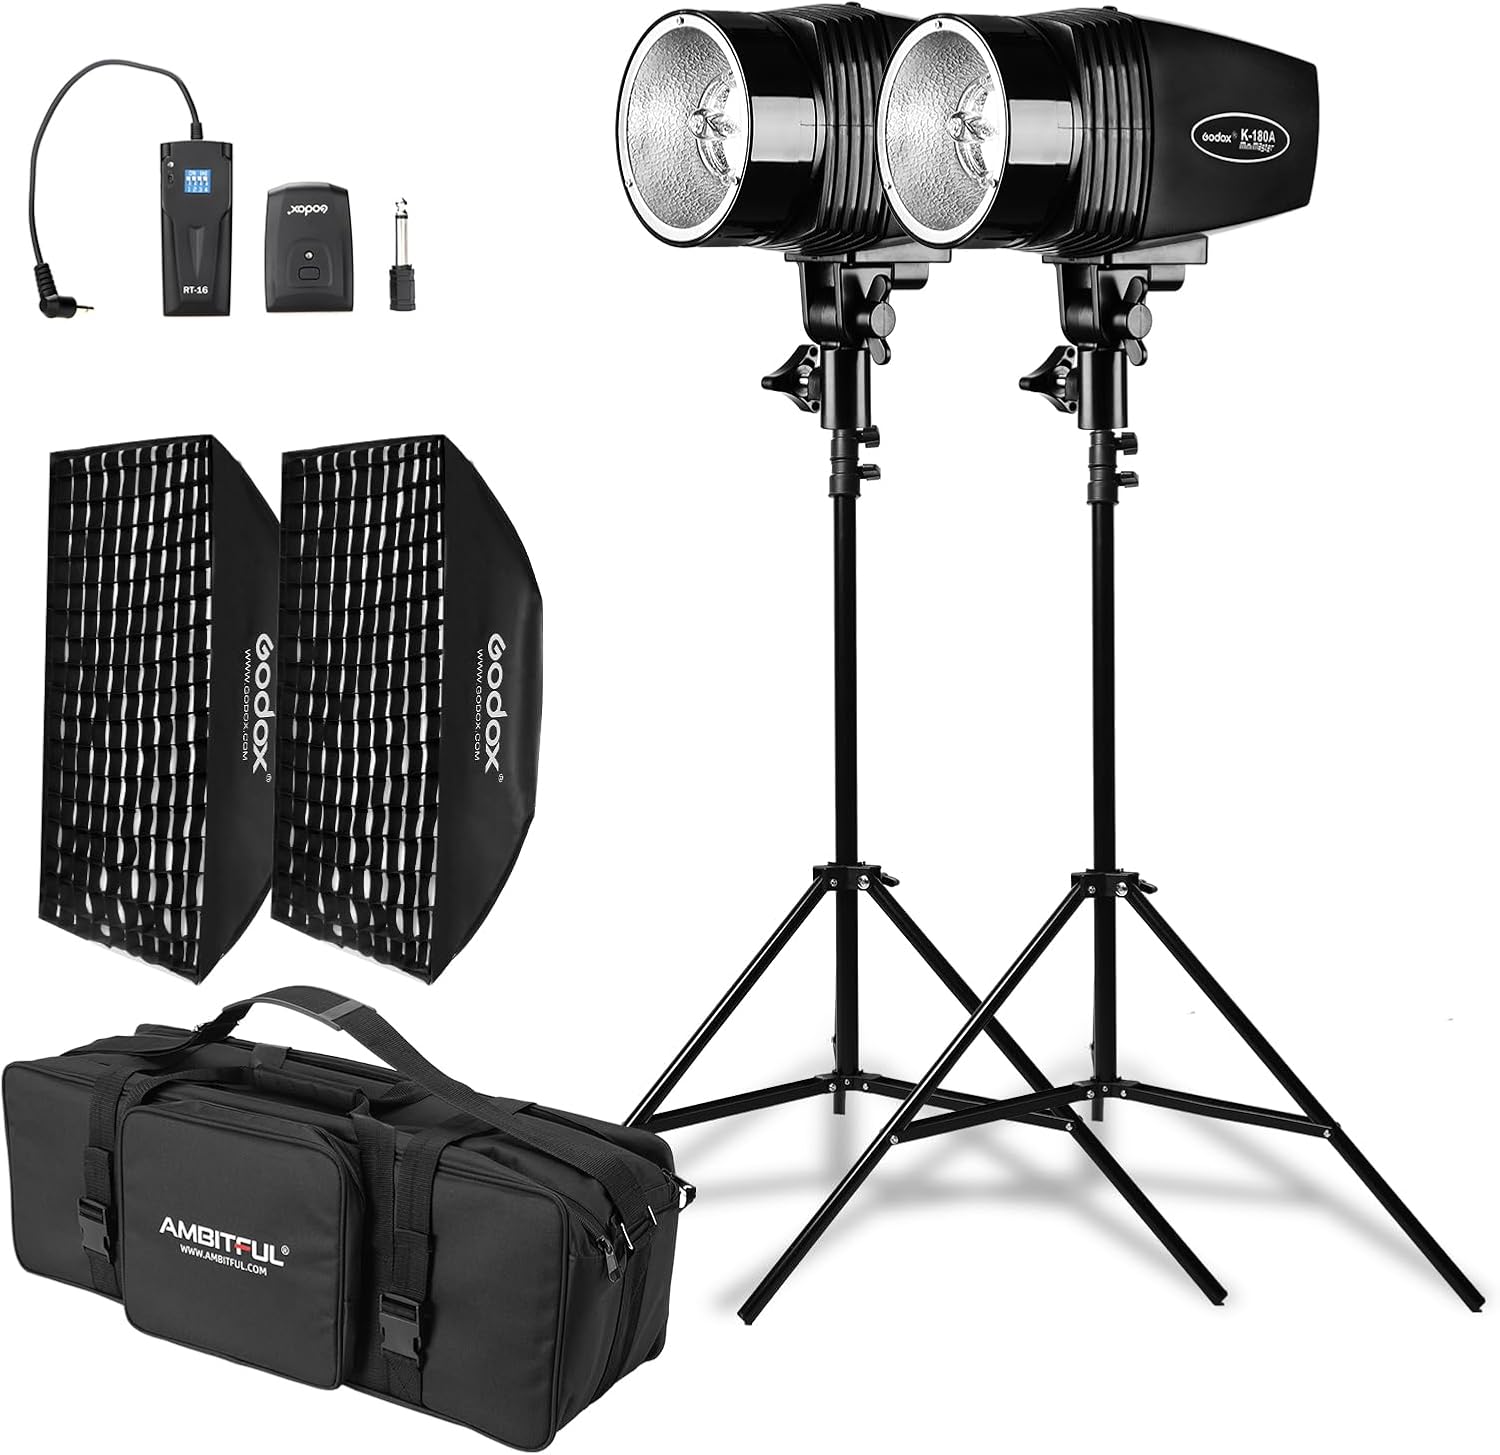
Figur 2.1: Overview of the Godox K-180A Strobe Light Kit components.
3. Opsætningsvejledning
3.1. Light Stand Assembly
- Place the light stand on a flat, stable surface.
- Extend the legs of the tripod base until they are fully spread and stable. Secure the locking knob at the base.
- Loosen the height adjustment knobs on the stand sections.
- Extend the center column to the desired height, ensuring each section is securely locked before extending the next.
- Tighten all adjustment knobs firmly to prevent accidental collapse.
Video 3.1: Demonstration of how to open and set up the tripod light stand.

Figure 3.1: Diagram illustrating the dimensions and setup of the light stand.
3.2. Softbox Assembly
- Lay the softbox flat with the inner reflective surface facing up.
- Insert the metal rods into the designated pockets on the softbox and into the central speedring. The rods will bend slightly to create tension and form the softbox shape.
- Attach the inner diffuser panel to the inside of the softbox using the Velcro tabs.
- Attach the outer diffuser panel to the front of the softbox using the Velcro edges.
- Mount the assembled softbox onto the monolight by aligning the speedring with the monolight's mount and twisting to lock it in place.
Video 3.2: Step-by-step guide on how to install the softbox onto the strobe light.

Figure 3.2: Diagram showing the dimensions and assembly points of the softbox.
3.3. Monolight Installation
- Carefully insert the 75W modeling lamp into the socket on the monolight.
- Attach the monolight to the top spigot of the light stand and secure it with the locking screw.
- Connect the power cord to the monolight and then to a power outlet.

Figur 3.3: Nærbillede view of the monolight with the modeling lamp installeret.
3.4. RT-16 Trigger Setup
- Insert 2x AAA batteries into the RT-16 receiver (if not pre-installed).
- Connect the RT-16 receiver to the sync port on the monolight.
- Mount the RT-16 transmitter onto your camera's hot shoe.
- Ensure both the transmitter and receiver are set to the same channel for synchronous flashing.

Figure 3.4: Image displaying the RT-16 Trigger components and their dimensions.
4. Betjeningsvejledning
4.1. Tænd/sluk
Locate the power switch on the back panel of the monolight. Flip the switch to the "ON" position to power on the unit. Flip to "OFF" to power down.
4.2. Justering af blitzstyrke
The flash output is adjustable from 1/8 to full power using the rotary knob on the control panel. Turn the knob clockwise to increase power and counter-clockwise to decrease it. The current setting will be displayed on the screen.

Figure 4.1: Close-up of the monolight's control panel, highlighting the brightness adjustment knob.
4.3. Modellering af Lamp Kontrollere
75W modellerings-lamp provides continuous light for previewing lighting effects. It can be turned on or off independently using the dedicated button on the control panel. The modeling lamp's brightness can also be adjusted proportionally to the flash output or set to a fixed percentage (5% til 100%).
4.4. Wireless Triggering (RT-16)
The included RT-16 trigger set allows for wireless synchronization of the strobe lights. Ensure the transmitter is on your camera's hot shoe and the receiver is connected to the monolight. Set both to the same channel. The wireless control working distance is up to 30 meters.

Figure 4.2: The RT-16 Trigger mounted on a camera, ready to wirelessly control the strobe light.
4.5. Optical Slave Modes (S1/S2)
The monolight features built-in optical slave modes (S1 and S2) for triggering without a dedicated receiver:
- S1 tilstand: The flash will fire in response to the first flash it detects. This is suitable for manual flash units.
- S2 tilstand: The flash will ignore a pre-flash (common in TTL systems) and fire on the second flash. This is useful when using a camera's built-in flash that emits a pre-flash.
4.6. Group and Channel Settings
The monolight supports multiple groups and channels for complex lighting setups. Refer to the individual monolight manual for detailed instructions on setting groups and channels to avoid interference with other wireless devices.
5. Vedligeholdelse
- Rensning: Use a soft, dry cloth to clean the exterior of the monolights and softboxes. Avoid abrasive cleaners or solvents.
- Opbevaring: When not in use, disassemble the softboxes and light stands and store all components in the provided storage bag in a cool, dry place.
- Battery Care (RT-16 Receiver): Remove AAA batteries from the RT-16 receiver when not in use for extended periods to prevent corrosion and damage.
- Håndtering af pære: Handle the modeling lamps and flash tubes with care. Avoid touching the glass directly with bare hands, as oils can reduce their lifespan.
6. Fejlfinding
| Problem | Mulig årsag | Løsning |
|---|---|---|
| Strobe light not firing. | Power cable not connected; unit not powered on; trigger not synchronized; optical sensor blocked. | Check power connections and switch; ensure RT-16 transmitter and receiver are on the same channel; clear any obstructions from the optical sensor. |
| Softbox difficult to assemble. | Rods not properly bent or inserted into the speedring. | Lay the softbox flat and ensure rods are bent sufficiently to fit into the speedring's holes. Refer to the softbox assembly video. |
| Modellering lamp virker ikke. | Lamp burnt out; modeling lamp funktionen er slået fra. | Check if the modeling lamp is securely installed; press the modeling lamp button to cycle through modes; replace the lamp if burnt out. |
| Trådløs trigger virker ikke. | Incorrect channel setting; dead batteries in receiver/transmitter; out of range. | Verify channels match on both units; replace batteries; reduce distance between trigger and strobe. |
7. Specifikationer
- Model: K-180A
- Flash-output: 180Ws
- Farvetemperatur: 5600K
- Modellering L.amp: 75W, 3200K (yellow color)
- Flash-varighed: 1/2000 - 1/800s
- Vejledende nummer (GN): 45
- Genbrugstid: 0.5 - 3 sekunder
- Trådløs kontrol: RT-16 Trigger (up to 30m)
- Softbox Size: 20"x28" / 50x70cm
- Light Stand Height: Up to 3.2m (approx. 190cm max length)
- Strømindgang: AC200-240V 50-60Hz (check product label for specific voltage)
- Varens vægt: 14.52 pounds (entire kit)
- Fabrikant: GODOX
8. Garanti og support
For garantioplysninger og kundesupport henvises til den officielle GODOX webwebstedet eller kontakt din forhandler. Gem din købskvittering som købsbevis i tilfælde af garantikrav.
Additional protection plans may be available for purchase. Please check with your vendor for details.


