Indledning
This manual provides detailed instructions for the assembly, operation, and maintenance of your VOUNOT Walk-in Greenhouse. Designed to protect plants from adverse weather conditions and provide an optimal growing environment, this portable greenhouse features a robust frame, a durable polyethylene cover, and integrated shelving. Please read these instructions carefully before assembly and use to ensure proper setup and longevity of your product.

Image: Fully assembled VOUNOT Walk-in Greenhouse, showcasing its spacious interior with various potted plants on shelves.
The greenhouse cover is made from 135 g/m² high-density polyethylene, offering 100% waterproofing and excellent UV protection. It allows sunlight to pass through, supporting plant growth while shielding them from heavy rain, wind, frost, and snow. The design includes a roll-up zip panel door and screened windows for airflow regulation.

Image: Visual representation of the greenhouse cover's dual protection against rain and harmful UV rays, ensuring plant safety.
Sikkerhedsoplysninger
- Ensure the greenhouse is assembled on a level and stable surface.
- Securely anchor the greenhouse to the ground using the provided ropes and ground anchors to prevent wind damage.
- Do not place heavy objects on the shelves beyond the specified load capacity of 10 kg per shelf.
- Hold børn og kæledyr væk fra samlingsområdet for at forhindre ulykker.
- In extreme weather conditions (e.g., very strong winds, heavy snow accumulation), consider temporarily disassembling or reinforcing the structure.
Opsætning
Pakkeindhold:
- 1x Foil Greenhouse Cover
- 4x Removable Shelves
- 4x Ropes
- 4x Ground Anchors
- 16x Kabelbindere
- 1x Assembly Instructions (refer to this manual)
- Stålrammekomponenter (forskellige stænger og forbindelsesstykker)
Monteringstrin:
- Udpak komponenter: Carefully unpack all parts and verify against the package contents list.
- Saml stålrammen: Using the practical plug-in system, connect the steel frame poles and connectors. No tools are required. Refer to the diagram below for the structural layout and dimensions. Ensure all connections are secure.
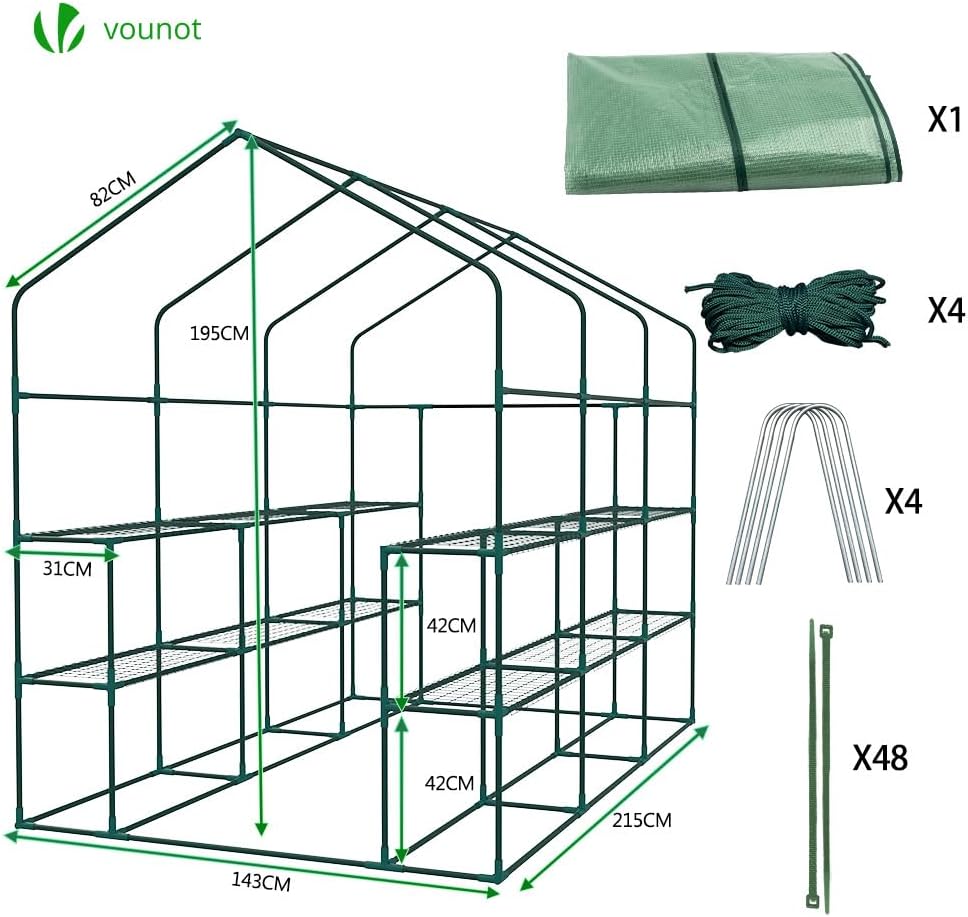
Image: Detailed assembly diagram illustrating the dimensions of the greenhouse frame and the various components included for construction.
- Installer hylder: Once the frame is partially assembled, or as indicated by the frame design, place the 4 removable shelves onto their designated supports. Ensure they are stable. Each shelf can hold up to 10 kg.

Billede: Nærbillede view of a greenhouse shelf, demonstrating its wire mesh construction and how it connects to the steel frame.
- Draper betrækket: Carefully drape the polyethylene cover over the assembled steel frame. Ensure the door and window openings align correctly with the frame structure.
- Fastgør dækslet: Use the provided cable ties to secure the cover to the frame at various points, especially at corners and along edges, to prevent it from shifting in the wind.
- Anker drivhuset: For enhanced stability, especially in outdoor conditions, use the 4 ropes and 4 ground anchors. Attach the ropes to the designated loops on the greenhouse cover and secure them firmly into the ground using the anchors.
- Weigh Down the Base: The bottom edge of the cover is designed to be slightly longer than the frame. It is highly recommended to weigh down this edge with soil, stones, or sandbags to increase overall stability and prevent wind from lifting the greenhouse.

Image: Illustration of various methods to secure the greenhouse, including a ground anchor with rope, a cable tie securing the cover to the frame, and stones used to weigh down the base.
Betjeningsvejledning
Ventilation og adgang:
- Roll-up Zip Panel Door: The front panel features a zipper for easy access. Roll up the door and secure it at the top to allow entry and exit, and to provide significant airflow when needed.
- Screened Window: The greenhouse includes a screened window, typically located at the back or side. This window can be opened to regulate internal temperature and humidity, allowing for cross-ventilation while keeping pests out. The back window also serves as an observation window.

Billede: Detaljeret view of the greenhouse's roll-up door with its zipper mechanism and a screened window, highlighting features for access and ventilation.

Billede: Et ydre view of the greenhouse, showing the screened window open for ventilation and providing a broader perspective of the structure in a garden setting.
Planteplacering:
Utilize the four sturdy removable shelves to organize your flower pots and trays. Arrange plants according to their light and temperature requirements, placing taller plants on the ground level if necessary.
Opretholdelse
- Rengøring af låget: Periodically clean the polyethylene cover with mild soap and water to remove dirt, dust, and algae buildup. Avoid abrasive cleaners or brushes that could damage the material.
- Rammeinspektion: Regularly check the steel frame for any signs of rust, damage, or loose connections. Tighten any loose parts and address rust promptly to maintain structural integrity.
- Forankringstjek: Ensure ropes and ground anchors remain securely in place, especially after strong winds or heavy rain. Re-secure or adjust as needed.
- Hyldebelastning: Do not exceed the 10 kg load capacity per shelf to prevent bending or collapse.
- Sæsonbestemt opbevaring: If disassembling for off-season storage, clean all components thoroughly, allow them to dry completely, and store them in a cool, dry place away from direct sunlight.
Fejlfinding
- Drivhusustabilitet: If the greenhouse feels unstable, ensure all frame connections are tight, ropes are taut, ground anchors are fully inserted, and the base of the cover is adequately weighed down with soil or stones.
- Poor Ventilation/High Humidity: Open the roll-up door and screened window to increase airflow. Consider using a small fan inside if natural ventilation is insufficient in very humid conditions.
- Water Accumulation on Cover: Ensure the cover is taut and properly draped to allow water to run off. Clear any debris that might be causing puddling.
- Skade på låg (rifter/huller): Små rifter kan ofte repareres med specialiseret reparationstape til drivhuse. Overvej at udskifte dækslet ved større skader.
Specifikationer
| Feature | Specifikation |
|---|---|
| Total Dimensions (HxLxW) | 195 x 215 x 143 cm (76.77"H x 84.65"L x 56.3"W) |
| Belastningskapacitet pr. hylde | 10 kg (22 lbs) |
| Rammemateriale | Legeret stål |
| Dækmateriale | 135 g/m² højdensitetspolyethylen (PE) |
| Farve | Grøn |
| Antal døre | 1 (Roll-up zip panel) |
| Windows | 1 (Screened) |
| Varens vægt | 12 kg (26.4 pund) |
| Indendørs/Udendørs brug | Udendørs |
| Modelnummer | 9720371446109 |


