Indledning
The Monster Mini M2 Electric Scooter is a high-quality, versatile personal mobility device designed for both adults and children. Featuring a robust aluminum alloy frame, powerful motor, and comfortable design, it offers an efficient and enjoyable riding experience. This manual provides essential information for the safe operation, maintenance, and troubleshooting of your scooter.
Sikkerhedsoplysninger
Always prioritize safety when operating the scooter. Failure to follow safety guidelines can result in injury or damage to the product.
- Brug altid hjelm og passende sikkerhedsudstyr (knæbeskyttere, albuebeskyttere, håndledsbeskyttere) når du kører.
- Kør ikke i vådt føre, kraftig regn eller gennem vandpytter.
- Sørg for, at alle bolte og fastgørelseselementer er spændt før hver tur.
- Overskrid ikke den maksimale vægtkapacitet på 100 kg (220 lbs).
- Avoid riding on uneven surfaces, steep inclines, or slippery terrain.
- Vær opmærksom på dine omgivelser og andre fodgængere eller køretøjer.
- Lad ikke børn betjene scooteren uden opsyn af voksne.
- Sæt dig bekendt med lokale love og regler vedrørende brug af elektriske løbehjul.
- Do not modify the scooter in any way.
Pakkens indhold
Bekræft at alle varer er til stede i pakken:
- Monster Mini M2 Electric Scooter
- Hurtigoplader (2A)
- Brugermanual
- Tools for assembly (if required, not explicitly mentioned but common)
Opsætning
Follow these steps to prepare your Monster Mini M2 Scooter for its first use:
- Udfoldning af scooteren:
Carefully remove the scooter from its packaging. Locate the folding mechanism, usually near the base of the steering column. Release the latch and unfold the scooter until it locks securely into place. Ensure the locking mechanism is fully engaged before proceeding.

Image: The Monster Mini M2 Electric Scooter in its fully unfolded state, showing the main body, handlebars, and seat.
- Justering af styrhøjde:
The handlebar height is adjustable for rider comfort. Loosen the quick-release clamp on the steering column, extend or retract the handlebar to your desired height, and then securely tighten the clamp. Ensure the handlebar is firm and does not wobble.

Billede: Et nærbillede view of the front wheel, suspension, and LED headlight of the Monster Mini M2 Electric Scooter. The handlebar stem is visible.
- Attaching/Adjusting the Seat:
The scooter comes with a comfortable leather seat that can be attached or removed. If attaching, insert the seat post into the designated slot and adjust its height for optimal comfort. Secure it with the quick-release lever. If you prefer to ride standing, the seat can be easily removed.

Billede: En detaljeret view of the comfortable leather seat and its adjustable post on the Monster Mini M2 Electric Scooter.
- Indledende opladning:
Before first use, fully charge the scooter's battery. Connect the charger to the charging port on the scooter and then plug it into a power outlet. The charger indicator light will typically change from red to green when fully charged. Refer to the "Charging the Battery" section for more details.
Betjeningsvejledning
Tænd/sluk
Press and hold the power button on the digital display to turn the scooter on or off. The display will illuminate, showing speed, battery level, and other information.
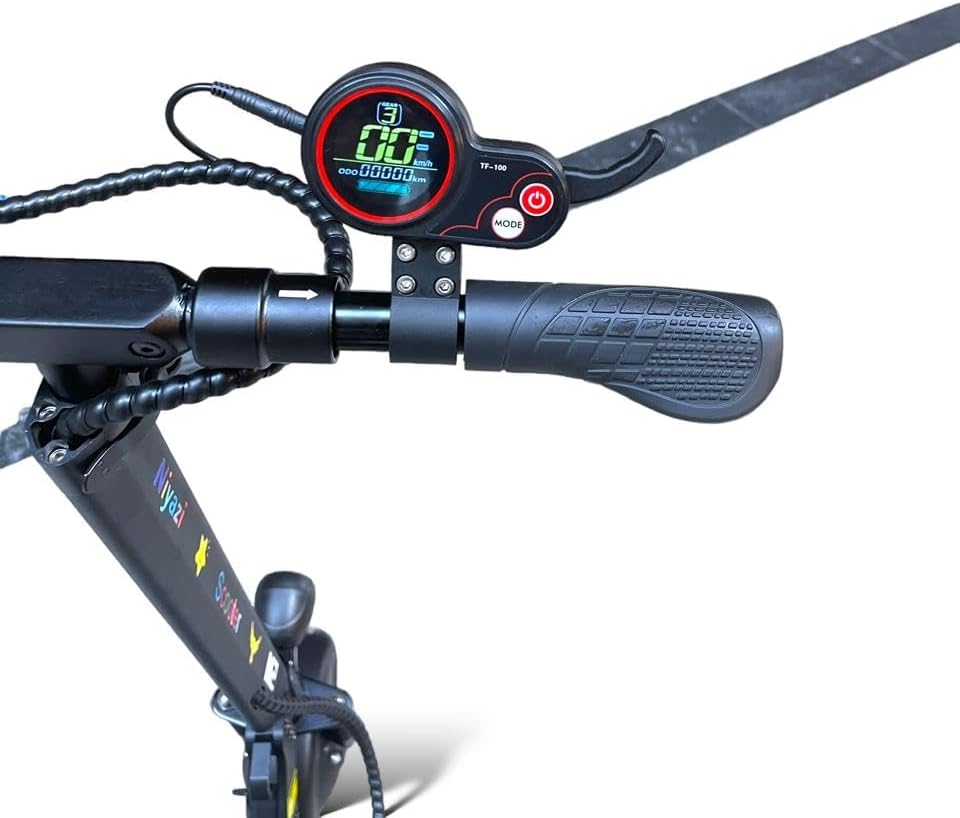
Image: A close-up of the digital display and handlebar controls, including the power button and mode button, on the Monster Mini M2 Electric Scooter.
Kører på scooter
- Starter: Place one foot on the deck and push off with the other foot to gain some initial momentum. Once moving, gently press the throttle to engage the motor.
- Hastighedstilstande: The scooter features three speed modes. Use the mode button on the display to cycle through them and select the appropriate speed for your riding conditions. The maximum speed is 40-45 KM/H.
- Bremsning: The scooter is equipped with front and rear disc brakes. Apply the brake levers gently and evenly to slow down or stop. The rear brake light will illuminate when braking.
- Drejning: Lean into turns and use the handlebars to steer.
- Horn og lys: Use the horn for signaling and the powerful front LED headlight for visibility, especially in low-light conditions. Side turn signals are also available.
Digitale displayfunktioner
Det digitale display giver information i realtid:
- Hastighedsindikator: Viser din aktuelle hastighed.
- Batteriniveau: Viser den resterende batteriopladning.
- Kilometertæller/triptæller: Tracks total distance or current trip distance.
- Hastighedstilstandsindikator: Shows the currently selected speed mode.
Opladning af batteriet
To ensure optimal battery life and performance, follow these charging guidelines:
- Only use the provided 2A fast charger.
- Sørg for, at scooteren er slukket, inden den oplades.
- Connect the charger to the scooter's charging port, then plug it into a standard wall outlet.
- The charger indicator light will typically be red during charging and turn green when the battery is fully charged.
- Overoplade ikke batteriet. Frakobl opladeren, når opladningen er færdig.
- A single charge can cover a distance of up to 40 km (25 miles), depending on riding conditions and terrain.
Opretholdelse
Regular maintenance helps prolong the life of your scooter and ensures safe operation.
- Rensning: Tør scooteren af med reklameamp cloth after each use. Do not use high-pressure water or immerse the scooter in water.
- Dæk: The scooter uses 6.5-inch solid rubber tires, which do not require inflation. Periodically inspect them for wear and tear.
- Bremser: Regularly check the front and rear disc brakes for proper function. Ensure the brake levers engage smoothly and the brakes provide adequate stopping power. Adjust if necessary, or consult a professional.
- Fastgørelsesmidler: Kontrollér regelmæssigt alle skruer, bolte og hurtigudløsermekanismer for at sikre, at de er stramme og sikre.
- Opbevaring: When not in use, store the scooter in a cool, dry place, away from direct sunlight and extreme temperatures. The foldable design allows for easy storage.
Fejlfinding
Her er nogle almindelige problemer og deres potentielle løsninger:
| Problem | Mulig årsag | Løsning |
|---|---|---|
| Scooteren tænder ikke. | Low battery; loose connection; power button issue. | Charge the battery fully. Check all connections. Press and hold the power button firmly. |
| Motoren går ikke i indgreb. | Throttle not pressed correctly; low battery; motor fault. | Ensure you push off to gain initial speed before pressing the throttle. Check battery level. If issue persists, contact support. |
| Bremserne er ikke effektive. | Brake pads worn; cable loose; disc dirty. | Inspect brake pads and disc. Adjust brake cable tension. Clean disc. If unsure, seek professional assistance. |
| Reduced range/battery life. | Battery not fully charged; riding conditions (hills, heavy load); battery degradation. | Ensure full charge. Avoid continuous uphill riding or carrying excessive weight. Battery life naturally degrades over time. |
Specifikationer
| Feature | Detalje |
|---|---|
| Modelnavn | Monster Mini M2 Original |
| Mærke | General (Niyazi Manufacturer) |
| Farve | Sort |
| Motorkraft | 500W |
| Batteri | 36V 8AH |
| Max Range per Charge | Op til 40 km (25 miles) |
| Max hastighed | 40 - 45 KM/H (25 - 28 MPH) |
| Bremse type | Front og bageste skivebremser |
| Rammemateriale | Aluminiumslegering |
| Affjedring | Front and Rear Shock Absorbers |
| Dæk | 6.5-inch Solid Rubber (Non-inflatable) |
| Vise | Digital Display (Speed, Battery, etc.) |
| Belysning | Powerful Front LED Headlight, Rear Brake Light, Side Turn Signals |
| Sæde | Adjustable Height Leather Seat (Removable) |
| Max belastningskapacitet | Op til 100 kg (220 lbs) |
| Produktmål (L x B x H) | 180 x 26 x 140 cm (70.9 x 10.2 x 55.1 tommer) |
| Varens vægt | 38 kg (83.8 lbs) |
| Sammenfoldelig | Yes, for easy storage |
Note: The maximum weight limit for rider capacity is 100 kg, while the item weight of the scooter itself is 38 kg.
Garanti og support
For warranty information, technical support, or service inquiries, please contact the manufacturer or your point of purchase. Keep your purchase receipt as proof of purchase.
- Manufacturer: Niyazi
- For assistance, refer to the contact information provided with your product packaging or visit the official Niyazi webwebsted.


