1. Introduktion
Thank you for choosing the Auronic AU3273 Compact Series Dehumidifier. This appliance is designed to effectively remove excess moisture from your indoor environment, helping to prevent mold, mildew, and musty odors. With a dehumidification capacity of 25 liters per day, it is ideal for spaces up to 50 m².
This manual provides important information regarding the safe operation, installation, maintenance, and troubleshooting of your dehumidifier. Please read it thoroughly before use and retain it for future reference.

Image 1.1: Auronic AU3273 Dehumidifier with visual representation of air circulation.
2. Sikkerhedsinstruktioner
For at sikre sikker betjening og forhindre skader på apparatet eller personskade, bedes du overholde følgende sikkerhedsforanstaltninger:
- Placer altid affugteren på en stabil, plan overflade.
- Bloker ikke luftindtaget eller -udtaget. Hold mindst 20 cm afstand omkring enheden.
- Sørg for, at strømforsyningen matcher voltage angivet på mærkatet.
- Betjen ikke enheden med en beskadiget strømledning eller stik.
- Tag stikket ud af apparatet, før du rengør, flytter eller udfører nogen form for vedligeholdelse.
- Brug ikke affugteren i områder, hvor der opbevares brandfarlige gasser eller væsker.
- Hold børn og kæledyr væk fra apparatet under drift.
- If the unit has been tilted more than 45 degrees during transport, allow it to stand upright for at least 24 hours before plugging it in and operating. This allows the refrigerant to settle.
- Stik ikke genstande ind i ventilationsåbningerne.
- Dette apparat er kun til indendørs brug.
3. Pakkens indhold
Carefully unpack your Auronic AU3273 Dehumidifier and check that all items are present and in good condition. The package should contain:
- Auronic AU3273 Dehumidifier Unit
- Drain Hose for continuous drainage
- Brugervejledning (dette dokument)

Image 3.1: Contents of the Auronic AU3273 Dehumidifier package, showing the unit, drain hose, and manual.
4. Produktet er slutview
4.1. Hovedkomponenter
- Kontrolpanel: Placeret øverst på enheden til indstilling af funktioner.
- Luftindtag: Where humid air is drawn into the unit.
- Luftudtag: Hvor tør luft udstødes.
- Vandtank: Collects condensed water. Capacity: 4 liters.
- Kontinuerlig drænudløb: For connecting the drain hose.
- Hjul: For nem mobilitet.
4.2. Kontrolpanelfunktioner
The control panel provides access to all operational settings. Refer to the image below for button identification:

Billede 4.1: Detaljeret view of the control panel with button descriptions.
- HASTIGHED: Justerer blæserhastigheden.
- SLEEP/RESET: Activates sleep mode or resets certain functions.
- LÅSE: Engages child lock to prevent accidental changes.
- Pil op/ned: Adjust humidity settings or timer values.
- TIMER: Indstiller driftstiden.
- KØRSELSVEJLEDNING: Switches between different operating modes (e.g., Laundry Dry).
- STAND-BY (Power Button): Tænder eller slukker enheden.
5. Opsætning
5.1. Indledende placering
Place the dehumidifier in the desired location, ensuring it is on a firm, level surface. Allow at least 20 cm of space around all sides for proper airflow. The unit is equipped with wheels for easy movement.
5.2. Strømtilslutning
Plug the power cord into a grounded electrical outlet. If the unit was tilted during transport, wait 24 hours before plugging it in.
5.3. Continuous Drainage (Optional)
For continuous operation without needing to empty the water tank, connect the included drain hose:
- Locate the continuous drain outlet on the back or side of the unit.
- Securely attach one end of the drain hose to this outlet.
- Direct the other end of the hose to a suitable drain point (e.g., floor drain, sink), ensuring it is lower than the unit's drain outlet for gravity flow.
- Ensure the hose is not kinked or blocked.
6. Betjeningsvejledning
6.1. Tænd/sluk
Tryk på STÅ VED knappen for at tænde eller slukke for affugteren.
6.2. Indstilling af ønsket luftfugtighed
When the unit is on, the display will show the current room humidity. Use the Up og Ned arrow buttons to set your desired humidity level. The unit will operate until the set humidity is reached, then cycle on and off to maintain it.
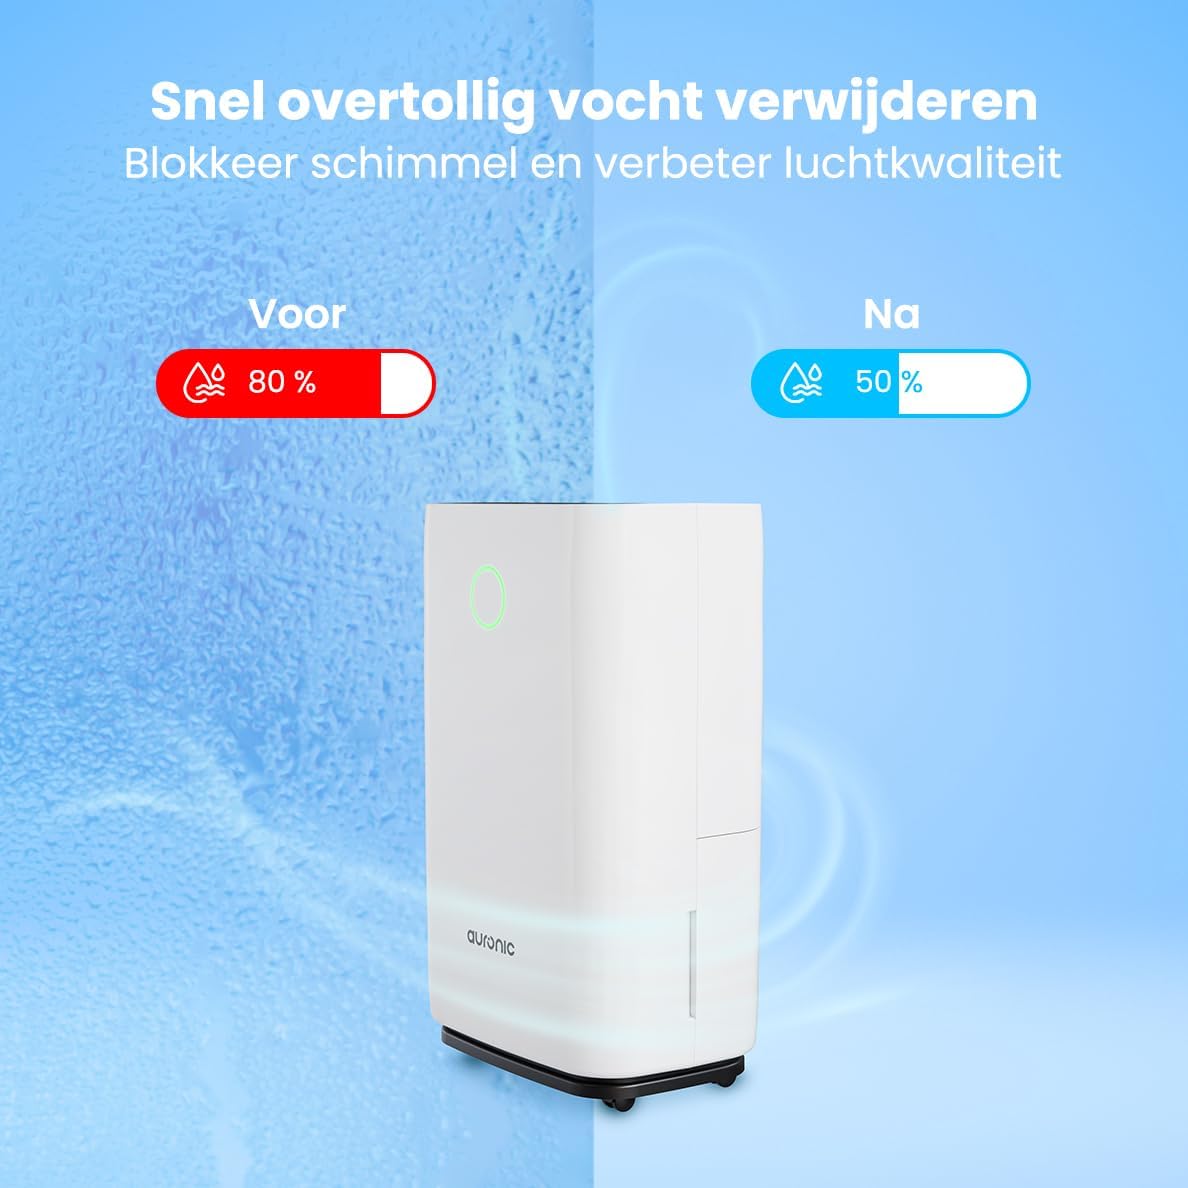
Image 6.1: Visual representation of humidity reduction from 80% to 50% using the dehumidifier.
6.3. Driftstilstande
- Automatisk tilstand: The unit automatically adjusts its operation based on the ambient humidity.
- Laundry Dry Function: Tryk på MODE button to select the Laundry Dry function. This mode increases fan speed and continuous operation to accelerate the drying process of clothes. Place the dehumidifier in your laundry room for optimal results.
- Sove mode: Tryk på SOVE/RESET button to activate sleep mode. In this mode, the display lights dim, and the fan operates at a lower speed for quieter operation, suitable for nighttime use.

Image 6.2: The dehumidifier operating quietly, suitable for use in a bedroom.
6.4. Timer funktion
Tryk på TIMER button to set an auto-on or auto-off time. Use the Up og Ned arrows to adjust the desired hours (1-24 hours). The unit will turn on or off after the set time has elapsed.
6.5. Børnesikring
Tryk og hold på LÅSE button for a few seconds to activate or deactivate the child lock. When activated, the control panel buttons will be unresponsive to prevent accidental changes.
7. Vedligeholdelse
Regelmæssig vedligeholdelse sikrer optimal ydeevne og forlænger levetiden på din affugter.
7.1. Tømning af vandtanken
When the water tank is full, the unit will automatically stop operating, and an indicator light will illuminate. Carefully remove the water tank from the unit, empty the collected water, and then reinsert the tank securely. Ensure the tank is properly seated to resume operation.
7.2. Rengøring af luftfilteret
Luftfilteret bør rengøres hver anden uge eller oftere afhængigt af brug og luftkvalitet. Et snavset filter kan reducere effektiviteten.
- Tag stikket til affugteren ud af stikkontakten.
- Find og fjern luftfilteret (normalt på bagsiden eller siden).
- Rengør filteret med en støvsuger, eller vask det forsigtigt med varmt sæbevand.
- Skyl grundigt, og lad filteret lufttørre helt, før det monteres igen.
- Sæt tørfilteret i igen, og sæt stikket i enheden igen.
7.3. Generel rengøring
Tør ydersiden af enheden af med en blød, damp klud. Brug ikke skrappe kemikalier, slibende rengøringsmidler eller opløsningsmidler, da disse kan beskadige overfladen.
8. Fejlfinding
Hvis du støder på problemer med din affugter, kan du se følgende almindelige problemer og løsninger:
- Enheden tænder ikke:
- Kontroller, om netledningen er sat ordentligt i en fungerende stikkontakt.
- Ensure the water tank is properly inserted and not full.
- Check if the child lock is activated.
- No water collected or low dehumidification:
- Verify that the set humidity level is lower than the current room humidity.
- Check if the air filter is clean and not blocked.
- Ensure room temperature is above 5°C (41°F), as dehumidifiers are less effective in cold conditions.
- Close doors and windows in the room to prevent humid air from entering.
- Allow a few minutes for the unit to accurately measure humidity upon startup, as initial readings may be inaccurate.
- Enheden larmer:
- Sørg for, at enheden står på en stabil og plan overflade.
- Check for any obstructions in the air inlet or outlet.
- Rengør luftfilteret, hvis det er snavset.
- Defrost function activates frequently:
- This is normal in cooler environments (e.g., below 20°C). The unit temporarily stops dehumidifying to melt any ice buildup on the coils.
If the problem persists after trying these solutions, please contact Auronic customer support.
9. Specifikationer
| Feature | Specifikation |
|---|---|
| Mærke | Auronic |
| Modelnummer | AU3273 |
| Produktdimensioner | 57 x 34 x 23 cm (H x B x D) |
| Vægt | 13.6 kg |
| Farve | Hvid |
| Materiale | Plastic and ABS Plastic |
| Wattage | 395 watt |
| Støjniveau | 45 decibel |
| Særlige funktioner | Automatisk sluk |
| Inkluderede komponenter | Manual, Drain Hose |
| Kapacitet (affugtning) | 25 liter om dagen |
| Tankvolumen | 4 liter |
| Dækning af gulvareal | Op til 50 m² |
| Antal hastigheder | 1 |
10. Garanti og support
For warranty information and customer support, please refer to the warranty card included with your purchase or visit the official Auronic website. If you experience any issues not covered in the troubleshooting section, please contact Auronic customer service for assistance.
Fabrikant: Auronic


