1. Introduktion
Thank you for choosing the TOMLOV P10 Handheld Digital Microscope. This compact and portable device is designed for detailed observation and documentation of various objects, from coins and jewelry to plants and electronic components. Featuring a 2-inch LCD screen, 100X fixed magnification, and integrated lighting, the P10 offers a clear and shareable viewing experience. This manual provides essential information for setting up, operating, and maintaining your microscope to ensure optimal performance.
2. Pakkens indhold
Kontroller venligst, at alle nedenstående varer er inkluderet i din pakke:
- 1x TOMLOV P10 bærbart mikroskop
- 1x 8GB Micro SD-kort
- 1 x USB-kabel
- 1x brugermanual

Figure 2.1: Contents of the TOMLOV P10 package.
3. Produktet er slutview
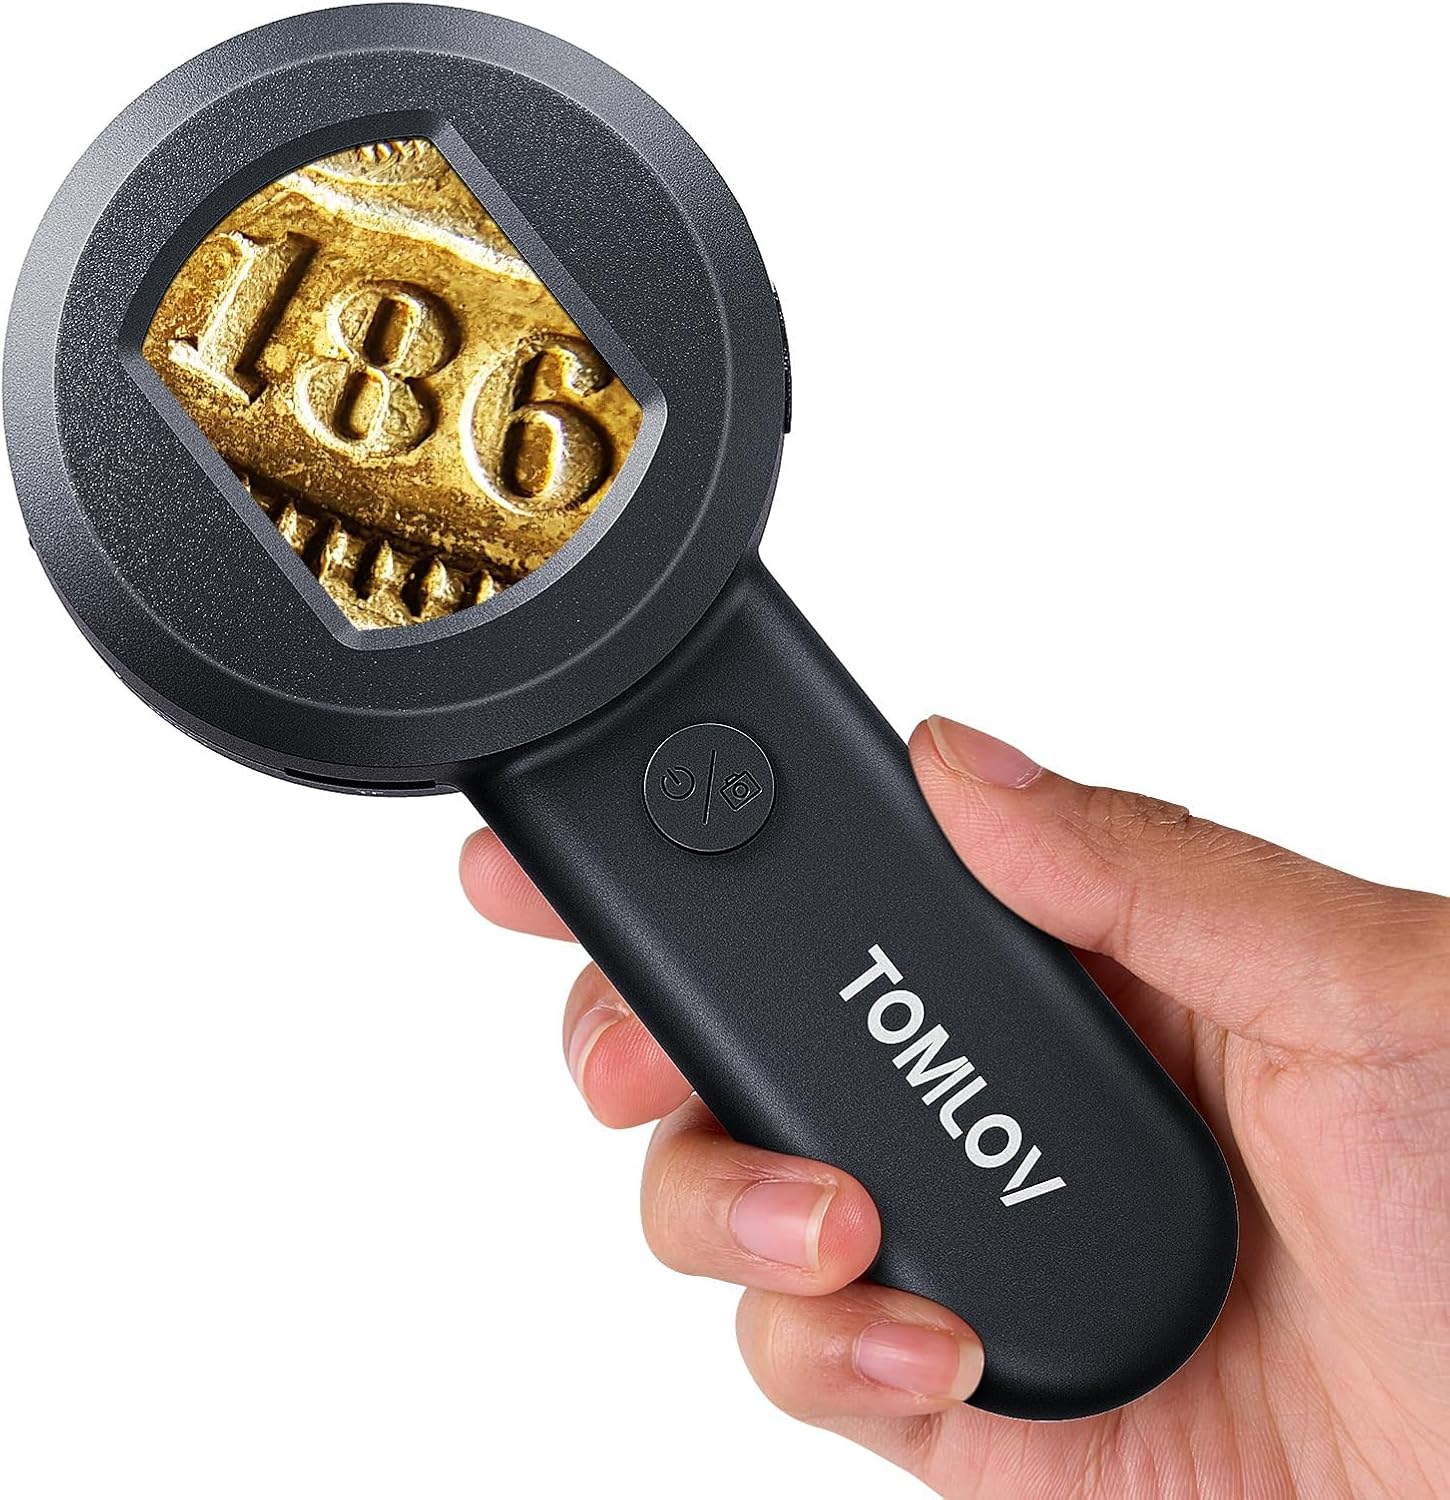
The TOMLOV P10 is designed for ease of use and portability. Familiarize yourself with its main components:
- 2 tommer LCD-skærm: Displays live images and captured media.
- Magnification Lens: Provides a fixed 100X magnification.
- Power knap: Tænder/slukker enheden.
- Lyskontrolknap: Cycles between white LED lights and UV lights.
- Micro SD -kortplads: For inserting the included 8GB Micro SD card to store images and videos.
- USB-C-port: Til opladning af enheden og tilslutning til en computer.
- LED lys: Dimmable 4 white LEDs and 4 UV lights for illumination.
Figur 3.1: Forside view of the TOMLOV P10.

Figur 3.2: Detaljeret view of the 2-inch LCD screen.
4. Opsætning
4.1 Opladning af enheden
Before first use, fully charge the TOMLOV P10. Connect the included USB cable to the USB-C port on the device and the other end to a standard USB power adapter (not included) or a computer USB port. The battery indicator on the screen will show charging status. A full charge takes approximately 1.5 hours and provides up to 50 minutes of continuous use.

Figure 4.1: Battery specifications and working time.
4.2 Indsættelse af Micro SD-kortet
Locate the Micro SD card slot on the side of the device. Gently insert the included 8GB Micro SD card until it clicks into place. Ensure the card is inserted in the correct orientation to avoid damage.
5. Betjening
5.1 Tænd/sluk
Press and hold the Power button for a few seconds to turn the microscope on or off. The 2-inch LCD screen will illuminate upon startup.
5.2 Viewobjekter
The TOMLOV P10 has a fixed 100X magnification. For a clear image, position the microscope approximately 0.3 inches (about 0.76 cm) from the object you wish to examine. Adjust the distance slightly until the image on the screen is sharp.

Figure 5.1: Using the TOMLOV P10 for inspection.

Figure 5.2: The 2-inch LCD screen allows for easy sharing of observations.
5.3 Justering af belysning
Press the Light Control button to cycle between the 4 white LED lights and the 4 UV lights. The white LEDs are dimmable, allowing you to adjust brightness for optimal viewing conditions. UV lights are useful for inspecting features visible under ultraviolet light, such as security features on currency.

Figure 5.3: White and UV light illumination options.
5.4 Optagelse af billeder og videoer
The TOMLOV P10 features a 16MP camera for capturing high-resolution images and videos. While viewing an object, press the Capture button (usually integrated with the Power button or a separate dedicated button, refer to device markings) to take a photo or start/stop video recording. All captured media is saved to the inserted 8GB Micro SD card.

Figure 5.4: 100X magnification for detailed inspection.
5.5 PC-tilslutning
For en større viewing experience or to easily transfer and manage your captured files, connect the TOMLOV P10 to a computer using the provided USB cable. The device will typically be recognized as a webcam or a mass storage device, allowing you to view live feeds on your computer screen or access the contents of the Micro SD card.

Figure 5.5: Connecting the P10 to a PC for larger viewing.
6. Vedligeholdelse
6.1 Rengøring
To maintain optimal image clarity, regularly clean the lens and screen. Use a soft, lint-free cloth, preferably a microfiber cloth, to gently wipe away dust and smudges. For stubborn marks, a small amount of lens cleaning solution can be applied to the cloth (not directly to the lens/screen).
6.2 Pleje af batterier
To prolong battery life, avoid fully discharging the device frequently. If storing for an extended period, charge the battery to about 50% and recharge every few months. Do not expose the device to extreme temperatures.
6.3 Opbevaring
Store the TOMLOV P10 in a cool, dry place, away from direct sunlight and excessive humidity. Keep it in its original packaging or a protective case when not in use to prevent dust accumulation and physical damage.
7. Fejlfinding
If you encounter issues with your TOMLOV P10, please refer to the following common problems and solutions:
| Problem | Mulig årsag | Løsning |
|---|---|---|
| Enheden tænder ikke. | Lavt batteri; Tænd/sluk-knappen er ikke trykket korrekt ind. | Charge the device fully. Press and hold the Power button firmly for a few seconds. |
| Billedet er sløret eller ude af fokus. | Forkert afstand til objektet; Snavset linse. | Ensure the microscope is approximately 0.3 inches from the object. Clean the lens with a soft cloth. |
| Kan ikke gemme billeder/videoer. | Micro SD card not inserted or full; Card error. | Ensure the Micro SD card is correctly inserted. Check if the card is full and delete unnecessary files or replace it. Format the card if necessary (this will erase all data). |
| PC connection not working. | Faulty USB cable; Driver issue; Incorrect mode. | Try a different USB port or cable. Ensure the device is powered on when connecting. Check your computer's device manager for driver issues. |
8. Specifikationer
| Feature | Detalje |
|---|---|
| Modelnavn | P10 |
| Forstørrelse | Fixed 100X |
| Skærmstørrelse | 2 tommer LCD |
| Kameraopløsning | 16 MP |
| Opbevaring | 8 GB Micro SD-kort (medfølger) |
| Lyskilde | 4 Dimmable White LEDs, 4 UV Lights |
| Batteritype | Litium-ion (500mAh) |
| Arbejdstid | Op til 50 minutter |
| Opladningstid | Ca. 1.5 timer |
| Forbindelse | USB-C (for charging and PC connection) |
| Varens vægt | 5.6 ounce (ca. 159 gram) |
| Dimensioner | 7.28 x 3.78 x 1.5 tommer |
9. Garanti og support
TOMLOV products are designed for reliability and performance. For any product-related inquiries, technical support, or warranty claims, please refer to the contact information provided on the product packaging or visit the official TOMLOV website. Please retain your proof of purchase for warranty purposes. Standard return policies apply as per retailer terms.
For mere information, besøg TOMLOV Store on Amazon.


