Indledning
This manual provides comprehensive instructions for the setup, operation, and maintenance of your Peakeep Large Display Digital Alarm Clock, Model MHP6060. This clock is designed to offer clear time display, reliable alarm functions, and convenient features for various environments such as bedrooms, living rooms, and offices.
Key features include a large, dimmable display, adjustable alarm volume, automatic Daylight Saving Time (DST) adjustment, a USB charging port, and battery backup for settings and alarm functionality during power outages.
Hvad er der i æsken
- Peakeep Large Display Digital Alarm Clock (Model MHP6060)
- Type C strømadapter
- Brugermanual
Note: 4 AAA batteries are required for battery backup functionality and are not included.
Opsætning
1. Strømtilslutning
Connect the included Type C power adapter to the "Type C 5V IN" port on the back of the clock and plug it into a standard wall outlet. The clock display will illuminate.

Billede: Bagside view of the alarm clock with power input and USB output ports highlighted. The included Type C adapter is shown connected to the power input.
2. Installation af batteribackup
For battery backup, insert 4 AAA batteries (not included) into the battery compartment on the back of the clock. This ensures that time settings and alarm functions are retained during a power outage. The display will not remain continuously lit on battery power alone; pressing the top of the clock will temporarily illuminate the display for 20 seconds.

Image: Illustration of the clock's power source (Type C adapter) and battery backup feature. It shows that with battery backup, the alarm still functions during a power outage, and the display can be temporarily lit by pressing the top.
3. Indstilling af starttidspunkt
Upon first power-up, the clock may display a default time. Refer to the "Operating Instructions" section for detailed steps on setting the current time and date.
Betjeningsvejledning
Visning af tid og dato
The clock features a large digital display showing the time, day of the week, and date. The time can be displayed in 12-hour (with AM/PM indicator) or 24-hour (military) format.

Image: The main product image of the Peakeep digital alarm clock, showing a large display with time (12:59 AM), day of the week (WED), and date (12.24), along with an 'AUTO DST' indicator.

Image: The digital alarm clock's large display showing time, day of the week, and date. Icons below indicate its features: day of the week, Daylight Saving Time (DST), date, and plug-in operation.
Indstilling af tid og dato
- Tryk på TIDSINDSTILLING knap på bagsiden af uret.
- Brug + og - knapperne for at justere timetallet. Tryk på TIDSINDSTILLING igen for at bekræfte.
- Repeat the process for minutes, year, month, and day.
- Trykke TIDSINDSTILLING one last time to exit time setting mode.
Alarm indstilling
- Tryk på ALARM SÆT knap på bagsiden.
- Brug + og - knapperne for at indstille den ønskede alarmtime. Tryk på ALARM SÆT for at bekræfte.
- Gentag for alarmminutter.
- Trykke ALARM SÆT again to exit alarm setting mode.
- For at aktivere/deaktivere alarmen skal du trykke på ON/OFF button (often combined with DIMMER). An alarm icon will appear/disappear on the display.
Justering af alarmvolumen
The alarm features 5 adjustable volume levels, from gentle to very loud, suitable for light to heavy sleepers.
- While the alarm is sounding, or in alarm setting mode, press the BIND knap.
- Brug + og - buttons to cycle through the 5 volume levels (U01 to U05).
- The selected volume will be indicated on the display.
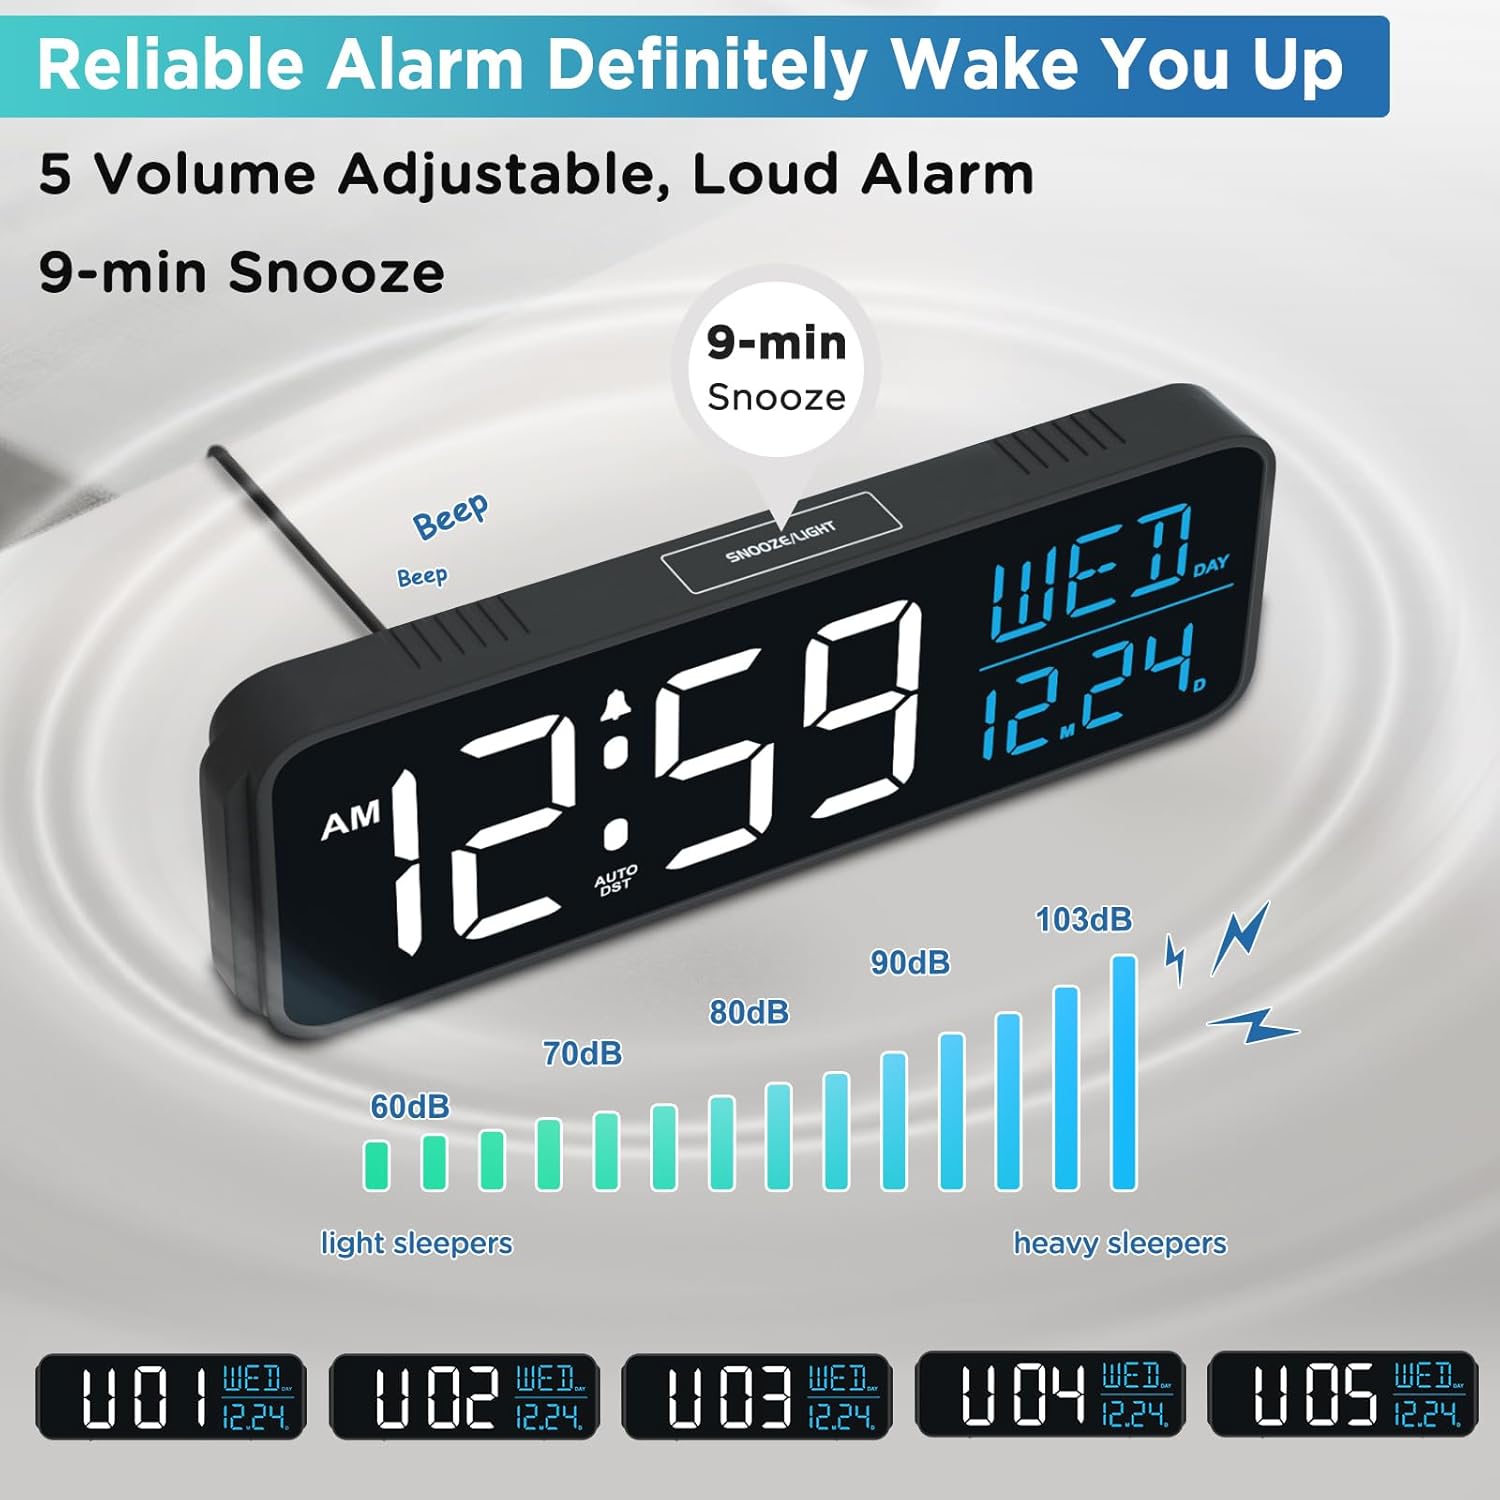
Image: Visual representation of the alarm volume settings, showing sound intensity from 60dB (light sleepers) to 103dB (heavy sleepers). The clock display indicates the current volume level (U01-U05).
Snooze funktion
Når alarmen lyder, skal du trykke på den store SNOOZE / LYS button on the top of the clock to activate the 9-minute snooze function. The alarm will sound again after 9 minutes.
Justering af displayets lysstyrke (dæmper)
The clock offers 6 brightness levels, including an option to turn the display completely off, to suit various lighting conditions and personal preferences.
- Tryk på DIMMER button (often combined with ON/OFF) on the back of the clock to cycle through the brightness levels (L5, L4, L3, L2, L1, OFF).
- Select the desired brightness for day or night viewing.

Image: A visual guide demonstrating the six adjustable brightness levels (L5 to OFF) of the clock's display, allowing users to customize visibility for various ambient light conditions.
Automatic Daylight Saving Time (DST)
The clock features an automatic DST function, eliminating the need for manual adjustments during seasonal time changes.
- Tryk på DST ON / OFF button on the back of the clock to enable or disable this feature.
- When enabled, the clock will automatically adjust for "Spring Forward" and "Fall Back" time changes.

Image: Diagrams illustrating the automatic adjustment for Daylight Saving Time, showing how the clock transitions during "Spring Forward" (advancing one hour) and "Fall Back" (reverting one hour).
USB-opladningsport
A USB-A charging port is located on the back of the clock, allowing you to charge your mobile devices while you sleep, saving outlet space.
- Tilslut din enheds USB-opladerkabel til USB OUT port on the back of the clock.
- Ensure the clock is powered via the Type C adapter for charging functionality.
Opretholdelse
- Rensning: Wipe the clock's surface with a soft, dry cloth. Avoid using abrasive cleaners or solvents, as they may damage the finish.
- Magt: Always use the provided Type C power adapter. If replacing batteries for backup, ensure they are new AAA alkaline batteries and inserted with correct polarity.
- Placering: Placer uret på en stabil, flad overflade væk fra direkte sollys, overdreven varme eller fugt.
Fejlfinding
Clock Display is Blank or Not Working
- Ensure the Type C power adapter is securely plugged into both the clock and a working wall outlet.
- Check if the display brightness is set to "OFF". Press the DIMMER knappen for at justere.
- If using battery backup, the display will only light up for 20 seconds when the top SNOOZE / LYS button is pressed. This is normal operation for battery-only mode.
Alarm Does Not Sound
- Verify that the alarm is activated (alarm icon visible on display). If not, press the ON/OFF knappen for at aktivere den.
- Check the alarm volume setting. Ensure it is not set to U00 or a very low level. Adjust using the BIND knap.
- Confirm the alarm time is set correctly.
- Hvis en magt outage occurred and batteries are not installed or are depleted, the alarm may not sound.
Time is Incorrect
- Manually reset the time and date as described in the "Operating Instructions" section.
- If DST is enabled, ensure it is functioning correctly during time changes. If issues persist, try toggling the DST ON / OFF knap.
- If the clock loses time frequently, ensure a stable power connection and fresh AAA batteries for backup.
USB-opladning virker ikke
- Ensure the clock is powered by the Type C adapter, not just battery backup. The USB charging port requires external power.
- Check the USB cable and the device being charged for proper connection and functionality.
Specifikationer
| Mærke | Peakeep |
| Modelnummer | MHP6060 |
| Farve | Hvid og Blå |
| Display Type | Digital |
| Stil | Moderne |
| Særlige funktioner | Corded Electric, Large Display with Date Day of Week, Auto DST, 6 Dimmer, Loud Alarm (5 levels of Volume), 1 USB Port, Battery Backup |
| Produktdimensioner | 9 cm B x 2.6 cm H |
| Strømkilde | Corded Type C Adapter (included) |
| Batterikrav | 4 AAA batteries (not included) for backup |
| Værelsestype | Bedroom, Living Room, Classroom, Dining Room, Home Office, Kid’s Room, Kitchen, Study Room |
| Materiale | Plast |
| Monteringstype | Bordplade |
| Varens vægt | 9.6 ounces (0.6 pund) |
| UPC | 850004383858 |
Garanti og support
For warranty information and customer support, please refer to the contact details provided with your purchase documentation or visit the official Peakeep webwebsted. Gem din købskvittering som købsbevis i tilfælde af garantikrav.


