1. Introduktion
Thank you for choosing the TOMLOV TriL110 3-Lens Digital Microscope. This advanced digital microscope is designed for a wide range of applications, from coin observation and soldering to biological slide examination. Featuring a 10.1-inch IPS screen, 2K video resolution, and three interchangeable lenses (1000X, 1500X, 2500X), it provides exceptional clarity and versatility. This manual will guide you through the setup, operation, and maintenance of your new microscope to ensure optimal performance and longevity.
2. Sikkerhedsoplysninger
- Do not disassemble or modify the microscope. Unauthorized modifications can lead to malfunction or injury.
- Hold enheden væk fra vand og andre væsker for at forhindre elektrisk stød eller skader.
- Brug kun den medfølgende strømadapter og kabler.
- Avoid direct exposure of the screen to strong sunlight for extended periods.
- Handle lenses with care to prevent scratches or damage.
- Ensure the microscope is placed on a stable, level surface during operation.
3. Hvad er der i æsken
Tjek venligst pakkens indhold ved ankomst:
- 10.1-Inch 3 Lens HDMI Digital Microscope (1)
- 12.6-Inch Adjustable Stand (1)
- 64GB Micro SD Card (1)
- Slides Bottom Light (1)
- Fjernbetjening (1)
- USB-kabel (2)
- HDMI-kabel (1)
4. Produktet er slutview
The TOMLOV TriL110 digital microscope consists of a main unit with an integrated screen, an adjustable stand, and three interchangeable lenses. Key components include the screen, lens barrel, focus wheel, LED lights, and various ports for connectivity.

Figur 4.1: Overview of the TOMLOV TriL110 Digital Microscope components.
5. Opsætningsvejledning
- Saml stativet: Attach the adjustable stand to the base. Ensure all screws are tightened for stability.
- Mount the Microscope Unit: Securely attach the main microscope unit (with screen) to the adjustable stand.
- Install a Lens: Select the desired lens (1000X, 1500X, or 2500X) and attach it to the lens barrel by rotating it into place. The microscope features a rotating lens barrel for easy switching.
- Tilslut strøm: Connect the microscope to a power source using the provided USB cable. The device includes a rechargeable battery for portable use.
- Indsæt SD-kort: Insert the included 64GB Micro SD card into the designated slot on the microscope unit. This is required for saving photos and videos.
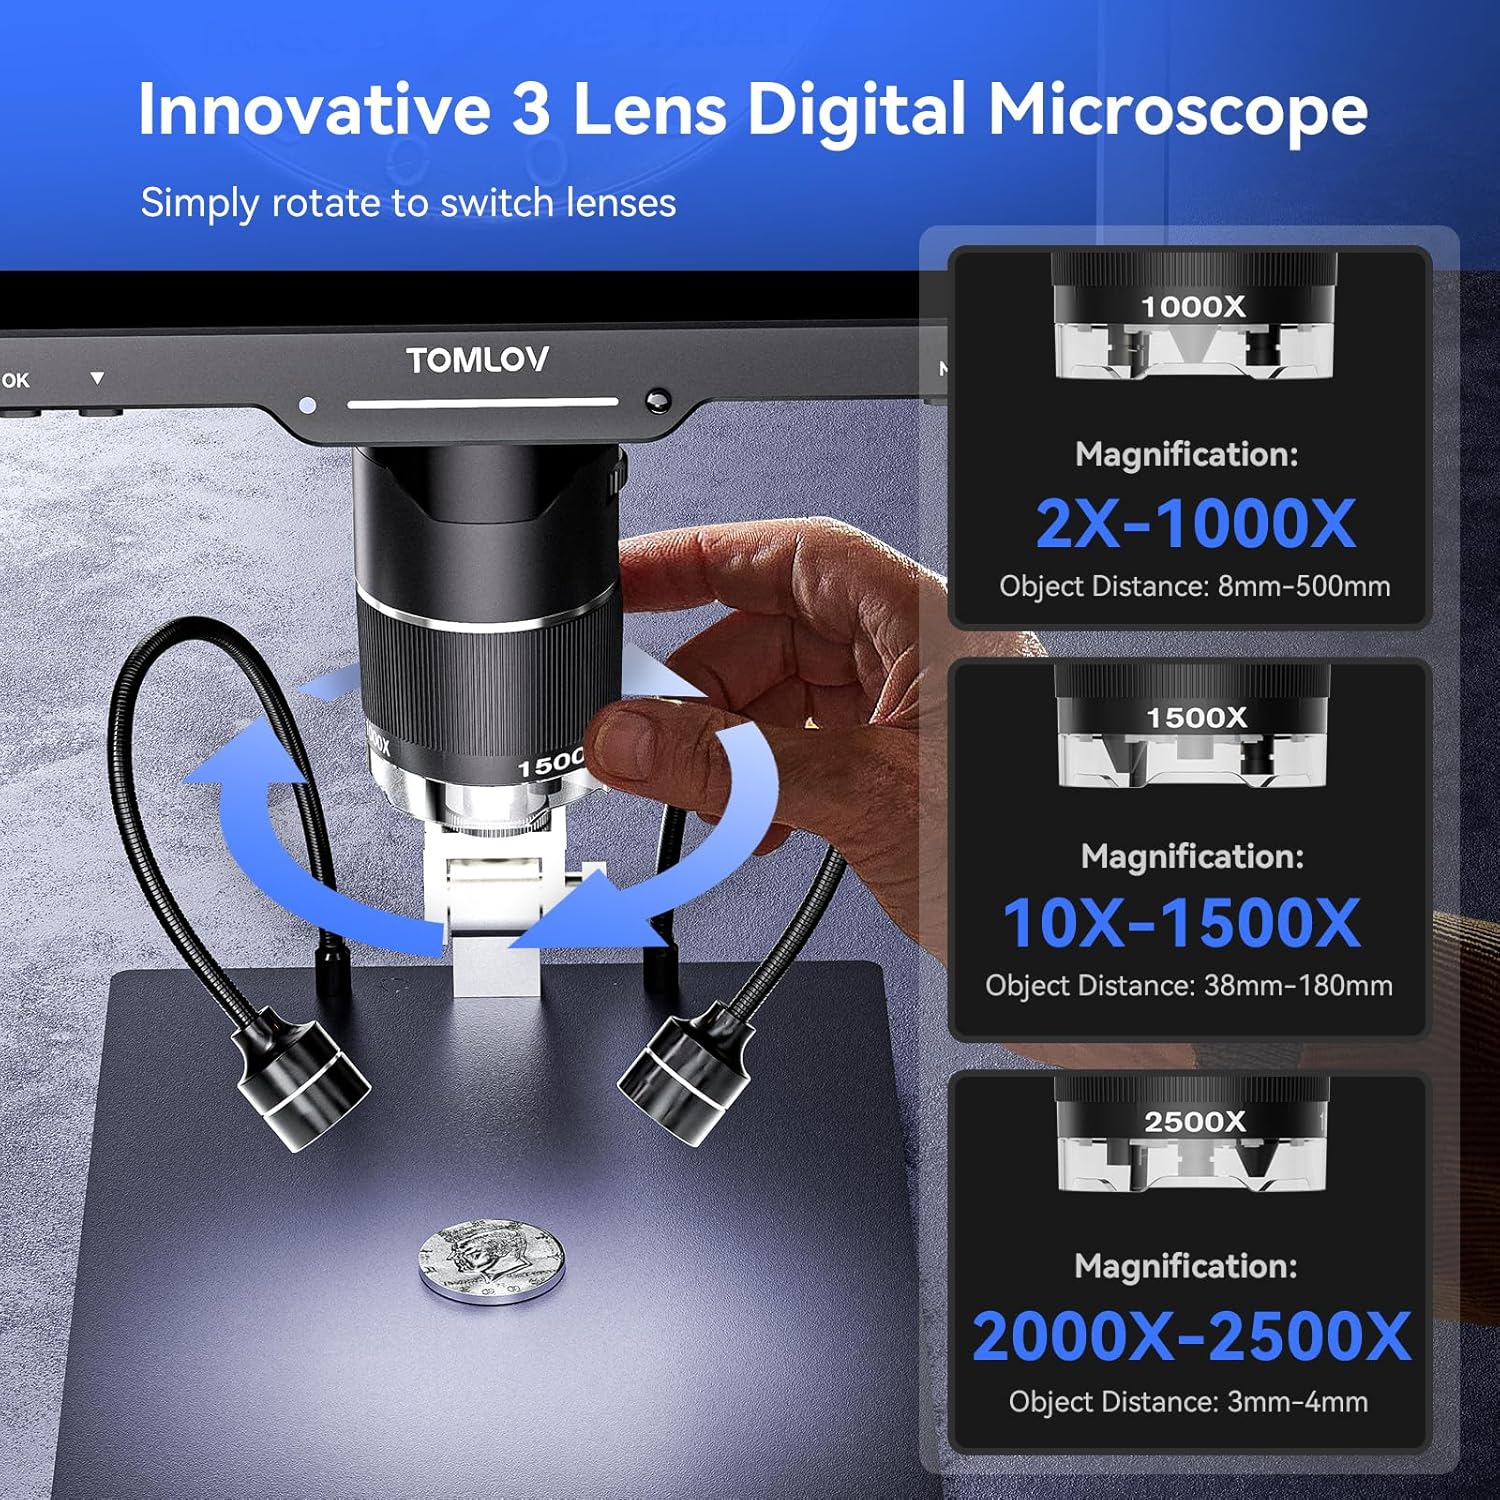
Figure 5.1: Rotating the lens barrel to switch between lenses.
6. Betjeningsvejledning
6.1 Tænd/sluk
Press and hold the power button on the microscope unit to turn it on or off. The screen will illuminate upon startup.
6.2 Lens Switching and Focusing
The TriL110 features three distinct lenses for various magnification needs:
- 1000X Lens (2X-1000X Magnification): Ideal for observing entire coins, stamps, and larger objects. Object distance: 8mm-500mm.
- 1500X Lens (10X-1500X Magnification): Suitable for intricate tasks like PCB soldering and watch repair, offering a larger working distance. Object distance: 38mm-180mm.
- 2500X Lens (2000X-2500X Magnification): Designed for microscopic details, such as biological slides and mites. Object distance: 3mm-4mm. Note: For optimal focus with the 2500X lens, the lens needs to be very close to the object.
To switch lenses, simply rotate the lens barrel until the desired lens clicks into position. Adjust the distance between the object and the microscope lens, then rotate the focus wheel to achieve a clear image on the HD IPS screen.
6.3 Lysanlæg
The microscope is equipped with a comprehensive lighting system:
- 12 Built-in LED Main Lights: Provide illumination from around the lens.
- 2 Gooseneck Side Lights: Adjustable lights for angled illumination, useful for reducing glare or highlighting textures.
- Bottom Slide Light: For observing transparent or translucent specimens, such as biological slides.
All lights can be dimmed and charged independently. Use the dedicated controls on the microscope or remote to adjust brightness.

Figure 6.1: The versatile lighting system of the TriL110.
6.4 Foto- og videooptagelse
The microscope supports 24MP photo capture and 2K video recording. Use the buttons on the unit or the wireless remote control to switch between photo and video modes and to initiate capture.
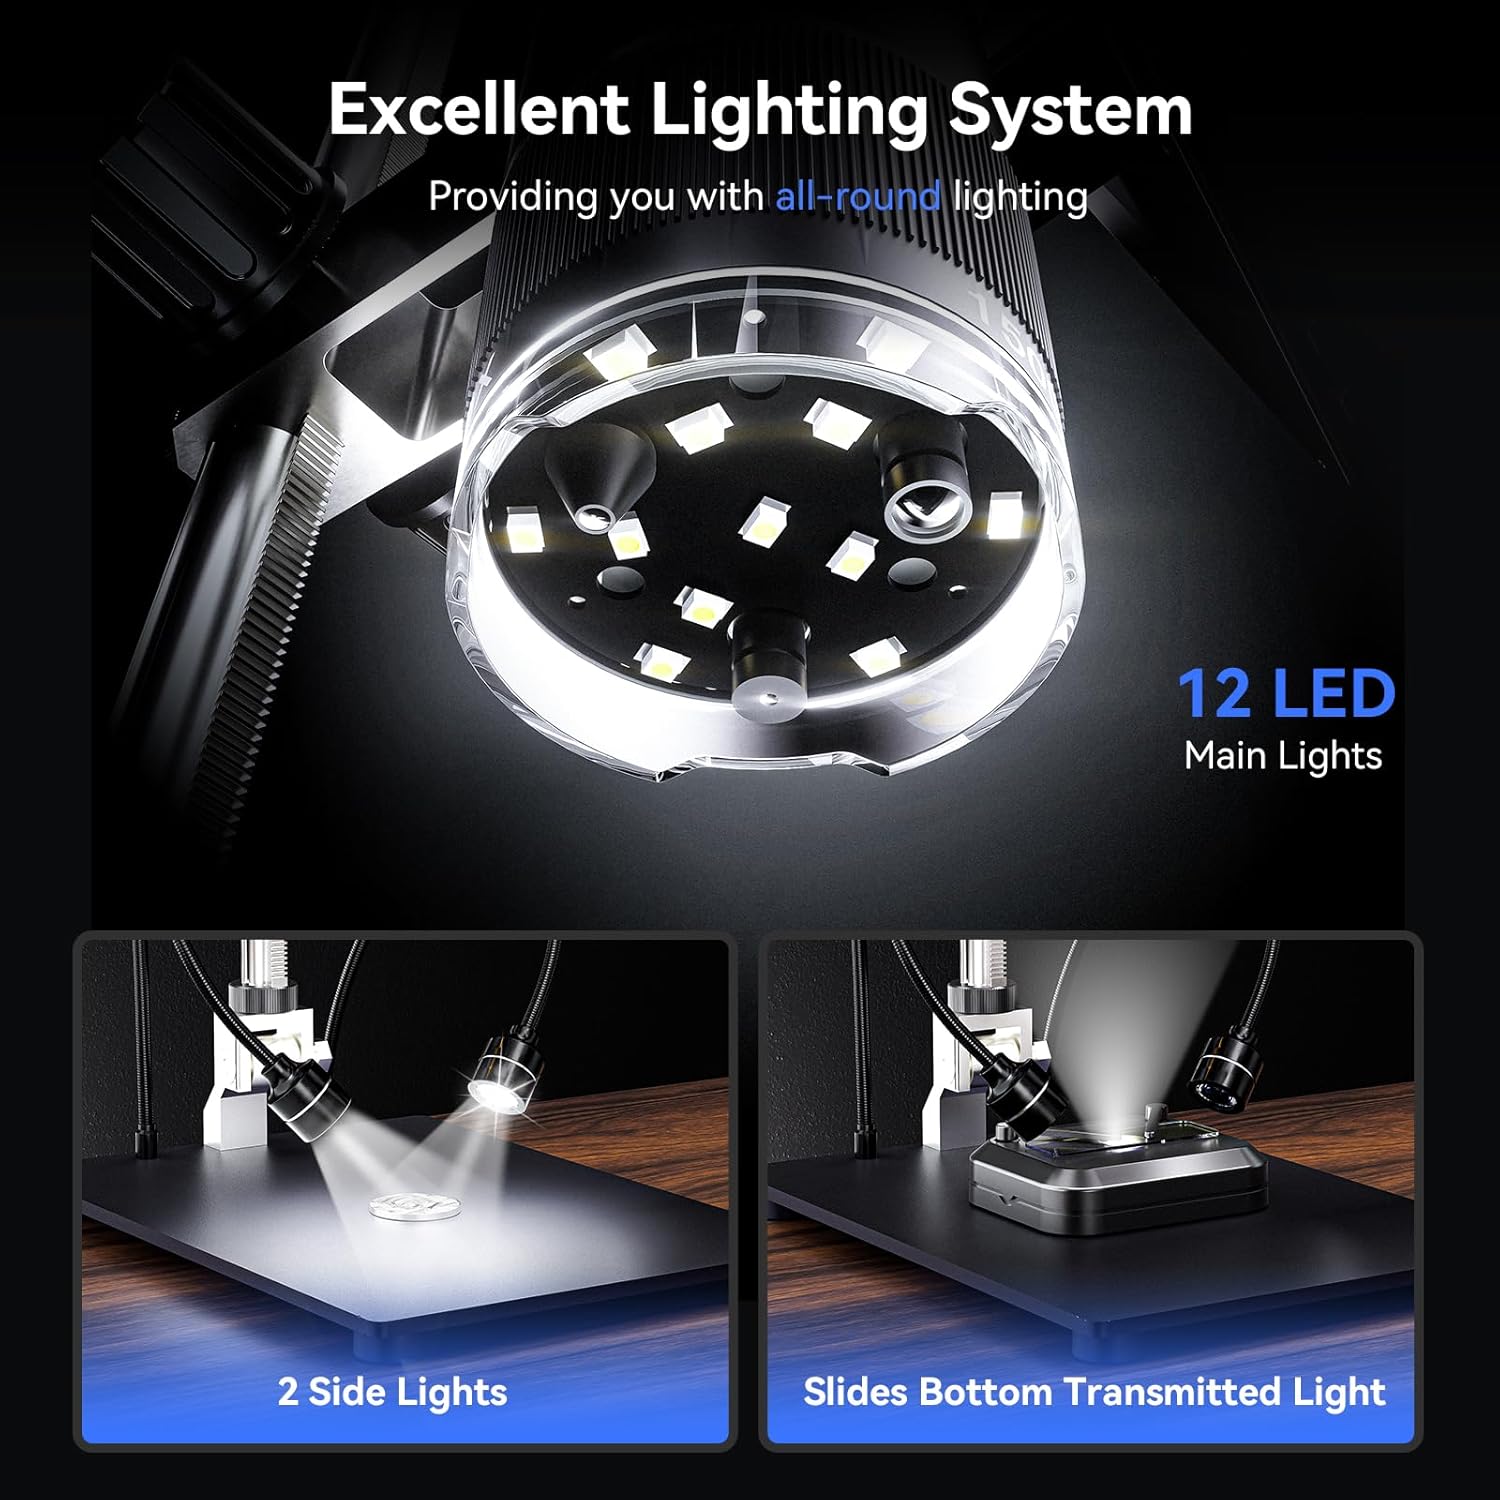
Figure 6.2: Saving discoveries to the included 64GB SD card.
6.5 HDMI & USB Output
Connect the microscope to an external display (monitor, TV) via HDMI or to a computer via USB for a larger view or data transfer. This allows for real-time sharing and detailed analysis.

Figure 6.3: Real-time output to larger screens.
6.6 Trådløs fjernbetjening
The included wireless remote control allows for convenient operation without disturbing the microscope or sample. Functions include adjusting magnification, capturing photos, and recording videos.
6.7 Specific Lens Applications
6.7.1 Coin Observation (1000X Lens)
The 1000X lens is optimized for viewing entire coins, from small dimes to large dollar coins, thanks to the taller 12.6-inch stand and larger 7x8-inch base. This provides ample space for coin collection and detailed examination.

Figure 6.4: Using the 1000X lens for coin observation.
6.7.2 Soldering and Repair (1500X Lens)
The 1500X lens provides high magnification suitable for intricate soldering tasks, watch repair, and examining small electronic components. Its design ensures a stable and spacious work area.

Figure 6.5: The 1500X lens for precision soldering.
6.7.3 Biological Observation (2500X Lens)
Explore the microscopic world with the 2500X lens, perfect for observing biological slides and other minute specimens. Remember the very short observation distance (3mm-4mm) for this lens.
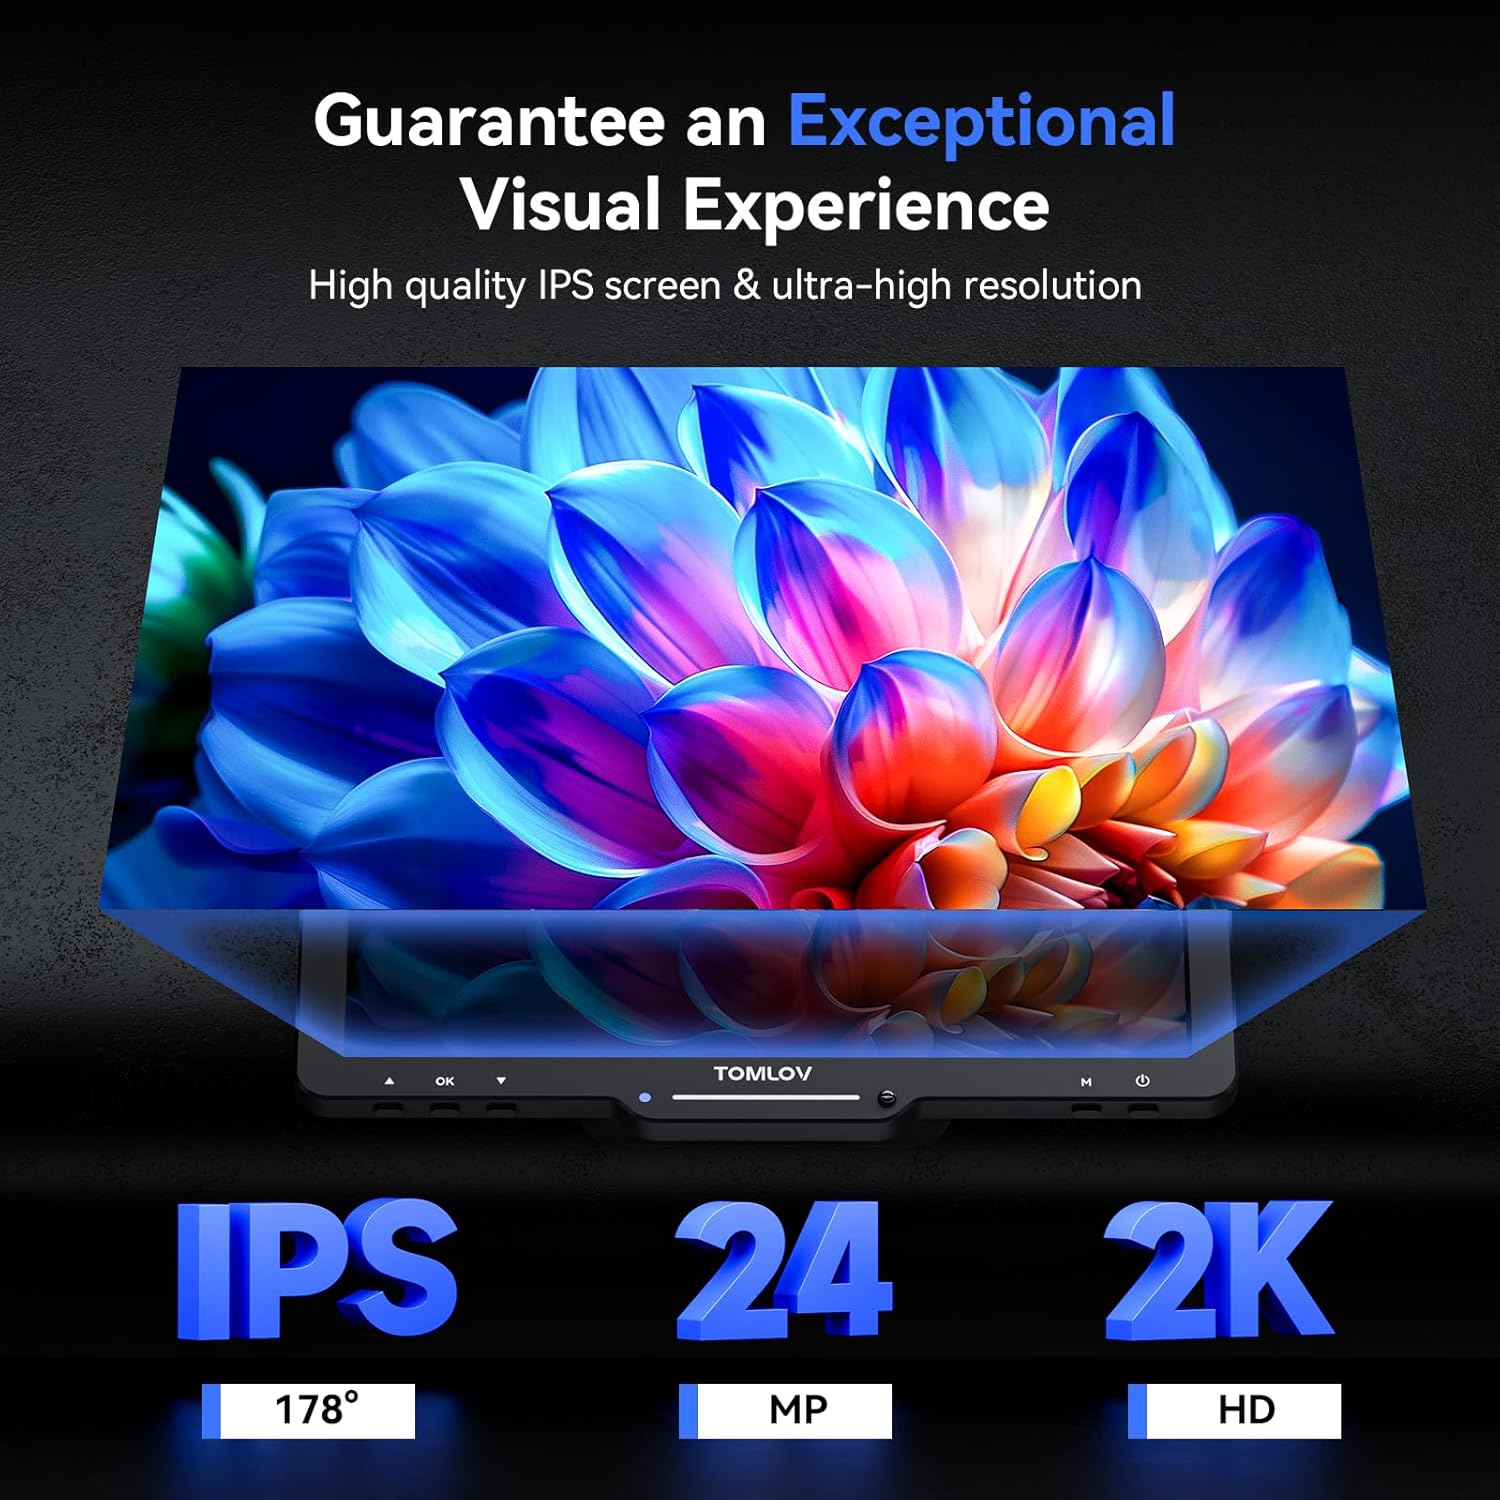
Figure 6.6: The 2500X lens for biological studies.
7. Vedligeholdelse
- Rengøring af linser: Brug en blød, fnugfri klud, der er specielt designet til optiske linser. Til genstridige pletter kan en lille mængde linserengøringsmiddel påføres kluden, ikke direkte på linsen.
- Rengøringsskærm: Wipe the screen gently with a microfiber cloth. Avoid abrasive cleaners.
- Generel rengøring: Use a dry, soft cloth to wipe the body of the microscope. Do not use harsh chemicals or solvents.
- Opbevaring: Store the microscope in a cool, dry place, away from direct sunlight and extreme temperatures. When not in use for extended periods, remove the SD card and ensure the battery is partially charged.
- Batteripleje: The microscope contains a Lithium Ion battery. Avoid fully discharging the battery frequently. Charge it regularly, even if not in use, to maintain battery health.
8. Fejlfinding
| Problem | Mulig årsag | Løsning |
|---|---|---|
| Intet billede på skærmen | Microscope not powered on; Lens cap on; Object not in focus; Incorrect lens selected. | Ensure power is on; Remove lens cap; Adjust focus wheel; Rotate lens barrel to correct lens. |
| Sløret eller uklart billede | Incorrect focus; Object distance too far/close; Dirty lens; Insufficient lighting. | Adjust focus wheel; Reposition object; Clean lens; Adjust LED brightness or add side lights. |
| Kan ikke gemme billeder/videoer | SD card not inserted; SD card full; SD card corrupted; Incorrect mode. | Insert SD card; Delete old files or use new card; Format SD card (backup data first); Ensure you are in photo/video mode. |
| Fjernbetjening virker ikke | Battery low/dead; Obstruction between remote and microscope; Remote not paired. | Replace remote battery; Ensure clear line of sight; Refer to pairing instructions (if applicable). |
9. Specifikationer
| Feature | Detalje |
|---|---|
| Modelnavn | TriL110 |
| Skærmstørrelse | 10.1 tommer IPS |
| Foto opløsning | 24 MP |
| Video opløsning | 2K |
| Magnification (Max) | 2500x |
| Inkluderede linser | 1000X, 1500X, 2500X |
| Belysningssystem | 12 Main LEDs, 2 Gooseneck Side Lights, Bottom Slide Light |
| Opbevaring | 64 GB Micro SD-kort (medfølger) |
| Forbindelse | HDMI, USB |
| Stativhøjde | 12.6 tommer |
| Grundmål | 7 x 8 tommer |
| Materiale | Aluminiumslegering |
| Varens vægt | 4.41 pund (2000 gram) |
| Strømkilde | 5 Volts, 1 Lithium Ion battery (included) |
10. Garanti og support
For warranty information and technical support, please refer to the documentation provided with your purchase or visit the official TOMLOV website. You may also contact TOMLOV customer service directly for assistance with product inquiries, troubleshooting, or warranty claims.


