1. Introduktion
Thank you for choosing the Hiicam Speed 10 Action Camera. This manual provides essential information for setting up, operating, and maintaining your camera to ensure optimal performance and longevity. The Speed 10 is designed to capture high-quality 5K 30FPS video and 30MP photos, featuring Electronic Image Stabilization (EIS), Wi-Fi connectivity, and waterproof capabilities up to 131 feet (40 meters) with its included housing. It is ideal for various activities including sports, travel, and underwater adventures.
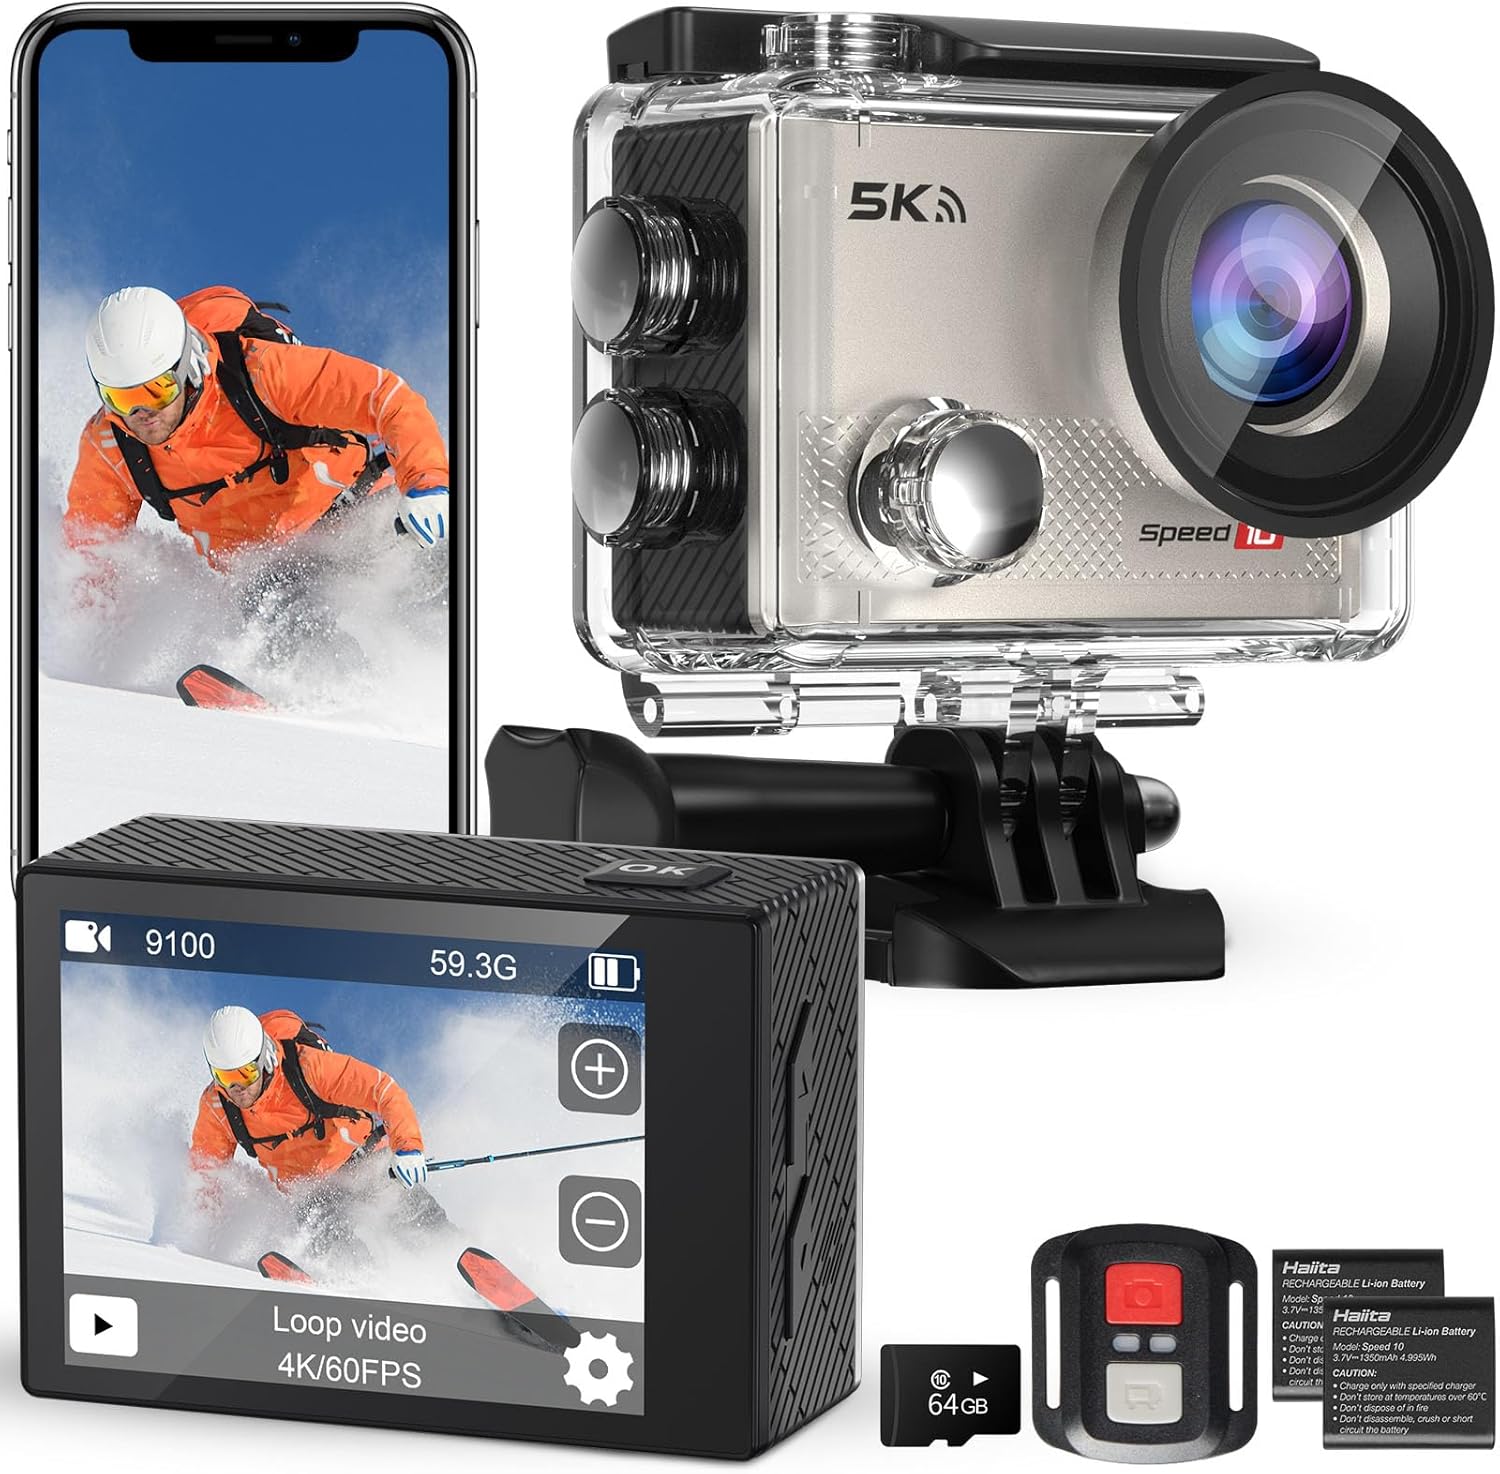
Figure 1.1: Hiicam Speed 10 Action Camera and included accessories.
2. Pakkens indhold
Kontroller venligst pakkens indhold ved udpakning for at sikre, at alle varer er til stede.
- Hiicam Speed 10 actionkamera
- Vandtæt hus
- Fjernbetjening
- 2 x 1350mAh Rechargeable Lithium-Ion Batteries
- Batterioplader
- Mounting Accessories Kit (various mounts, straps, adhesives)
- USB opladningskabel
- Brugervejledning (dette dokument)
- (Note: Memory card may or may not be included depending on the specific product variant purchased.)
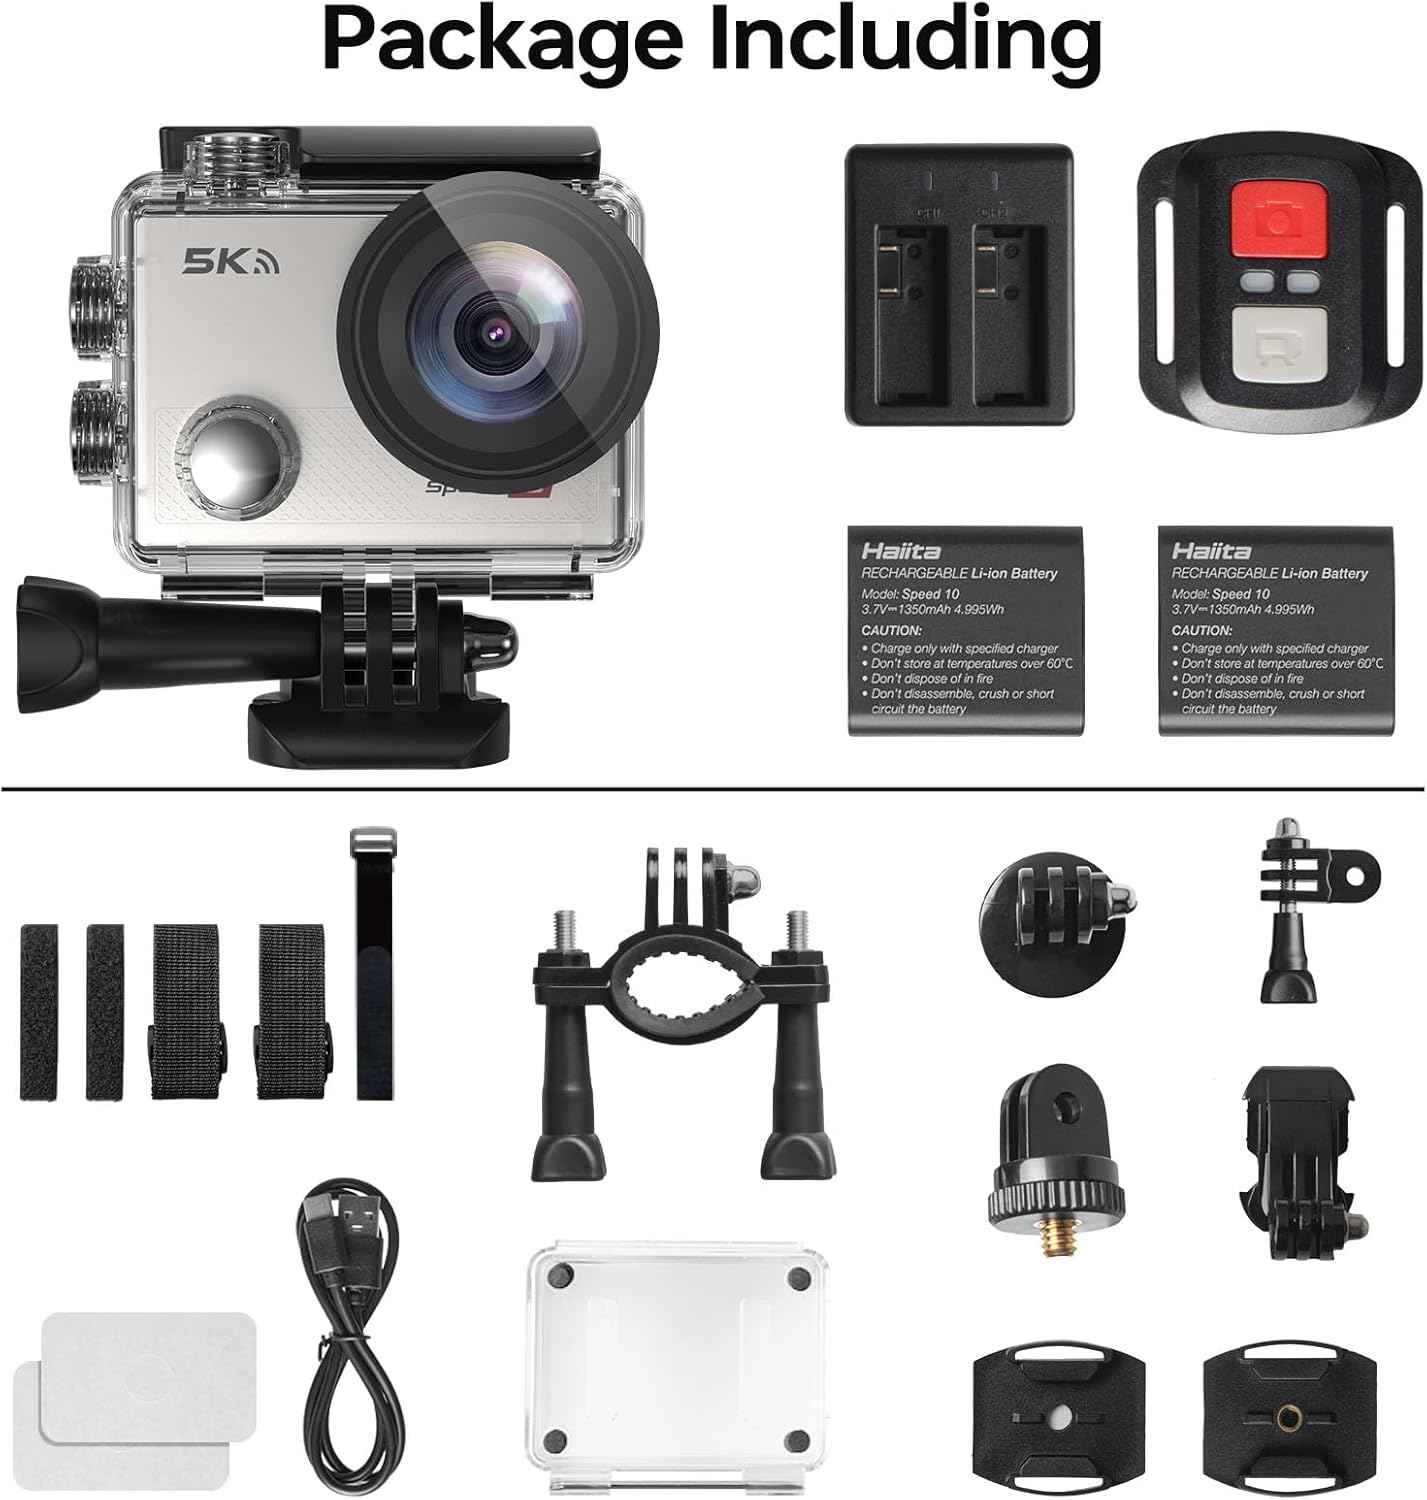
Figur 2.1: Alle komponenter inkluderet i standardpakken.
3. Kamerakomponenter
Familiarize yourself with the main parts of your Hiicam Speed 10 Action Camera.
| Komponent | Beskrivelse |
|---|---|
| Linse | Captures images and videos. Features a 170° wide-angle view. |
| Forreste skærm | Displays camera status, mode, and can be used for selfies. |
| Rear Touch Screen | Hoveddisplay til live view, afspilning og menunavigation. |
| Tænd/sluk-knap | Powers the camera on/off and switches between shooting modes. |
| Udløser/OK knap | Starts/stops recording, takes photos, confirms selections. |
| Op / Ned-knapper | Navigation in menus, zoom control. |
| MicroSD Card Slot | For inserting a microSD card (up to 256GB, Class 10 or higher recommended). |
| Batterirum | Indeholder det genopladelige batteri. |
| USB-port | Til opladning og dataoverførsel. |
4. Opsætning
4.1. Batteriinstallation og opladning
- Åbn batteridækslet i bunden af kameraet.
- Insert a fully charged 1350mAh battery, ensuring the contacts align correctly.
- Luk batterirummets dæksel forsvarligt.
- To charge, insert the battery into the provided battery charger and connect the charger to a USB power source using the USB cable. The indicator light will show charging status.
- Alternatively, you can charge the battery inside the camera by connecting the camera directly to a USB power source.

Figure 4.1: Charging batteries with the external charger.

Figure 4.2: The camera supports extended recording time with two included batteries.
4.2. Indsættelse af microSD-kort
A microSD card (not always included) is required to store photos and videos.
- Sørg for, at kameraet er slukket.
- Find microSD-kortstikket på siden af kameraet.
- Insert a Class 10 or higher microSD card (up to 256GB) with the contacts facing the correct direction until it clicks into place.
- For at fjerne det skal du forsigtigt skubbe kortet, indtil det springer ud.
4.3. Waterproof Housing Usage
The waterproof housing allows the camera to be used underwater up to 131 feet (40 meters).
- Before each use, inspect the waterproof housing for any dirt, debris, or damage to the O-ring seal.
- Place the camera inside the housing, ensuring it fits snugly.
- Close the latch securely. Perform a dry test (without the camera) in water before first use to confirm no leaks.
- After underwater use, rinse the housing with fresh water and allow it to air dry.

Figure 4.3: The camera is waterproof up to 131 feet (40 meters) with the housing.
5. Betjening af kameraet
5.1. Tænd/sluk
- Sådan tænder du: Tryk på tænd/sluk-/tilstandsknappen og hold den nede i et par sekunder.
- To power off: Press and hold the Power/Mode button again until the camera shuts down.
5.2. Skift tilstande
Tryk gentagne gange på tænd/sluk-/tilstandsknappen for at skifte mellem forskellige tilstande: Video, Foto, Afspilning og Indstillinger.
5.3. Recording Video / Taking Photos
- In Video mode: Press the Shutter/OK button to start recording. Press again to stop.
- In Photo mode: Press the Shutter/OK button to take a photo.

Figure 5.1: Capture ultra-sharp 5K 30FPS video and 30MP photos.
5.4. Menuindstillinger
Access the settings menu to customize camera parameters.
- From any mode, navigate to the Settings icon (gear icon) using the Mode button or touch screen.
- Use the Up/Down buttons or touch screen to navigate through options.
- Press the Shutter/OK button or tap to select an option.
- Nøgleindstillinger inkluderer:
- Videoopløsning: Select from 5K/30FPS, 4K/60FPS, 4K/30FPS, 2.7K/30FPS, 1080P/120FPS, 1080P/60FPS, 720P/240FPS.
- Billedopløsning: Adjust photo size up to 30MP.
- Elektronisk billedstabilisering (EIS): Enable or disable for smoother footage.
- Vidvinkel: Juster feltet af view (170° ultra-wide angle available).
- Loop Recording, Time-Lapse, Slow Motion, Burst Photo: Explore various shooting modes.

Figure 5.2: Electronic Image Stabilization (EIS) ensures steady and smooth footage.

Figure 5.3: The 170° wide-angle lens captures a broad field of view.
6. Avancerede funktioner
6.1. Wi-Fi & Smart App Control
Tilslut dit kamera til en smartphone eller tablet via Wi-Fi for fjernbetjening, live-forhåndsvisningview, og file overførsel.
- Download the "iSmart DV" app (or specified app in camera manual) from your device's app store.
- On the camera, enable Wi-Fi from the settings menu. The camera's Wi-Fi name (SSID) and password will be displayed.
- Gå til Wi-Fi-indstillinger på din smartphone, og opret forbindelse til kameraets Wi-Fi-netværk.
- Open the app. You can now control the camera, view live footage, and download content to your device.

Figure 6.1: Share your moments instantly with Wi-Fi and app control.
6.2. Fjernbetjening
Den medfølgende fjernbetjening giver mulighed for bekvem betjening på afstand.
- Sørg for, at fjernbetjeningen har et fungerende batteri.
- Pair the remote with the camera (refer to the camera's settings menu for remote pairing instructions if needed).
- Use the dedicated buttons on the remote to start/stop video recording or take photos.

Figure 6.2: Wireless remote control for effortless capture.
7. Vedligeholdelse og pleje
- Hold kameraet og dets tilbehør rent og tørt.
- Brug en blød, fnugfri klud til at rengøre linsen og skærmene. Undgå slibende materialer.
- Når kameraet ikke er i brug, skal det opbevares et køligt og tørt sted, væk fra direkte sollys og ekstreme temperaturer.
- Fjern batterierne, hvis kameraet ikke skal bruges i en længere periode.
- Sikkerhedskopier regelmæssigt din fodtage and format the microSD card to maintain optimal performance.
8. Fejlfinding
| Problem | Mulig løsning |
|---|---|
| Kameraet tænder ikke. | Sørg for, at batteriet er fuldt opladet og isat korrekt. Prøv et andet opladet batteri. |
| Kan ikke optage video/tage billeder. | Check if a microSD card is inserted and has sufficient free space. Ensure the card is Class 10 or higher. Format the card if necessary (this will erase all data). |
| Footage er sløret/rystede. | Ensure EIS (Electronic Image Stabilization) is enabled in settings. Check if the lens is clean. |
| Problemer med Wi-Fi-forbindelse. | Ensure Wi-Fi is enabled on the camera and your smartphone. Re-enter the Wi-Fi password. Restart both devices. Ensure you are using the correct app. |
| Kameraet fryser. | Fjern og sæt batteriet i igen for at nulstille kameraet. Opdater firmware, hvis tilgængelig. |
| Vandlækage i huset. | Immediately remove the camera. Inspect the O-ring seal for dirt, hair, or damage. Ensure the latch is fully secured. Do not use if the housing is damaged. |
9. Tekniske specifikationer
| Feature | Specifikation |
|---|---|
| Modelnavn | Hastighed 10 |
| Video opløsning | Op til 5K 30FPS |
| Foto opløsning | Op til 30 MP |
| Billedstabilisering | Elektronisk billedstabilisering (EIS) |
| Vandtæt dybde | 131FT / 40M (with waterproof housing) |
| Linsevinkel | 170° vidvinkel |
| Vise | 2-inch Rear Touch Screen, Front Screen |
| Batteri | 2 x 1350mAh Lithium-Ion (included) |
| Opbevaring | MicroSD card, up to 256GB (Class 10 or higher) |
| Forbindelse | Wi-Fi, USB |
| Dimensioner | 2.2 x 0.95 x 1.61 tommer |
| Vægt | 1.1 pund |
10. Garanti og kundesupport
The Hiicam Speed 10 Action Camera typically comes with a manufacturer's warranty. Please refer to the warranty card included in your package or visit the official Hiicam webhjemmeside for detaljerede garantivilkår.
For technical support, troubleshooting assistance, or warranty claims, please contact Hiicam customer service through their official channels.
- Hiicam Store on Amazon: Visit the Hiicam Store
- Se kontaktoplysningerne på din produktemballage.


