1. Introduktion
This manual provides detailed instructions for the safe and effective use of your KKnoon Digital Multimeter, specifically focusing on the FY128 model. This compact and intelligent electrical tester is designed for accurate measurements of various electrical parameters, making it suitable for professionals, educational institutions, and home users. It adheres to the safety requirements of the International Electrotechnical Safety Standard (IEC-61010) for electronic measuring instruments.
The multimeter features a 5999-count backlit LCD for clear readings, along with functions for AC/DC voltage, resistance, frequency, continuity, live wire checking, and Non-Contact Voltage (NCV) detektion.

Figur 1: Forside view of the KKnoon Digital Multimeter (Model FY128) showing the display and control buttons.
2. Sikkerhedsoplysninger
To ensure safe operation and prevent damage to the meter, please read and follow all safety instructions carefully. Improper use can result in electric shock or damage to the instrument.
- Always verify the meter's functionality before use by testing a known voltage eller nuværende kilde.
- Overskrid ikke de maksimale inputværdier, der er angivet for hvert måleområde.
- Ensure test leads are in good condition, free from cracks or damaged insulation, before connecting them to any circuit.
- Never use the meter if it appears damaged or if the casing er åben.
- Udvis ekstrem forsigtighed, når du arbejder med voltagover 30V AC RMS, 42V peak eller 60V DC. Disse voluminertages udgør en stødfare.
- Fjern testledninger fra kredsløbet, før du ændrer funktioner eller områder.
- Udskift batterierne med det samme, når indikatoren for lavt batteri vises, for at sikre nøjagtige aflæsninger.
- Brug ikke måleren i eksplosive gas-, damp- eller støvede omgivelser.
3. Produktfunktioner
The KKnoon Digital Multimeter offers a range of features designed for convenience and accuracy:
- Multifunktionalitet: Mål AC/DC Voltage, Resistance, Frequency, Continuity, Live Wire Checking, and NCV (Non-Contact Voltagog).
- Two Measurement Modes:
- Automatisk identifikation: Automatically detects and measures AC/DC voltage, frequency, resistance, and continuity.
- Manuel skift: Allows selection of specific functions including AC/DC voltage, frequency, resistance, continuity, diode, capacitance (FY129C only), and LIVE NCV.
- Data Hold: Lock the current measurement reading on the display with a single button press.
- Stort LCD-display: Provides clear and easy-to-read values with a 5999-count resolution.
- Flashlight & Screen Backlight: Forbedrer synlighed i svagt lys.
- Compact Design with Bracket: Portable and includes a built-in support bracket for hands-free operation.
- Sikkerhedsoverholdelse: Designed and produced according to IEC-61010 safety standards.

Figure 2: The multimeter's large LCD display clearly shows various measurement functions.

Figure 3: The integrated support bracket allows for convenient hands-free use.
4. Pakkens indhold
Når du åbner din pakke, bedes du kontrollere, at alle nedenstående varer er til stede og i god stand:
- 1 x KKnoon Digital Multimeter (Model FY128)
- 1 x par testledninger (rød og sort)
- 1 x Brugermanual (engelsk)
5. Opsætning
5.1 Batteriinstallation
The multimeter requires 2 x 1.5V AAA batteries (not included). To install or replace batteries:
- Sørg for, at multimeteret er slukket, og at testledningerne er frakoblet.
- Find batteridækslet på bagsiden af enheden.
- Brug en skruetrækker til at åbne batterirummet.
- Isæt to 1.5V AAA-batterier, og overhold den korrekte polaritet (+/-) som angivet inde i batterirummet.
- Sæt batterirummets dæksel på igen og fastgør det med skruen.
5.2 Tilslutning af testledninger
The multimeter comes with a pair of test leads (red and black). Connect them as follows:
- Insert the black test lead into the 'COM' (Common) input jack.
- Sæt den røde testledning i 'INPUT'-stikket for de fleste målinger (volumentage, Resistance, Frequency, Continuity, Diode, Capacitance).

Figure 4: Labeled diagram of the multimeter's functions and input jacks.
6. Betjeningsvejledning
6.1 Tænd/sluk
Tryk på den røde tænd/sluk-knap (Tænd / sluk-knap) to turn the multimeter on or off. The device features an auto-shutdown function to conserve battery life after a period of inactivity.
6.2 Måletilstande
The multimeter offers two primary measurement modes:

Figure 5: The multimeter supports both auto identification and manual switching modes.
- Auto Identification Mode: When powered on, the meter defaults to auto identification. In this mode, it automatically detects and measures AC/DC voltage, frequency, resistance, and continuity. Simply connect the test leads to the circuit, and the meter will display the relevant measurement.
- Manuel skifttilstand: To access specific functions not covered by auto identification or to manually select a range, press the 'NCV/LIVE' button (or other function buttons if available on your specific model, e.g., FY129C for Diode/Capacitance). This allows you to cycle through AC/DC voltage, frequency, resistance, continuity, LIVE, and NCV.
6.3 Måling af AC/DC Voltage
- Connect the black test lead to the 'COM' jack and the red test lead to the 'INPUT' jack.
- If in auto identification mode, the meter will automatically detect voltage. If in manual mode, select the appropriate AC or DC voltage funktion.
- Tilslut testledningerne parallelt på tværs af den komponent eller det kredsløb, der skal måles.
- Læs bindtage -værdi på LCD -displayet.
6.4 Måling af modstand
- Sørg for, at kredsløbet er spændingsløst, før du måler modstanden.
- Tilslut den sorte testledning til 'COM' og den røde testledning til 'INPUT'.
- If in auto identification mode, the meter will automatically detect resistance. If in manual mode, select the resistance function (Ω).
- Connect the test leads across the component whose resistance you wish to measure.
- Aflæs modstandsværdien på LCD-displayet.
6.5 Målefrekvens
- Tilslut den sorte testledning til 'COM' og den røde testledning til 'INPUT'.
- If in auto identification mode, the meter will automatically detect frequency. If in manual mode, select the frequency function (Hz).
- Connect the test leads to the circuit where frequency is to be measured.
- Aflæs frekvensværdien på LCD-displayet.
6.6 Kontinuitetstest
- Sørg for, at kredsløbet er spændingsløst.
- Tilslut den sorte testledning til 'COM' og den røde testledning til 'INPUT'.
- If in auto identification mode, the meter will automatically detect continuity. If in manual mode, select the continuity function (★)).
- Touch the test leads to the two points of the circuit or component you want to test.
- En kontinuerlig biplyd indikerer en lav modstandsvej (kontinuitet). Displayet viser modstandsværdien.
6.7 Live Wire Checking
This function helps identify live AC wires.
- Tilslut den sorte testledning til 'COM' og den røde testledning til 'INPUT'.
- Press the 'NCV/LIVE' button until 'LIVE' is indicated on the display.
- Insert the red test lead into the socket or touch it to the wire you suspect is live.
- The meter will beep and the display will indicate 'LIVE' if a live wire is detected.
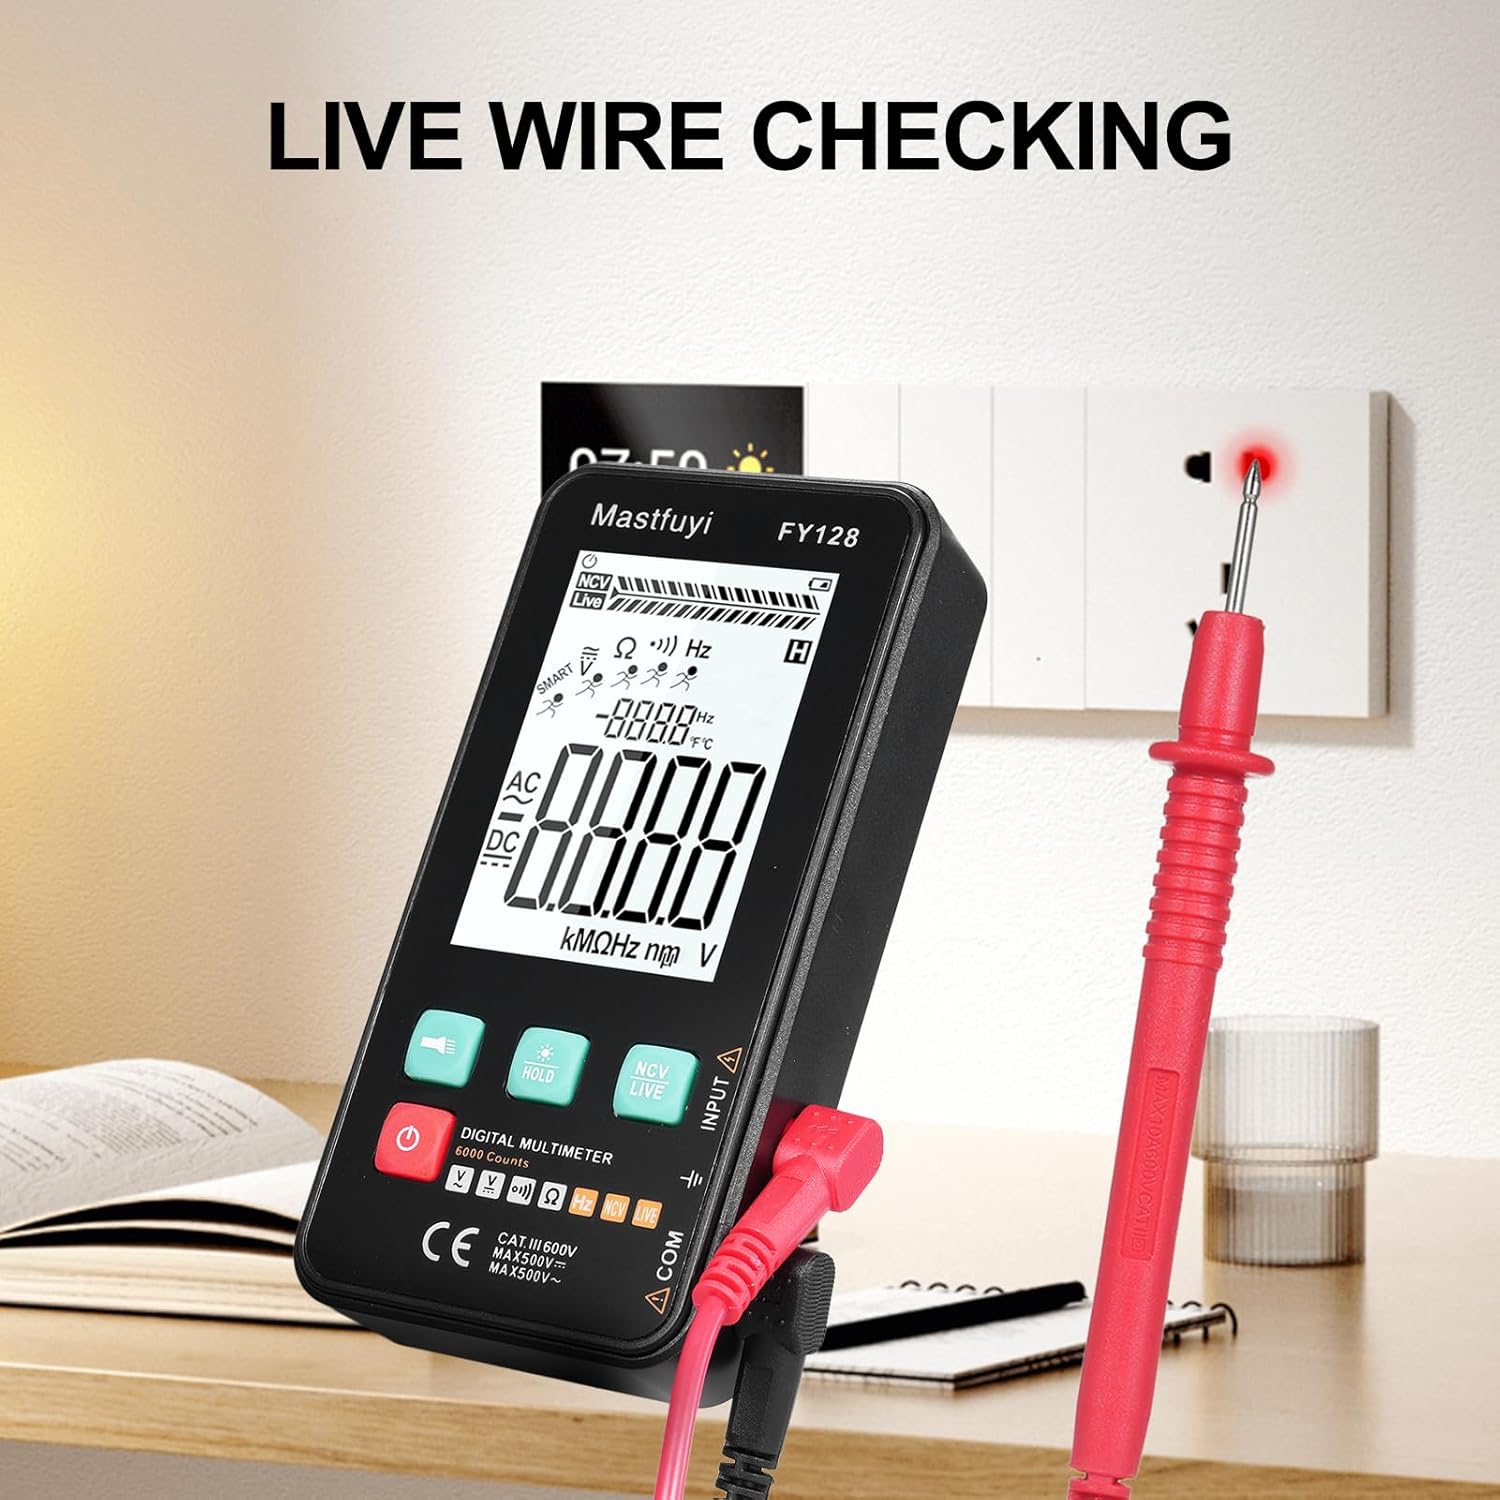
Figure 6: Using the multimeter for live wire detection.
6.8 NCV (kontaktfri volumen)tage) Test
NCV-funktionen muliggør detektering af AC-volumentage uden direkte kontakt.
- Press the 'NCV/LIVE' button until 'NCV' is indicated on the display.
- Bring the top front part of the multimeter close to the wire or electrical outlet.
- The meter will beep and the NCV indicator on the display will illuminate or increase in intensity as it detects AC voltage.

Figur 7: Ikke-kontaktvolumentage (NCV) detection in progress.
6.9 Dataholdefunktion
To freeze the current reading on the display, press the 'HOLD' button. Press it again to release the hold and resume live measurements.
6.10 Flashlight & Backlight
Press the flashlight button (🔦) to turn on the built-in flashlight. Long press the 'HOLD' button to activate the screen backlight for improved visibility in dark environments.
7. Vedligeholdelse
7.1 Udskiftning af batteri
When the low battery indicator appears on the display, replace the batteries as described in Section 5.1. Always use new 1.5V AAA batteries.
7.2 Rengøring
For at rengøre multimeteret skal du tørre huset af med enamp klud og et mildt rengøringsmiddel. Brug ikke slibemidler eller opløsningsmidler. Sørg for, at enheden er helt tør, før den tages i brug.
7.3 Opbevaring
If the multimeter is not used for an extended period, remove the batteries to prevent leakage and corrosion. Store the device in a cool, dry place, away from direct sunlight and extreme temperatures.
8. Fejlfinding
If you encounter issues with your multimeter, refer to the following common problems and solutions:
| Problem | Mulig årsag | Løsning |
|---|---|---|
| Intet display eller svagt display | Lave eller døde batterier; Forkert batteriinstallation | Udskift batterier; Kontroller batteripolariteten |
| Unøjagtige aflæsninger | Low batteries; Damaged test leads; Incorrect function selected | Replace batteries; Inspect/replace test leads; Select correct measurement function |
| Kontinuitetstesten bipper ikke | Open circuit; High resistance; Incorrect function | Ensure circuit is closed; Check for breaks; Select continuity function |
| Måleren reagerer ikke | Frozen display (Data Hold); Internal fault | Press 'HOLD' button to release; Contact customer support if issue persists |
9. Specifikationer
The following specifications apply to the KKnoon Digital Multimeter Model FY128 (and FY128C, unless specified for FY129C):
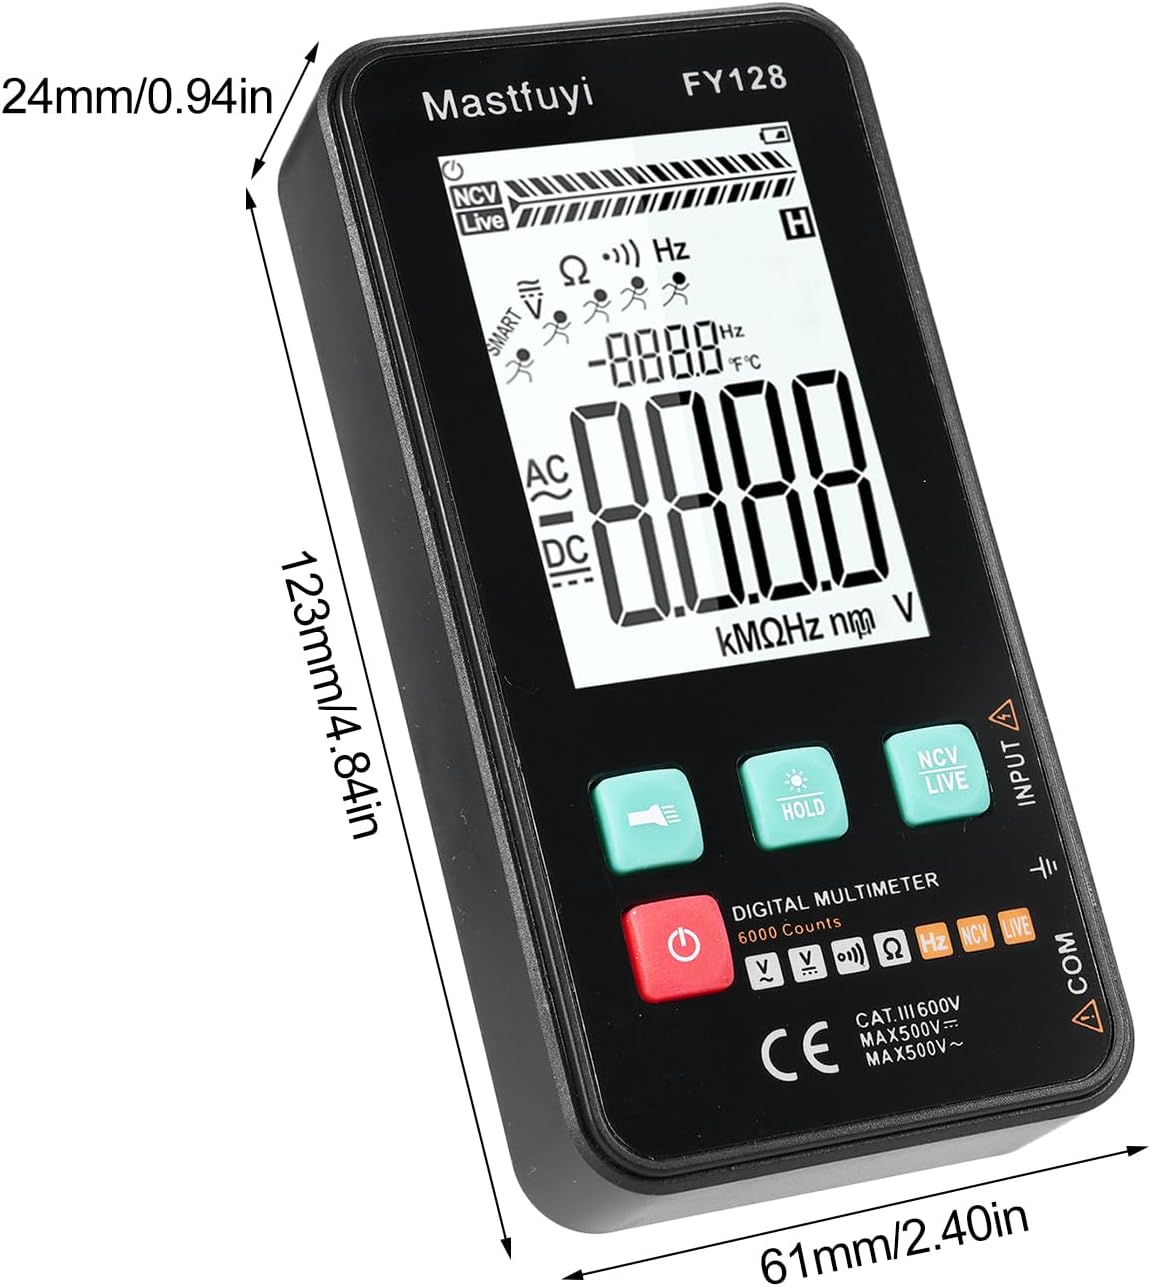
Figure 8: Physical dimensions of the KKnoon Digital Multimeter.
| Parameter | Specification (FY128/FY128C) | Specification (FY129C - if different) |
|---|---|---|
| AC Voltage | 1V~500V, ±(1.5%+3) | 0.8V~500V, ±(1.5%+5) |
| DC bindtage | 0.5V~500V, ±(1.2%+5) | 0.8V~500V, ±(1.2%+5) |
| Modstand | 30Ω~10000KΩ, ±(2%+5) | 30Ω~60000KΩ, ±(2%+5) |
| Frekvens | 40Hz~1000Hz, ±(2.5%+5) | 10Hz~6000Hz, ±(2.5%+5) |
| Kapacitans | N/A | 6nf~60000µf, ±(2.5%+5) |
| Temperatur | N/A | -20℃~1000℃, ±(5%+4) |
| Omgivelsestemperatur | N/A | 0℃~70℃ |
| Diode | Ingen | Ja |
| Kontinuitet | Ja | Ja |
| NCV | Ja | Ja |
| Live Wire Checking | Ja | Ja |
| Automatisk nedlukning | Ja | Ja |
| Strømforsyning | 2 * 1.5V AAA-batterier (medfølger ikke) | 2 * 1.5V AAA-batterier (medfølger ikke) |
| Varestørrelse | 123 * 61 * 24 mm / 4.84 * 2.40 * 0.94 tommer | 123 * 61 * 24 mm / 4.84 * 2.40 * 0.94 tommer |
| Varens vægt | 113 g / 3.98 oz | 113 g / 3.98 oz |
10. Garanti og support
For warranty information or technical support, please refer to the product packaging or contact your retailer. Keep your purchase receipt as proof of purchase. For general inquiries, you may visit the KKnoon brand page on Amazon.
