1. Introduktion
This manual provides detailed instructions for the installation, operation, and maintenance of your ANNKE Dual-Lens Outdoor Security Camera System. Please read this manual thoroughly before using the product to ensure proper setup and functionality. Keep this manual for future reference.
2. Hvad er der i æsken
Bekræft at alle komponenter er til stede i din pakke:
- 1 x 8CH 6MP NVR (Network Video Recorder)
- 1 x 6TB Hard Drive (pre-installed in NVR)
- 1 x 6MP PoE Dual-Lens Panoramic Camera
- 1 x 30m Ethernet Cable
- 1 x USB-mus
- 1 x strømadapter til NVR
- 1 x 1.8m HDMI-kabel
- 1 x brugermanual
- 1 x vægklistermærke
- Screws and Wall Plugs for camera installation

Figure 2.1: Package Contents. This image displays the NVR, dual-lens camera, power adapter, USB mouse, 30m network cable, HDMI cable, wall sticker, user manual, screws, and a 6TB surveillance HDD.
3. Produktet er slutview og nøglefunktioner
The ANNKE Dual-Lens Outdoor Security Camera System offers advanced surveillance capabilities with its innovative design and smart features.
3.1. Dual-Lens Panoramic Camera
- 180° Wider View: The camera integrates two 1/2.5" BSI sensors to provide a single, stitched 180° panoramic view without distortion, covering a significantly wider area than standard cameras.
- 6MP Clarity: Delivers high-resolution 6-megapixel video for clear and detailed imaging.
- Nattesyn i fuld farve: Equipped with two spotlights, the camera provides vivid, full-color video even in low-light conditions, extending visibility up to 100 ft.
- AI Smart Bevægelsesdetektion: Features intelligent detection for human and vehicle motion, reducing false alarms. Customizable detection zones and lines are supported.
- Tovejs lyd: Built-in microphone and speaker allow for real-time communication through the camera.
- PoE (Power over Ethernet): Forenkler installationen ved at levere strøm og data via et enkelt Ethernet-kabel.
- Vejrbestandig: IP66 rated for outdoor use, capable of withstanding various weather conditions.
- Lokal opbevaring: Supports a built-in micro SD/SDHC/SDXC slot up to 256 GB (card not included) for local recording.

Figure 3.1: 180° Stitched Panoramic View. This image illustrates the wider field of view provided by the dual-lens camera compared to traditional cameras, showing a seamless 180-degree image.
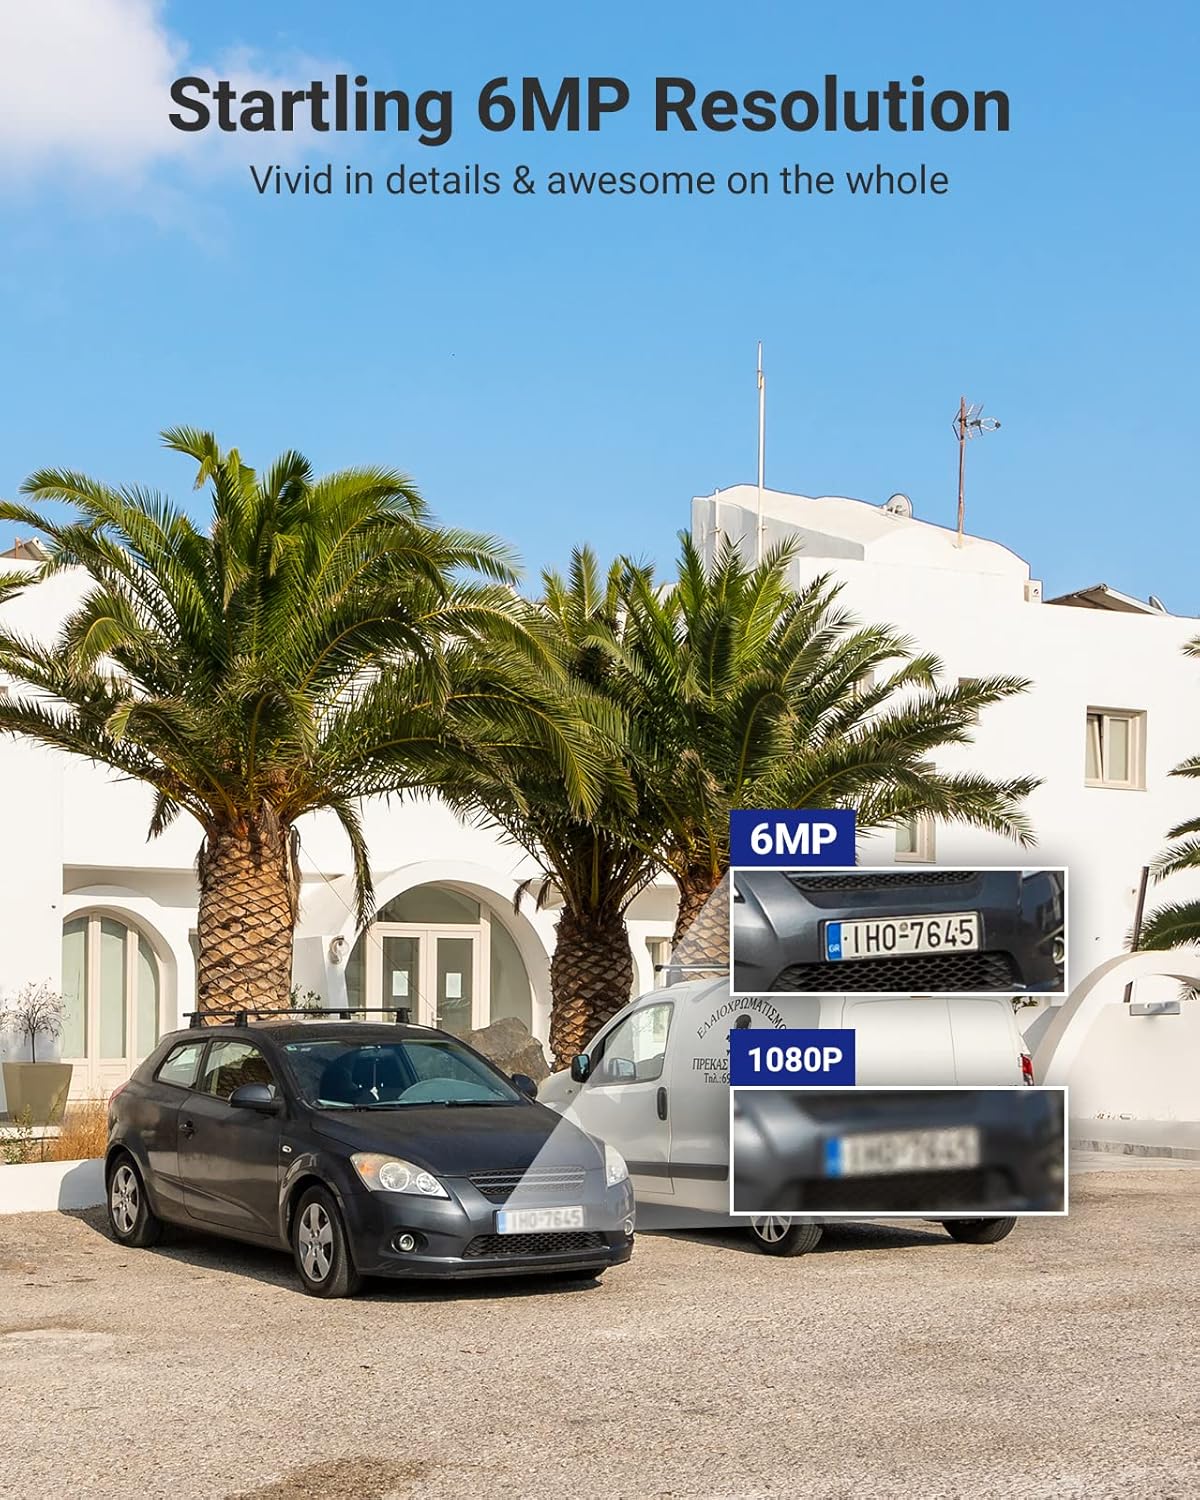
Figure 3.2: 6MP Resolution Clarity. This image demonstrates the enhanced detail of 6MP resolution, showing clearer license plate numbers compared to 1080p resolution.

Figure 3.3: Full-Color Night Vision. This image shows the camera mounted on a building, illuminating a wide outdoor area with its spotlights, providing a full-color view om natten.
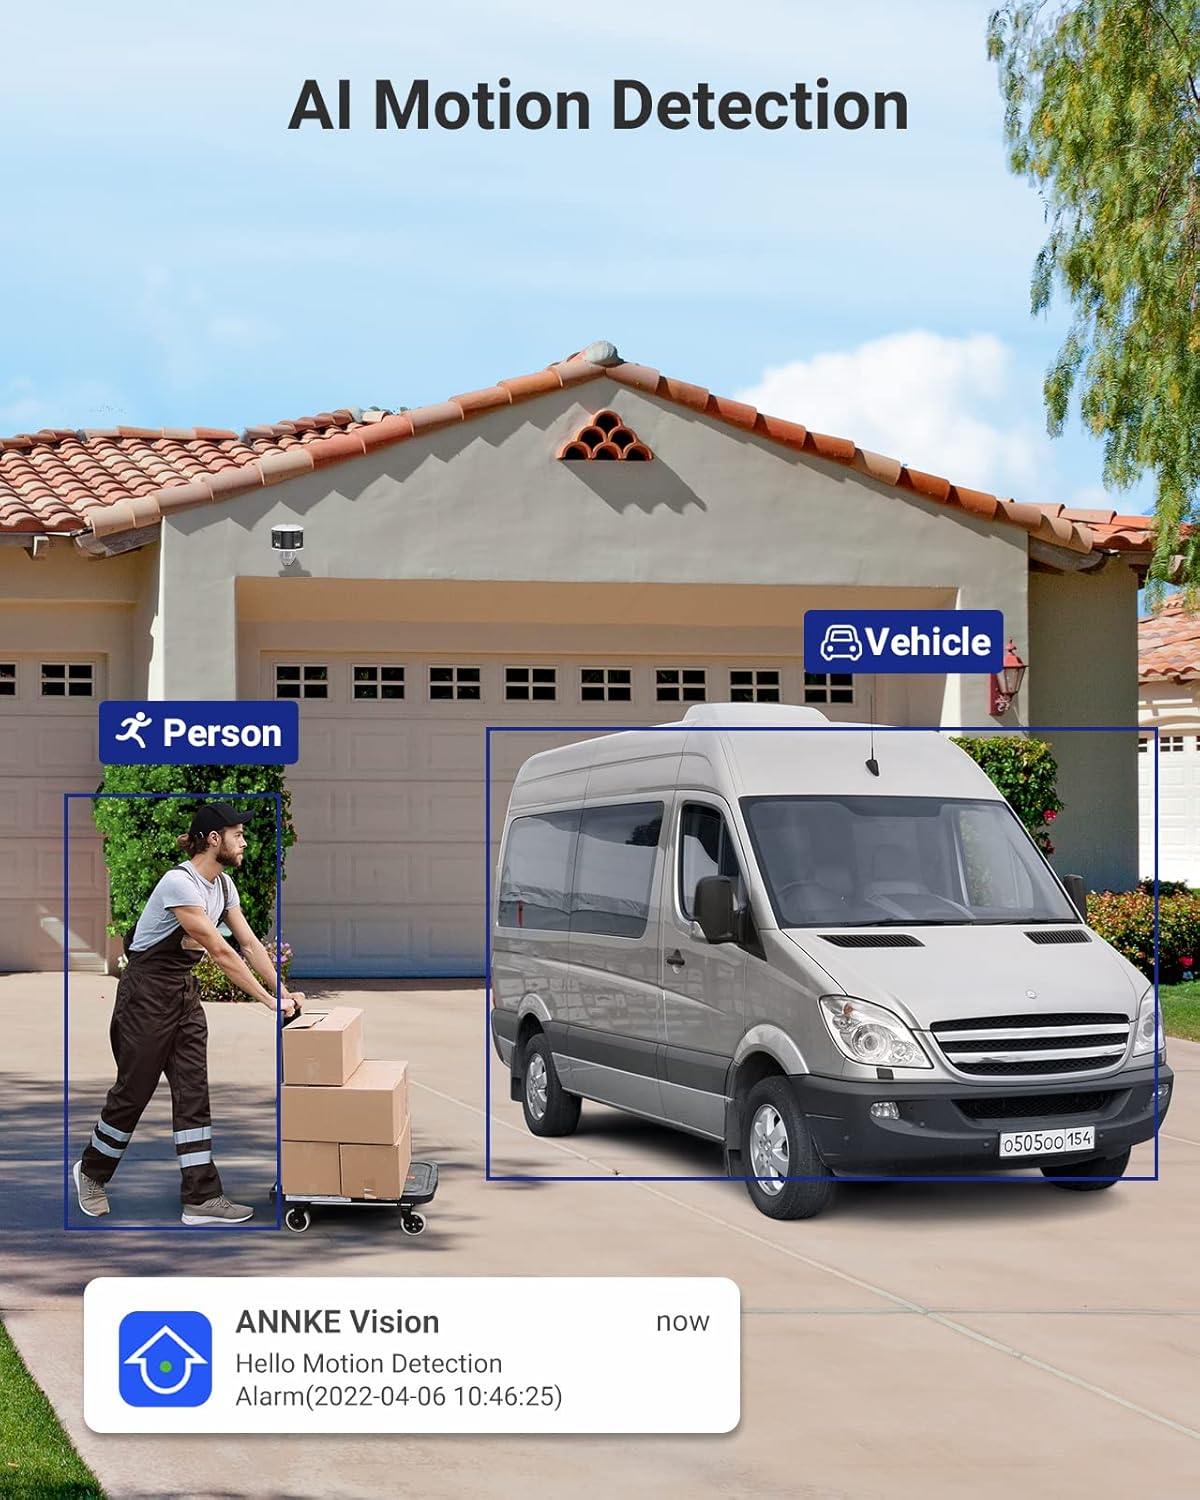
Figure 3.4: AI Motion Detection. This image depicts the camera's ability to distinguish between a person and a vehicle, highlighting detected objects with bounding boxes and showing a notification alert.

Figure 3.5: Two-Way Audio. This image illustrates a user communicating with a delivery person via the camera's two-way audio feature, with speech bubbles indicating the conversation.

Figure 3.6: Single Camera, Dual Functionality. This diagram visually explains how one dual-lens camera provides the coverage equivalent to two traditional single-lens cameras, simplifying installation.

Figure 3.7: Micro SD Card Slot. A close-up view of the camera's micro SD card slot, indicating support for up to 256GB of local storage.
3.2. 8-Channel NVR (Network Video Recorder)
- 8-Channel PoE Input: Connects up to 8 PoE IP cameras, providing power and data.
- 6MP Max Recording Resolution: Supports recording resolutions up to 6 megapixels.
- H.265+ videokomprimering: Advanced compression technology for efficient storage and bandwidth usage.
- 6TB harddisk inkluderet: Comes with a pre-installed 6TB hard disk drive for extensive video storage.
- HDMI & VGA Output: Connects to monitors for local viewing up to 1080P.
- Onvif Protocols: Supports Onvif for compatibility with various IP cameras.

Figure 3.8: ANNKE Security System Components. This image displays the ANNKE NVR unit and the dual-lens panoramic PoE camera, along with a visual representation of the 6TB hard drive.
4. Specifikationer
4.1. NVR Specifications
| Feature | Specifikation |
|---|---|
| IP-videoindgang | 8 Channels PoE |
| Max optageopløsning | Op til 6 MP |
| Video output | HDMI & VGA Up to 1080P |
| Videokomprimering | H.265+/H.265/H.264+/H.264 |
| HDD-kapacitet | Up to 6TB capacity (6TB HDD Included) |
| PoE | Max 25.5W for enkelt port |
| Network interface | RJ45 x 1 (10/100 M) |
| USB | 2x USB 2.0 |
| Driftskraft | DC48V |
| Driftstemperatur | 14 °F ~ 131 °F (-10 °C ~ +55 °C) |
| Dimensioner (L x B x H) | 10.43 x 8.86 x 1.89 tommer |
4.2. Camera Specifications
| Feature | Specifikation |
|---|---|
| Billedsensor | 2x 1/2.5" Progressive Scan CMOS |
| Linse | Dobbeltlinse: 2.8 mm |
| Felt af View (FoV) | 180 ° panoramisk |
| Video Bit Rate | 32 Kbps til 16 Mbps |
| Lyd | Built-in Microphone (with environment noise filtering), Two-Way Audio |
| Billedforbedring | BLC, HLC, 3D DNR |
| Bredt dynamisk område | 120dB WDR |
| Driftskraft | PoE (802.3af), 12 VDC ± 25% |
| Opbevaring | Built-in micro SD/SDHC/SDXC slot, up to 256 GB (card not included), support NAS, NVR |
| Lyd alarm | Support (Parameters adjustable, custom audio, triggered from APP) |
| Miljøvurdering | Indendørs/Udendørs (IP66) |
5. Opsætningsvejledning
Follow these steps to set up your ANNKE Security Camera System.
5.1. NVR Installation
- Placering: Place the NVR in a secure, dry, and well-ventilated area, away from direct sunlight and heat sources. Ensure it is easily accessible for connections.
- Tilslut skærm: Connect a monitor to the NVR's HDMI or VGA port using the provided HDMI cable or a VGA cable (not included).
- Tilslut mus: Sæt USB-musen i en af NVR'ens USB-porte.
- Opret forbindelse til netværk (valgfrit, men anbefalet): For remote access and firmware updates, connect the NVR's RJ45 network port to your router/switch using an Ethernet cable.
- Tænd: Connect the NVR to the power adapter and plug it into a power outlet. The NVR will start automatically.
5.2. Kamerainstallation
- Vælg placering: Select a suitable outdoor location for the camera, ensuring it covers the desired area and has a clear line of sight. Consider mounting height for optimal detection and view.
- Montering: Use the provided screws and wall plugs to securely mount the camera to a wall or ceiling. Ensure the mounting surface is strong enough to support the camera's weight.
- Connect Camera to NVR: Connect the camera to one of the NVR's PoE ports using the provided 30m Ethernet cable. The camera will receive both power and data through this single cable.
- Juster vinkel: Loosen the camera's adjustment screws to position the camera for the desired 180° panoramic view. Tighten the screws once the angle is set.
5.3. Initial NVR Configuration
- First-Time Setup Wizard: Upon first boot, the NVR will guide you through a setup wizard. Follow the on-screen prompts to set language, date/time, password, and network settings.
- Harddiskinitialisering: The pre-installed 6TB HDD may need to be initialized or formatted by the NVR. Follow the prompts to ensure it's ready for recording.
- Kameraregistrering: The NVR should automatically detect and add the connected PoE camera. If not, refer to the NVR's specific user manual for manual camera addition.
- Netværkskonfiguration: If you connected the NVR to your network, ensure DHCP is enabled or configure a static IP address. This is crucial for remote access.
6. Betjeningsvejledning
This section covers basic operation of your ANNKE Security Camera System.
6.1. Lev View
- After successful setup, the NVR will display the live feed from the connected camera(s) on the monitor.
- Use the USB mouse to navigate the NVR interface. Double-click a camera view to enlarge it, or right-click to access the main menu.
6.2. Optagelse og afspilning
- Indspilning: The NVR is configured for continuous recording by default. You can adjust recording schedules (e.g., motion-triggered, scheduled) via the NVR's menu (typically under "Record" or "Storage").
- Afspilning: Access the "Playback" menu on the NVR. Select the desired camera and date/time to review optaget footage. Use the timeline to navigate through recordings.
6.3. Bevægelsesdetektion og advarsler
- Konfiguration: Navigate to the "Event" or "Alarm" settings in the NVR menu. Here you can enable and configure Human/Vehicle Detection for your camera.
- Detection Zones/Lines: Draw specific areas or lines on the camera's view where motion detection should be active. This helps to minimize false alarms.
- Advarsler: Configure how you receive alerts (e.g., push notifications to your mobile app, email alerts, audible siren from the camera).
6.4. Tovejslyd
- To use two-way audio, access the camera's live view through the NVR interface or the mobile application.
- Look for a microphone icon to speak and a speaker icon to listen. Ensure your mobile device's microphone is enabled for the app.
6.5. Fjernadgang (mobilapp)
- Download app: Download the official ANNKE mobile application from your smartphone's app store (e.g., "ANNKE Vision" or similar, refer to NVR manual for exact app name).
- Registrer konto: Opret en konto og log ind.
- Tilføj enhed: Use the app to scan the QR code on your NVR or manually enter its serial number to add the device.
- Levende View & Afspilning: Når du har tilføjet det, kan du view live feeds, play back recordings, receive alerts, and use two-way audio remotely.
7. Vedligeholdelse
- Rensning: Rengør kameralinsen regelmæssigt med en blød kludamp klud for at sikre en klar billedkvalitet. Brug ikke skrappe kemikalier.
- Firmwareopdateringer: Tjek ANNKE website or your mobile app periodically for firmware updates. Keeping your system updated ensures optimal performance and security.
- Kabelinspektion: Periodically inspect all cables for wear and tear, especially outdoor Ethernet cables, to prevent connection issues.
- Harddiskens tilstand: The NVR may have a feature to check the health of the hard drive. Monitor this to prevent data loss.
8. Fejlfinding
8.1. No Video Display
- Tjek strøm: Sørg for, at NVR'en er tændt, og at strømadapteren er tilsluttet korrekt.
- Skærmforbindelse: Verify the HDMI/VGA cable is securely connected to both the NVR and the monitor. Try a different cable or monitor if possible.
- Kameraforbindelse: Ensure the Ethernet cable from the camera is securely plugged into a PoE port on the NVR. Check if the PoE port indicator light is on.
- NVR Settings: Access the NVR menu (if display works) and check camera management settings to ensure the camera is added and enabled.
8.2. No Remote Access
- Netværks forbindelse: Verify the NVR is connected to your router/network and has internet access. Check the network status in the NVR settings.
- App-login: Ensure you are logged into the correct account on the mobile app.
- Enhed tilføjet: Confirm the NVR is correctly added to your account in the mobile app.
- Firewall/Router: Check your router's firewall settings. Ensure necessary ports are open if manual port forwarding is required (though P2P usually bypasses this).
8.3. Motion Detection Not Working
- Aktivér detektion: Ensure Human/Vehicle Detection is enabled for the specific camera in the NVR's event settings.
- Følsomhed: Adjust the detection sensitivity. Too low may miss events, too high may cause false alarms.
- Detektionsområde: Verify the detection zones/lines are correctly configured and cover the desired areas.
- Skema: Check if the motion detection schedule is active for the current time.
9. Garanti og support
ANNKE-produkter leveres typisk med en begrænset garanti. For specifikke garantivilkår henvises til garantikortet, der følger med din pakke, eller besøg den officielle ANNKE-side. webwebsted.
For technical support, product inquiries, or service requests, please contact ANNKE customer support through their official website or the contact information provided in your NVR's user manual.
Official ANNKE Webwebsted: www.annke.com


