1. Introduktion
Thank you for choosing the ecomoment GT801 Dash Cam. This device is designed to record your driving journey in high definition, providing crucial evidence in unexpected situations and enhancing your overall driving safety. This manual provides detailed instructions for installation, operation, maintenance, and troubleshooting to ensure optimal performance of your dash cam.
2. Sikkerhedsoplysninger
- Ensure the dash cam is installed in a location that does not obstruct the driver's view eller forstyrre køretøjets sikkerhedsfunktioner.
- Use only the provided power cable and accessories to prevent damage to the device or vehicle.
- Do not attempt to disassemble or modify the dash cam. Unauthorized modifications will void the warranty.
- Undgå at udsætte enheden for ekstreme temperaturer, direkte sollys i længere perioder eller overdreven fugtighed.
- Regularly check that the dash cam is securely mounted and functioning correctly.
3. Pakkens indhold
Kontroller venligst, at alle nedenstående varer er til stede i din pakke:
- Dashkamera ×1
- Rear camera (6M/20ft) ×1
- Elektrostatiske film x4
- Car Charging Cable (5V/1.5A) ×1
- Storage card x1 (64GB MicroSD card)
- Kabelklemmer ×5
- Pry tool ×1
- Brugervejledning ×1
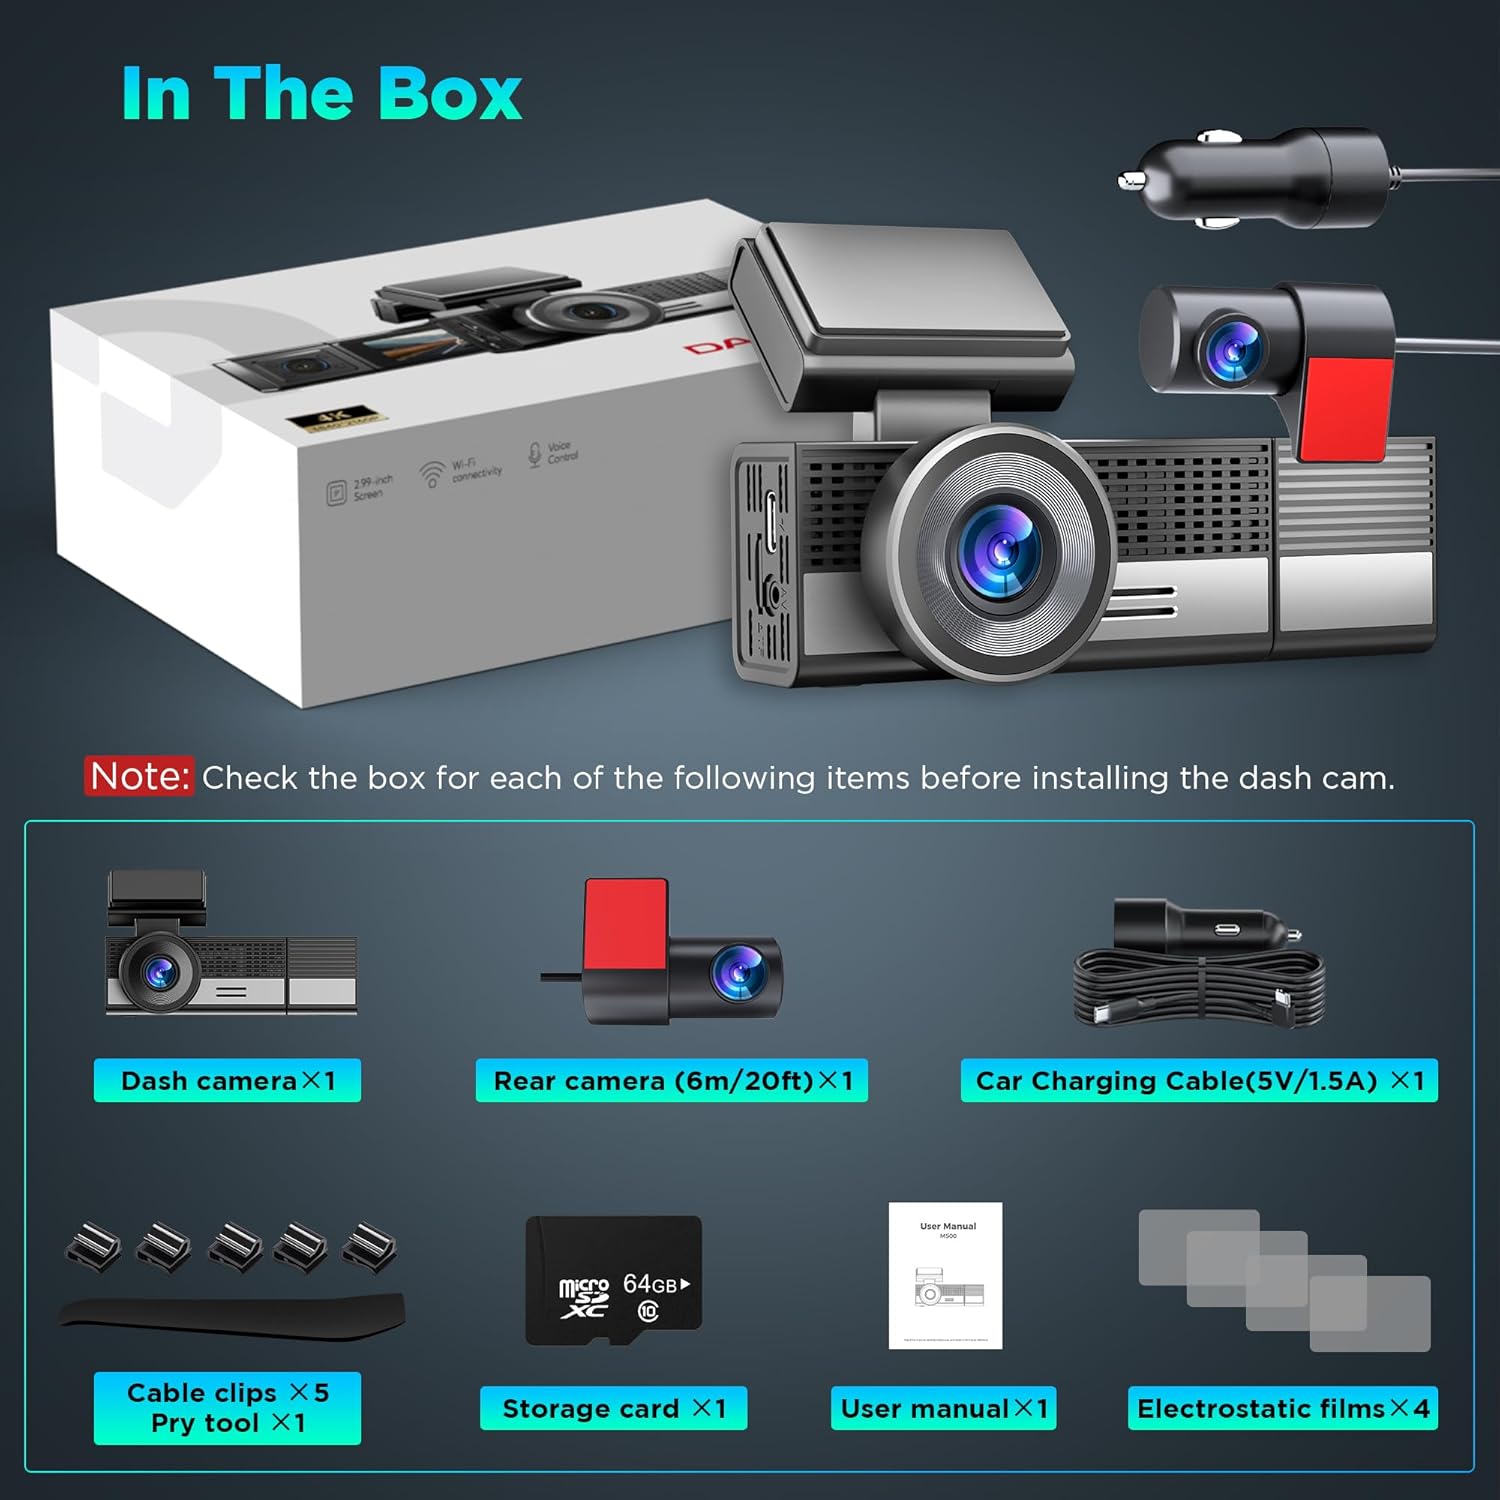
Figur 3.1: All components included in the ecomoment GT801 Dash Cam package, including the main dash camera, rear camera, charging cable, MicroSD card, electrostatic films, cable clips, pry tool, and user manual.
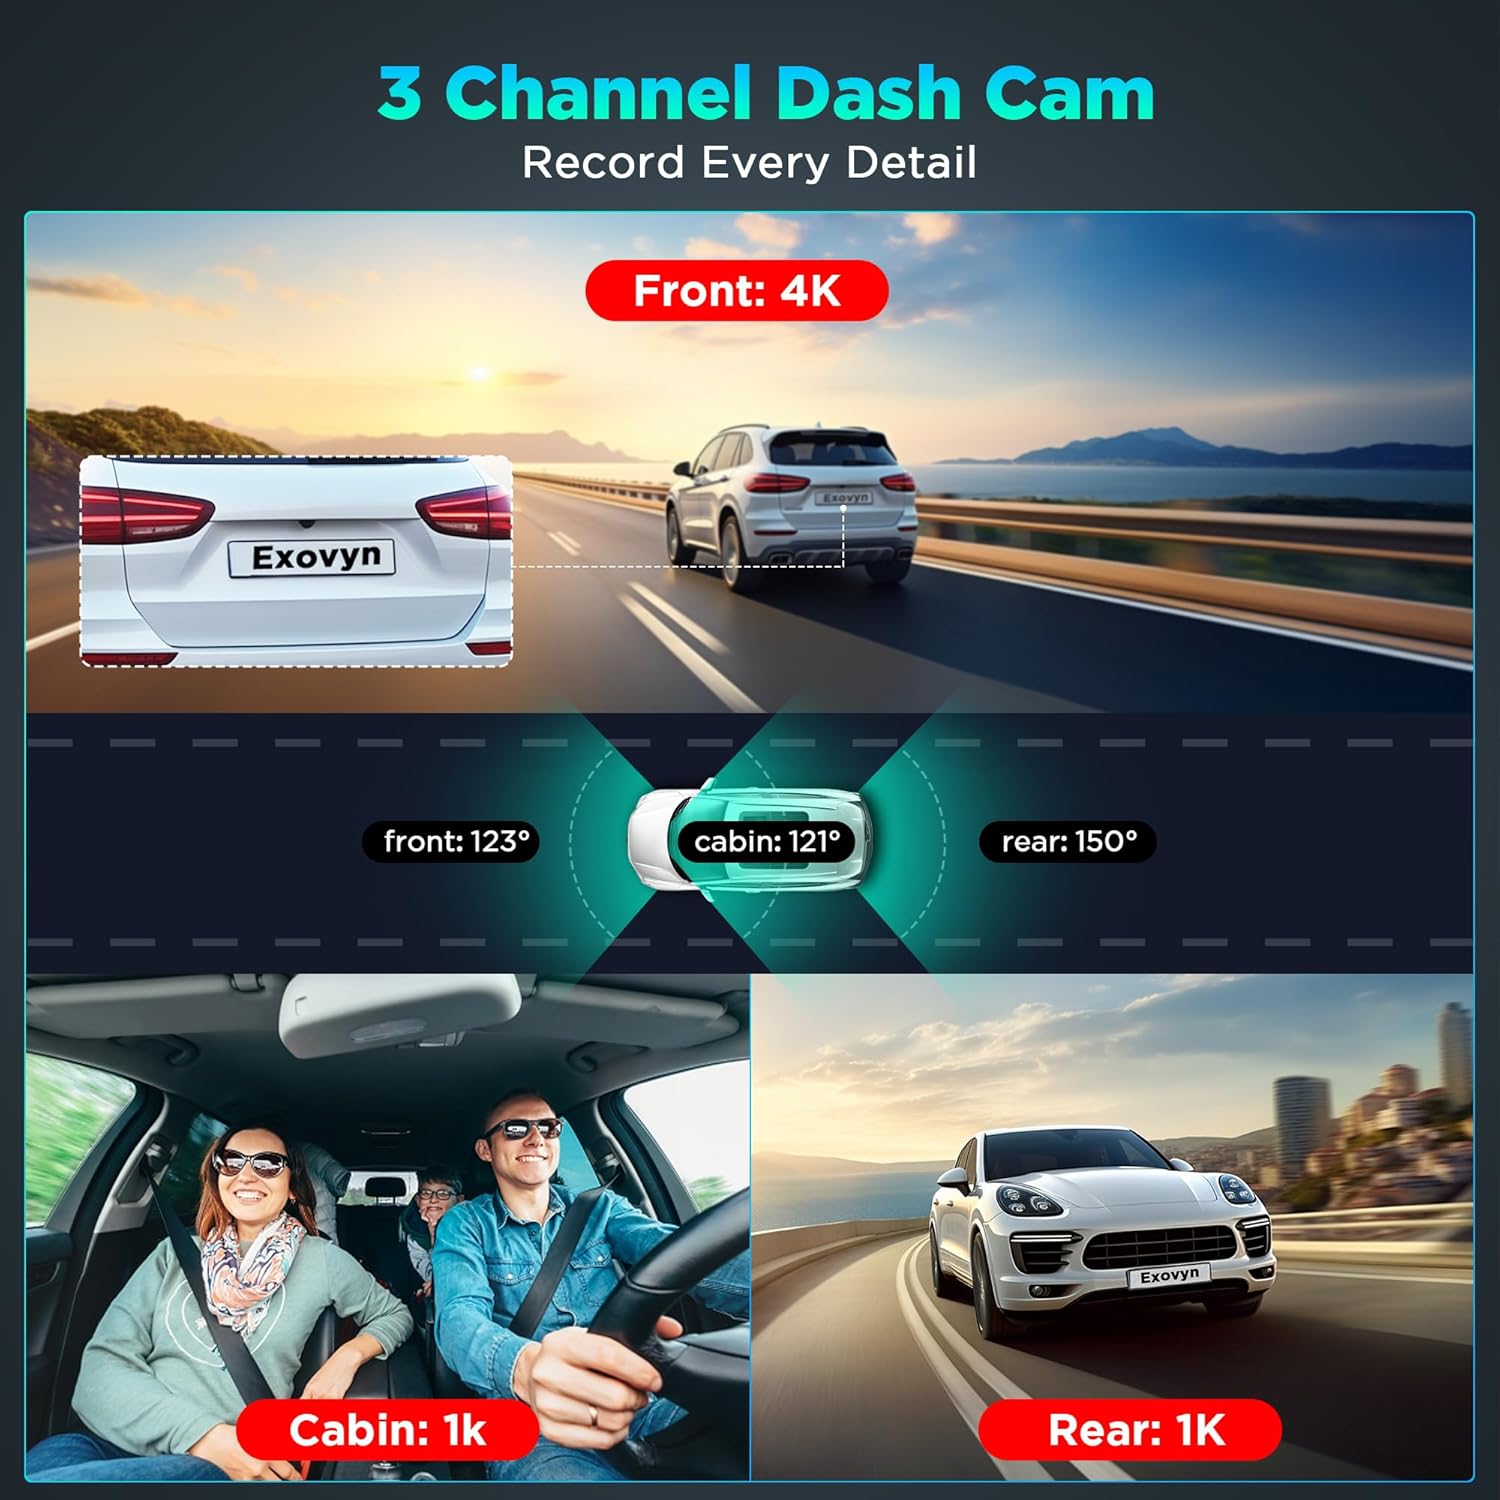
4. Produktet er slutview
The ecomoment GT801 is a dual dash camera system featuring a front camera with 4K resolution and a rear camera with 1080P resolution. It includes advanced features such as built-in Wi-Fi, GPS functionality, G-sensor, loop recording, night vision, and parking monitoring.

Figur 4.1: En overview of the ecomoment GT801 Dash Cam, showing the main front camera unit, rear camera, car charger, and included 64GB MicroSD card.

Figur 4.2: The compact design of the dash cam, highlighting the 39° vertical rotation for the cabin camera and 360° horizontal rotation for the rear camera, allowing comprehensive coverage.
5. Opsætning og installation
5.1 Installation af microSD-kort
Insert the provided MicroSD card into the designated slot on the dash cam. Ensure the card is inserted correctly until it clicks into place. A 64GB MicroSD card is included, and the device supports up to 128GB.

Figur 5.1: Illustration of how to insert the MicroSD card into the dash camera's slot. The image also shows the USB-C and AV ports.
5.2 Montering af dashcam
Følg disse trin for korrekt installation:
- Front Cam Mounting: Position the main dash cam unit on your windshield using the provided electrostatic sticker. Choose a location that does not obstruct your driving view.
- Rear Cam Placement: Attach the rear camera to the rear window using its electrostatic sticker. Ensure a clear view af vejen bagved.
- Kabelføring: Carefully tuck the power cable and rear camera cable under the vehicle's weatherstrip and trim using the included pry tool. This keeps the cables neat and out of the way.
- Opstart: Plug the car charging cable into your vehicle's cigarette lighter outlet to activate the dash cam.
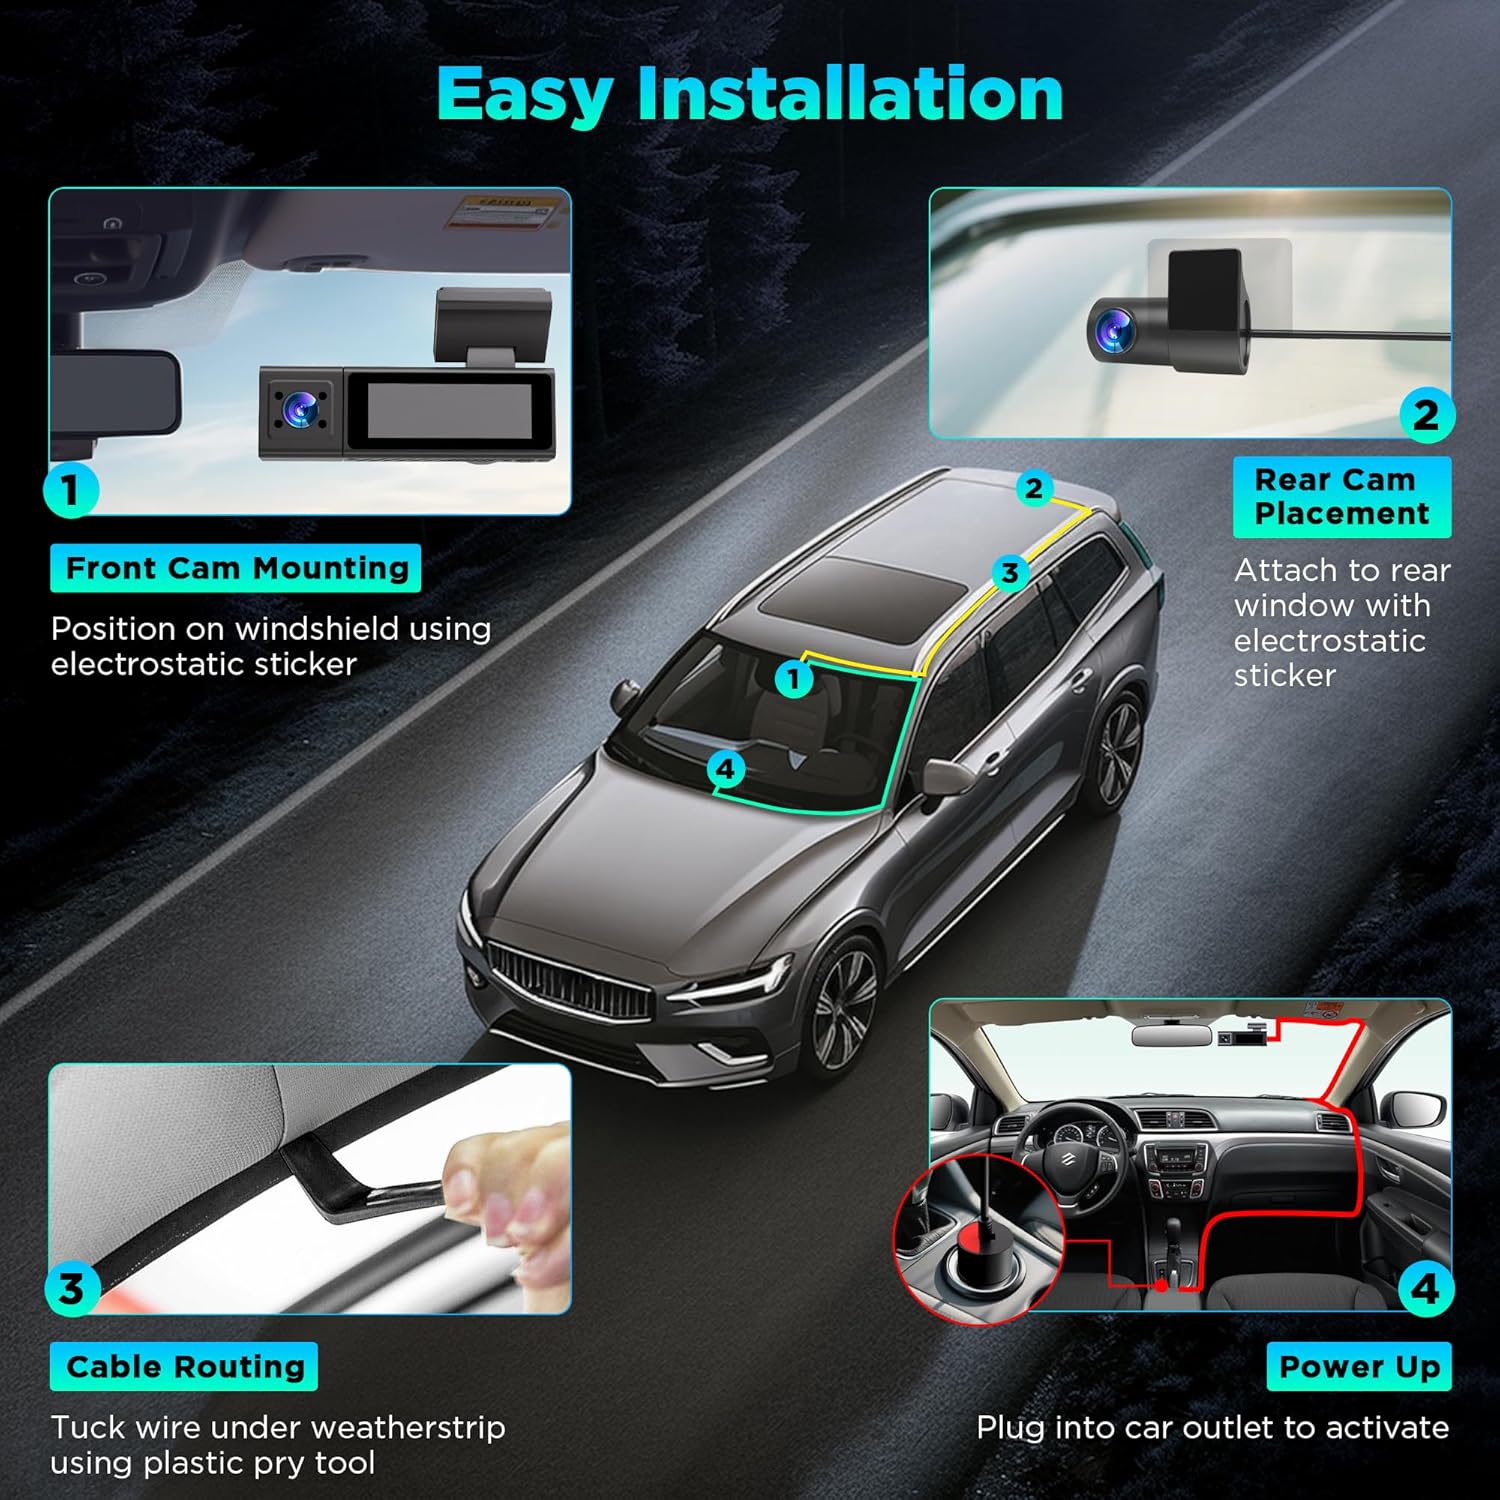
Figur 5.2: Visual guide for installing the dash cam, showing front camera mounting, rear camera placement, cable routing, and connecting to the car's power outlet.
6. Betjeningsvejledning
6.1 Grundlæggende betjening
- Tænd/sluk: The dash cam will automatically power on and begin recording when your vehicle starts. It will power off automatically when the vehicle is turned off.
- Indspilning: The dash cam continuously records video from the front and rear cameras. The front camera records in 4K, and the rear camera records in 1080P.

Figur 6.1: Display showing simultaneous recording from the front (4K), cabin (1K), and rear (1K) cameras, illustrating the wide-angle coverage.
6.2 Loop-optagelse
The dash cam utilizes loop recording. When the MicroSD card is full, the oldest unlocked video files will be overwritten by new recordings. This ensures continuous recording without manual intervention.
6.3 G-Sensor and Emergency Lock
The built-in G-sensor detects sudden impacts or collisions. When an event is detected, the current video segment is automatically locked and saved to a protected folder, preventing it from being overwritten by loop recording. This feature ensures critical footage er bevaret.

Figur 6.2: The Emergency Lock function, which automatically saves critical footage upon collision detection or via voice command, ensuring important video evidence is secured.
6.4 Parkeringsovervågning
The GT801 offers 24-hour parking monitoring with two modes:
- Kollisionsdetektion: Records a 1-minute locked emergency video after a collision is detected while parked.
- Time-lapse-optagelse: Provides continuous 1fps recording after parking, condensing long recordings into accelerated clips.
Note: Parking Monitoring requires a hardwire kit (not included) for continuous power connection to the vehicle battery.

Figur 6.3: Illustration of the 24-hour parking monitoring feature, detailing collision detection and time-lapse recording, both activated by the built-in G-sensor.
6.5 Advanced GPS Functionality
The integrated GPS functionality allows for accurate tracking and playback of your driving routes. You can monitor speed, location, and route history on compatible computers and mobile phones, providing additional context for recorded footage.
6.6 Superior Night Vision
The GT801 dash cam features a starlight night vision sensor and a 170° ultra-wide angle 6-layer glass lens. This technology ensures clear and detailed footage even in low-light conditions, enhancing visibility during nighttime driving.

Figur 6.4: The dash cam's display showing clear night vision footage, highlighting its ability to capture details in low-light environments.

Figur 6.5: A close-up of the dash cam's lens assembly, emphasizing the 6-layer glass lens and starlight night vision sensor for enhanced low-light performance.
6.7 Wi-Fi and Smart App Control
Connect the GT801 dash cam to your smartphone via Wi-Fi using the "VeeCar" app (available on App Store and Google Play). The app allows you to:
- View live footage.
- Afspil optagede videoer.
- Administrer indstillinger for instrumentbrætkamera.
- Download and edit videos.
- Share content directly from the app.
Figur 6.6: A smartphone displaying the "Kacam APP" interface, demonstrating how to wirelessly access real-time footage, download clips, and adjust settings via Wi-Fi.
6.8 Stemmekontrol
The dash cam supports voice commands for hands-free operation. Commands include:
- "Emergency recording" to lock current video.
- "Vis bakkamera"
- "Vis frontkamera"
- "Look the video"
- "Tag billede"
- "Tænd lyd"
- "Tænd skærmen"

Figur 6.7: A driver interacting with the dash cam using voice commands, illustrating the hands-free control for various functions.
7. Vedligeholdelse
7.1 Rengøring
Gently wipe the camera lenses and screen with a soft, dry cloth. Avoid using abrasive cleaners or solvents that could damage the device.
7.2 Administration af microSD-kort
It is recommended to format the MicroSD card periodically (e.g., once a month) to maintain optimal recording performance and prevent data corruption. This can usually be done through the dash cam's settings menu or the mobile app.
7.3 Firmwareopdateringer (OTA)
The dash cam supports Over-the-Air (OTA) firmware updates. To update, save the official firmware file (provided by ecomoment) directly to the MicroSD card. The device will automatically initiate the upgrade process upon power-up.
8. Fejlfinding
- Dashcam tænder ikke:
Ensure the car charger is securely plugged into both the dash cam and the vehicle's power outlet. Check the vehicle's power outlet for functionality. - Optagelse stopper eller footage er beskadiget:
Format the MicroSD card. Ensure you are using a high-speed (Class 10 or U3 recommended) MicroSD card. Replace the MicroSD card if the issue persists. - Problemer med Wi-Fi-forbindelse:
Ensure Bluetooth is turned off on your smartphone as it may interfere with the Wi-Fi connection. Make sure you are within 10 feet of the dash cam. Restart both the dash cam and your smartphone. - Parkeringsovervågning virker ikke:
Verify that a hardwire kit is correctly installed and connected to your vehicle's battery. Ensure parking monitoring is enabled in the dash cam settings. - GPS signal not found:
Sørg for, at dashcam'et har en klar view of the sky. Move the dash cam away from any metallic objects or electronic devices that might interfere with the GPS signal. - Dårlig videokvalitet:
Clean the camera lenses. Ensure the protective film has been removed from the lenses. Check the video resolution settings in the app or on the device.
9. Specifikationer
| Modelnavn | GT801 |
| Produktdimensioner | 1.6 x 2.2 x 4 tommer |
| Varens vægt | 3.52 ounce |
| Videooptagelsesopløsning | Front: 4K, Rear: 1080P |
| Felt Af View | 135 Degrees (Front), 170° (Lens) |
| Forbindelsesteknologi | USB, Wi-Fi |
| Særlige funktioner | Loop Recording, Built-In WiFi, Night Vision, G-Sensor, Emergency Lock, Parking Monitor, App Control, Voice Control, Built-In Supercapacitor, Built-In Microphone, Compact Design, Built-In Display |
| Monteringstype | Forrudemontering |
| Farve | Vivid Black |
| Fabrikant | ecomoment |
10. Garanti og support
ecomoment provides a 10 års gratis garanti for the GT801 Dash Cam. Additionally, lifetime professional technical support is available to assist you with any questions or issues you may encounter. For support, please refer to the contact information provided with your product or visit the official ecomoment webwebsted.


