1. Introduktion
The SingularXYZ E1 RTK GNSS Survey Equipment is a high-precision positioning system designed for land surveying, navigation, and various geospatial applications. This manual provides detailed instructions for setting up, operating, and maintaining your E1 system to ensure optimal performance and longevity.
1.1 Hvad er der i æsken
The E1 RTK GNSS Survey Equipment package includes the following components:
- E1 GNSS Receiver (x2)
- Transportkasse (x2)
- USB-Type C-kabel (x2)
- Superlader (x2)
- Hurtig startguide (x1)
- Hurtigstartkort (x1)
- SC200 Dataindsamler (x1)
- USB cable (for SC200) (x1)
- Super Charger (for SC200) (x1)
- Beslag (x1)
- SingularPad-software (x1)
- Piskantenne (x2)
- Tape Measure (x1)
- 20 cm extension rod plugged on tribrach (x1)
- Tribrach (x1)

Figur 1.1: Overview of the E1 RTK GNSS Survey Equipment and its main components.

Figure 1.2: Detailed breakdown of the E1 Base and Rover components, including adapters, software, and data collector.
2. Produktfunktioner
The E1 RTK GNSS Survey Equipment is engineered with advanced features to provide reliable and accurate surveying capabilities:
- Høj præcision: Achieves centimeter-level precision measurement with low power consumption.
- IMU Integration: Supports tilt measurements up to 60° with quick initialization (5 seconds).
- Udvidet rækkevidde: Radio range between rover and base can reach up to 5 kilometers (3.1 miles).
- Full-Constellation Tracking: Supports GPS, GLONASS, Galileo, BDS, QZSS, IRNSS, SBAS for robust signal acquisition in challenging environments.
- Alsidig tilslutning: Features NFC (Touch connection), Bluetooth, USB Type-C, WiFi, TNC Connector, and RS232 Serial Port.
- Lang udholdenhed: 6700mAh battery provides over 20 hours of continuous operation.
- Holdbart design: IP68 rated for waterproof and dustproof protection.

Figure 2.1: Key features of the E1 receiver, including NFC one-touch connection, compact size, easy data download via Web UI, and fast charging capabilities.

Figur 2.2: Detaljeret view of the E1 receiver's front panel indicators (Satellite Tracking, Static & Network, Correction Data, Power) and various interfaces (NFC, Type-C, TNC, RS232).

Figure 2.3: Information on the SC200 Data Collector, highlighting its Android OS, processor, RAM, storage, sunlight-readable screen, and integrated connectivity.

Figure 2.4: The E1's Web UI allows for easy static data download, firmware upgrades, and configuration via WiFi.

Figure 2.5: A comparative overview of the E1's specifications against typical industry alternatives, highlighting its advantages in channels, trans-range, IMU, battery life, and material protection.
3. Opsætning
3.1 Enhedsforbindelse
Connecting your GNSS device to the SingularPad software is crucial for operation. Follow these steps:
- Turn on your GNSS device.
- On the data collector, navigate to Device >> Communication.
- Select the appropriate device manufacturer and type (e.g., SingularXYZ >> RTK >> Bluetooth for SingularXYZ RTK Receivers, or Other >> RTK(NMEA0183) >> Bluetooth for other brands, or Other >> Internal GPS for SingularXYZ GNSS Tablets).
- Søg efter your device's serial number (SN) and connect.
- After connection, you can view current device information by going to Device >> Device Information.
Video 3.1: Singular Software Tutorial - Device Connection. This video demonstrates the process of connecting your GNSS device to the SingularPad software.
3.2 Arbejdstilstande
The E1 system supports two primary working modes:
- Base + Rover (Radio/UHF): This mode is compatible with base stations from other brands and is not subject to network and regional restrictions.
- Rover + CORS (NTRIP): This mode requires a CORS account (purchased from your local CORS provider) and a network signal.

Figure 3.1: Illustration of the two main working modes for the E1 RTK GNSS system: Base + Rover using radio/UHF and Rover + CORS using NTRIP.
4. Betjeningsvejledning
4.1 SingularPad Software Usage
The SingularPad software provides a comprehensive interface for managing projects, collecting data, and performing various surveying tasks. It offers features like project management, coordinate system settings, point database, and various survey methods.

Figure 4.1: The SingularPad software interface, designed for ease of use with functions like one-click fixation, road stakeout, and power line survey.

Figure 4.2: A flowchart illustrating the quick start workflow for E1 surveying, from creating a new project to exporting data.
4.2 Tilt Surveying
The E1 system features IMU technology allowing for tilt surveying up to 60 degrees with high accuracy and fast initialization.

Figure 4.3: The E1's capability for tilt surveying, showing measurements at various angles up to 60 degrees with 1cm accuracy and 5-second fast initialization.

Figure 4.4: The E1 system's ability to measure with up to 60° tilt, providing ±2.5cm accuracy for tilt surveying.
4.3 Working with E1 Rover + Base
To configure the E1 system for Rover + Base operation:
- Ensure you have two E1 GNSS receivers, designating one as the base and the other as the rover.
- Connect them separately to your PDA device via Bluetooth.
- Place both your E1 base and rover in an open view af himlen.
- Connect the whip antenna to both E1 base and rover.
Setting up the Base:
- Connect E1 base to your PDA, go to Device >> Base.
- For Base Startup Mode, you can input known point coordinates to setup, or select Enkelt punkt mode for automatic setup.
- Sæt Data link as Internal Radio, and customize radio channels, frequency, and protocol according to your needs.
- Save settings and Start Base. The status bar will become Base.
Setting up the Rover:
- Connect E1 base to your PDA and connect to the rover in the software.
- Gå til Device >> Rover, set Data Link as Internal Radio.
- Match og indstil den samme protokol og frekvens som basisindstillingen.
- Klik Samling to save settings and click Anvende.
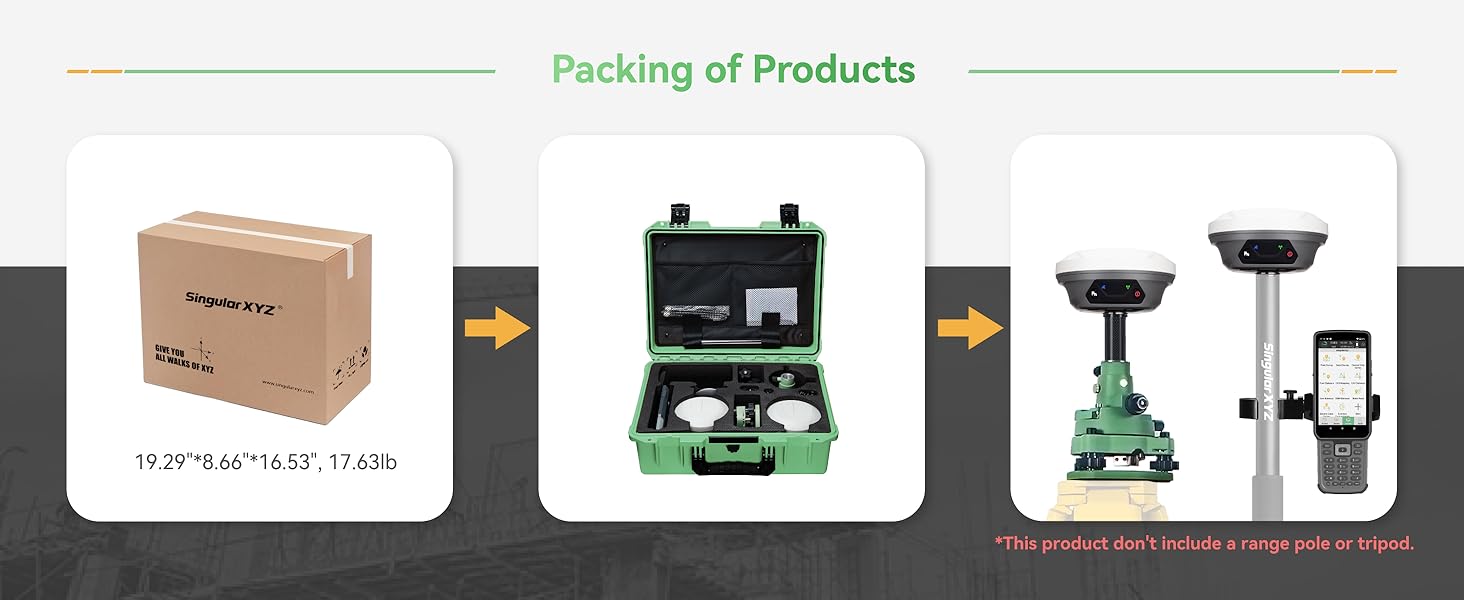
Figure 4.5: Step-by-step guide for setting up the E1 as a Rover and Base, including software interface screenshots for configuration.
4.4 Samarbejde med CORS/RTK-korrektionstjenesten
To use the E1 system with a CORS/RTK Correction Service:
- Køb en CORS/RTK-korrektionstjenestekonto i dit lokalområde.
- Ensure your PDA device (phone/tablet/data collector) can access network and support Bluetooth connection.
- Place your E1 GNSS receiver in an open view af himlen.
Trin:
- Åbn SingularPad-softwaren.
- Click "Communication" and connect to your E1 receiver's SN via Bluetooth.
- Click "Rover" >> Set Data Link as Phone Internet, then go to Tilslut tilstand and fill in your CORS/RTK Correction Service account details.
- Klik Få to obtain MountPoint list and select appropriate one. Click Starte og Anvende.
Note: Find the appropriate mount point via the website of your local CORS/RTK Correction Service provider. Ensure the baseline is within 50km. Be noted that the long baseline will affect the RTK performance and measuring accuracy.
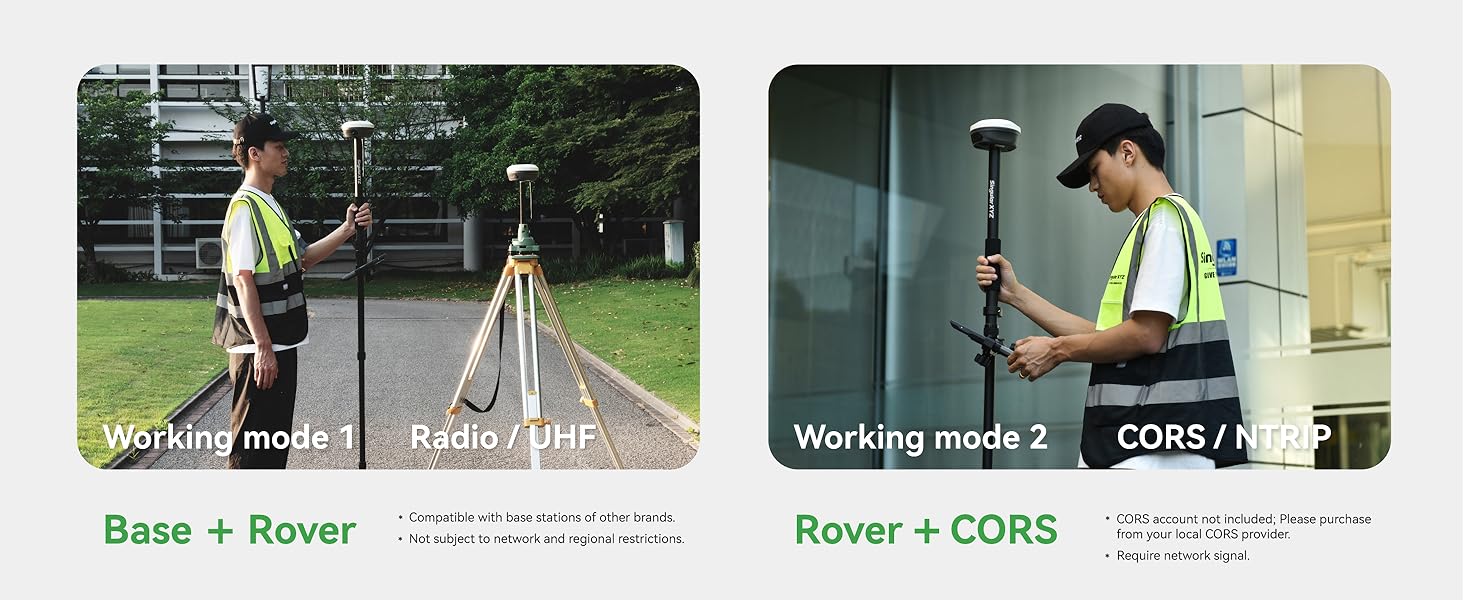
Figure 4.6: Guide for configuring the E1 system to work with a CORS/RTK Correction Service, including software interface screenshots for connection and settings.
5. Vedligeholdelse
5.1 Batteri og opladning
The E1 RTK GNSS receiver is equipped with a 6700mAh battery, providing over 20 hours of continuous operation. It supports fast charging via its Type-C port.
- Opladningstid: Cirka 3.5-4 timer for fuld opladning.
- Driftstid: Over 20 hours on a single charge.

Figure 5.1: Information on the E1's battery performance, indicating 3.5-4 hours for fast charging and over 20 hours of continuous working time.
5.2 Rengøring og opbevaring
To maintain the device's performance and extend its lifespan:
- Rengør regelmæssigt enheden med en blød, damp klæde. Undgå skrappe kemikalier.
- Sørg for, at alle porte er fri for støv og snavs.
- Store the equipment in its transport case in a dry, cool place when not in use.
- The E1 is IP68 waterproof and dustproof, but avoid prolonged submersion or exposure to extreme conditions.
6. Fejlfinding
This section addresses common issues you might encounter with your E1 RTK GNSS Survey Equipment. For more complex problems, please refer to the support section.
6.1 Almindelige problemer og løsninger
| Problem | Mulig årsag | Løsning |
|---|---|---|
| Enheden forbinder ikke via Bluetooth | Bluetooth is off; device not discoverable; incorrect device selected. | Ensure Bluetooth is enabled on both devices. Make sure the E1 is in pairing mode. Select the correct device SN from the list. |
| No RTK fixed solution | Poor satellite visibility; incorrect base/rover setup; no correction data. | Flyt til et åbent område med klar himmel view. Verify base and rover settings (frequency, protocol). Check CORS connection or radio link. |
| Kort batterilevetid | Battery not fully charged; old battery; extreme temperatures. | Ensure full charge before use. Consider battery replacement if old. Operate within recommended temperature ranges. |
7. Specifikationer
Detailed technical specifications for the SingularXYZ E1 RTK GNSS Survey Equipment:
| Specifikation | Værdi |
|---|---|
| Varens vægt | 18.3 pund |
| Produktdimensioner | 2.64 x 2.64 x 5.26 tommer |
| Varemodelnummer | SingularXYZ-E1(1+1) |
| Batterier | 3 Lithium Ion batterier påkrævet (medfølger) |
| Display Size (SC200) | 1 Inches (for E1 receiver indicators), 5.5 inches (SC200) |
| Batterilevetid | 20 timer |
| Stemmekommando | Tastatur |
| Modelnavn | E1 GNSS RECEIVER (IMU) |
| Speciel funktion | Bluetooth, NFC, Waterproof (IP68) |
| Forbindelsesteknologi | Bluetooth, Ethernet, USB, Wi-Fi |
| Korttype | På verdensplan |
| Lydudgangstilstand | Digital |
| Monteringstype | Handlebar Mount (for data collector) |
8. Garanti og support
SingularXYZ is committed to providing excellent customer service and support for your E1 RTK GNSS Survey Equipment.
8.1 Garantioplysninger
The E1 RTK GNSS Survey Equipment comes with a et års garanti fra købsdatoen.
8.2 Teknisk support
SingularXYZ offers livslang teknisk support for the E1 system. Our skilled and professional after-sales team is available to help you resolve any issues promptly and effectively. We provide complete user manuals and video tutorials to assist you in getting started and troubleshooting.

Figure 8.1: The SingularXYZ after-sales technical support team, dedicated to providing professional assistance.
For support, please visit the official SingularXYZ website or contact our customer service team through the provided channels in your product documentation.


