1. Introduktion
This manual provides comprehensive instructions for the MT-VIKI HDMI Extender (Model MT-ED01S). This device is designed to extend 1080p HDMI signals up to 50 meters (164 feet) over a single Cat6 or Cat7 Ethernet cable. It supports Full HD resolution at 60Hz, EDID learning, and Power over Cable (POC) functionality, allowing for flexible installation in various environments.
2. Produktet er slutview
The MT-VIKI HDMI Extender consists of a transmitter (TX) unit and a receiver (RX) unit. These units work in conjunction to transmit uncompressed HDMI audio and video signals over long distances using standard Ethernet cabling.

Image 1: MT-VIKI HDMI Extender Transmitter (TX) and Receiver (RX) units. The units are compact, black, and feature HDMI connectors on one end and RJ45 ports on the other, with a USB-C power port on the side.
Nøglefunktioner:
- 50m Extension: Extends 1080p@60Hz HDMI signals up to 50 meters (164 feet) using Cat6 or higher network cables.
- POC Power Supply: Supports single-sided Power over Cable, meaning only one unit (either transmitter or receiver) requires external power via a USB-C cable.
- EDID Function: Ensures optimal picture quality by automatically detecting and adjusting display settings.
- Plug and Play: Easy installation without the need for additional drivers or software.
- Bred kompatibilitet: Compatible with most HDMI devices, including TVs, projectors, Blu-ray players, and game consoles.
- ESD beskyttelse: Built-in electrostatic discharge protection for enhanced safety and stability.
3. Pakkens indhold
Kontroller venligst, at alle varer er til stede i din pakke:
- 1 x MT-VIKI HDMI Extender Transmitter (TX)
- 1 x MT-VIKI HDMI Extender Receiver (RX)
- 1 x USB-C strømkabel
- 1 x Brugermanual (dette dokument)

Image 2: Contents of the MT-VIKI HDMI Extender package, showing the transmitter, receiver, USB-C power cable, and product box.
4. Opsætning og installation
Follow these steps to set up your MT-VIKI HDMI Extender:
- Tilslut senderen (TX): Plug the HDMI input of the transmitter unit into the HDMI output port of your source device (e.g., PC, laptop, DVD player).
- Tilslut modtageren (RX): Plug the HDMI output of the receiver unit into the HDMI input port of your display device (e.g., monitor, TV, projector).
- Tilslut Ethernet-kabel: Connect a single Cat6 or Cat7 Ethernet cable between the RJ45 ports of the transmitter and receiver units. Ensure the cable is securely plugged into both units.
- Power the Extender: Connect the provided USB-C power cable to either the transmitter or the receiver unit, and then connect the USB-A end to a power source (e.g., USB port on your device, USB wall adapter). The blue LED indicator on the powered unit will light up.
- Bekræft forbindelsen: Once all connections are made and power is supplied, the blue LED indicator on both the transmitter and receiver should light up, indicating a successful connection. Your display should now show the signal from the source device.
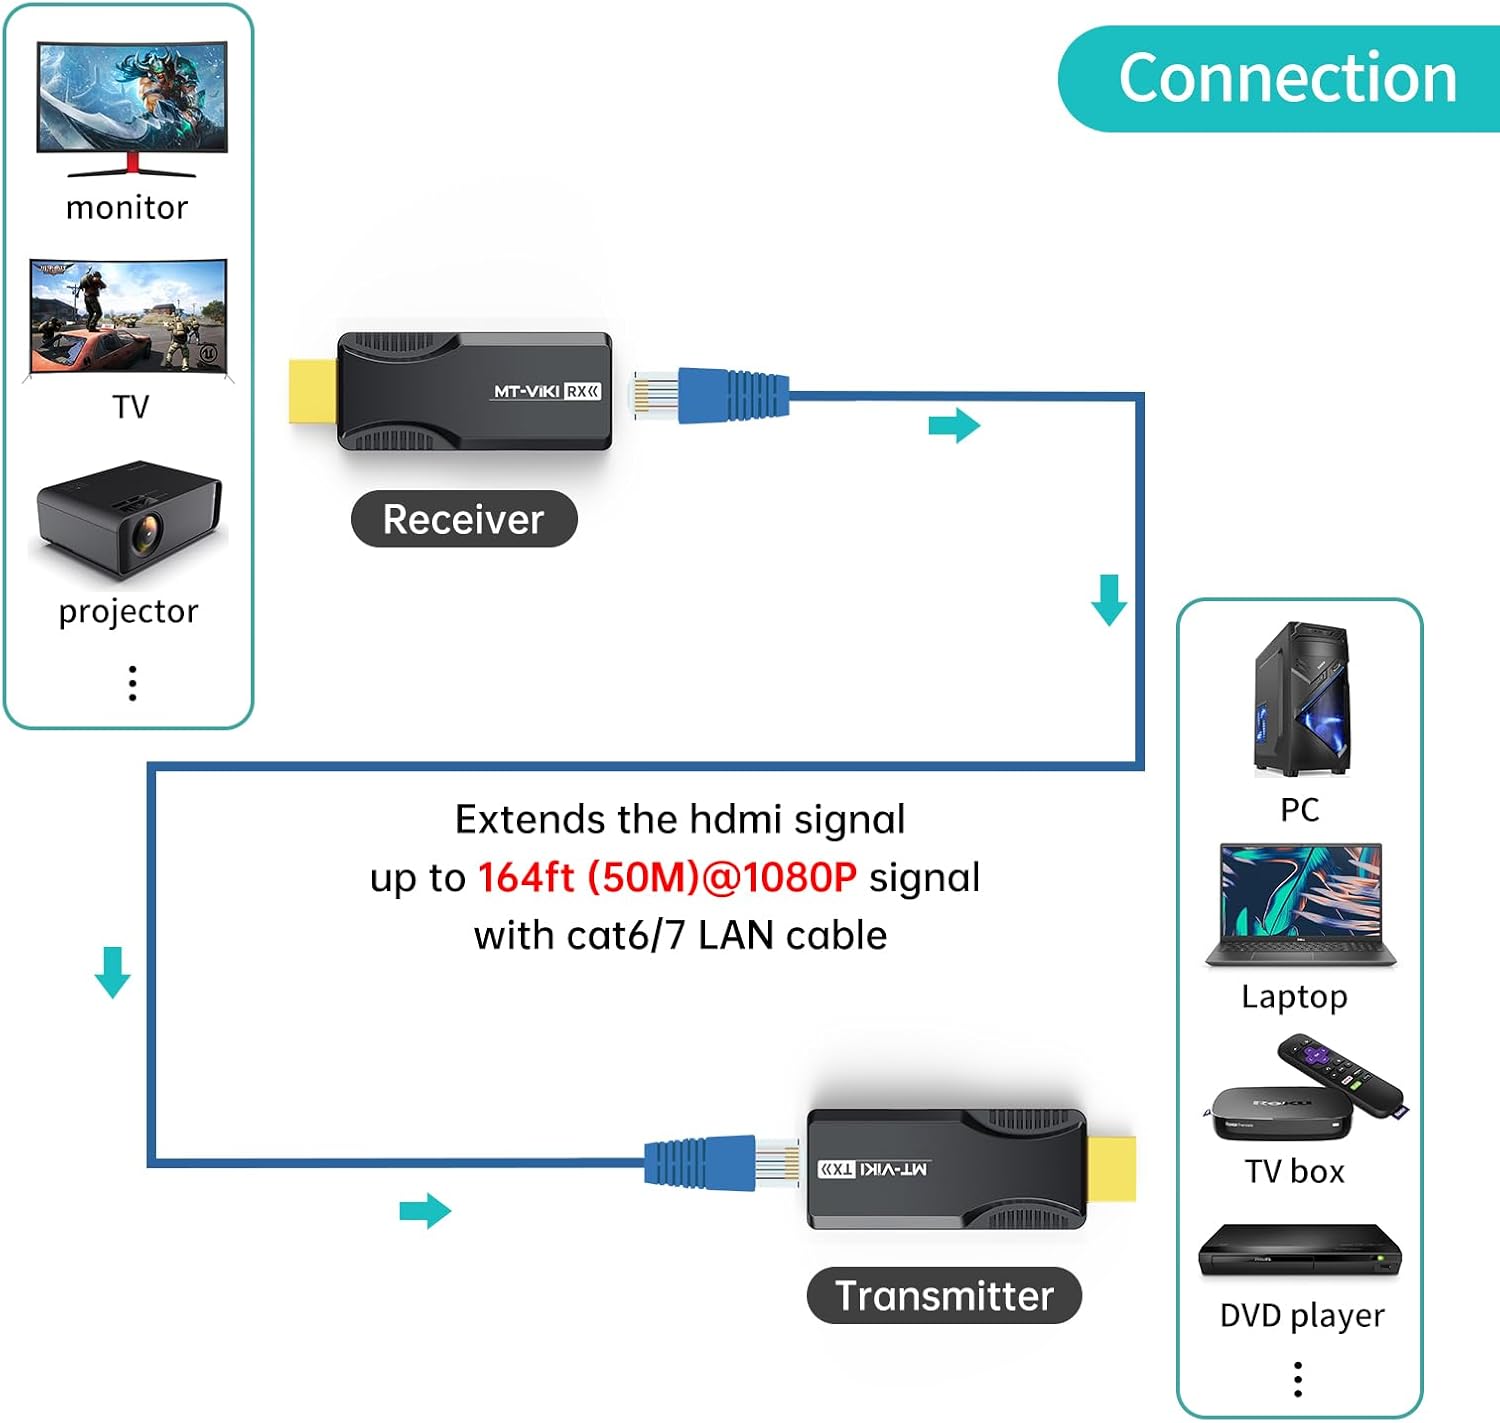
Image 3: Diagram illustrating the connection setup for the HDMI Extender. A source device (PC, laptop) connects to the Transmitter (TX), which is linked to the Receiver (RX) via a Cat6/7 cable. The Receiver then connects to a display device (monitor, TV, projector).

Image 4: Illustration of the Power over Cable (POC) feature. The transmitter (TX) is powered via a USB-C cable connected to a wall adapter, and the receiver (RX) does not require separate power.
Installationsvideo:
Video 1: A step-by-step guide on how to connect and use the MT-VIKI HDMI Extender over CAT6 cable, demonstrating the setup process and showing the extender in action.
5. Betjeningsvejledning
Once properly connected, the MT-VIKI HDMI Extender operates automatically. The extender supports both Extender-tilstand (extending a single display) and Duplikeringstilstand (mirroring the source display). No additional configuration is typically required for basic operation.

Image 5: Depicts a laptop connected to the HDMI Extender transmitter, with the receiver connected to a large display, showcasing 1080p@60Hz HD resolution and long-distance transmission capabilities.
Indikatorlys Beskrivelse:
The units feature indicator lights to show their status:

Billede 6: Nærbillede view of the transmitter and receiver units, highlighting the HDMI input/output, RJ45 ports, DC 5V USB-C power port, and the function key (reset/EDID) on the transmitter.
| Status | TX-indikator | RX indikator |
|---|---|---|
| TX powered, RX not | Blåt lys tændt | Slukket |
| RX powered, TX not | Slukket | Blåt lys tændt |
| Forbindelsen lykkedes | Blåt lys tændt | Blåt lys tændt |
| Læs EDID | Blåt lys blinker hurtigt | N/A |
| Recover EDID | Blåt lys blinker langsomt | N/A |
6. EDID Function
The EDID (Extended Display Identification Data) function allows the extender to learn and store the optimal display settings from your monitor, projector, or TV. This helps resolve compatibility issues with non-standard HDMI interfaces or displays.
Steps to Learn EDID:
- Connect the transmitter (TX) to the monitor or display you wish to learn EDID from, and ensure both are powered on.
- Press and hold the function button on the transmitter for more than 3 seconds. The blue light will flash and then stop, indicating that the new EDID has been learned and stored by the transmitter.
Steps to Restore Default EDID:
- First, power on the transmitter without any HDMI input connected.
- Press and hold the function button on the transmitter for more than 3 seconds. The blue indicator light will flash slowly.
- Release the button once the indicator light stops flashing, then unplug the power cord. The default EDID (3DTV) will be restored.
7. POC Power Supply
The MT-VIKI HDMI Extender supports Power over Cable (POC), which simplifies installation by requiring only one power adapter for either the transmitter or the receiver unit. Power is transmitted through the Ethernet cable to the other unit.
- If the transmitter (TX) is connected to the power supply, the receiver (RX) does not need to be connected to a power supply.
- If the receiver (RX) is connected to the power supply, the transmitter (TX) does not need to be connected to a power supply.
Use the provided USB-C power cable for optimal performance.
8. Specifikationer
| Feature | Detalje |
|---|---|
| Modelnummer | MT-ED01S |
| Forlængelse afstand | Op til 50 meter (164 fod) |
| Understøttet opløsning | 1920x1080@60Hz (1080p Full HD) |
| Kabeltype | Cat6 or Cat7 Ethernet cable (recommended) |
| Strømforsyning | POC (Power over Cable), single-sided via USB-C |
| EDID support | Yes, EDID learning function |
| ESD beskyttelse | Indbygget |
| Kompatible enheder | Laptops, Monitors, PCs, Televisions, Projectors, Blu-ray players, Game Consoles |
| Connector Type | HDMI, RJ45, USB-C (for power) |
| Farve | Sort |
| Varens vægt | 2.39 ounce |
| Pakkedimensioner | 4.25 x 4.09 x 1.06 tommer |
9. Fejlfinding
- Intet signal på displayet:
- Sørg for, at alle HDMI- og Ethernet-kabler er korrekt tilsluttet.
- Verify that the power cable is connected to either the TX or RX unit and that the blue LED indicator is lit.
- Try connecting the source directly to the display to confirm the source and display are working correctly.
- Ensure you are using a Cat6 or Cat7 Ethernet cable. Lower category cables may not support the required bandwidth over distance.
- Perform an EDID learning procedure (see Section 6) to ensure compatibility with your display.
- Flimrende eller intermitterende signal:
- Check the length and quality of your Ethernet cable. Excessive length or poor quality cable can cause signal degradation.
- Sørg for, at der ikke er stærke elektromagnetiske interferenskilder i nærheden af Ethernet-kablet.
- Verify that the power supply is stable.
- Screen Restoration (Reset Function):
- If the screen becomes unresponsive or displays incorrectly, press the function button on either the transmitter or receiver unit. The screen should restore after a brief black screen.
10. Garanti og support
For warranty information, technical support, or service inquiries, please refer to the product packaging or contact MT-VIKI customer service directly. Keep your purchase receipt for warranty claims.


