1. Introduktion
This manual provides essential information for the safe and effective operation of your VICTOR 8145C Digital Bench Multimeter. The VICTOR 8145C is a high-precision, 4½-digit (22000 count) bench-type multimeter featuring True RMS measurement, auto-ranging capabilities, and a large LCD display with backlight. It is designed for accurate electrical measurements in both laboratory and mobile service environments, offering a wide range of functions including DC/AC voltage and current, resistance, capacitance, frequency, and temperature.
Please read this manual thoroughly before using the device to ensure proper handling, optimal performance, and safety.
2. Sikkerhedsoplysninger
WARNING: To avoid electric shock or personal injury, please read and understand all safety information before using this multimeter.
- Always ensure the multimeter is in good working condition and free from damage before use.
- Anvend ikke voltage or current that exceeds the maximum specified limits for the selected range. The device is rated CAT III 600V.
- Use only the test leads provided or approved replacements. Ensure test leads are fully seated into the input jacks.
- Never use the multimeter if the test leads are damaged or if the meter itself appears damaged.
- Vær forsigtig, når du arbejder med vol.tagover 30V AC RMS, 42V peak eller 60V DC. Disse voluminertages udgør en stødfare.
- Afbryd strømmen til kredsløbet og aflade alle højspændingsledninger.tage-kondensatorer før du udfører modstands-, kontinuitets-, diode- eller kapacitansmålinger.
- Brug ikke multimeteret i eksplosive gas-, damp- eller støvede omgivelser.
- Vælg altid den korrekte funktion og det korrekte område, før du foretager en måling.
- Hold fingrene bag fingerbeskytterne på testproberne under målingerne.
3. Pakkens indhold
Carefully unpack the VICTOR 8145C Digital Bench Multimeter and check for the following items:
- VICTOR 8145C digitalt bordmultimeter
- Testledninger (røde og sorte)
- Strømledning
- USB kommunikationskabel
- PC Software CD
- Brugermanual
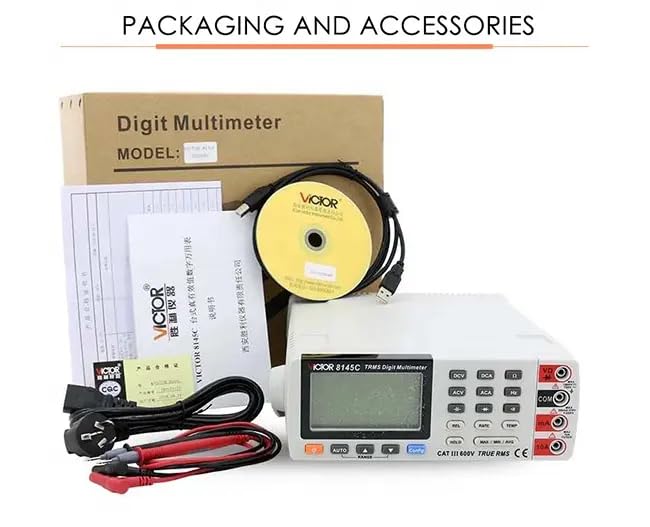
Figure 3.1: The image displays the product packaging and the accessories that come with the VICTOR 8145C, including the multimeter, test leads, power cord, USB cable, software CD, and user manual.
4. Produktet er slutview
4.1 Frontpanel
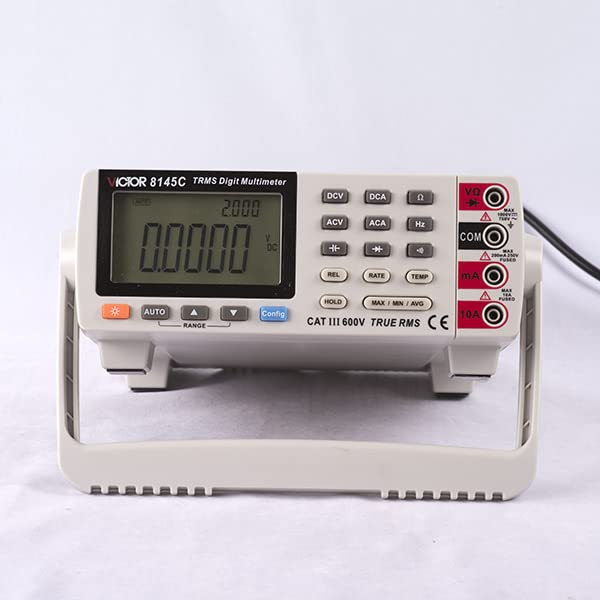
Figure 4.1: This image shows the front panel of the VICTOR 8145C Digital Bench Multimeter, highlighting its large LCD screen, function buttons, and input terminals.
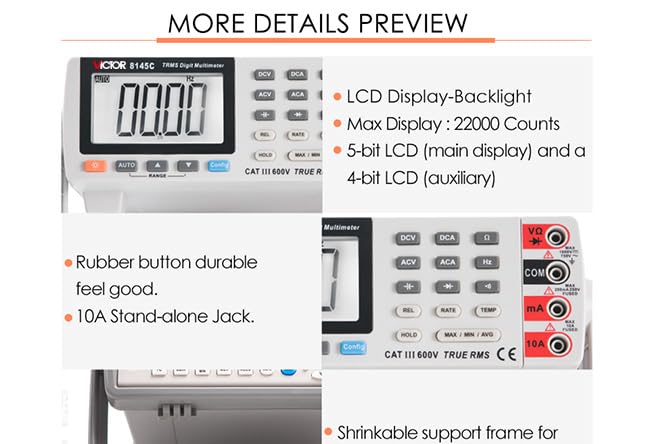
Figur 4.2: Et nærbillede view highlighting the multimeter's LCD display with backlight, 22000 count capability, durable rubber buttons, and the 10A stand-alone input jack.
- LCD-skærm: Large, backlit display with a maximum count of 22000. Features a 5-bit main display for primary readings and a 4-bit auxiliary display for secondary information.
- Funktionsknapper: Dedicated buttons for selecting measurement types (DCV, DCA, ACV, ACA, Hz, TEMP) and special functions (REL, RATE, HOLD, MAX/MIN/AVG, Config).
- AUTO/RANGE Buttons: For automatic or manual range selection.
- Indgangsstik:
- VΩ: Input til bdtage. modstands-, kapacitans-, frekvens-, diode- og kontinuitetsmålinger.
- COM: Fælles (jord) indgang for alle målinger.
- mA: Input for milliamperestrømsmålinger.
- 10A: Input for high current (up to 10A) measurements.
4.2 Bagpanel
The rear panel typically includes the main power switch, AC power input, and a USB port for PC connectivity.
4.3 Nøglefunktioner
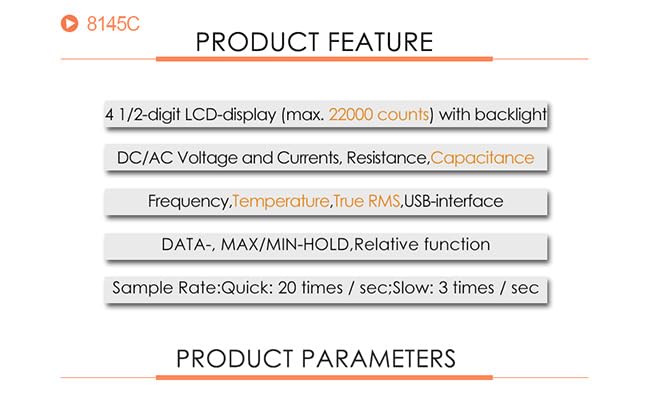
Figure 4.3: This graphic summarizes the main features of the VICTOR 8145C, including its 4 1/2-digit LCD, measurement capabilities (DC/AC Voltage, Current, Resistance, Capacitance, Frequency, Temperature, True RMS), USB interface, and data functions.
- 4½-digit LCD display (max. 22000 counts) with backlight.
- Mål DC/AC Voltage and Currents, Resistance, Capacitance, Frequency, and Temperature.
- True RMS measurement for accurate readings of non-sinusoidal waveforms.
- USB interface for PC connectivity and data logging.
- DATA HOLD, MAX/MIN/AVG, and Relative function.
- Sample Rate: Quick (20 times/sec) and Slow (3 times/sec).
5. Specifikationer

Figure 5.1: A detailed table outlining the technical specifications of the VICTOR 8145C Digital Bench Multimeter, including measurement ranges, basic accuracy, display words, and special functions.
| Feature | Beskrivelse |
|---|---|
| Vise | 22000 Counts, 4½-digit LCD with backlight |
| DC bindtagRækkevidde | 200mV / 2V / 20V / 200V / 1000V |
| DC bindtage Grundlæggende nøjagtighed | ± (0.05% + 4dgt) |
| AC VoltagRækkevidde | 200mV / 2V / 20V / 200V / 750V |
| AC Voltage Grundlæggende nøjagtighed | ± (0.5% + 40dgt) |
| DC strømområde | 0.2mA / 2mA / 20mA / 200mA / 10A |
| Grundlæggende nøjagtighed for DC-strøm | ± (0.2% + 10dgt) |
| AC nuværende rækkevidde | 0.2mA / 2mA / 20mA / 200mA / 10A |
| AC-strøm Grundlæggende nøjagtighed | ± (0.8% + 30dgt) |
| Modstandsområde | 200Ω / 2kΩ / 20kΩ / 200kΩ / 2MΩ / 20MΩ / 60MΩ |
| Grundlæggende nøjagtighed i modstand | ± (0.2% + 5dgt) |
| kapacitans Range | 10nF / 100nF / 1000nF / 10uF / 100uF / 1000uF |
| Kapacitans Grundlæggende nøjagtighed | ± (5% + 5dgt) |
| Frekvensområde | 10Hz ~ 10MHz |
| Frekvens Grundlæggende Nøjagtighed | ± (0.02% + 4dgt) |
| Termoelement rækkevidde | K indexing: -200.0°C ~ 1372.0°C |
| Termoelementets grundlæggende nøjagtighed | ±(0.5%+5°C) |
| Målehastighed | Hurtig: 20 gange/sekund; Langsom: 2.5 gange/sekund |
| Automatic / Manual Range | Ja |
| Ægte RMS | Ja |
| Båndbredde | 1kHz |
| Diodetest | Ja |
| Kontinuitet Beeper | Ja |
| MAKS/MIN/GNS | Ja |
| Relativ værdimåling | Ja |
| Datahold | Ja |
| Referenceforbindelseskompensation | Ja |
| °C / °F Conversion | Ja |
| Strømkilde | AC Power (1 LR41 battery included for internal functions) |
| Produktmål (L x B x H) | 20 x 15 x 18 cm (7.87 x 5.91 x 7.09 tommer) |
| Varens vægt | 1 kg (2.2 lbs) |
| Fabrikant | Xi'an Beicheng Electronics Co.Ltd (VICTOR and Ruoshui) |
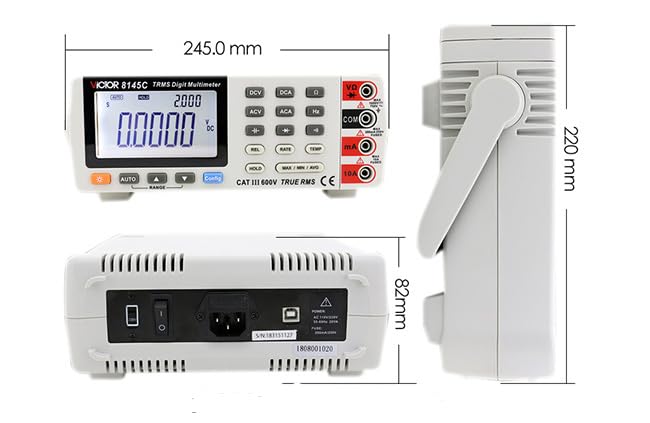
Figure 5.2: This diagram illustrates the physical dimensions of the VICTOR 8145C Digital Bench Multimeter, showing its length, width, and height in millimeters.
6. Opsætning
6.1 Strømtilslutning
- Ensure the multimeter's power switch (located on the rear panel) is in the OFF position.
- Connect the provided power cord to the AC power input on the rear panel of the multimeter.
- Sæt den anden ende af netledningen i en passende stikkontakt.
- Flip the power switch to the ON position to power on the device.
6.2 Tilslutning af testledning
Always connect the test leads to the appropriate input jacks based on the measurement you intend to perform.
- For de fleste målinger (volumentage, resistance, capacitance, frequency, diode, continuity): Insert the red test lead into the VΩ stikket og den sorte testledning ind i KOM stik.
- For milliampere current measurements: Insert the red test lead into the mA stikket og den sorte testledning ind i KOM stik.
- For high current (up to 10A) measurements: Insert the red test lead into the 10A stikket og den sorte testledning ind i KOM stik.
6.3 USB-forbindelse (valgfrit)
To connect the multimeter to a computer for data logging or control:
- Install the provided PC software from the CD onto your computer.
- Connect one end of the USB communication cable to the USB port on the rear panel of the multimeter.
- Tilslut den anden ende af USB-kablet til en ledig USB-port på din computer.
- Follow the instructions in the PC software manual for establishing communication and using data logging features.
7. Betjeningsvejledning
7.1 Grundlæggende måletrin
- Ensure the multimeter is powered on and test leads are correctly connected for the desired measurement type.
- Select the appropriate function by pressing the corresponding button (e.g., DCV for DC Voltagog).
- The multimeter will typically operate in auto-ranging mode. If manual ranging is desired, press the RANGE button to cycle through available ranges.
- Tilslut testproberne til det kredsløb eller den komponent, der testes.
- Aflæs måleværdien på LCD-displayet.
- Disconnect the test probes from the circuit after measurement.
7.2 Specifikke målefunktioner
- DC/AC Voltage (DCV/ACV): Tryk på DCV or ACV button. Connect probes in parallel with the circuit.
- DC/AC Current (DCA/ACA): Tryk på DCA or ACA button. Connect probes in series with the circuit. Ensure correct jack (mA or 10A) is used.
- Modstand (Ω): Tryk på Ω button. Disconnect power from the circuit. Connect probes across the component.
- Kapacitans (F): Tryk på F button. Disconnect power and discharge the capacitor before connecting probes.
- Frekvens (Hz): Tryk på Hz button. Connect probes to the signal source.
- Temperatur (TEMP): Tryk på TEMP button. Connect a K-type thermocouple (not included) to the appropriate input terminals.
- Diode test: Tryk på Diode button. Connect probes across the diode. Forward bias will show a voltage drop, reverse bias will show OL.
- Kontinuitetstest: Tryk på Kontinuitet button. Connect probes across the circuit. A beep indicates continuity (low resistance).
7.3 Specialfunktioner
- HOLDE: Tryk på HOLDE knappen for at fryse den aktuelle aflæsning på displayet. Tryk igen for at slippe.
- MAKS/MIN/GENNEMSNIT: Tryk på MAKS/MIN/GNS button to record the maximum, minimum, and average values over a period. Press repeatedly to cycle through MAX, MIN, AVG, and exit.
- REL (relativ måling): Tryk på REL button to store the current reading as a reference value. Subsequent measurements will be displayed as the difference from this reference. Press again to exit.
- Konfiguration: Used for advanced settings and configurations, refer to the detailed software manual for specific options.
8. Vedligeholdelse
8.1 Rengøring
For at rengøre multimeteret skal du tørre huset af med enamp cloth and a mild detergent. Do not use abrasives or solvents. Ensure the device is powered off and disconnected from all power sources before cleaning.
8.2 Battery Replacement (Internal)
The multimeter includes an LR41 battery, typically for internal memory or clock functions. If the display shows signs of memory loss or incorrect time (if applicable), this battery may need replacement. This procedure should ideally be performed by qualified personnel to avoid damaging internal components.
8.3 Udskiftning af sikringer
If the current measurement function fails, the internal fuse may need replacement. Refer to the detailed service manual or contact customer support for fuse specifications and replacement procedures. Always replace with a fuse of the identical type and rating.
8.4 Opbevaring
When not in use for extended periods, store the multimeter in a dry, dust-free environment, away from direct sunlight and extreme temperatures. Disconnect all test leads and the power cord.
9. Fejlfinding
| Problem | Mulig årsag | Løsning |
|---|---|---|
| Ingen skærm, når den er tændt | No AC power; Power cord loose; Power switch off | Check AC power connection; Ensure power switch is ON. |
| Forkerte aflæsninger | Wrong function/range selected; Poor test lead connection; Damaged test leads | Select correct function/range; Reconnect test leads firmly; Inspect/replace test leads. |
| Strømmåling virker ikke | Blown fuse; Incorrect jack used | Check/replace fuse (refer to service manual); Ensure red lead is in mA or 10A jack. |
| Continuity beeper not working | Circuit resistance too high; Beeper function not selected | Ensure circuit resistance is low; Select continuity function. |
| USB-kommunikationsfejl | Driver not installed; Loose USB cable; Software issue | Install USB drivers from CD; Reconnect USB cable; Consult software manual. |
10. Garanti og support
For warranty information, please refer to the documentation provided at the time of purchase or contact your retailer. The manufacturer of this product is Xi'an Beicheng Electronics Co.Ltd (VICTOR and Ruoshui).
If you encounter any issues not covered in this manual or require technical assistance, please contact the seller or authorized service center for support.


