1. Introduktion
This manual provides detailed instructions for the installation, operation, and maintenance of your TESmart USB 3.0 HDMI+DP+USB C KVM Switch (Model HDC403-P23). This device allows you to control up to four computers (three desktops and one USB-C laptop) from a single set of keyboard, mouse, and three monitors, supporting 4K@60Hz resolution. It integrates KVM functionality with a USB 3.0 docking station, offering enhanced connectivity and display management.
2. Sikkerhedsoplysninger
Please read and understand the following safety precautions before operating the device:
- Ensure the power adapter is correctly connected and matches the specified voltage.
- Udsæt ikke enheden for vand, fugt eller ekstreme temperaturer.
- Undgå at placere tunge genstande på enheden.
- Forsøg ikke at åbne eller reparere enheden selv. Overlad al service til kvalificeret personale.
- Brug kun den medfølgende strømadapter og kabler for at forhindre skader.
- Disconnect power before cleaning the device. Use a soft, dry cloth.
3. Pakkens indhold
Bekræft at alle varer er til stede i pakken:

Image: A diagram illustrating the contents of the product package, including the KVM switch, various cables, power adapter, and accessories.
- 1x TESmart 4x3 KVM Switch (Model HDC403-P23)
- 1x DC 20V strømadapter
- 2x KVM Cables (USB-B to USB-A, HDMI, DP)
- 4 x HDMI kabler
- 1 x DisplayPort-kabel
- 1x USB-C-kabel
- 1x Brugermanual (dette dokument)
- 1x IR-fjernbetjening
- 1x USB 3.0 Type-A to Type-B Cable
- 2x Rack-Ears
4. Produktet er slutview og specifikationer
4.1. Nøglefunktioner
- 4-Port Triple Monitor KVM Switch: Manages up to four computers (3 desktops + 1 USB-C laptop) with three monitors.
- Integrated USB 3.0 Docking Station: Features 4x USB 3.0 ports (two with power delivery), 2x USB 2.0 ports, 1x LAN port, 1x 3.5mm headphone jack, and 3 HDMI outputs.
- Ultra HD 4K Visuals: Supports resolutions up to 3840x2160 (4K) @60Hz, 3440x1440@100Hz, and 2560x1440@144Hz. Compatible with 3D, HDR, HDCP, and Dolby Vision, delivering clear and authentic video.
- EDID Emulators: Ensures consistent display settings across all connected computers, preventing resolution changes or window rearrangement during switching.
- MST Mode Support: For Windows laptops, a single USB-C cable can transmit audio, video, and USB data.
- Wired Network Sharing: Allows all four connected PCs to share a single wired network connection via the built-in USB Ethernet adapter.
- Multiple Switching Modes: Switch between computers using keyboard hotkeys, IR remote control, or front panel buttons.
- K&M Pass-through Mode: Ensures compatibility with various keyboard and mouse types, including wired, wireless, mechanical, and gaming peripherals.
4.2. Tekniske specifikationer
| Feature | Specifikation |
|---|---|
| Modelnummer | HDC403-P23 |
| Produktdimensioner | 16.5 x 8.7 x 4.7 tommer |
| Vægt | 6.94 pund |
| Videoindgange | HDMI, DisplayPort, USB-C |
| Videoudgange | 3 x HDMI |
| Max opløsning | 4K@60Hz (3840x2160), 3440x1440@100Hz, 2560x1440@144Hz |
| USB-porte | 4x USB 3.0 (2 with power delivery), 2x USB 2.0 |
| Netværksport | 1x LAN (RJ45) |
| Audio Port | 1x 3.5 mm hovedtelefonstik |
| Operation Voltage | 20V DC |
| Nuværende vurdering | 5 Amps |
| Driftstilstand | TÆND SLUK |
5. Opsætning og tilslutning
5.1. Tilslutningsdiagram
Refer to the diagram below for a visual guide on connecting your computers and monitors to the KVM switch.
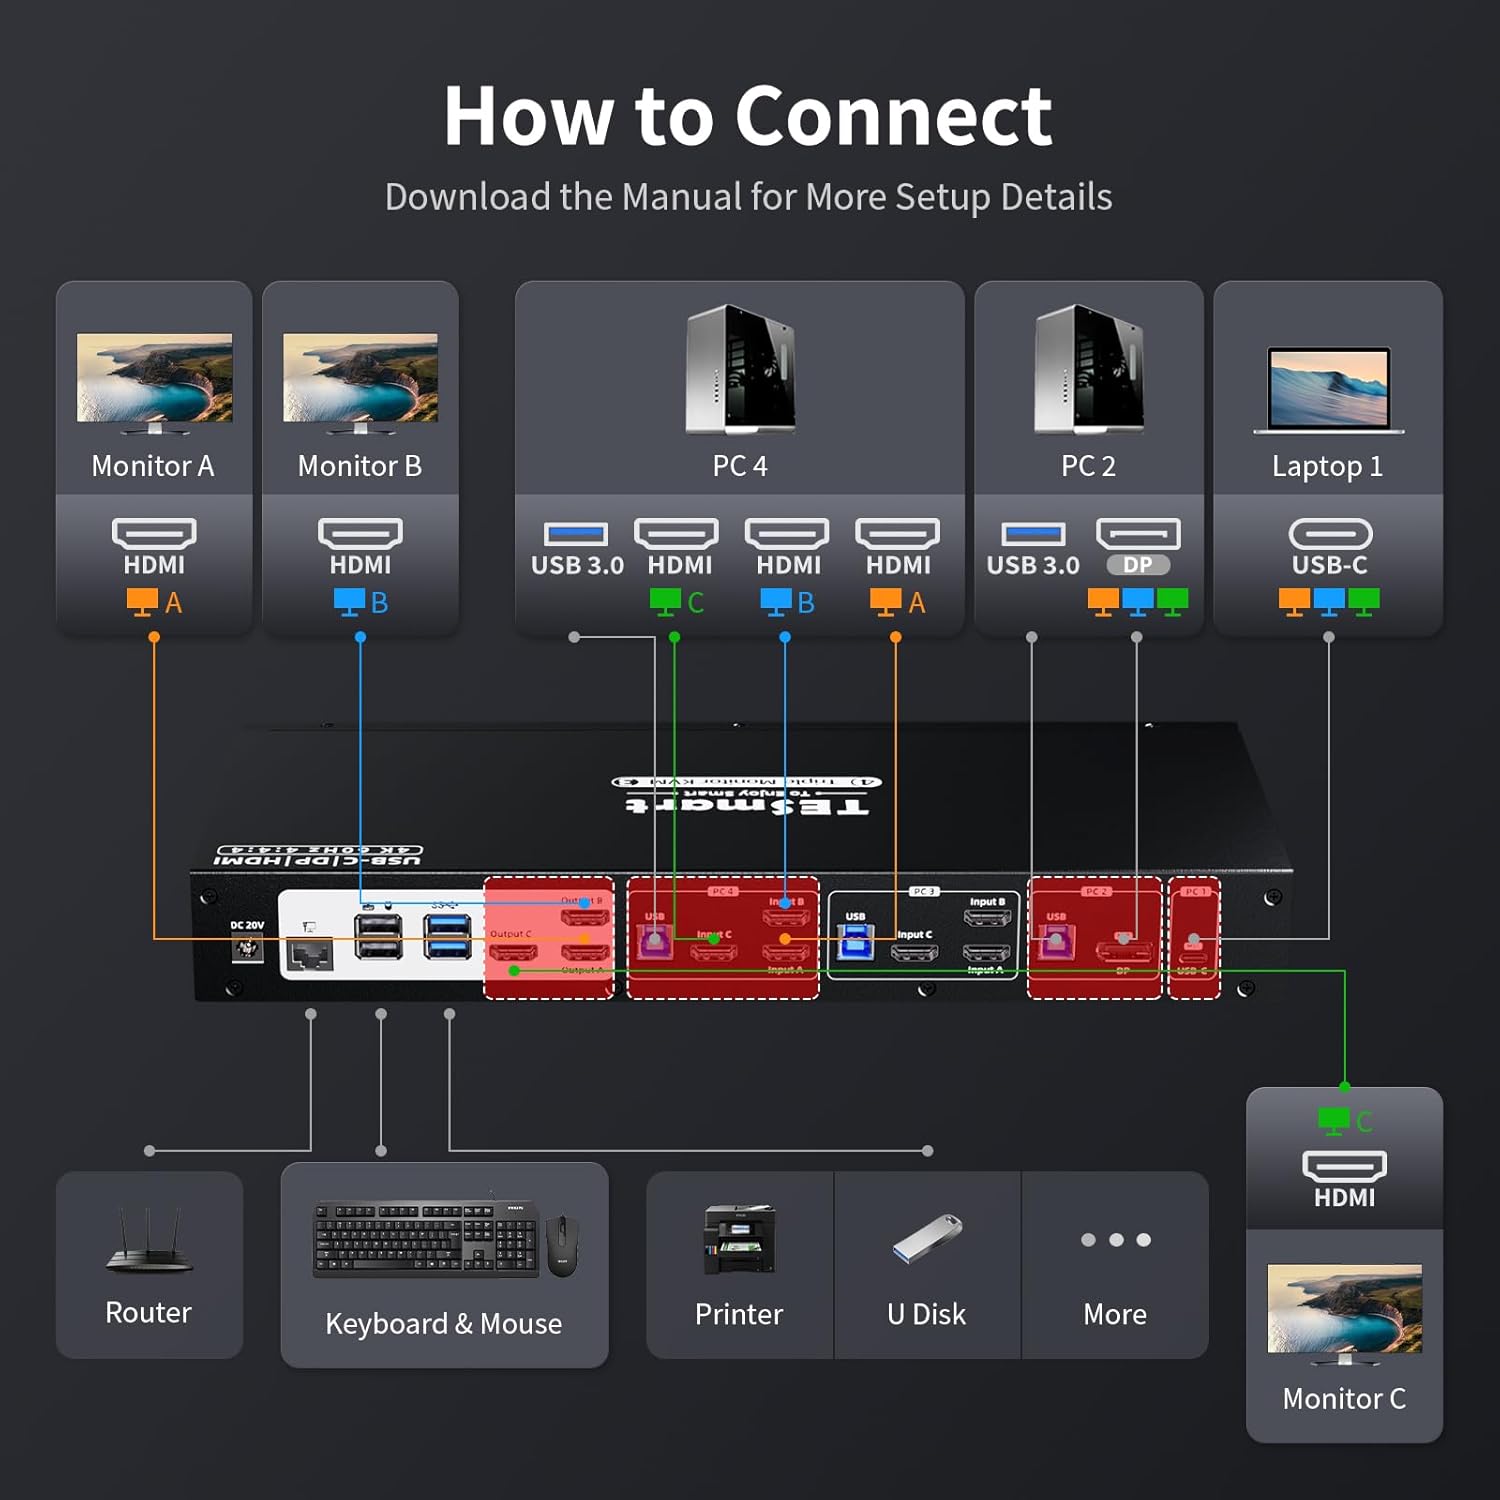
Image: A detailed diagram illustrating how to connect monitors (A, B, C) and various PCs (PC4, PC2, Laptop1) to the KVM switch, along with peripherals like keyboard, mouse, printer, and router.
5.2. Step-by-Step Connection
- Sluk for enheder: Sørg for, at alle computere og skærme er slukket, før du foretager nogen tilslutninger.
- Tilslut skærme: Connect your three monitors to the KVM switch's HDMI Output A, B, and C ports using the provided HDMI cables.
- Tilslut computere:
- For each desktop PC, connect the video outputs (HDMI, DisplayPort) and a USB 3.0 cable from the PC to the corresponding Input A, B, C, and USB ports on the KVM switch.
- For a USB-C laptop, connect a USB-C cable from the laptop to the USB-C input on the KVM switch. This single cable can handle video, audio, and USB data for Windows systems supporting MST.
- Tilslut ydre enheder:
- Connect your keyboard and mouse to the dedicated USB 2.0 ports on the KVM switch.
- Connect other USB devices (e.g., printer, USB drive) to the USB 3.0 ports.
- Connect your headset or speakers to the 3.5mm audio jack.
- Connect an Ethernet cable from your router to the LAN port on the KVM switch to enable wired network sharing for all connected PCs.
- Tænd: Connect the DC 20V power adapter to the KVM switch and then plug it into a power outlet. Power on the KVM switch, followed by your monitors and computers.
5.3. EDID Emulators
The KVM switch features built-in EDID emulators. These emulators store the display information of your monitors, ensuring that your computers always receive the correct display settings. This prevents issues like resolution changes or window rearrangement when switching between inputs.

Image: A comparison showing how display settings can change without EDID emulators, and how they remain stable with EDID emulators enabled.
5.4. MST Mode and Wired Network
The KVM switch supports Multi-Stream Transport (MST) mode, particularly beneficial for Windows notebooks. With MST, a single USB-C connection to the KVM switch can transmit audio, video, and USB data, simplifying cable management.

Image: An illustration of MST mode, demonstrating how a single USB-C connection from a laptop to the KVM can manage multiple monitors.
Additionally, the integrated USB Ethernet adapter allows all connected PCs to share a single wired network connection, eliminating the need for separate network cables for each computer.

Image: A diagram showing a router connected to the KVM switch's LAN port, providing network access to all connected PCs.
6. Betjeningsvejledning
6.1. Skift mellem computere
The KVM switch offers three methods for switching between connected computers:
- Tastatur genvejstaster: Use predefined key combinations on your connected keyboard to switch inputs. Refer to the specific hotkey commands in the full user manual for details (e.g., Right-Ctrl + Scroll Lock).
- Knapper på frontpanelet: Press the corresponding input button on the front panel of the KVM switch to select a computer.
- IR fjernbetjening: Use the included IR remote control to switch between inputs. Ensure the remote has a clear line of sight to the KVM switch's IR receiver.

Image: Visual representation of the three switching methods: keyboard hotkeys, front panel buttons, and IR remote control.
6.2. Visningstilstande
The KVM switch supports two primary display modes for managing your triple monitors:
- Shared Display Mode (Display Mode 1): All three monitors display content from the currently selected PC, extending the desktop across them or duplicating content as configured on the PC.
- Independent PC Views (Display Mode 2): Each monitor can display content from a different PC, allowing for a multi-computer, multi-monitor setup where you can view outputs from various sources simultaneously.

Image: Illustrations of Display Mode 1 (all monitors showing one PC) and Display Mode 2 (monitors showing different PCs).
6.3. USB 3.0 Docking Station Functionality
The integrated USB 3.0 docking station allows you to share various USB peripherals across all connected computers. This includes:
- Dataoverførsel: Connect USB drives, external hard drives, and other storage devices for shared access.
- Opladning: Two USB 3.0 ports offer power delivery for charging devices like smartphones.
- Periferiudstyr: Connect printers, scanners, webcams, and other USB accessories.

Image: A visual guide to the KVM's docking station capabilities, showing connections for phone, hard disk drive, printer, USB driver, headset, audio splitter, speaker, and microphone.
The K&M pass-through mode ensures broad compatibility with various keyboard and mouse types, including specialized gaming or mechanical keyboards, by directly passing through their signals.
7. Vedligeholdelse
For at sikre din KVM-switchs levetid og optimale ydeevne skal du følge disse vedligeholdelsesretningslinjer:
- Rensning: Regularly wipe the device with a soft, dry, anti-static cloth. Avoid using liquid or aerosol cleaners, as they may damage the casing eller interne komponenter.
- Ventilation: Sørg for, at KVM-switchen er placeret et godt ventileret område for at forhindre overophedning. Bloker ikke ventilationsåbninger.
- Kabelstyring: Hold kablerne organiseret og fri for knæk eller overdreven bøjning for at forhindre signalforringelse eller beskadigelse.
- Power Cycle: If the device becomes unresponsive, disconnect the power adapter, wait a few seconds, and then reconnect it.
8. Fejlfinding
Hvis du støder på problemer med din KVM-switch, kan du se følgende almindelige problemer og løsninger:
| Problem | Mulig årsag/løsning |
|---|---|
| No display on monitors after switching. |
|
| Tastatur eller mus reagerer ikke. |
|
| Display resolution or arrangement changes after switching. |
|
| USB devices (e.g., external drive, printer) not detected. |
|
| Problemer med netværksforbindelse. |
|
| MacBook Pro/Air second monitor not working. |
|
9. Garanti og support
9.1. Garantioplysninger
The TESmart KVM Switch (Model HDC403-P23) comes with a standard 1 års garanti, which can be extended by an additional 2 år upon product registration, totaling a 3-year warranty period. Please refer to the warranty card included in your package or visit the official TESmart webwebsted for detaljerede vilkår og betingelser.
9.2. Teknisk support
For any technical assistance, troubleshooting, or inquiries regarding your TESmart KVM switch, please contact TESmart customer support. 24/7 teknisk support er tilgængelig for at hjælpe dig.
Contact information can typically be found on the TESmart official webwebsted eller i produktemballagen.
10. Overholdelse af lovgivningen
This device complies with relevant regulatory standards. For specific compliance details, please refer to the product packaging or the official TESmart webwebsted.


