Mastech MS2101 AC/DC digital kølemiddelamp Brugervejledning til måler
Model: MS2101 | Brand: Mastech
1. Vigtige sikkerhedsoplysninger
Please read and understand all safety information and operating instructions before using this instrument. Improper use may result in electric shock or damage to the meter. Always adhere to local and national safety codes.
- Overskrid ikke de maksimale inputværdier, der er angivet for hver funktion.
- Ensure the test leads are properly connected and in good condition before making any measurements.
- Brug ikke måleren, hvis den ser beskadiget ud, eller hvis isoleringen på testledningerne er kompromitteret.
- Udvis ekstrem forsigtighed, når du arbejder med voltagover 30V AC RMS, 42V peak eller 60V DC. Disse voluminertages udgør en stødfare.
- Afbryd altid strømmen til kredsløbet og aflade alle højspændingsledninger.tage capacitors before measuring resistance, continuity, diodes, or capacitance.
- Udskift batterierne med det samme, når indikatoren for lavt batteri vises, for at sikre nøjagtige aflæsninger.
- This device is rated for CAT III 600V and CAT II 1000V. Adhere to these safety categories.
2. Produktet er slutview
The Mastech MS2101 is a versatile AC/DC digital clamp meter designed for accurate measurement of current, voltage, resistance, capacitance, frequency, and temperature. It features auto-ranging capabilities and a clear digital display, making it suitable for both domestic and industrial electrical testing.
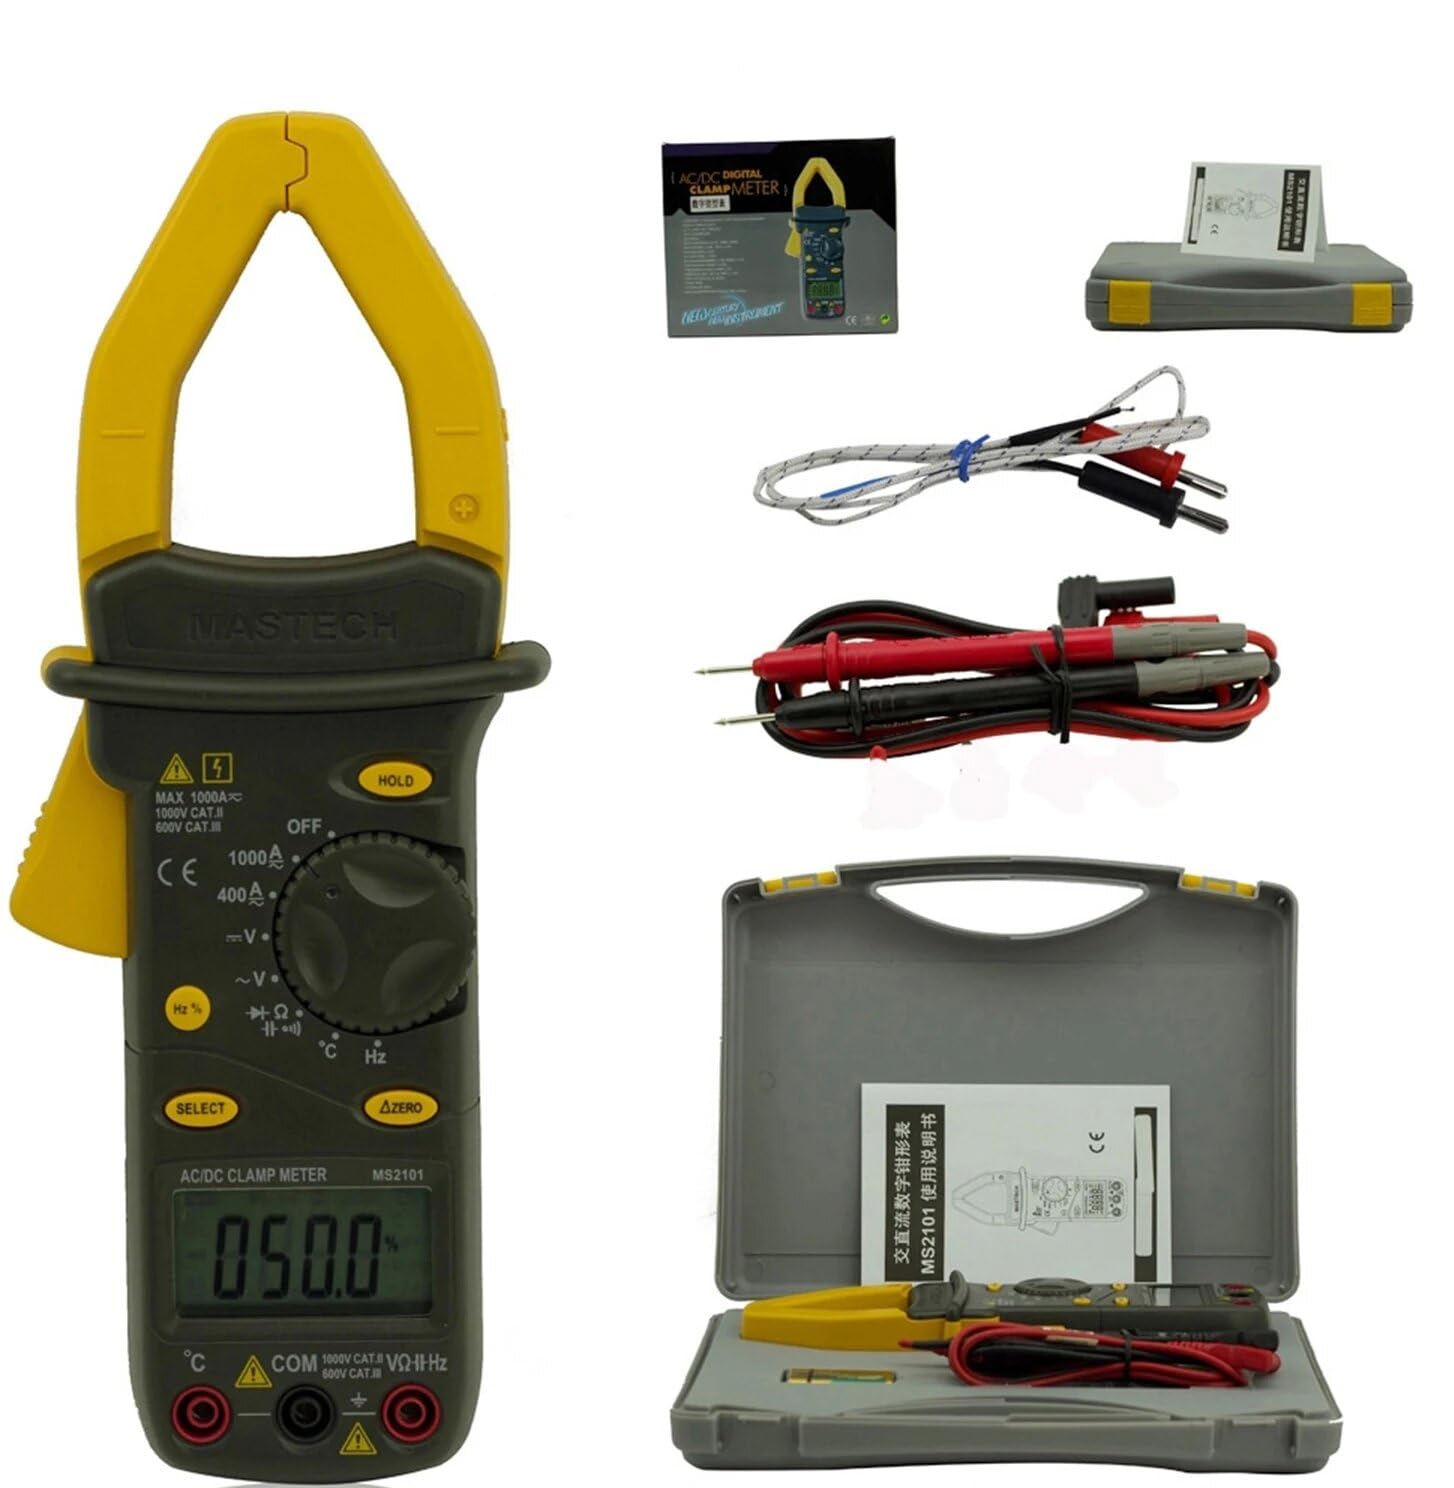
Image: Mastech MS2101 clamp meter with included test leads, temperature probe, and carrying case.
2.1 Nøglefunktioner
- Display: 4000 tæller
- Jaw Opening: Φ42mm / 1.7 inches
- Automatisk og manuel rækkevidde
- Auto Power Off funktion
- Diode Open Voltage: 2.2V
- Continuity Buzzer: Activates at <50±20Ω
- Data Hold funktion
- Low Battery Display indicator
3. Pakkens indhold
Når du åbner pakken, skal du kontrollere, at alle nedenstående varer er til stede og i god stand.

Image: Contents of the Mastech MS2101 package, including the meter, test leads, and documentation.
- Mastech MS2101 AC/DC digital kølemiddelamp Måler
- Test Leads (one pair)
- K-Type Thermocouple (for temperature measurement)
- Bæretaske
- Kalibreringscertifikat
- Hurtig startvejledning
- Batteries (2 x LR44, included)
4. Enhedslayout og kontroller
Familiarize yourself with the various parts and controls of your MS2101 clamp måler.

Billede: Forside view of the Mastech MS2101, highlighting the display, rotary switch, and function buttons.
- Nuværende Clamp Kæbe: Anvendes til berøringsfri AC/DC-strømmåling.
- Kæbeaftrækker: Squeeze to open the current clamp kæbe.
- Drejekontakt: Selects the desired measurement function (OFF, V, A, Ω, Capacitance, Hz, Diode, Continuity, Temperature).
- LCD-skærm: Viser måleaflæsninger, enheder og funktionsindikatorer.
- HOLD knap: Fryser den aktuelle aflæsning på displayet.
- SELECT -knap: Toggles between AC/DC modes or different functions within a rotary switch position (e.g., Diode/Continuity, AC/DC Voltagog).
- ΔZERO Button: Used to zero out DC current readings or relative measurements.
- COM-indgangsstik: Common (negative) input for test leads.
- VΩHz Input Jack: Positiv indgang for volumentage, resistance, frequency, capacitance, diode, and continuity measurements.
- Temperature Input Jack: Specific input for the K-type thermocouple.
5. Indledende opsætning
5.1 Batteriinstallation
The Mastech MS2101 requires two LR44 batteries for operation. These are typically included in the package.

Billede: Bagside view of the Mastech MS2101, indicating the location of the battery compartment screws.
- Sørg for, at måleren er slukket.
- Find batterirummet på bagsiden af måleren.
- Use a screwdriver to remove the screws securing the battery cover.
- Fjern forsigtigt batteridækslet.
- Insert two LR44 batteries, observing the correct polarity (+ and -) as indicated inside the compartment.
- Replace the battery cover and secure it with the screws.
6. Betjeningsvejledning
6.1 Tænd/sluk
To power on the meter, rotate the rotary switch from the 'OFF' position to any desired measurement function. To power off, rotate the switch back to 'OFF'.
6.2 Funktionsvalg
Turn the rotary switch to the desired measurement function. For functions with multiple modes (e.g., AC/DC Voltage, Diode/Continuity), press the 'SELECT' button to toggle between them.
6.3 Måling af AC/DC-strøm
- Rotate the switch to the 'A' (Current) position.
- Press 'SELECT' to choose between AC or DC current measurement.
- Tryk på kæbeaftrækkeren for at åbne clamp kæbe.
- Inkluder kun én leder af kredsløbet inden for clamp kæbe. Sørg for, at kæben er helt lukket.
- Aflæs den aktuelle værdi på LCD-displayet.
- For DC current, use the 'ΔZERO' button to zero the display before measurement if necessary.
6.4 Måling af AC/DC Voltage
- Rotate the switch to the 'V' (Voltage) stilling.
- Press 'SELECT' to choose between AC or DC voltage måling.
- Insert the red test lead into the 'VΩHz' jack and the black test lead into the 'COM' jack.
- Tilslut testproberne parallelt til det kredsløb eller den komponent, du ønsker at måle.
- Læs bindtage -værdi på LCD -displayet.
6.5 Måling af modstand
- Rotate the switch to the 'Ω' (Resistance) position.
- Insert the red test lead into the 'VΩHz' jack and the black test lead into the 'COM' jack.
- Ensure the circuit or component is de-energized before connecting the test probes across it.
- Aflæs modstandsværdien på LCD-displayet.
6.6 Måling af Kapacitans
- Rotate the switch to the 'Capacitance' position.
- Insert the red test lead into the 'VΩHz' jack and the black test lead into the 'COM' jack.
- Ensure the capacitor is fully discharged before connecting the test probes across it.
- Aflæs kapacitansværdien på LCD-displayet.
6.7 Measuring Frequency/Duty Cycle
- Rotate the switch to the 'Hz' (Frequency) position.
- Insert the red test lead into the 'VΩHz' jack and the black test lead into the 'COM' jack.
- Tilslut testproberne på tværs af signalkilden.
- Read the frequency or duty cycle value on the LCD display. Press 'SELECT' to toggle between frequency and duty cycle.
6.8 Diodetest
- Rotate the switch to the Diode/Continuity position. Press 'SELECT' until the diode symbol appears.
- Insert the red test lead into the 'VΩHz' jack and the black test lead into the 'COM' jack.
- Forbind den røde probe til anoden og den sorte probe til katoden på dioden.
- Læs videre bindtage drop on the display. Reverse the probes to check for open circuit (OL) in reverse bias.
6.9 Kontinuitetstest
- Rotate the switch to the Diode/Continuity position. Press 'SELECT' until the continuity buzzer symbol appears.
- Insert the red test lead into the 'VΩHz' jack and the black test lead into the 'COM' jack.
- Tilslut testproberne på tværs af kredsløbet eller komponenten.
- If the resistance is below approximately 50Ω, the buzzer will sound, indicating continuity.
6.10 Temperaturmåling
- Rotate the switch to the '°C/°F' (Temperature) position.
- Insert the K-type thermocouple into the dedicated temperature input jacks, observing polarity.
- Place the thermocouple tip on or near the object whose temperature you wish to measure.
- Read the temperature on the LCD display. Press 'SELECT' to toggle between Celsius and Fahrenheit.
6.11 Dataholdefunktion
Tryk på 'HOLD'-knappen for at fryse den aktuelle aflæsning på displayet. Tryk igen for at slippe hold-knappen og genoptage livemålinger.
6.12 Zeroing (ΔZERO) Function
In DC current mode, press the 'ΔZERO' button to zero the display before making a measurement. This compensates for any residual magnetic fields or offsets, ensuring more accurate DC current readings.
6.13 Automatisk slukning
The meter will automatically power off after approximately 15 minutes of inactivity to conserve battery life. To reactivate, turn the rotary switch to 'OFF' and then back to the desired function.
7. Vedligeholdelse
7.1 Rengøring
Tør målerens c afasing med annonceamp en klud og et mildt rengøringsmiddel. Brug ikke slibemidler eller opløsningsmidler. Sørg for, at måleren er helt tør før brug.
7.2 Udskiftning af batteri
When the low battery indicator appears on the display, replace the batteries as described in Section 5.1. Always use two new LR44 batteries.
7.3 Opbevaring
If the meter is not used for an extended period, remove the batteries to prevent leakage and damage. Store the meter in a cool, dry place, away from direct sunlight and extreme temperatures.
8. Fejlfinding
- Måleren tænder ikke: Kontroller batteriinstallationen, og sørg for, at batterierne ikke er afladede.
- No reading or 'OL' displayed: Ensure test leads are properly connected and making good contact. For current measurements, ensure only one conductor is within the clamp jaw. For resistance/continuity, ensure the circuit is de-energized. 'OL' (Overload) indicates the measured value is beyond the meter's range.
- Unøjagtige aflæsninger: Check battery level. Ensure the correct function is selected. For DC current, use the 'ΔZERO' function.
- Buzzer not sounding in continuity mode: The resistance may be too high (above 50Ω), or the circuit is open.
9. Tekniske specifikationer
Detailed specifications for the Mastech MS2101 clamp meter are provided below.

Image: Table detailing the measurement ranges, resolutions, and accuracies of the Mastech MS2101.
| Måling | Rækkevidde | Opløsning | Nøjagtighed |
|---|---|---|---|
| DC bindtage | 400mV/4V/40V/400V 1000V | 0.1mV/1mV/10mV/0.1V 1V | ±(0.7 %+1) ±(0.8 %+3) |
| AC Voltage | 4V/40V/400V 750V | 1mV/10mV/0.1V 1V | ±(0.8 %+5) ±(1.0 %+10) |
| DC-strøm | 400A/1000A | 0.1A/1A | ±(3.0 %+3) |
| AC strøm | 400A/1000A | 0.1A/1A | ±(3.0 %+3) |
| Modstand | 400Ω/4kΩ/40kΩ/400kΩ/4MΩ 40MΩ | 0.1Ω/1Ω/10Ω/100Ω/1kΩ 10kΩ | ±(1.2 %+1) ±(2.0 %+3) |
| Kapacitans | 4nF/40nF/400nF 4µF/40µF/100µF | 1pF/10pF/0.1nF 1nF/10nF/100nF | ±(4.0 %+10) ±(4.0 %+10) |
| Frekvens | 40Hz/400Hz/4kHz/40kHz/100kHz | 0.01Hz/0.1Hz/1Hz/10Hz/0.1kHz | ±(2.0 %+1) |
| Duty Cycle | 0.1 % ~ 99.9 % | 0.10 % | ±(2.0 %+2) |
| Temperatur | -40°C ~ 0°C 1°C ~ 400°C 401°C ~ 750°C | 1°C 1°C 1°C | ±(1.0 %+6) ±(1.0 %+3) ±(1.0 %+5) |
| Vise | 4000 tæller | ||
| Kæbeåbning | 42 mm / 1.7 tommer | ||
| Kontinuitet Buzzer | <50±20Ω | ||
| Diode Open Voltage | 2.2V | ||
| Strømkilde | 2 x LR44 batteries | ||
| Dimensioner (L x B x H) | 7.87 x 5.91 x 9.84 tommer | ||
| Vægt | 1 kilogram (2.2 pund) | ||
10. Garanti og support
The Mastech MS2101 Digital Clamp Meter comes with a 1-year warranty from the date of purchase, covering manufacturing defects. Please retain your proof of purchase for warranty claims.
For technical support, product information, or warranty inquiries, please visit the official Mastech webhjemmeside eller kontakt deres kundeservice:
- Official Mastech Webwebsted: www.mastech-group.com
- Supportside: http://www.mastech-group.com/support.php?n=0


