1. Introduktion
This manual provides detailed instructions for the installation, operation, and maintenance of the StarTech.com FD121-KVM-EXTENDER DisplayPort KVM Extender Over Fiber Optic. This device allows you to extend a 4K 60Hz DisplayPort video signal and USB KVM control over a fiber optic cable, enabling remote access to a KVM switch, console, or PC from distances up to 984 feet (300 meters) using multi-mode fiber.
2. Produktet er slutview
2.1 Pakkens indhold
- 1x KVM Extender Transmitter Unit
- 1x KVM Extender Receiver Unit
- 2x SFP+ Modules (pre-installed)
- 2x USB-A to Micro-B Cables
- 2x Universal Power Adapters (NA/EU/UK/AU)
- 1x Brugsanvisning (dette dokument)

Image: All components included with the StarTech.com FD121-KVM-EXTENDER KVM Extender kit.
2.2 Funktioner
- Extends 4K 60Hz DisplayPort video and USB KVM control up to 984ft (300m) over multi-mode fiber optic cable.
- Supports UHD resolutions up to 3840x2160 at 60Hz (4:4:4).
- DP 1.2 compliant with EDID pass-through for optimal display compatibility.
- Three USB HID ports on the receiver for connecting peripherals (mouse, keyboard, etc.).
- Point-to-point fiber connection requires no drivers or software.
- Compatible with all major operating systems (Windows, macOS, Linux).
- Durable steel chassis designed to reduce electromagnetic interference (EMI).
- SFP+ slots support MSA-compliant modules for both multi-mode and single-mode fiber (single-mode modules sold separately).
2.3 Komponentidentifikation

Billede: Bagside view of the KVM Extender Transmitter (left) and Receiver (right) units, highlighting the Power, Link, Monitor, and Host (HID) ports.
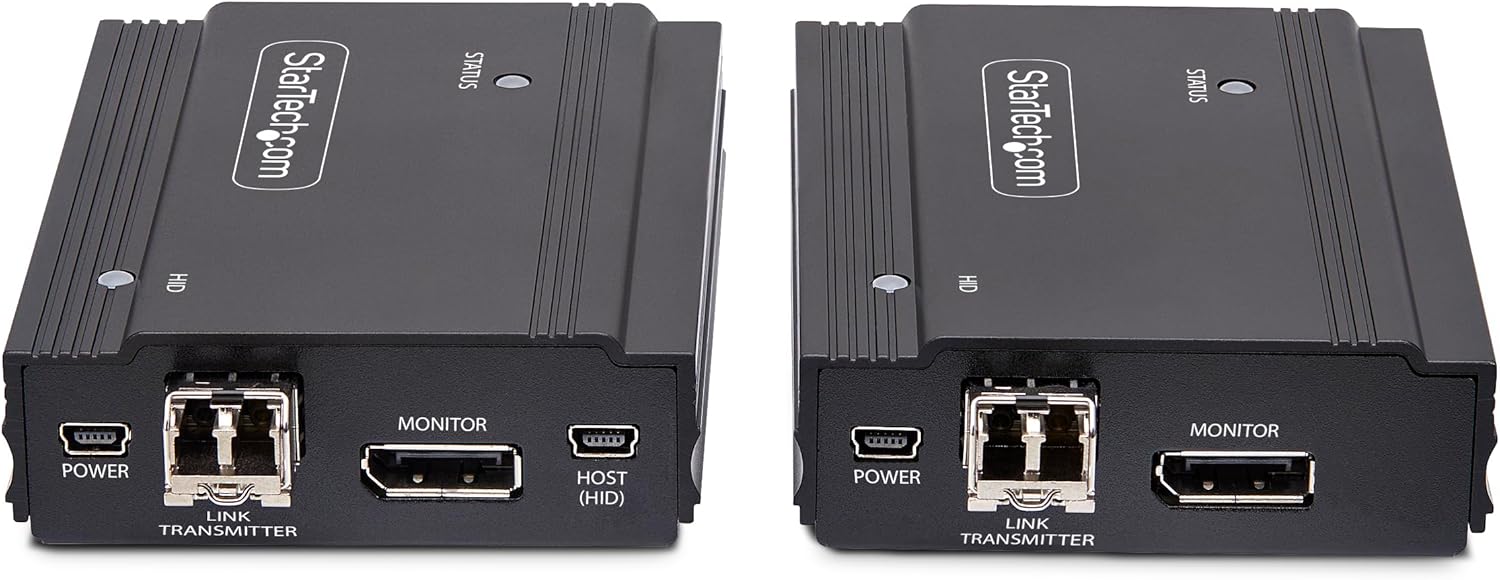
Billede: Forside view of the KVM Extender units, showing the USB HID ports on the receiver unit.
The KVM Extender consists of two main units: a Transmitter and a Receiver. Each unit features:
- Strømindgang: Micro-B USB port for connecting the power adapter.
- Linkport: SFP+ slot for fiber optic cable connection.
- Monitorport: DisplayPort input on the Transmitter, DisplayPort output on the Receiver.
- Host (HID) Port (Transmitter): USB-B port for connecting to the source computer/KVM switch.
- HID Ports (Receiver): USB-A ports for connecting KVM peripherals (keyboard, mouse).
- Status-LED: Indicates power and link status.
- HID LED: Indicates USB HID activity.
3. Opsætningsvejledning
Follow these steps to set up your StarTech.com KVM Extender:
- Sluk for enheder: Ensure all devices (source computer, KVM switch, display) are powered off before beginning installation.
- Connect Transmitter to Source:
- Connect a DisplayPort cable from your source computer or KVM switch to the Monitor (Input) port on the KVM Extender Transmitter unit.
- Connect the provided USB-A to Micro-B cable from a USB-A port on your source computer or KVM switch to the Host (HID) port on the KVM Extender Transmitter unit.
- Connect Receiver to Console:
- Connect a DisplayPort cable from the Monitor (Output) port on the KVM Extender Receiver unit to your display.
- Connect your USB keyboard, mouse, or other HID peripherals to the HID USB-A ports on the KVM Extender Receiver unit.
- Tilslut fiberoptisk kabel:
- Insert the pre-installed SFP+ modules into the Forbindelse ports on both the Transmitter and Receiver units.
- Connect a multi-mode fiber optic cable (not included) between the Forbindelse port on the Transmitter and the Forbindelse port on the Receiver. Ensure the fiber cable is securely connected.

Image: The KVM Extender Transmitter and Receiver units with SFP+ modules inserted into their respective Link ports.
- Anvend strøm: Connect the provided power adapters to the Magt input ports on both the Transmitter and Receiver units, then plug the adapters into power outlets.
- Tænd enheder: Power on your display, then your source computer or KVM switch. The Status LEDs on both extender units should illuminate, indicating a successful connection.
4. Betjeningsvejledning
Once the setup is complete, the KVM Extender operates automatically:
- The DisplayPort video signal from your source will be extended to your remote display.
- Your connected USB keyboard and mouse will control the source computer or KVM switch as if they were directly connected.
- The EDID pass-through feature ensures that your display's optimal resolution and refresh rate are communicated to the source device.
- No additional software or drivers are required for operation.
5. Vedligeholdelse
To ensure the longevity and optimal performance of your KVM Extender:
- Keep the units in a clean, dust-free environment.
- Rengør ydersiden med en blød, tør klud. Brug ikke flydende rengøringsmidler eller opløsningsmidler.
- Ensure proper ventilation around both units to prevent overheating.
- Kontrollér regelmæssigt alle kabelforbindelser for at sikre, at de er fastgjort.
6. Fejlfinding
If you encounter issues with your KVM Extender, refer to the following common troubleshooting steps:
6.1 Ingen videovisning
- Tjek strøm: Ensure both the Transmitter and Receiver units are powered on and their Status LEDs are illuminated.
- Bekræft kabelforbindelser: Confirm that all DisplayPort and fiber optic cables are securely connected to their respective ports on both units and connected devices.
- Fiber Optic Link: Ensure the fiber optic cable is not damaged and is correctly connected between the Transmitter and Receiver. The Link LED should be active.
- Skærmkompatibilitet: Verify your display supports the resolution and refresh rate output by the source device.
- Source Output: Test the source device directly with the display to ensure it is outputting a signal.
6.2 No KVM Control (Keyboard/Mouse Not Responding)
- Tjek USB-forbindelser: Ensure the USB-A to Micro-B cable is securely connected from the source to the Transmitter's Host (HID) port, and your peripherals are connected to the Receiver's HID ports.
- Peripheral Compatibility: Confirm your keyboard and mouse are standard HID-compliant devices.
- Fiber Optic Link: A stable fiber optic link is required for KVM control. Ensure the link is active.
- Genstart: Try restarting the source computer and then the KVM Extender units.
6.3 Intermittent Signal
- Kabelkvalitet: Use high-quality DisplayPort and fiber optic cables.
- Kabellængde: Ensure the fiber optic cable length does not exceed the maximum supported distance (984ft/300m for multi-mode).
- EMI: While the units are designed to reduce EMI, ensure they are not placed near strong sources of electromagnetic interference.
- Strømstabilitet: Ensure both units are receiving stable power.
7. Specifikationer
| Attribut | Værdi |
|---|---|
| Mærke | STARTECH |
| Modelnummer | FD121-KVM-EXTENDER |
| Connector Type | DisplayPort |
| Forbindelsesprotokol | Fiberoptik |
| Max opløsning | 3840x2160 @ 60Hz (4K 60Hz) |
| Max Distance (Multi-Mode) | 984 fod (300 m) |
| Max Distance (Single-Mode) | 1,640ft (500m) (with optional SFP+ modules) |
| Video standard | DisplayPort 1.2 |
| USB-understøttelse | USB HID (Keyboard, Mouse) |
| Operativsystemkompatibilitet | OS Independent (Windows, macOS, Linux) |
| Dimensioner (L x B x H) | 4.5 x 3.1 x 1.1 tommer (11.4 x 7.9 x 2.8 cm) |
| Varens vægt | 1.16 pund (0.53 kg) |
| Materiale til hus | Stål |
| TAA-kompatibel | Ja |
8. Sikkerhedsoplysninger
Læs og følg disse sikkerhedsretningslinjer for at forhindre skade på produktet eller personskade:

Image: Safety warnings and precautions for the KVM Extender.
- Elektriske farer: Do not use damaged or frayed cables. Exposed wires can lead to electric shocks. Ensure all cables are properly routed and connected to prevent hazards.
- Varmeopbygning: Overloaded or tightly bundled cables can overheat and pose a fire hazard. Ensure adequate ventilation around the units and avoid bundling power cables tightly.
- Skadeforebyggelse: Always unplug power adapters by holding the plug itself, not by pulling the cable. Pulling by the cable can damage the internal wiring and expose live wires, leading to electrical shocks or burns.
9. Garanti og support
This StarTech.com product is backed by a 2-year warranty. Additionally, free lifetime 24/5 multi-lingual technical assistance is available.
For product support, technical assistance, or to access the latest drivers and manuals, please visit the official StarTech.com webwebsted eller kontakt deres supportteam:
- Webwebsted: www.startech.com/support
- Kontaktoplysninger: Refer to the support section of the StarTech.com webhjemmeside for regionale kontaktoplysninger.


