Indledning
This manual provides detailed instructions for the setup, operation, and maintenance of your XTU X1 Trail Camera. Designed for versatile outdoor use, this camera features 64MP photo resolution, 2.7K video recording, advanced night vision, solar power capabilities, and convenient WiFi/Bluetooth connectivity for app control. It is suitable for wildlife monitoring, outdoor security, hunting, and farm surveillance.

Image: XTU X1 Trail Camera, solar panel, and included 32GB SD card, highlighting its features.

Image: Multiple scenarios for using the XTU Trail Camera, including hunting, home security, farm, and wildlife monitoring.
Hvad er der i æsken?
Kontroller, at alle komponenter er til stede ved udpakning:
- XTU Trail Camera (X1) x 1
- Solpanel x 1
- 32 GB SD-kort x 1
- Brugervejledning x 1
- Skruer
- Kamerabeslag
- Solpanel beslag
- Monteringsstrop x 1
- Type C kabel x 1

Image: All components included in the XTU Trail Camera package.
Opsætningsvejledning
1. Battery and Solar Panel Installation
The camera is powered by a rechargeable lithium battery and an external solar panel. Ensure the battery is charged before initial use. The solar panel provides continuous power, extending operational time.
- Connect the solar panel to the camera using the provided cable.
- Monter solpanelet et sted, der modtager ampdirekte sollys hele dagen.
- The camera can also be charged via the Type C cable using a standard USB power adapter (not included).

Image: Trail camera with integrated solar power supply, showing connection to the solar panel.

Image: Charging options for the camera: solar power and USB cable.
2. Installation af SD-kort
The camera supports up to a 256GB micro SD card. A 32GB micro SD card is included.
- Open the camera's housing.
- Insert the micro SD card into the designated slot with the contacts facing the correct direction.
- Close the housing securely to maintain the IP66 waterproof rating.
- It is recommended to format the SD card within the camera's settings before first use.
3. Montering af kameraet
Use the provided mounting strap or brackets to secure the camera.
- Montering af rem: Før monteringsstroppen gennem rillerne på bagsiden af kameraet, og fastgør den omkring et træ eller en stang.
- Montering af beslag: Attach the camera bracket to a tree or wall using the screws. Then, attach the camera to the bracket. Ensure the camera is stable and pointed towards the desired monitoring area.

Image: XTU Trail Camera mounted on a tree, demonstrating its outdoor use and IP66 waterproof rating.
4. App Connection (Morecam APP)
The XTU Trail Camera connects to your smartphone via WiFi and Bluetooth for remote viewing og kontrol.
- Installer appen: Download and install the "Morecam" app from your smartphone's app store.
- Registrer konto: Open the Morecam app and register a new user account.
- Tænd kameraet: Tænd for kameraet ved hjælp af afbryderen.
- Forbinde: Follow the in-app instructions to connect to the camera. The camera uses its own hotspot WiFi for connection, not your home WiFi network.

Image: Steps for connecting the camera to the Morecam mobile application.

Billede: Fjernbetjening viewing and control of the camera via WiFi and Bluetooth connection to a smartphone.
Betjeningsvejledning
Basic Operation and Modes
The camera offers various modes for capturing wildlife activity:
- Fototilstand: Captures still images at 64MP resolution.
- Videotilstand: Records video at 2.7K resolution.
- Foto + videotilstand: Captures a still image followed by a video recording.
Settings for these modes, such as resolution, video length, and photo burst, can be adjusted via the camera's internal menu or the Morecam app.

Billede: Eksamples of 64MP photos and 2.7K UHD videos captured by the camera.

Image: High-quality 2.7K video and 64MP image capture capabilities.
Nattesyn
The camera is equipped with 8pcs 850nm low glow infrared lights, providing clear night vision up to 65 feet (20 meters). These lights are designed to be discreet, minimizing disturbance to wildlife.

Image: Crystal night vision performance with 850nm infrared lights, showing a bobcat.

Image: Enhanced night vision capabilities, capturing clear images in low light conditions.
Motion Detection and Trigger Speed
The camera features 3 PIR sensors for a 120° wide motion detection angle and a rapid 0.2-second trigger speed. This ensures that fleeting moments of wildlife activity are captured effectively.
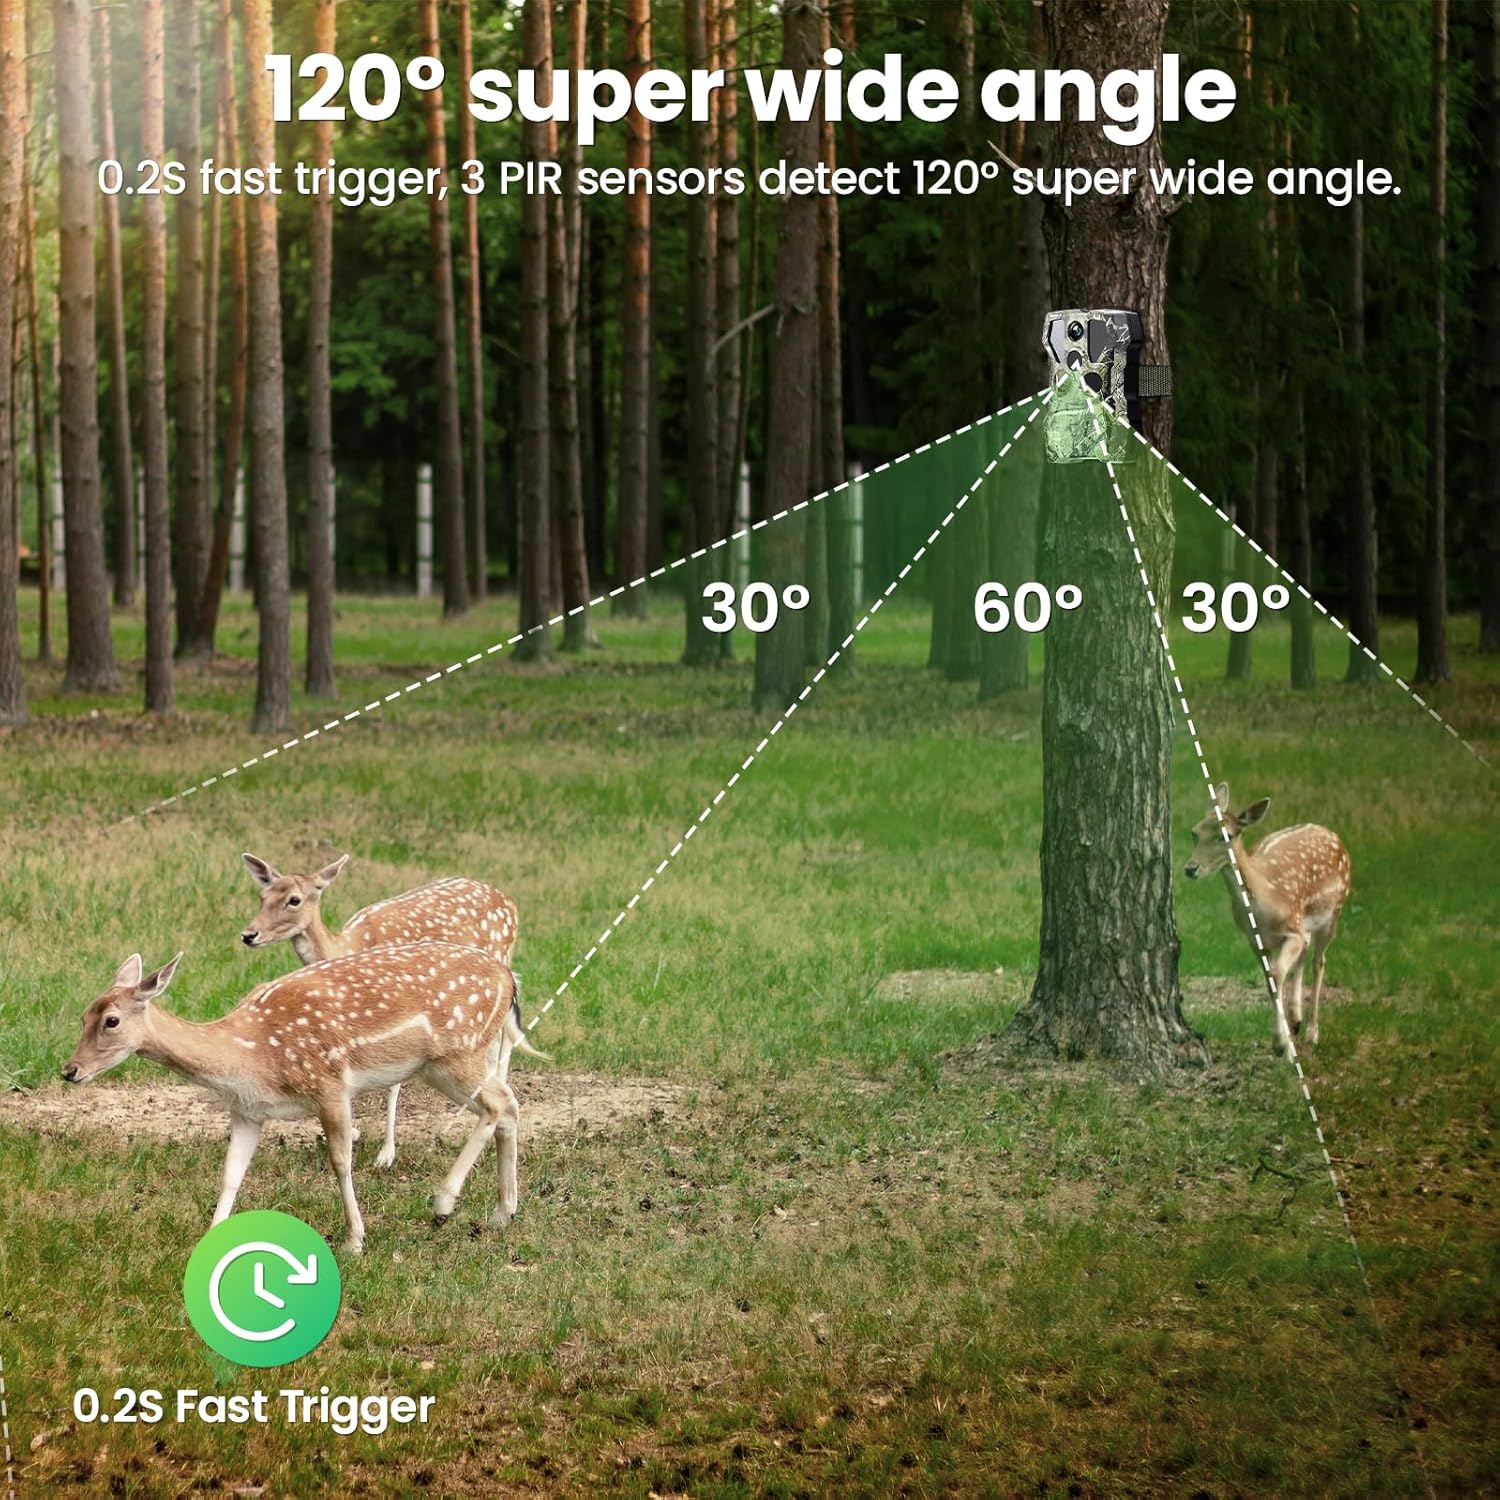
Image: 120° super wide angle detection with 3 PIR sensors.

Image: Demonstration of the 0.2-second ultra-fast trigger speed capturing a hippo.
To-vejs lyd
After connecting to the Morecam app, the camera supports two-way audio communication, allowing you to speak to individuals near the camera remotely.
Video loop optagelse
When the SD card is full, the camera will automatically overwrite the oldest files to continue recording new footage. This ensures continuous monitoring without manual intervention.

Image: Explanation of video loop recording functionality.
Opretholdelse
Rensning
- Regularly clean the camera lens and PIR sensors with a soft, dry cloth to ensure optimal performance.
- Keep the solar panel free of dirt, leaves, or snow to maximize charging efficiency.
Batteripleje
- While the solar panel provides continuous power, ensure the camera's internal battery is periodically checked, especially during prolonged periods of low sunlight.
- If storing the camera for an extended period, fully charge the battery and store it in a cool, dry place.
Vandtætning
The camera has an IP66 weather-proof rating, making it resistant to rain, snow, and dust. Ensure all ports and the housing are securely closed to maintain this protection.

Image: The camera's IP66 waterproof rating, suitable for various weather conditions.
Fejlfinding
Kamera tænder ikke
- Ensure the internal battery is charged. Connect the camera to a power source via the Type C cable or ensure the solar panel is receiving sufficient sunlight.
- Kontroller tænd/sluk-knappens position.
Problemer med appforbindelse
- Sørg for, at Bluetooth er aktiveret på din telefon.
- Verify that you are within the camera's WiFi hotspot range (up to 98ft/30m).
- Genstart både kameraet og din smartphone.
- Re-attempt the connection process as outlined in the "App Connection" section.
- Note: The camera connects via its own hotspot, not your home Wi-Fi network.
Poor Image/Video Quality
- Rengør kameralinsen.
- Sørg for, at kameraet er stabilt og ikke udsat for vibrationer.
- Check the resolution settings in the camera menu or app.
Motion Detection Not Triggering / Slow Trigger
- Adjust the PIR sensitivity settings (Low, Medium, High) in the camera menu or app. Higher sensitivity may be needed for smaller or faster-moving subjects.
- Ensure there are no obstructions directly in front of the PIR sensors.
- Avoid placing the camera where moving branches or tall grass might cause false triggers.
Nattesynsproblemer
- Ensure the infrared lights are not obstructed.
- Check for any reflective surfaces close to the camera that might cause overexposure in night mode.
Specifikationer
| Model | X1 |
| Foto opløsning | 64 MP |
| Video opløsning | 2.7K |
| Strømkilde | Solar Powered, Battery Powered (Lithium Ion) |
| Forbindelse | Bluetooth, Wi-Fi (Hotspot) |
| Bevægelsesdetekteringsvinkel | 120 Degrees (3 PIR sensors) |
| Udløserhastighed | 0.2 sekunder |
| Night Vision Range | 65 Feet (20 meters) with 850nm IR LEDs |
| Vandtæt vurdering | IP66 |
| Opbevaring | Micro SD card (up to 256GB, 32GB included) |
| Dimensioner (L x B x H) | 4.49 x 3.18 x 2.47 tommer |
| Vægt | 1.96 pund |
| Driftstemperatur | -20°C til +60°C |
Garanti og support
XTU is committed to providing quality products and customer service. While specific warranty details are not provided in this manual, please refer to your purchase documentation or the official XTU webwebsted for garantiinformation.
For technical support, questions, or assistance, please contact XTU customer service. Many users have reported positive experiences with XTU's responsive and helpful support team.
- Hurtigt svar: Forvent rettidige svar på dine henvendelser.
- 24/7 Professional Technical Support: Der er hjælp til rådighed døgnet rundt.

Image: XTU's commitment to customer support.


