1. Introduktion
This manual provides detailed instructions for the safe and effective use of your GOYOJO Digital Torque Wrench (Model GM200-JP). Please read this manual thoroughly before operation and retain it for future reference. This high-precision, durable digital torque wrench offers three measurement modes and four unit options, making it suitable for various applications including automotive, motorcycle, and bicycle maintenance.

Image 1.1: GOYOJO Digital Torque Wrench (Model GM200-JP)
2. Sikkerhedsoplysninger
Always observe the following safety precautions to prevent injury or damage to the tool and workpiece:
- Wear appropriate personal protective equipment, such as safety glasses and gloves, during operation.
- Sørg for, at emnet er forsvarligt fastgjort, før du påfører moment.
- Do not exceed the maximum torque capacity of the wrench (200 Nm).
- Avoid dropping the wrench or subjecting it to strong impacts, as this may affect its accuracy.
- Keep the wrench clean and dry. Do not expose it to water or corrosive substances.
- Store the wrench in its protective case when not in use.
- Do not attempt to disassemble or modify the wrench. Repairs should only be performed by qualified personnel.
3. Produktkomponenter
The GOYOJO Digital Torque Wrench package includes the following items:
- Digital Torque Wrench Body (Model GM200-JP) x 1
- Protective Storage Case x 1
- AAA batterier x 2
- Instruction Manual (Japanese) x 1
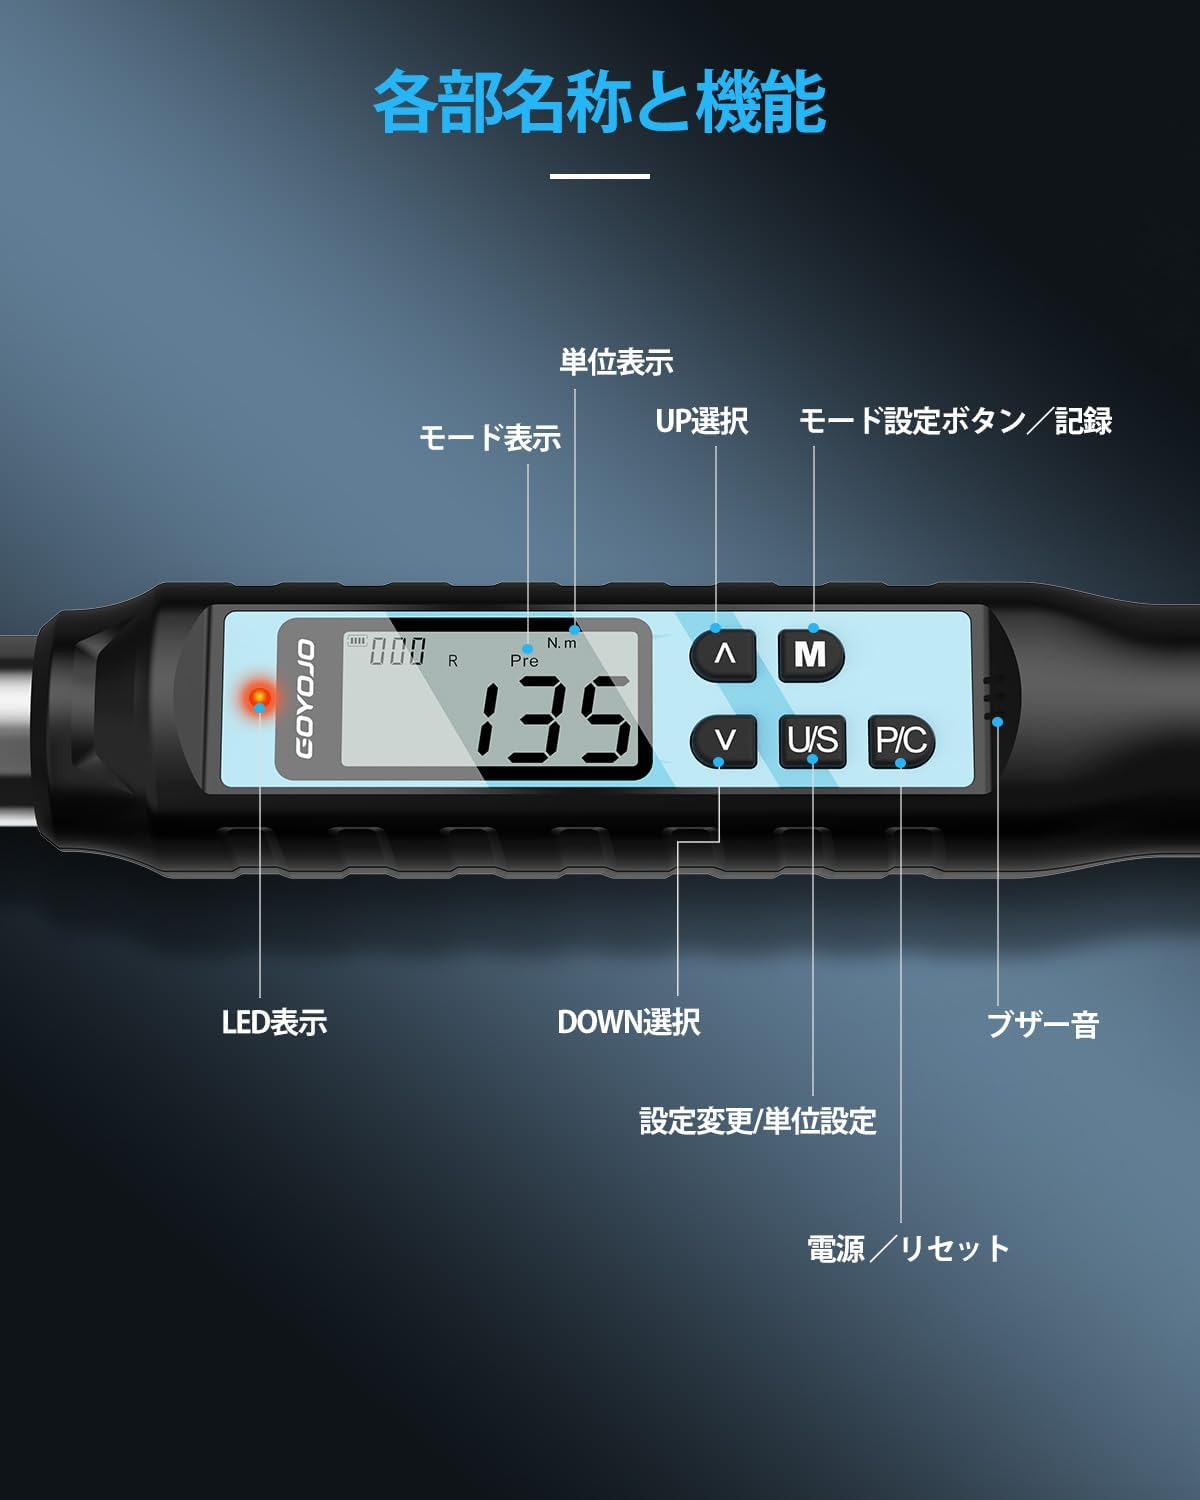
Image 3.1: Diagram showing the main parts and functions of the digital torque wrench.
Nøglekomponenter:
- Skraldehoved: Bidirectional, 72-tooth mechanism for tightening and loosening. Features a push-button for easy socket attachment and detachment.
- Digital skærm: LCD screen showing torque values, measurement modes, and units.
- Kontrolknapper:
- OP/NED knapper: Adjust target torque values and navigate menus.
- M (tilstand) knap: Selects measurement modes (Track, Peak Hold, Preset) and saves data.
- U/S (Unit/Setting) Button: Switches between torque units (N.m, ft.lbf, in.lbf, kgf.cm) and enters setting mode.
- P/C (Power/Clear) Button: Powers the device ON/OFF and clears data.
- LED-indikator: Provides visual alerts for target torque status.
- Summer: Provides audible alerts for target torque status.
4. Opsætning
4.1 Batteriinstallation
- Locate the battery compartment at the base of the handle.
- Åbn dækslet til rummet.
- Isæt to AAA-batterier, og sørg for at polariteten (+/-) vender korrekt.
- Luk batterirummets dæksel forsvarligt.
4.2 Indledende tænding
- Tryk på P / C button to power on the device. The display will light up.
- The wrench will perform a self-check and display the current torque value and mode.
Video 4.1: Demonstration of powering on the digital torque wrench and setting torque values.
5. Betjeningsvejledning
5.1 Setting Torque Values
- Tryk på OP/NED buttons to select a target torque value group (P1-P9).
- Tryk på M button to activate the selected group.
- Brug OP/NED buttons to adjust the specific torque value. Long-press for 2 seconds to enter rapid adjustment mode.
- Once the desired torque value is set, press the P / C knappen for at bekræfte.
Video 5.1: Detailed guide on how to set torque values and use the digital torque wrench.
5.2 Valg af måletilstande
Tryk på M button to cycle through the three measurement modes:
- Track (T) Mode: Displays the real-time torque value as it is applied.
- Peak Hold (P) Mode: Captures and displays the maximum torque value applied during an operation.
- Preset (Pre) Mode: Allows setting a target torque value. The wrench will alert you when 80% of the target is reached (intermittent buzzer and flashing LED) and when the target is reached or exceeded (continuous buzzer and solid LED).

Image 5.2: Illustration of the three measurement modes: Track, Peak Hold, and Preset.

Image 5.3: Visual representation of the buzzer and LED alerts when approaching and reaching the target torque in Peak/Preset modes.
5.3 Switching Torque Units
Tryk på OS button to cycle through the available torque units:
- N.m (Newton-meter)
- ft.lbf (Foot-pound force)
- in.lbf (Inch-pound force)
- kgf.cm (Kilogram-force centimeter)

Image 5.4: Display showing the four selectable torque units.
5.4 Attaching and Detaching Sockets
The wrench features a 1/2-inch drive ratcheting head with a push-button mechanism for secure socket attachment and easy release. Simply press the button to insert or remove a socket.

Image 5.5: Demonstration of the bidirectional ratcheting head and push-button socket release.
5.5 Data Recording and Retrieval
The wrench can store up to 999 torque measurement records.
- Lagring af data: After a torque measurement, press the M button to save the reading.
- Retrieving Data: Tryk længe på M button to enter data retrieval mode. Use the OP/NED buttons to browse through saved records.
- Sletning af data: In data retrieval mode, press the OS button to access deletion options ("ALL" for all data, "ONE" for individual records). Confirm deletion by pressing the M button. A "SUCC" message indicates successful deletion.
Video 5.6: Demonstration of data saving, retrieval, and deletion functions.
6. Vedligeholdelse
- Rensning: Wipe the wrench with a soft, dry cloth after each use. Do not use abrasive cleaners or solvents.
- Opbevaring: Store the wrench in its protective case in a dry, cool place, away from direct sunlight and extreme temperatures.
- Udskiftning af batteri: Replace batteries when the low battery indicator appears on the display. Remove batteries if the wrench will not be used for an extended period.
- Kalibrering: Digital torque wrenches require periodic calibration to maintain accuracy. Refer to a professional calibration service for this procedure.
7. Fejlfinding
| Problem | Mulig årsag | Løsning |
|---|---|---|
| Nøglen tænder ikke. | Lave eller døde batterier. Forkert batteriinstallation. | Udskift batterierne med nye. Sørg for, at batterierne er isat med den rigtige polaritet. |
| Unøjagtige momentaflæsninger. | Wrench needs calibration. Damage from impact. | Contact a professional calibration service. Avoid dropping the wrench. |
| Skærmen er svag eller flimrer. | Lav batteristrøm. | Udskift batterierne. |
| Buzzer/LED alerts not working. | Settings may be disabled or faulty. | Check settings in the manual. If problem persists, contact support. |
8. Specifikationer
| Feature | Detalje |
|---|---|
| Model | GM200-JP |
| Måleområde | 6-200 Nm |
| Drevstørrelse | 1/2 tomme |
| Nøjagtighed | Clockwise: ±2%, Counter-clockwise: ±2.5% |
| Ratcheting Head | 72-tooth, Bidirectional |
| Måletilstande | Track (T), Peak Hold (P), Preset (Pre) |
| Enheder | N.m, ft.lbf, in.lbf, kgf.cm |
| Datalagring | Op til 999 poster |
| Vise | Digital LCD med baggrundsbelysning |
| Strømkilde | 2 x AAA batterier |
| Automatisk sluk | Efter 2 minutters inaktivitet |
| Materiale | Kulstofstål |
| Længde | 53.5 cm |
| Vægt (pakke) | 1.8 kg |

Image 8.1: Detailed specifications table for various GOYOJO digital torque wrench models.
9. Garanti og support
Your GOYOJO Digital Torque Wrench comes with a 1 års kvalitetsgaranti from the date of purchase. In the event of an initial defect, we offer free exchange or refund.
For any issues or inquiries during use, please contact our customer support with your order number and product model number. Our specialized staff will provide assistance.
For further support, you may visit the official GOYOJO Store on Amazon: GOYOJO Japan Store


