1. Introduktion
Thank you for choosing the IMAGE HL420 Rechargeable Ultra-Bright Barbecue Grill Light. This versatile and durable light is designed to provide optimal illumination for your grilling, outdoor cooking, and various other tasks. Featuring a flexible gooseneck, magnetic base, and dual power options, it ensures convenience and reliability.
2. Pakkens indhold
Kontroller venligst, at alle nedenstående varer er inkluderet i din pakke:
- 2 x IMAGE HL420 Barbecue Grill Lights
- 2 x Rechargeable 18650 Batteries (pre-installed or separate)
- 2 x USB Charging Cables (pin connector)
- 2 x Metal Plates with Adhesive Backing

Image: Contents of the HL420 Grill Light package.
3. Produktfunktioner
- Ultra-Bright LED Illumination: Provides powerful and clear lighting for various tasks.
- Fleksibel svanehals: Allows for 360° adjustment of the light angle and precise positioning.
- Adjustable Focal Distance: Easily customize the light beam from wide flood to focused spot.
- Magnetisk base: Securely attaches to most ferrous metal surfaces for hands-free operation.
- Dobbelt strømindstillinger: Operates with the included rechargeable 18650 battery or 3 AAA batteries (not included).
- USB genopladelig: Convenient charging via USB cable with an indicator light.
- Holdbar aluminiumslegeringskonstruktion: Built to withstand high temperatures and outdoor conditions.
- Metal Plates Included: For attaching the light to non-magnetic surfaces.
4. Opsætning
4.1 Batteriinstallation
The grill light can be powered by either one 18650 rechargeable battery (included) or three AAA batteries (not included).
- Unscrew the bottom cap of the light to access the battery compartment.
- Insert one 18650 rechargeable battery with the positive (+) end facing towards the gooseneck, or insert three AAA batteries into the provided adapter, then place the adapter into the compartment.
- Securely screw the bottom cap back on.
4.2 Charging the 18650 Battery
To charge the included 18650 rechargeable battery:
- Locate the charging port on the side of the light's body, usually protected by a rubber cover.
- Gently lift the rubber cover and insert the small pin connector of the USB charging cable into the port.
- Connect the USB-A end of the cable to a standard USB power source (e.g., wall adapter, power bank, computer USB port).
- The LED indicator on the light will show rød under opladning og tænding grøn når den er fuldt opladet.
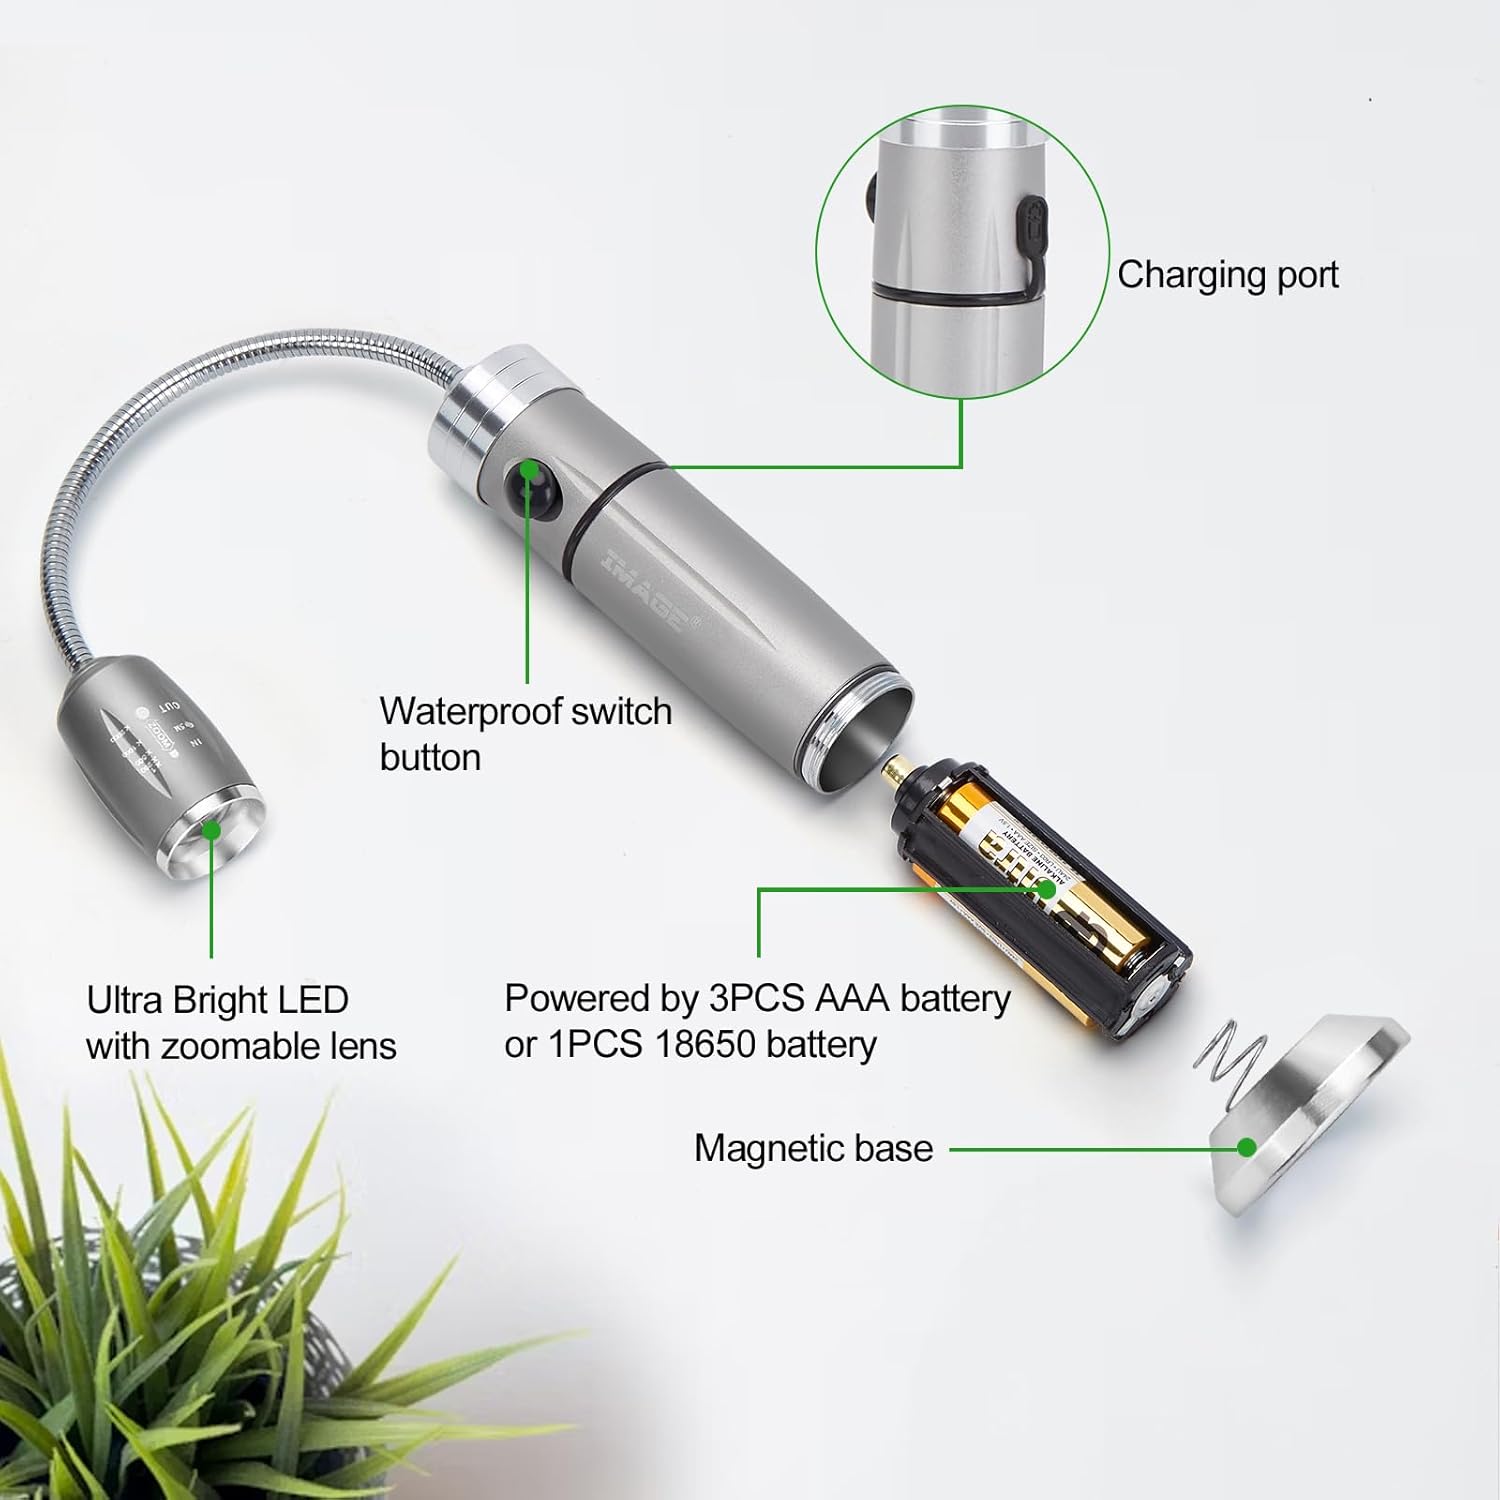
Image: Internal components and power options.

Image: USB charging with LED indicator.
4.3 Attaching the Light
The light features a strong magnetic base for easy attachment to metal surfaces.
- Til metaloverflader: Simply place the magnetic base directly onto any ferrous metal surface, such as a grill lid, car hood, or metal shelf.
- For Non-Metal Surfaces: Use the included metal plates. Peel off the adhesive backing from a metal plate and firmly press it onto the desired non-magnetic surface. Once the plate is secured, you can attach the light's magnetic base to the metal plate.

Image: Magnetic base attachment to steel surfaces.

Image: Using metal plates for non-magnetic surfaces.
5. Betjeningsvejledning
5.1 Tænd/sluk
Press the power button located on the body of the light once to turn it on. Press the button again to turn it off.
5.2 Justering af svanehalsen
The flexible gooseneck allows you to direct the light exactly where it's needed. Simply bend and twist the gooseneck to achieve your desired angle and position.

Image: Flexible gooseneck adjustment.
5.3 Adjusting Focal Distance and Lighting Range
The head of the light features an adjustable lens. Gently slide the head of the light forward or backward to change the focal distance and adjust the lighting range from a wide floodlight to a concentrated spotlight.

Image: Adjustable focal distance and lighting range.
5.4 Alsidige anvendelser
Beyond grilling, the HL420 light is ideal for various tasks requiring focused illumination:
- Automotive repairs (under the hood)
- Workshop tasks
- Campog udendørsaktiviteter
- Læselys
- Nødbelysning

Image: Grill lights in use during a barbecue.

Image: Versatile applications in various settings.
5.5 Produktdemonstrationsvideo
Video: A comprehensive demonstration of the Rechargeable Ultra-Bright Barbecue Grill Light's features and functionality, including its flexible gooseneck, adjustable focus, magnetic base, and charging process.
6. Vedligeholdelse
- Rensning: Tør lyset af med en blød, damp cloth. Do not use abrasive cleaners or immerse the light in water.
- Batteripleje: If storing the light for an extended period, remove the 18650 battery to prevent potential leakage. Recharge the battery periodically to maintain its lifespan.
- Opbevaring: Opbevar lampen et køligt, tørt sted væk fra direkte sollys og ekstreme temperaturer.
7. Fejlfinding
| Problem | Mulig årsag | Løsning |
|---|---|---|
| Lyset tændes ikke. | Batteriet er dødt eller forkert installeret. | Recharge the 18650 battery or replace AAA batteries. Ensure batteries are inserted with correct polarity. |
| Lyset er svagt. | Lavt batteri. | Recharge the 18650 battery or replace AAA batteries. |
| Magnetic base not sticking. | Surface is non-ferrous metal or non-magnetic. | Use the included adhesive metal plates on non-magnetic surfaces. |
| Ladeindikatoren virker ikke. | Cable not properly connected or battery already full. | Ensure the charging cable is securely connected to both the light and the power source. Check if the battery is already fully charged (green light). |
8. Specifikationer
| Modelnummer | HL420 |
| Mærke | BILLEDE |
| Lyskilde | LED |
| Materiale | Aluminiumslegering |
| Strømkilde | 1 x 18650 Rechargeable Battery (included) or 3 x AAA Batteries (not included) |
| Voltage | 3 volt |
| Monteringstype | Magnetisk base |
| Svanehals længde | Ca. 13 cm |
| Basehøjde | Ca. 10 cm |
| Item Weight (per light) | Ca. 0.5 lbs (0.23 kg) |
| Pakkemængde | 2 lys |
| Fabrikant | Brainytrade |
| Oprindelsesland | Kina |
9. Garanti og support
For warranty information or technical support, please refer to the product packaging or contact the seller directly through your purchase platform. Keep your purchase receipt as proof of purchase.


