1. Introduktion
This manual provides essential information for the safe and effective operation of your Mecpow Laser Engraver, covering both the X3 5W and X5 Pro 33W models. Please read this manual thoroughly before using the device to ensure proper setup, operation, and maintenance.
2. Sikkerhedsoplysninger
ADVARSEL: Laser engravers are powerful tools that can cause serious injury if not handled properly. Always follow safety guidelines.
- Brug altid passende laserbeskyttelsesbriller, når du betjener maskinen.
- Ensure proper ventilation to dissipate fumes and smoke generated during engraving/cutting.
- Efterlad aldrig maskinen uden opsyn under drift.
- Hold en ildslukker i nærheden.
- Do not engrave or cut unknown materials, as some may produce toxic fumes or catch fire easily.
- Hold børn og kæledyr væk fra operationsområdet.
- The Mecpow laser engraving machine is equipped with advanced safety features, including a flame detector, gyroscope, emergency stop button, and limit switches. Familiarize yourself with these features.
3. Produktet er slutview
3.1 Key Features (Mecpow X5 Pro 33W)
- Powerful 33W Output Diode Laser: The X5 Pro features a 33W output diode laser with 192W machine power, enabling efficient engraving and cutting.
- Høj skærehastighed: Operates at an ultra-fast cutting speed of up to 28,000 mm/min.
- Fivefold Safety Protection: Includes flame detector, gyroscope, emergency stop button, limit switches, and a safety lock.
- Bred kompatibilitet: Compatible with popular engraving software such as LightBurn (for experienced users) and LaserGRBL (for new users).
- Ultra-fine Focus Spot: Features a 0.05*0.07mm focus spot for detailed and vivid engraving.
- Built-in Air Duct Design: Air assist efficiently clears debris and fumes, ensuring smooth and clean engraving.
- Larger Engraving Area: The X5 Pro offers a 600x600mm (23.6x23.6 inch) engraving area, providing 50% more area compared to standard 400x400mm models.
- Fleksible tilslutningsmuligheder: Supports WiFi, USB Cable, and Micro SD Card connections.
3.2 Produktbilleder

Figure 1: Mecpow X3 5W (bottom) and X5 Pro 33W (top) laser engravers, showcasing their respective power outputs and engraving areas.

Figur 2: Nærbillede view of the Mecpow X5 Pro 33W laser engraver, highlighting its 600x600mm work area and external power supply.

Figure 3: The Mecpow X3 5W laser engraver, demonstrating its compact design and 5W laser module.

Figure 4: Illustration of the Mecpow X5 Pro 33W's cutting power, showing its ability to cut 15mm wood, 12mm acrylic, and 0.1mm stainless steel in a single pass.
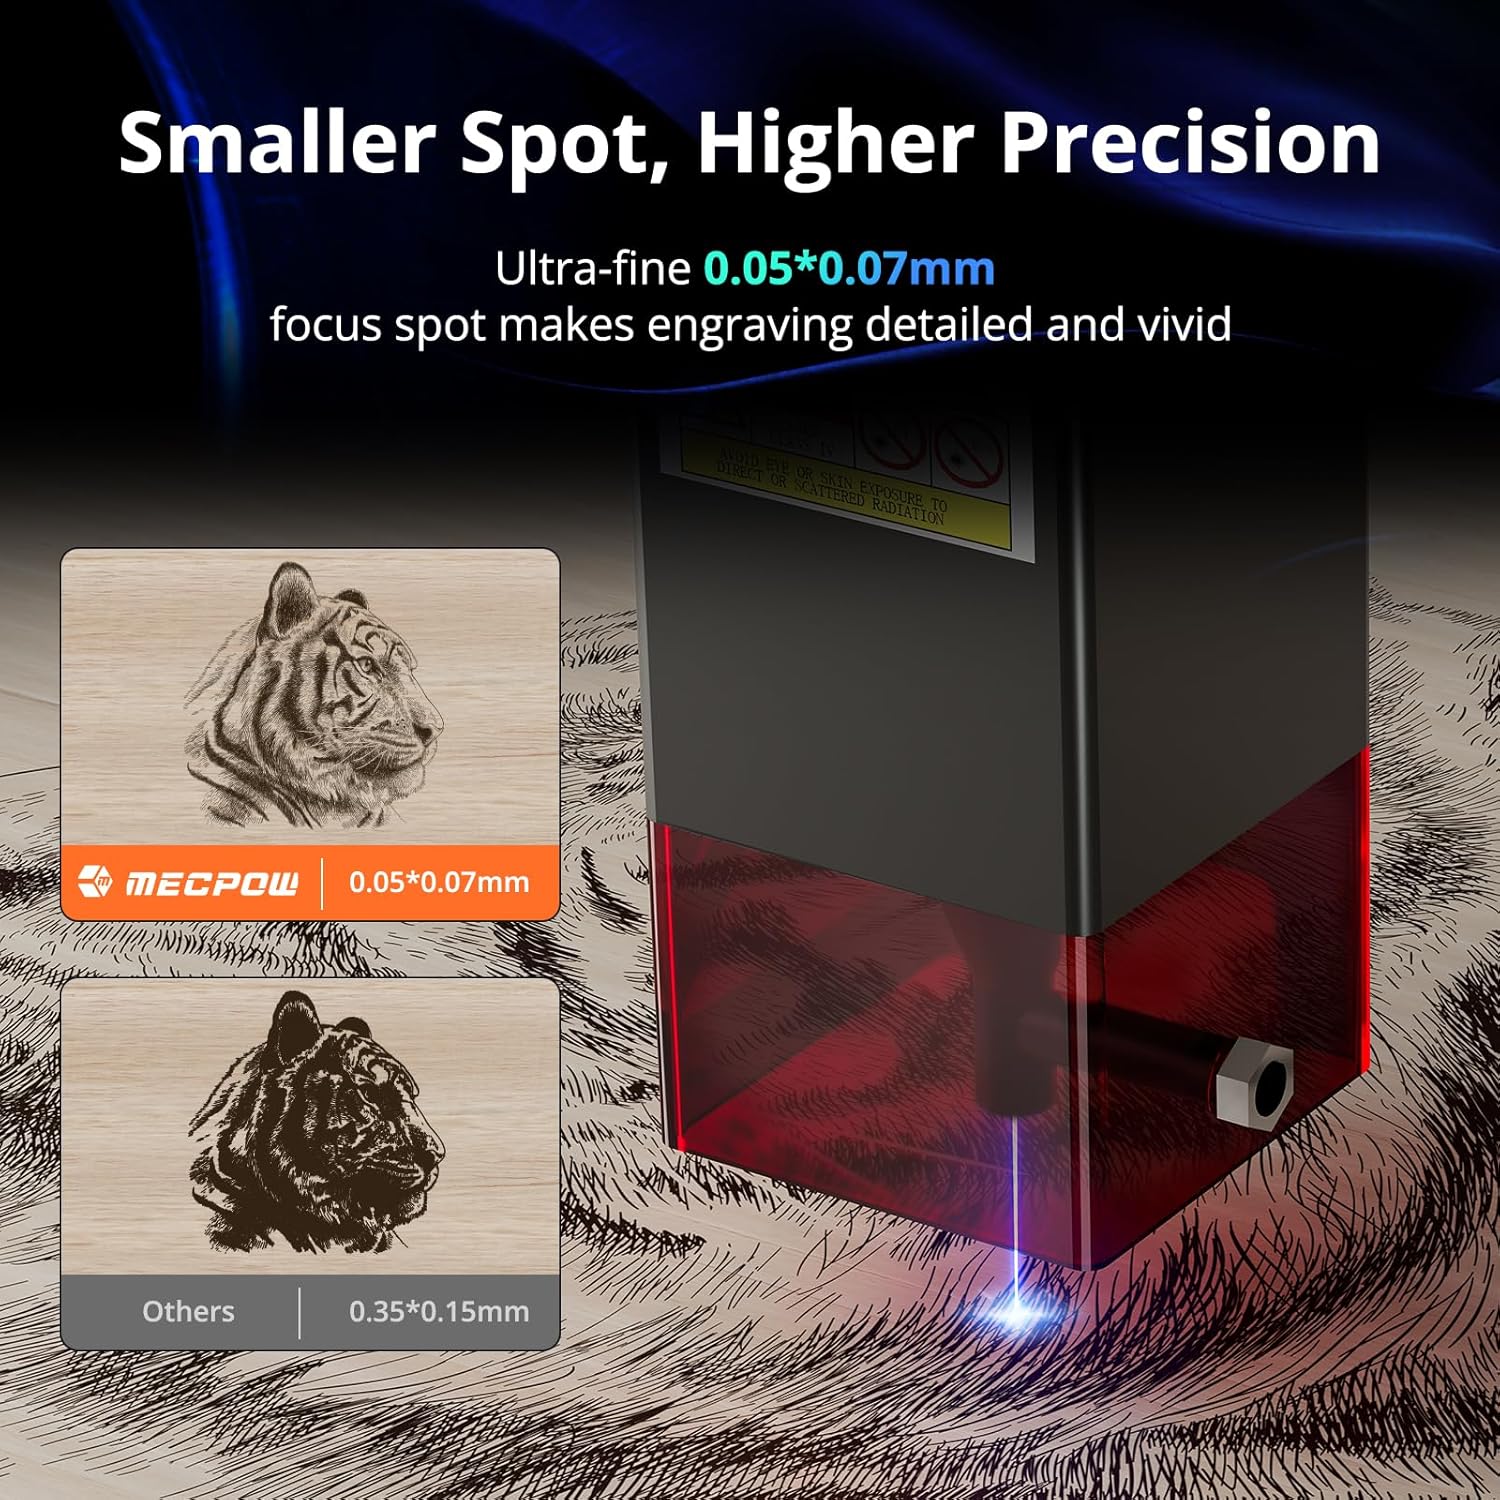
Figure 5: Visual comparison demonstrating the ultra-fine 0.05*0.07mm focus spot of the Mecpow engraver, resulting in higher precision and more detailed engravings compared to other models.

Figure 6: Depiction of the flexible connection options available for the Mecpow laser engraver, including WiFi, USB Cable, and Micro SD Card, with a smartphone displaying the control app.
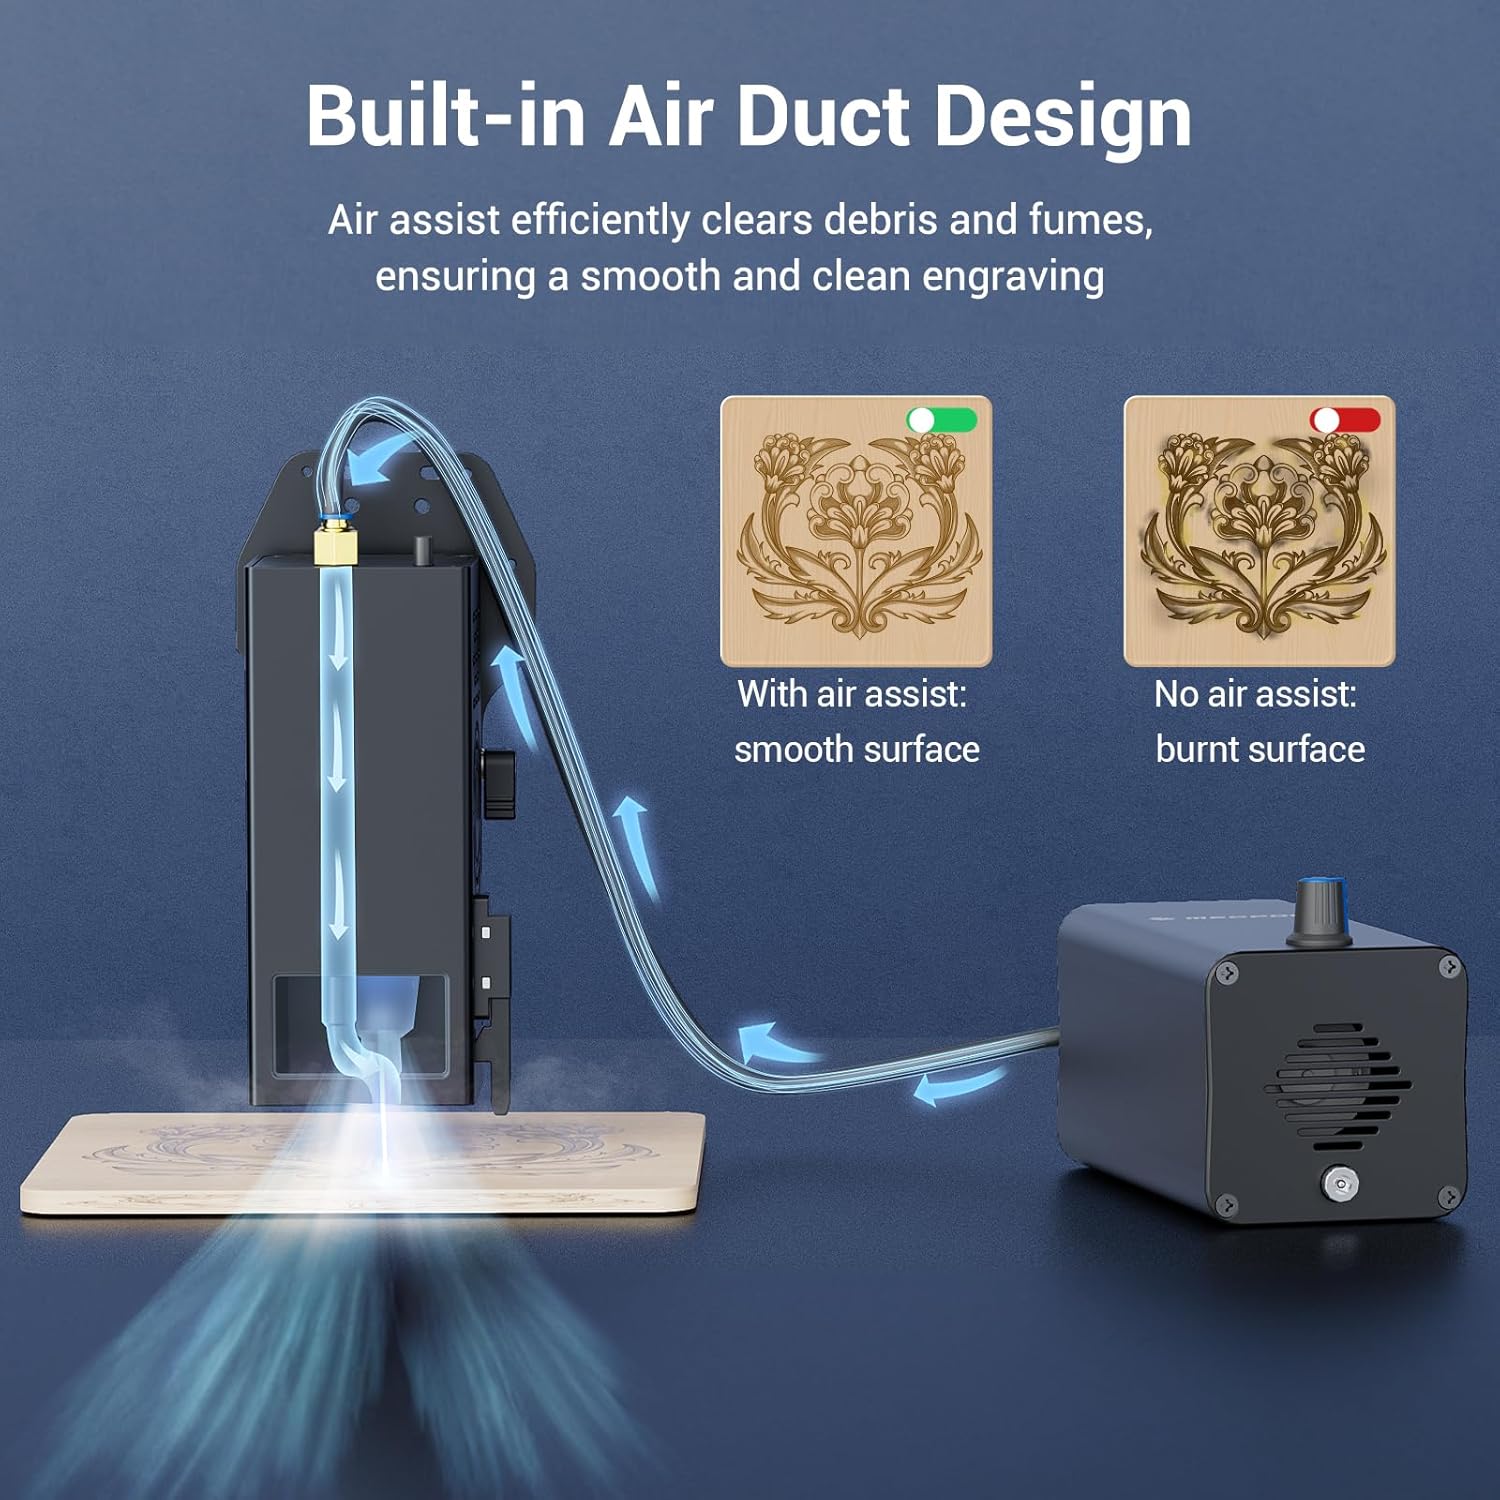
Figure 7: Diagram illustrating the built-in air duct design of the Mecpow engraver, showing how air assist clears debris and fumes for a smoother, cleaner engraving result compared to no air assist.

Figure 8: Comparison highlighting the larger 600x600mm engraving area of the Mecpow X5 Pro, offering significantly more creative space than standard 400x400mm engravers.

Figure 9: A collection of various items demonstrating the versatility of the Mecpow laser engraver, including engraved wood, acrylic, and metal, as well as cut wooden models.
4. Opsætning og montering
Detailed assembly instructions are typically provided in a separate quick-start guide or assembly video. Please refer to those resources for step-by-step guidance.
4.1 Første tilslutning
- Place the engraver on a stable, level, and fire-resistant surface.
- Tilslut strømadapteren til gravøren og derefter til en passende stikkontakt.
- For initial setup, connect the engraver to your computer via USB cable.
- Alternatively, for wireless control, ensure your device is connected to the same Wi-Fi network as the engraver after initial setup.
- Insert a Micro SD card if you plan to operate without a direct computer connection.
5. Betjeningsvejledning
5.1 Softwareinstallation
The Mecpow laser engraver is compatible with LightBurn and LaserGRBL software. Download the latest versions from their official webwebsteder.
- LightBurn: Recommended for experienced users, offering advanced features for design and control.
- LaserGRBL: Ideal for new users, providing a simpler interface for basic engraving tasks.
For smartphone control, search for "Laser Explorer" or "MKSLaser" in your device's app store (Google Play / App Store).
5.2 Grundlæggende betjeningstrin
- Forbered materiale: Place the material to be engraved or cut on the working surface. Ensure it is flat and securely positioned.
- Fokuser laseren: Adjust the laser module height to achieve the optimal focus spot on your material. Refer to the quick-start guide for specific focusing methods.
- Design and Import: Create or import your design into the chosen software (LightBurn/LaserGRBL).
- Indstil parametre: Configure engraving/cutting parameters such as power, speed, and passes based on the material type and desired outcome.
- Preview and Frame: Use the software's framing function to preview the working area and ensure the design fits correctly on your material.
- Start gravering/skæring: Press the start button in the software and on the machine (if applicable) to begin the operation.
- Overvåg fremskridt: Continuously monitor the machine during operation. Be prepared to press the emergency stop button if any issues arise.
6. Vedligeholdelse
- Rengør linsen: Regularly clean the laser lens with a soft, lint-free cloth and lens cleaning solution to maintain optimal laser performance.
- Rengør arbejdsområdet: Remove debris and dust from the engraving bed and rails after each use to prevent interference with movement.
- Smør skinner: Periodically apply a small amount of lubricant to the guide rails to ensure smooth movement of the laser module.
- Tjek forbindelser: Ensure all cables and connections are secure before each operation.
- Air Assist Maintenance: If using an external air assist pump, ensure its filter is clean and the hose is free of blockages.
7. Fejlfinding
| Problem | Mulig årsag | Løsning |
|---|---|---|
| Laseren udløses ikke eller har svagt output. | Forkert fokus; snavset objektiv; lav effektindstilling; løs forbindelse. | Re-focus the laser; clean the lens; increase power setting in software; check all cables. |
| Machine not moving or erratic movement. | Loose belts; obstructed rails; software connection issue; motor fault. | Check and tighten belts; clear obstructions; restart software/computer; contact support if motor fault suspected. |
| Engraving quality is poor (blurry, uneven). | Incorrect focus; material not flat; wrong speed/power settings; dirty lens. | Ensure proper focus; secure material; adjust settings; clean lens. |
| Emergency stop activated unexpectedly. | Flame detected; machine tilted (gyroscope); accidental button press. | Check for flames/smoke; ensure machine is stable; reset emergency stop button. |
8. Specifikationer
- Model: Mecpow X3 5W & X5 Pro 33W
- Laser Output Power (X5 Pro): 33W diodelaser
- Machine Power (X5 Pro): 192W
- Engraving Area (X5 Pro): 600 x 600 mm (23.6 x 23.6 tommer)
- Cutting Speed (X5 Pro): Op til 28,000 mm/min
- Focus Spot Size (X5 Pro): 0.05 x 0.07 mm
- Forbindelse: WiFi, USB Cable, Micro SD Card
- Kompatibel software: LightBurn, LaserGRBL
- Sikkerhedsfunktioner: Flame detector, Gyroscope, Emergency Stop Button, Limit Switches, Safety Lock
- ASIN: B0D1FRHVRN
- Dato først tilgængelig: 11. april 2024
9. Garanti og support
Mecpow products are designed for quality and reliability. For specific warranty terms and conditions, please refer to the warranty card included with your product or visit the official Mecpow webwebsted.
For technical support, troubleshooting assistance, or spare parts, please contact Mecpow customer service through their official channels. Provide your product model and serial number for faster service.
Visit the Mecpow Store: Mecpow Supreme Selection


