1. Introduktion
Thank you for choosing the WSDCAM Wireless Bike Alarm. This advanced anti-theft system is designed to provide robust security for your bicycles, e-bikes, motorcycles, and scooters. Featuring a 113dB loud alarm, IP65 waterproof rating, and a rechargeable battery, it offers reliable protection against theft and includes intelligent features like fall detection and adjustable sensitivity.
2. Produktet er slutview
The WSDCAM Wireless Bike Alarm system consists of a main alarm unit and a remote control. The alarm unit is compact, durable, and designed for discreet installation on various vehicles.

Image: The WSDCAM Wireless Bike Alarm unit, its remote control, and a USB-C charging cable. The alarm unit is black and rectangular with a speaker grille. The remote is also black with four buttons and a blue LED indicator.
Nøglefunktioner:
- 113dB Loud Alarm: Deters thieves effectively with a powerful siren.
- IP65 vandtæt: Ensures reliable operation in various weather conditions.
- Genopladeligt lithiumbatteri: 700mAh capacity with Type-C charging, offering long endurance (up to 3 months daily use, 6-11 months standby).
- 7 Adjustable Sensitivities: Customizable sensitivity from gentle touch to strong impact.
- Intelligent Fall Alarm: Automatically triggers an alarm if the vehicle tilts more than 45 degrees (SOS function, off by default).
- Fjernbetjening: Wireless range of up to 20M/66FT for arming, disarming, changing ringtones, and vehicle location.
- Nem installation: Can be installed using double-sided adhesive or straps, no screws or wiring needed.
3. Pakkens indhold
Kontroller venligst, at alle varer er til stede i din pakke:
- 1 x WSDCAM Wireless Bike Alarm Unit
- 1 x fjernbetjening
- 1 x USB-C opladningskabel
- 1 x Double-sided Adhesive Pad
- 2 x Cable Ties (Straps)
- 1 x Brugermanual (dette dokument)
4. Opsætning
4.1 Indledende opladning
Before first use, fully charge the alarm unit using the provided USB-C cable. Connect the cable to the alarm unit's Type-C port and a standard USB power source (e.g., power bank, laptop, wall adapter).

Image: The WSDCAM bike alarm unit connected via USB-C cable to a laptop and a wall adapter, illustrating multiple charging options. Icons below indicate Type-C charging port, 700mAh battery capacity, 3 months battery life, 6-11 months standby time, and 2 hours charging time.
En fuld opladning tager typisk cirka 2 timer.
4.2 Installation
The alarm unit can be installed discreetly using either the double-sided adhesive pad or the cable ties.
- Vælg placering: Select a hidden or inconspicuous location on your bike, e-bike, motorcycle, or scooter. Common locations include under the bike seat, under the motorcycle seat, or on the scooter frame.
- Montering af klæbemiddel:
- Clean the surface where the alarm will be attached.
- Peel off the protective film from one side of the double-sided adhesive pad and apply it to the back of the alarm unit.
- Peel off the other side of the film and firmly press the alarm unit onto the chosen surface for at least 30 seconds.
- Installation af kabelbindere:
- Thread the cable ties through the designated slots on the alarm unit.
- Wrap the cable ties around the frame or a suitable part of your vehicle and secure them tightly.
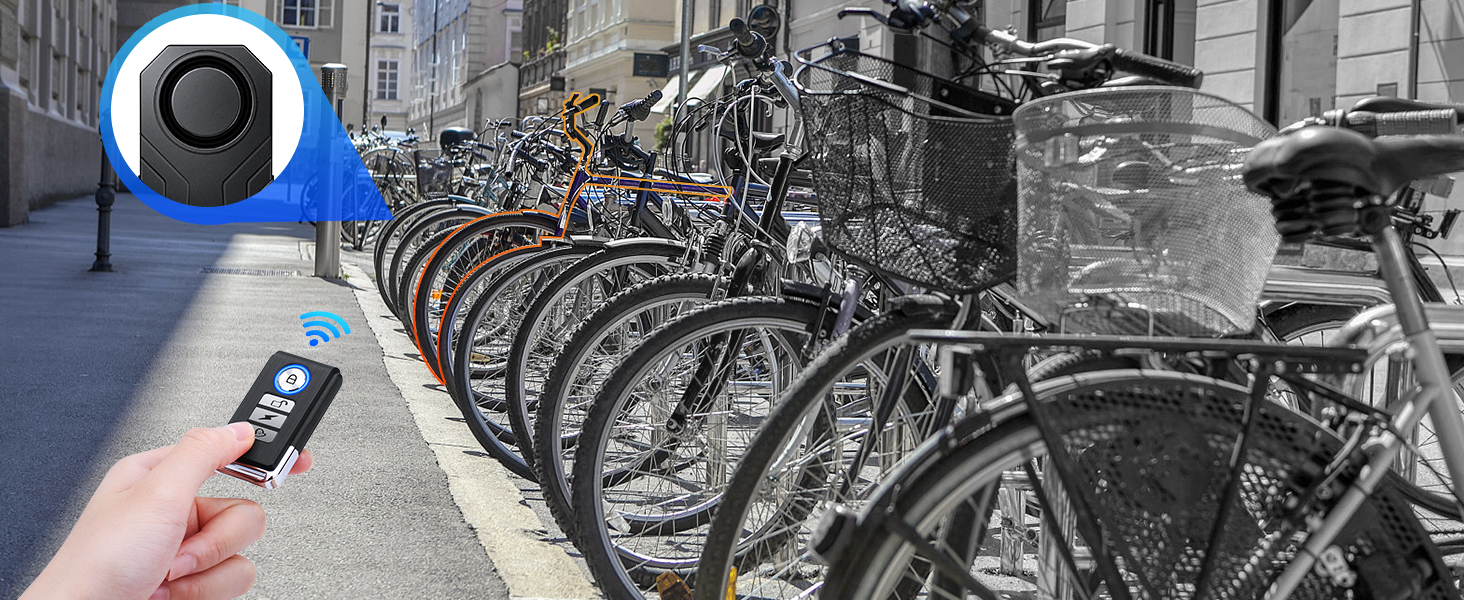
Image: A step-by-step diagram illustrating the installation process. Step 1 shows applying double-sided tape to the alarm, Step 2 shows threading cable ties, and Step 3 shows attaching the alarm to a bike frame.

Image: Four images demonstrating the portability and high concealment of the alarm: installed under a bike seat, under a motorcycle seat, on a scooter frame, and hidden inside a camera bag.
5. Betjeningsvejledning
5.1 Fjernbetjeningsfunktioner
Fjernbetjeningen har fire knapper:
| Knap ikon | Fungere | Beskrivelse |
|---|---|---|
| 🔒 (Låse) | Arm | Press once to arm the alarm. A short beep confirms arming. The alarm will trigger if vibration is detected. |
| 🔓 (Lås op) | Afvæbne | Press once to disarm the alarm. A short beep confirms disarming. |
| ⚡ (Lyn) | Ringtone / Change Tone | Press to cycle through 3 available ringtones. |
| 🔔 (Klokke) | Locate / Bell | Press to activate a short sound from the alarm unit, helping you locate your vehicle in a parking lot. |

Image: A close-up diagram of the remote control, clearly labeling each of its four buttons and their primary functions: Arm, Disarm, Ringtone, and Bell/Locate.

Image: A person using the remote control to locate their bike in a crowded bike rack. The image highlights the remote's search function, showing a signal from the remote to the alarm unit, which then emits a sound.
5.2 Justering af følsomhed
The alarm has 7 adjustable sensitivity levels, from a gentle touch to a strong impact. To adjust:
- While the alarm is disarmed, press and hold the ⚡ (Lightning) button for approximately 3 seconds until you hear a "Di" sound.
- The alarm will then emit a series of "Di" sounds, indicating the current sensitivity level (1 beep for lowest, 7 beeps for highest).
- Tryk på ⚡ (Lightning) button again to cycle through the sensitivity levels.
- Once you hear the desired number of "Di" sounds, stop pressing. The alarm will automatically save the setting after a few seconds.

Image: A visual representation of the 7 adjustable sensitivity levels, ranging from "gently touch" to "push/beat". The levels are depicted as increasing bar heights, labeled with musical solfège syllables (Si, La, So, Fa, Mi, Re, Do) to indicate different sensitivity settings.
5.3 Justering af lydstyrke
The alarm has 3 adjustable volume levels, up to 113dB. To adjust:
- While the alarm is disarmed, press and hold the 🔔 (Bell) button for approximately 3 seconds until you hear a "Di" sound.
- The alarm will then emit a series of "Di" sounds, indicating the current volume level (1 beep for lowest, 3 beeps for highest).
- Tryk på 🔔 (Bell) button again to cycle through the volume levels.
- Once you hear the desired number of "Di" sounds, stop pressing. The alarm will automatically save the setting after a few seconds.

Image: A diagram illustrating the three adjustable volume levels: 96dB, 106dB, and 113dB, with corresponding speaker icons indicating increasing loudness.
5.4 Fall Alarm (SOS Function)
The alarm features an intelligent algorithm that can detect if your vehicle has fallen or tilted more than 45 degrees from its initial position. When this occurs, the alarm will automatically sound to attract attention. This SOS function is slået fra som standard.
To enable/disable the SOS function:
- While the alarm is disarmed, press and hold the 🔒 (Lock) button for approximately 3 seconds until you hear a "Di" sound.
- The alarm will then emit a single "Di" sound if the SOS function is enabled, or two "Di" sounds if it is disabled.
- Tryk på 🔒 (Lock) button again to toggle the SOS function on or off.
- Once you hear the desired confirmation sound, stop pressing. The alarm will automatically save the setting after a few seconds.

Image: A scenario depicting a child next to a fallen bicycle, emphasizing the fall alarm function. An overlay diagram explains that if the bike tilts less than 45 degrees, there's no alarm, but if it tilts more than 45 degrees, an automatic alarm is triggered.
Video: A demonstration of the WSDCAM bike alarm's loudness and sensitivity. The video shows the alarm unit and remote, with various sounds and alarm triggers, including a loud siren when activated.
6. Vedligeholdelse
- Opladning: Recharge the alarm unit when the battery indicator is low or when the alarm's performance seems diminished. Regular charging ensures optimal operation.
- Rensning: Tør alarmenheden og fjernbetjeningen af med en blød, tør klud. Brug ikke skrappe kemikalier eller slibende rengøringsmidler.
- Opbevaring: If storing the alarm for an extended period, ensure it is fully charged and store it in a cool, dry place. Recharge every 3-6 months to maintain battery health.
- Vandeksponering: While IP65 waterproof, avoid submerging the device in water. Ensure the USB-C port cover is securely closed when not charging.
7. Fejlfinding
| Problem | Mulig årsag | Løsning |
|---|---|---|
| Alarmen reagerer ikke på fjernbetjeningen. | Low battery in alarm unit or remote; remote out of range; interference. | Charge the alarm unit. Replace remote battery if applicable. Move closer to the alarm unit. Avoid strong electromagnetic interference. |
| Alarmen udløses for let eller slet ikke. | Sensitivity setting is too high or too low. | Adjust the sensitivity level (refer to Section 5.2). |
| Alarmlydstyrken er for lav. | Lydstyrkeindstillingen er for lav. | Adjust the volume level (refer to Section 5.3). |
| Fall alarm (SOS) not working. | SOS function is disabled. | Enable the SOS function (refer to Section 5.4). |
| Kort batterilevetid. | Frequent triggers; aging battery; extreme temperatures. | Reduce sensitivity if false alarms are frequent. Ensure full charges. Operate within recommended temperature ranges. |
8. Specifikationer
| Feature | Detalje |
|---|---|
| Model | Wireless Bike Alarm with Remote |
| Alarmvolumen | Op til 113 dB (3 justerbare niveauer) |
| Følsomhed | 7 justerbare niveauer |
| Batteritype | 700mAh genopladeligt lithium-ion |
| Opladningsport | USB Type-C |
| Opladningstid | Ca. 2 timer |
| Batterilevetid (daglig brug) | Op til 3 måneder |
| Standby tid | 6-11 måneder |
| Vandtæt vurdering | IP65 |
| Fjernbetjenings rækkevidde | Up to 20M / 66FT (with walls) |
| Kompatible enheder | Bicycles, E-bikes, Motorcycles, Scooters |
| Varens vægt | Ca. 4.6 ounces |
| Dimensioner (alarmenhed) | Ca. 3.7 x 1.6 x 0.8 tommer |
| Oprindelsesland | Kina |

Image: A diagram illustrating the approximate dimensions of both the WSDCAM alarm unit (3.7in length, 1.6in width, 0.8in height) and its remote control (2.3in length, 1.2in width).
9. Garanti og support
The WSDCAM Wireless Bike Alarm comes with a 1 års garanti fra købsdatoen.
For technical support, troubleshooting assistance, or warranty claims, please contact WSDCAM customer service through the retailer where you purchased the product or visit the official WSDCAM store on Amazon:
Visit the WSDCAM Store on Amazon
Please have your purchase details and product model information ready when contacting support.


