1. Introduktion
The MASTECH MS2109D is a precise and versatile 6000-count digital multimeter with True RMS capabilities, designed for comprehensive electrical diagnosis. It features a 23mm max jaw opening for clamp measurements, overload protection, and various functions including Diode/Continuity, NCV Detection, Backlight, Data Hold, and Auto Power Off. This manual provides detailed instructions for the safe and effective use of your MS2109D multimeter.
2. Sikkerhedsoplysninger
Always observe safety precautions when using electrical testing equipment. Failure to do so may result in injury or damage to the meter or equipment under test.
- Sørg for, at måleren er i god stand før brug.
- Do not exceed the maximum input values for any function. The MS2109D is rated CAT III 600V.
- Vær forsigtig, når du arbejder med voltagover 30V AC RMS, 42V peak eller 60V DC. Disse voluminertages udgør en stødfare.
- Frakobl altid testledningerne fra kredsløbet, før du skifter funktioner.
- Do not operate the meter if the battery cover is not in place or if the meter appears damaged.
- Use only the specified type of batteries (1.5V AAA x 3).
3. Produktfunktioner
- 6000 tæller display
- Ægte RMS-måling
- Frequency Measurement (up to 1000Hz)
- Relativ måling
- LED / Flashlight for illumination
- Duty Cycle / Inrush Current Measurement
- Overbelastningsbeskyttelse
- Diode og kontinuitetstest
- Non-Contact Voltage (NCV) Detection / Live Wire Recognition
- Max Jaw Opening: 23mm
- Auto Power Off for battery saving
- Data Hold funktion
- Backlight for easy reading in low light conditions
- Enhedsvisning
4. Components and Parts Identification
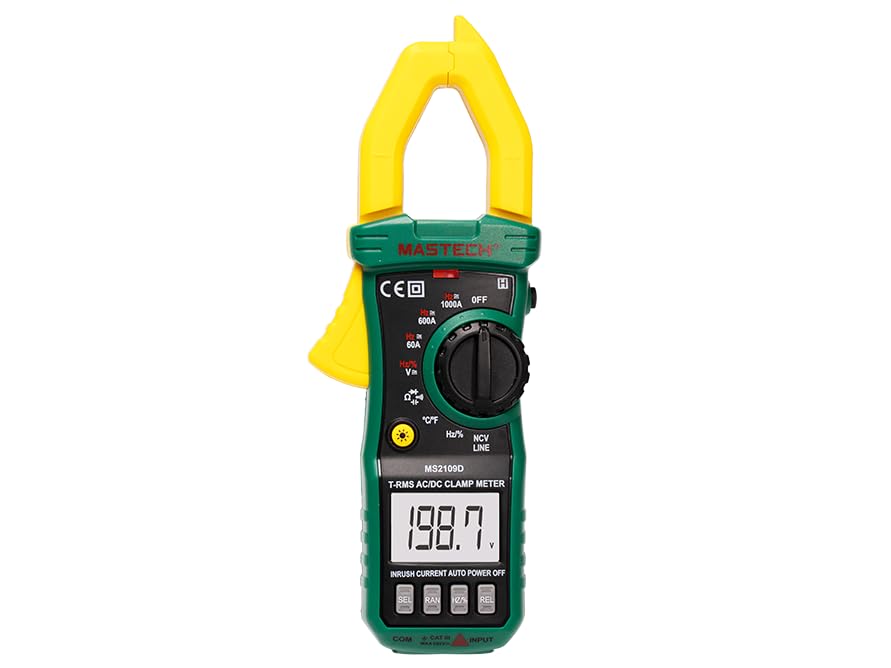
Figur 4.1: Forside view of the MASTECH MS2109D Digital Multimeter, showing the clamp jaw, display, rotary switch, and input terminals.
- Clamp Kæbe: Anvendes til berøringsfri AC/DC-strømmåling.
- LCD-skærm: Viser måleaflæsninger, enheder og funktionsindikatorer.
- Funktionsdrejekontakt: Vælger den ønskede målefunktion.
- Funktionsknapper: Buttons for specific features like HOLD, SELECT, NCV, etc.
- Indgangsstik: Terminals for connecting test leads (COM, VΩHz, A).
- Lommelygte/LED: Giver belysning til måleområdet.
5. Opsætning
5.1 Batteriinstallation
- Sørg for, at måleren er slukket.
- Find batterirummet på bagsiden af måleren.
- Skru dækslet til batterirummet af.
- Insert three 1.5V AAA batteries, observing the correct polarity (+/-) as indicated inside the compartment.
- Sæt batteridækslet på igen og fastgør det med skruen.
5.2 Tilslutning af testledninger
- For de fleste volumenertage, resistance, continuity, diode, frequency, and capacitance measurements, insert the black test lead into the 'COM' (common) jack and the red test lead into the 'VΩHz' jack.
- For current measurements using test leads (not clamp), refer to the specific current input jack (if available, typically 'A' or 'mA' for smaller currents). For the MS2109D, current is primarily measured via the clamp.
6. Betjeningsvejledning
6.1 Tænd/sluk
Turn the rotary switch from 'OFF' to any desired function to power on the meter. To power off, turn the rotary switch back to 'OFF'. The meter features Auto Power Off to conserve battery life after a period of inactivity.
6.2 DC/AC Voltage Måling (V)
- Set the rotary switch to the 'V' position. Use the 'SELECT' button to toggle between DCV and ACV if necessary.
- Connect the black test lead to the 'COM' jack and the red test lead to the 'VΩHz' jack.
- Tilslut testproberne parallelt til det kredsløb eller den komponent, der skal måles.
- Læs bindtage -værdi på displayet.
6.3 AC/DC Current Measurement (A) - Clamp Fungere
- Set the rotary switch to the 'A' position (60A, 600A, or 1000A range). Use the 'SELECT' button to toggle between DCA and ACA.
- Åbn clamp kæben ved at trykke på aftrækkeren.
- Inkluder kun én leder af kredsløbet inden for clamp kæbe. Sørg for, at kæben er helt lukket.
- Aflæs den aktuelle værdi på displayet.
6.4 Modstandsmåling (Ω)
- Set the rotary switch to the 'Ω' position.
- Connect the black test lead to 'COM' and the red test lead to 'VΩHz'.
- Sørg for, at kredsløbet eller komponenten er spændingsfri, før proberne tilsluttes.
- Tilslut testproberne på tværs af den komponent, der skal måles.
- Læs modstandsværdien på displayet.
6.5 Diode- og kontinuitetstest
- Set the rotary switch to the 'Diode/Continuity' position. Use 'SELECT' to toggle between functions.
- Connect the black test lead to 'COM' and the red test lead to 'VΩHz'.
- For Continuity: Connect probes across the circuit. A continuous beep indicates continuity (low resistance).
- For Diode Test: Connect the red probe to the anode and the black probe to the cathode of the diode. The display will show the forward voltage-dråbet. Vend proberne om; en aflæsning af et åbent kredsløb (OL) indikerer en god diode.
6.6 Frequency (Hz) and Capacitance (F) Measurement
- Set the rotary switch to the 'Hz/%' or 'Capacitance' position. Use 'SELECT' to toggle if combined.
- Connect the black test lead to 'COM' and the red test lead to 'VΩHz'.
- For Capacitance: Ensure the capacitor is fully discharged before testing. Connect probes across the capacitor.
- For Frequency: Connect probes across the signal source.
- Aflæs værdien på displayet.
6.7 Temperaturmåling (°C/°F)
- Set the rotary switch to the '°C/°F' position. Use 'SELECT' to toggle between Celsius and Fahrenheit.
- Connect the temperature probe (thermocouple) to the input jacks, observing polarity.
- Placer spidsen af temperatursonden på eller i nærheden af det objekt, hvis temperatur skal måles.
- Aflæs temperaturværdien på displayet.
6.8 Non-Contact Voltage (NCV) Detektion
- Indstil drejekontakten til 'NCV'-positionen.
- Move the top end of the meter (where the NCV sensor is located) close to the live conductor.
- The meter will emit an audible beep and the NCV indicator light will flash when AC voltage er opdaget.
6.9 Datahold og baggrundsbelysning
- Data Hold: Tryk på 'HOLD'-knappen for at fryse den aktuelle aflæsning på displayet. Tryk igen for at slippe.
- Baggrundsbelysning: Press the 'Backlight' button (often combined with another function button) to turn the display backlight on or off for improved visibility in dark environments.
7. Vedligeholdelse
7.1 Rengøring
Tør måleren c afasing med annonceamp klud og mildt rengøringsmiddel. Brug ikke slibemidler eller opløsningsmidler. Sørg for, at måleren er tør før brug.
7.2 Udskiftning af batteri
Når batteriindikatoren vises på displayet, skal batterierne udskiftes som beskrevet i afsnit 5.1. Brug altid nye 1.5V AAA-batterier.
7.3 Opbevaring
If the meter is not to be used for an extended period, remove the batteries to prevent leakage and store the meter in a cool, dry place away from direct sunlight and extreme temperatures.
8. Fejlfinding
- Ingen visning: Kontroller batteriinstallationen, og sørg for, at batterierne ikke er afladede.
- 'OL' (Overload) Reading: The measured value exceeds the meter's range for the selected function. Select a higher range or ensure the input is within specifications.
- Upræcise læsninger: Check test lead connections, ensure proper function selection, and verify battery level.
- Meter Does Not Turn On: Ensure the rotary switch is moved from the 'OFF' position.
9. Specifikationer
9.1 Generelle specifikationer
- Maks display: 6000 tæller
- Sikkerhedsvurdering: KAT III 600V
- Strømkilde: 3 x 1.5V AAA-batterier (inkluderet)
- Dimensioner: Cirka 7.64 x 2.83 x 1.38 tommer (19.4 x 7.2 x 3.5 cm)
- Vægt: Cirka 230 g
- Max Jaw Opening: 23 mm
9.2 Målespecifikationer
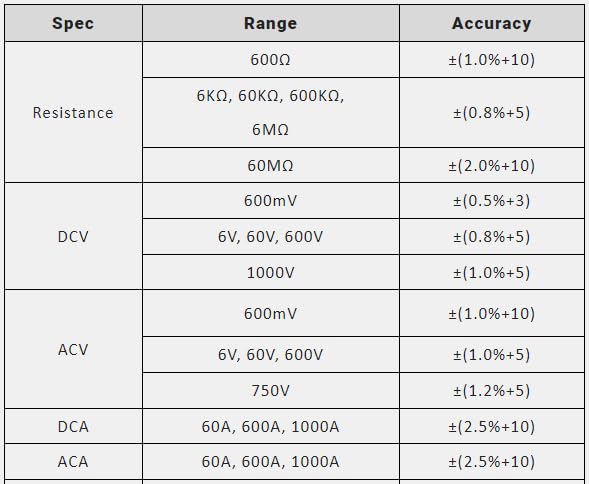
Figure 9.1: Measurement Specifications for Resistance, DCV, ACV, DCA, and ACA.
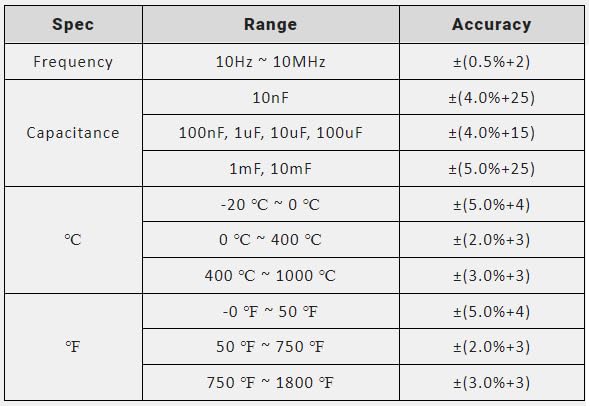
Figure 9.2: Measurement Specifications for Frequency, Capacitance, and Temperature (°C/°F).
10. Hvad er der i æsken
Når du åbner produktemballagen, bør du finde følgende:
- MASTECH MS2109D digitalt multimeter
- Bæretaske
- Test leads (one pair)
- Brugervejledning (dette dokument)
- Temperatursonde
- 3 x 1.5V AAA battery pack (pre-installed or separate)
11. Garanti og support
For warranty information and technical support, please refer to the warranty card included with your product or visit the official Mastech webwebsted. Behold din købskvittering som købsbevis i tilfælde af garantikrav.
If you encounter any issues not covered in this manual, please contact Mastech customer service for assistance.


