1. Introduktion
This manual provides comprehensive instructions for the setup, operation, maintenance, and troubleshooting of your Zeuslap P16KT 16-inch Portable Touch Monitor. Designed for versatility, this monitor features a 2560x1600 resolution, 144Hz refresh rate, ADS-IPS panel with 100% sRGB color gamut, 500 Cd/m² brightness, and touch functionality, making it ideal for various applications including work, gaming, and multimedia consumption on the go.

Figure 1.1: Zeuslap P16KT Portable Monitor showcasing its 2.5K resolution, 144Hz refresh rate, 16-inch size, 100% sRGB, and touch capabilities.
2. Opsætningsvejledning
Follow these steps to set up your Zeuslap P16KT portable monitor.
2.1 Pakkens indhold
- Zeuslap P16KT Portable Monitor
- USB-C til USB-C kabel
- Mini-HDMI til HDMI-kabel
- Power Adapter (if included, or use a compatible USB-C power source)
- Protective Cover/Stand
2.2 Tilslutning af skærmen
The Zeuslap P16KT offers versatile connectivity options. Ensure your device supports video output over USB-C (DisplayPort Alternate Mode) or HDMI.
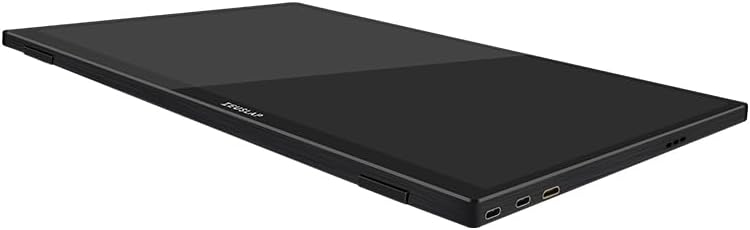
Figur 2.1: Sideprofile of the Zeuslap P16KT monitor, highlighting the USB-C and Mini-HD input ports.
- Strømtilslutning: Connect the monitor to a power source using one of the USB-C ports and a compatible power adapter (5V/3A or higher recommended). The monitor can also draw power directly from a connected device if it provides sufficient power via USB-C.
- USB-C Connection (Full Feature): For devices with a full-featured USB-C port (supporting video, audio, power, and touch data), connect one end of the provided USB-C to USB-C cable to the monitor's USB-C port and the other end to your device's USB-C port. This single cable can provide power, video, and enable touch functionality.
- Mini-HDMI Connection: For devices with an HDMI output, connect one end of the Mini-HDMI to HDMI cable to the monitor's Mini-HD port and the other end to your device's HDMI port. Note: When using Mini-HDMI, a separate USB-C connection for power and touch functionality (if desired) is required.
- USB-A Connection (for Touch): If using Mini-HDMI for video, connect a USB-A to USB-C cable from your device's USB-A port to the monitor's USB-C port to enable touch functionality.

Figur 2.2: Bagside view of the Zeuslap P16KT, indicating the location of Mini-HD, Type-C ports, USB port, and OSD control buttons.
2.3 Using the Protective Cover as a Stand
The included protective cover can be folded to serve as a stand, allowing you to position the monitor at various viewing vinkler.
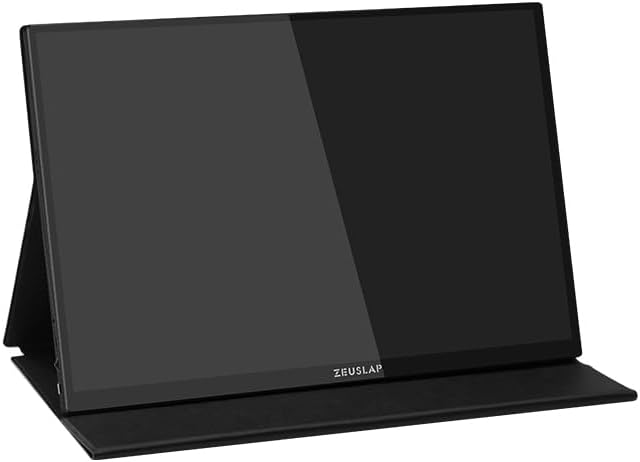
Figure 2.3: The Zeuslap P16KT monitor positioned using its multi-functional protective cover as a stable stand.
3. Betjeningsvejledning
Learn how to operate your Zeuslap P16KT monitor and utilize its features.
3.1 Tænd/sluk
Once connected to a power source and a video input, the monitor should automatically power on. To manually power off, press and hold the power button (usually integrated with the OSD joystick/button) for a few seconds.
3.2 On-Screen Display (OSD) menu
The OSD menu allows you to adjust various display settings. The OSD controls are typically located on the side or back of the monitor.
- Accessing OSD: Press the OSD button/joystick to bring up the menu.
- Navigation: Brug joysticket eller retningsknapperne til at navigere gennem menupunkterne.
- Udvælgelse: Press the OSD button/joystick to select an option.
- Udgang: Navigate to the 'Exit' option or press the back button to close the OSD menu.
Common OSD settings include Brightness, Contrast, Color Temperature, Input Source, Aspect Ratio, and Refresh Rate (e.g., switching between 144Hz and 120Hz if supported by your device).
3.3 Berøringsfunktionalitet
The Zeuslap P16KT features a responsive touch screen. Ensure the touch connection (via USB-C or separate USB-A to USB-C cable) is properly established with your device.
- Windows OS: Touch functionality should be plug-and-play. If not, check device manager for HID-compliant touch screen drivers.
- MacOS: macOS does not natively support touch input for external monitors. Third-party drivers may be available but are not officially supported.
- Android/Smartphones: Touch functionality depends on the phone's support for external touch displays via USB-C. Some phones may require specific settings or apps.
4. Vedligeholdelse og pleje
Korrekt pleje sikrer din skærms levetid og optimale ydeevne.
- Rengøring af skærmen: Tør forsigtigt skærmen af med en blød, fnugfri klud. Tør forsigtigt genstridige pletter afampen the cloth with water or a non-abrasive, screen-safe cleaning solution. Do not spray liquid directly onto the screen.
- Rengøring af Casing: Brug en blød, tør klud til at rengøre skærmens casing. Undgå barske kemikalier eller slibende materialer.
- Opbevaring: When not in use, store the monitor in its protective cover in a cool, dry place away from direct sunlight and extreme temperatures.
- Håndtering: Hold altid skærmen i kanterne. Undgå at trykke på skærmen.
5. Fejlfinding
Dette afsnit omhandler almindelige problemer, du kan støde på.
| Problem | Mulig årsag | Løsning |
|---|---|---|
| No display/"No Signal" message | Incorrect input source selected; Loose cable connection; Insufficient power; Device not outputting video. | Check all cable connections (USB-C, Mini-HDMI). Ensure the monitor is receiving adequate power. Use the OSD menu to select the correct input source. Verify your device's video output settings. |
| Touch-funktionen virker ikke | USB-C cable not full-featured; Separate USB cable for touch not connected; Device driver issue; Operating system limitation. | Ensure you are using a full-featured USB-C cable or have connected the separate USB-A to USB-C cable for touch data. Check device manager for touch screen drivers. Note that macOS does not natively support external touch displays. |
| Monitor frequently disconnects or flickers | Insufficient power; Faulty cable; Overheating. | Ensure the monitor is connected to a stable power source with sufficient wattage. Try a different USB-C or HDMI cable. Ensure adequate ventilation around the monitor. |
| Cannot connect to phone | Phone does not support DisplayPort Alternate Mode over USB-C; Phone requires specific settings. | Verify your phone's USB-C port supports video output. Some Android phones may require enabling 'Desktop Mode' or similar settings. Consult your phone's manual. |
| Image is distorted or incorrect resolution | Incorrect display settings on connected device. | Adjust the display resolution on your connected device to 2560x1600. Ensure the refresh rate is set correctly (e.g., 144Hz or 120Hz). |
6. Specifikationer
Detailed technical specifications for the Zeuslap P16KT Portable Monitor.
| Feature | Detalje |
|---|---|
| Mærke | ZEUSLAP |
| Modelnavn | ZL P16KT |
| Skærmstørrelse | 16 tommer |
| Skærmopløsning | 2560 x 1600 pixels (2K) |
| Paneltype | ADS-IPS |
| Opdateringshastighed | 144 Hz |
| Farveskala | 100 % sRGB |
| Lysstyrke | 500 Cd/m² |
| Forbindelsesteknologi | USB Type-C, Mini-HD |
| Speciel funktion | Portable, Touchscreen |
| Kompatible enheder | Stationær, bærbar, smartphone |
| Produktdimensioner | 0.5 x 35.5 x 23.2 cm |
| Farve | Sort |
| Første ledige dato | 27. februar 2024 |
7. Garanti og support
For warranty information and technical support, please refer to the documentation included with your purchase or visit the official ZEUSLAP webwebsted. Gem din købsbevis til garantikrav.
If you encounter issues not covered in this manual, please contact ZEUSLAP customer service for assistance.


