1. Introduktion
This manual provides detailed instructions for the installation, operation, and maintenance of your Thermalright TL-P12-S 120mm ARGB PWM CPU Case Fan. Please read this manual thoroughly before installation to ensure proper functionality and longevity of your product.
The Thermalright TL-P12-S is a high-performance 120mm fan designed for optimal airflow and silent operation within computer cases, radiators, and CPU coolers. It features Addressable RGB (ARGB) lighting for customizable aesthetics and Pulse Width Modulation (PWM) for precise speed control based on system temperature.

Image 1.1: The Thermalright TL-P12-S 120mm ARGB Silent Performance Fan, showcasing its design and ARGB lighting capabilities.
2. Pakkens indhold
Bekræft at alle komponenter er til stede i din pakke:
- Thermalright TL-P12-S 120mm ARGB PWM Fan
- Monteringsskruer
If any items are missing or damaged, please contact Thermalright customer support.
3. Opsætning og installation
Follow these steps to properly install your Thermalright TL-P12-S fan.
3.1. Understanding Fan Airflow
For normal airflow design fans, the side with the fan blades typically acts as the intake, drawing air in. The side with the frame structure acts as the exhaust, pushing air out. Ensure you install the fan in the correct orientation for your desired airflow direction within your PC case.

Image 3.1: The fan's static pressure blade design, optimized for efficient airflow, along with the PWM fan speed control cable.
3.2. Connecting the Fan
The TL-P12-S fan features two main connectors: a 4-pin PWM connector for fan speed control and a 3-pin 5V ARGB connector for lighting control.
- PWM-forbindelse: Locate an available 4-pin fan header on your motherboard. Connect the fan's 4-pin PWM cable to this header. This allows the motherboard to automatically control the fan speed based on system temperature. If connecting multiple fans, use the provided PWM sharing connector to synchronize fan speeds.
- ARGB-forbindelse: Locate an available 3-pin 5V Addressable RGB (ARGB) header on your motherboard. Connect the fan's 3-pin ARGB cable to this header. This enables software control of the fan's lighting effects. If connecting multiple ARGB devices, use the provided ARGB sharing connector to synchronize lighting effects. Note: Ensure you connect to a 5V ARGB header, not a 12V RGB header, to prevent damage.
Video 3.2: A quick start guide demonstrating the connection of the 4-pin PWM fan power connector to the motherboard fan header and the 3-pin 5V ARGB connector to the motherboard's ARGB header. It also shows how to use the sharing connectors for multiple fans.
3.3. Montering af ventilatoren
The fan can be mounted to various locations within your PC case, such as the rear, top, front, or bottom, or to a CPU cooler/radiator. Use the included screws to secure the fan in place. The fan features soft-touch rubber pads on each corner to absorb vibrations and reduce noise.
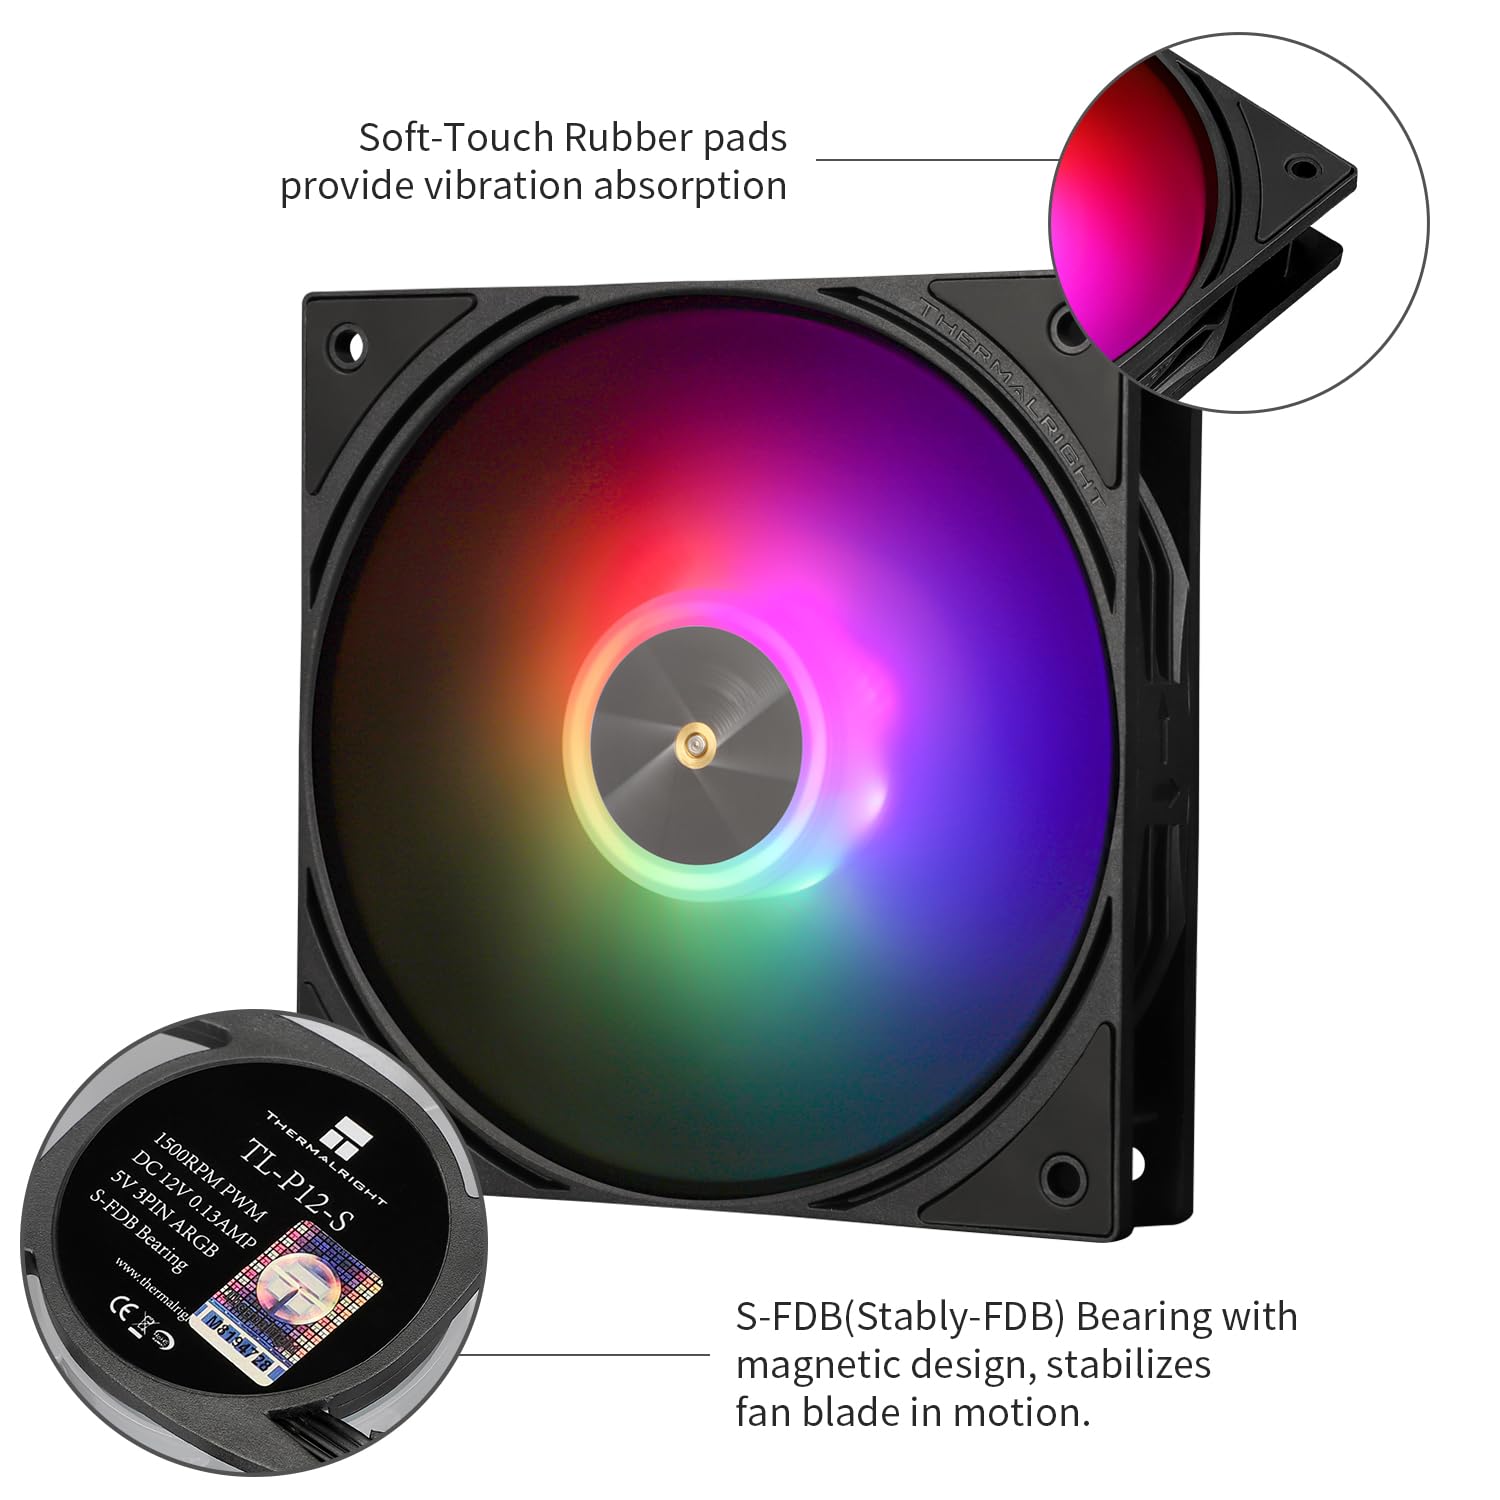
Billede 3.3: Nærbillede view of the fan highlighting the soft-touch rubber pads for vibration absorption and the S-FDB (Stably-FDB) bearing with magnetic design for stable operation.

Billede 3.4: Eks.amples of versatile cooling scenarios where the TL-P12-S fan can be used, including case airflow, air coolers, and water cooling radiators.
4. Betjeningsvejledning
4.1. Ventilatorhastighedskontrol (PWM)
The 4-pin PWM connector allows your motherboard to dynamically adjust the fan's speed (up to 1500 RPM) based on the CPU or system temperature. This ensures efficient cooling when needed and quieter operation during lighter loads. You can typically configure fan curves in your motherboard's BIOS/UEFI settings or through manufacturer-provided software.
4.2. ARGB-lysstyring
The 3-pin 5V ARGB connector allows you to control the fan's lighting effects through your motherboard's ARGB software (e.g., ASUS Aura Sync, MSI Mystic Light Sync, Gigabyte RGB Fusion, ASRock Polychrome Sync). The fan supports multiple modes of ARGB light effects, offering extensive customization options.

Image 4.1: The Thermalright TL-P12-S fan illuminated with vibrant ARGB lighting, demonstrating its aesthetic capabilities.

Image 4.2: The fan's high brightness LED and 5V ARGB control, supporting up to 17 modes of ARGB lighting effects for personalized aesthetics.
5. Vedligeholdelse
Regelmæssig vedligeholdelse er med til at sikre optimal ydeevne og forlænger din ventilators levetid.
- Rensning: Periodically clean the fan blades and frame to remove dust buildup. Use a soft brush or compressed air. Ensure the system is powered off before cleaning.
- Leje: The Thermalright TL-P12-S uses an S-FDB (Stably-FDB) bearing, which is designed for low-friction and low-noise operation with a long service life. This bearing is maintenance-free and should not be disassembled.

Billede 5.1: Detaljeret view of the S-FDB bearing, emphasizing its durability and maintenance-free design for extended product life.
6. Fejlfinding
Hvis du støder på problemer med din ventilator, kan du se følgende almindelige problemer og løsninger:
- Ventilatoren drejer ikke:
- Kontroller, om 4-bens PWM-stikket er korrekt tilsluttet bundkortets blæserheader.
- Ensure the fan header is enabled in your motherboard's BIOS/UEFI settings.
- Test the fan on a different fan header or with a fan controller to rule out a faulty header.
- ARGB Lights Not Working/Incorrect Colors:
- Verify that the 3-pin 5V ARGB connector is securely plugged into the correct 5V ARGB header on your motherboard. Do not connect to a 12V RGB header.
- Ensure your motherboard's ARGB software is installed and configured correctly.
- Check for any loose connections in the ARGB daisy chain if multiple devices are connected.
- Overdreven støj:
- Ensure the fan is securely mounted and not vibrating against the case or other components.
- Kontroller, om der er kabler eller forhindringer, der berører ventilatorbladene.
- Rengør eventuelt støvophobning på ventilatorbladene.
- Adjust fan speed settings in your motherboard's BIOS/UEFI or software to a lower RPM if noise is a concern during low load.
7. Specifikationer
| Feature | Specifikation |
|---|---|
| Produktdimensioner | 4.72 x 4.72 x 0.98 tommer (120 x 120 x 25 mm) |
| Varemodelnummer | TL-P12-S D6 |
| Mærke | Thermalright |
| Strømstik type | 4-Pin PWM |
| Voltage | 12 volt |
| Wattage | 1.56 watt |
| Afkølingsmetode | tvungen luft |
| Kompatible enheder | Desktop |
| Støjniveau | 22.1 decibel (maks.) |
| Materiale | PBT+PC (Fan Blades and Frame), Copper (Bearing components) |
| Maksimal rotationshastighed | 1500 RPM |
| Luftstrøm | 52.86 CFM (MAX) |
| Statisk tryk | 1.53 mm H2O |
| Leje Type | S-FDB (Stably-FDB) |
| ARGB stik | 3-benet 5V adresserbar RGB |
8. Garanti og support
Thermalright products are designed for reliability and performance. For warranty information, technical support, or further assistance, please refer to the official Thermalright webwebstedet eller kontakt din lokale forhandler. Gem din købskvittering til garantikrav.


