Indledning
This manual provides detailed instructions for the SUBSONIC Wireless Controller, designed for use with Nintendo Switch and Switch 2 consoles. This controller offers an enhanced gaming experience with features such as wireless connectivity, LED lighting, adjustable vibrations, and a 6-axis gyroscope.
Please read this manual thoroughly before using the controller to ensure proper operation and to maximize your gaming experience.

Front view of the SUBSONIC Wireless Controller, showcasing its ergonomic design and illuminated joysticks.
Pakkens indhold
- 1 x SUBSONIC Wireless Controller
- 1 x USB-C opladningskabel
- 1 x Brugermanual (dette dokument)
Controller layout
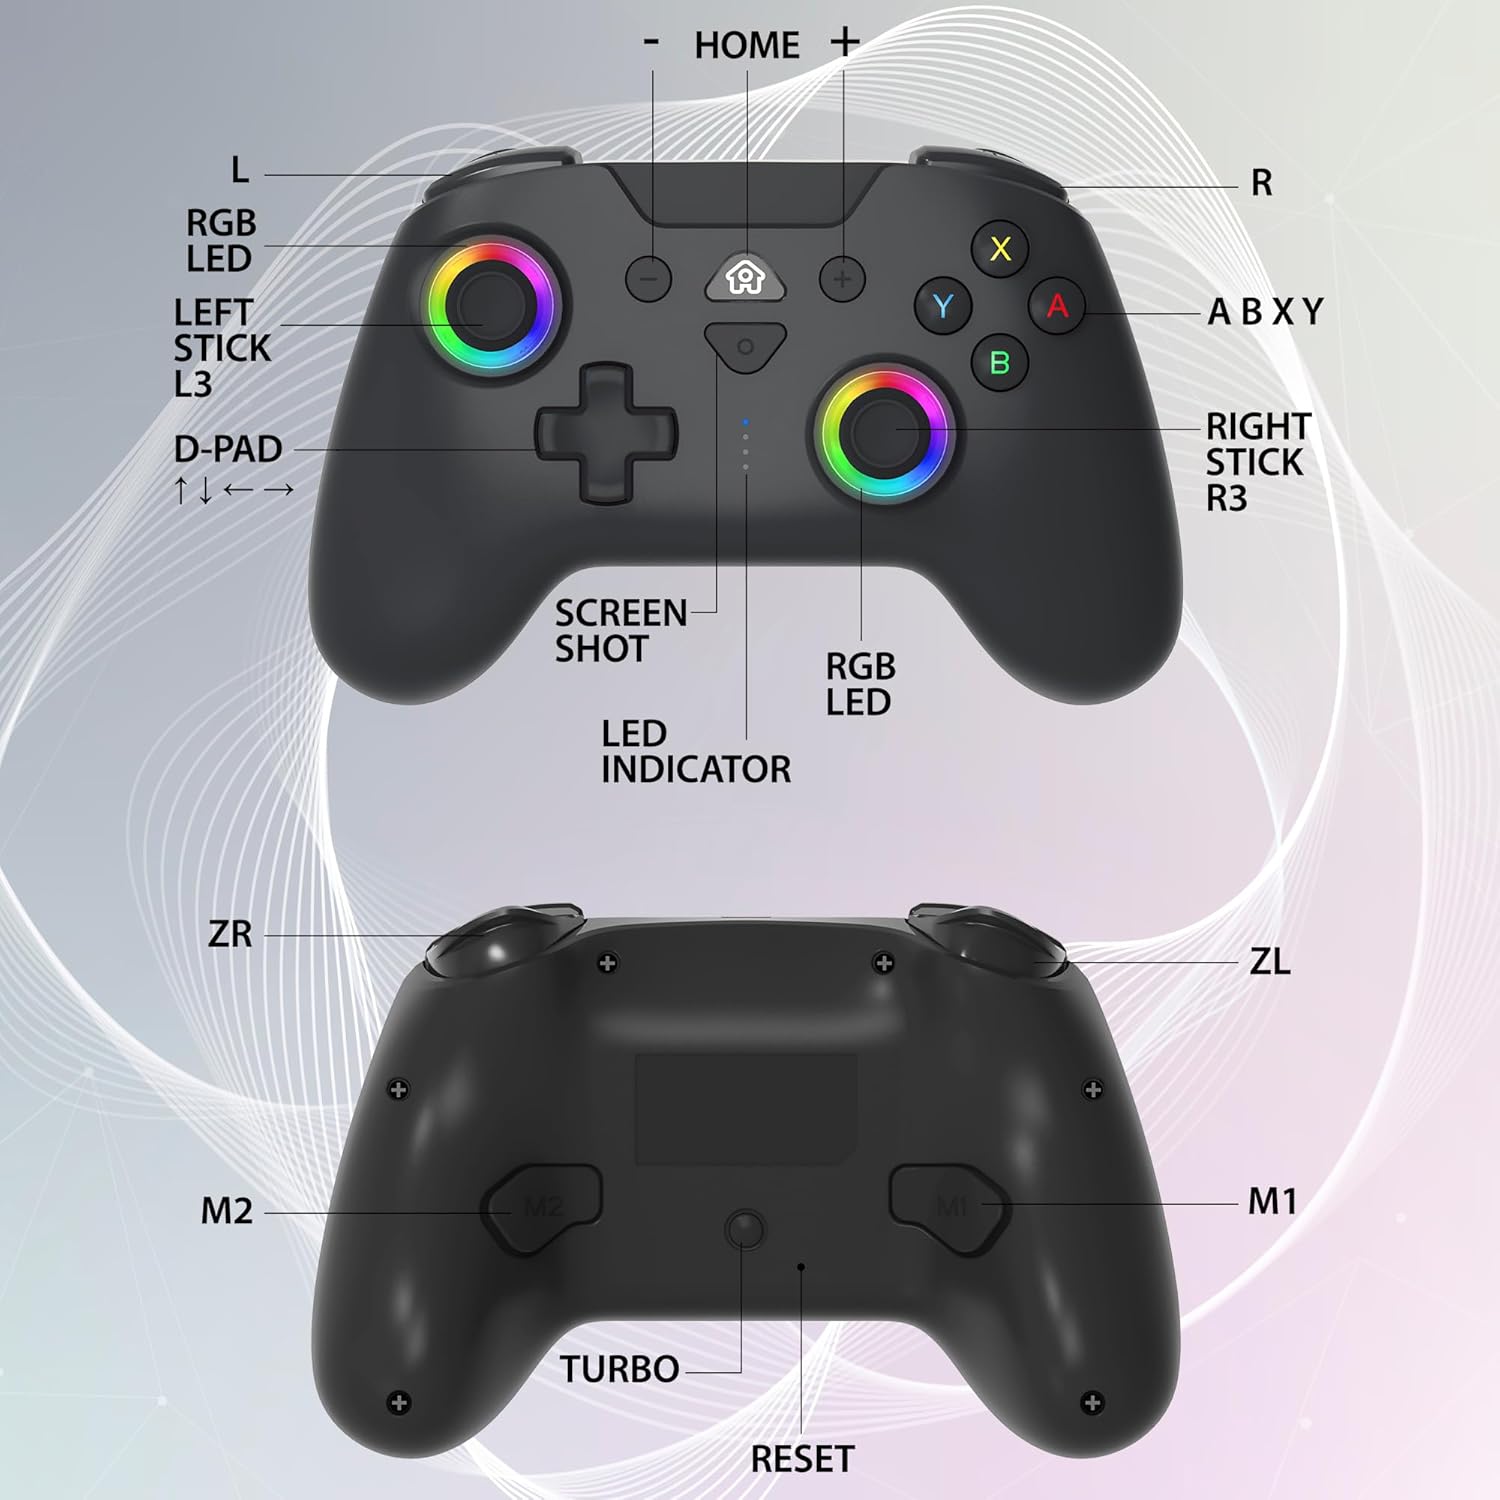
Detailed diagram of the controller's front and back, indicating all buttons, sticks, and indicators.
- L/R: Left/Right Shoulder Buttons
- ZL/ZR: Left/Right Trigger Buttons
- Venstre pind (L3): Left Analog Stick (press down for L3)
- Højre pind (R3): Right Analog Stick (press down for R3)
- D-Pad: Retningspude (op, ned, venstre, højre)
- ABXY knapper: Action knapper
- HJEM knap: Returns to the console's home screen
- Skærmbillede-knap: Captures screenshots
- +/- knapper: Plus/Minus-knapper
- LED-indikator: Shows connection status and battery level
- RGB LED: Customizable LED rings around joysticks
- M1/M2: Programmerbare tilbageknapper
- TURBO knap: Activates Turbo function
- Genstarts knap: Resets the controller (small pinhole)
Opsætning og tilslutning
Opladning af controlleren
Before first use, fully charge the controller. Connect the supplied USB-C cable to the controller's charging port and the other end to a USB power source (e.g., console, wall adapter). The LED indicator will show charging status and turn off when fully charged.

The controller provides approximately 10 hours of playing time on a full charge (600 mAh battery).
Pairing with Nintendo Switch/Switch 2
- Gå til HOME-menuen på din Nintendo Switch-konsol.
- Vælg 'Controllere' > 'Skift greb/rækkefølge'.
- On the SUBSONIC controller, press and hold the HOME button for 3-5 seconds until the LED indicators start flashing rapidly.
- The controller will automatically pair with the console. Once paired, the LED indicator(s) will light up solid.
Wake-up funktion
The controller supports a wake-up function for the Nintendo Switch. When the console is in sleep mode, simply press the HOME button on the controller to wake up the console and automatically reconnect.

Pressing the HOME button on the controller can wake up your Nintendo Switch console from sleep mode.
Betjeningsvejledning
Motion Sensors (6-Axis Gyro)
The controller is equipped with a 6-axis gyroscope and accelerometer, allowing for precise motion control in compatible games. This enables intuitive gameplay, similar to the original Joy-Con controllers.

The controller features 360° motion sensors for immersive gameplay.
Justerbar vibration
The controller offers three levels of vibration intensity (Weak, Medium, Strong) to suit your preference. Refer to the console's settings or specific game options to adjust vibration feedback.

Customize your gaming experience with adjustable vibration feedback.
Programmerbar RGB LED
The joysticks feature programmable RGB LEDs with two modes: fixed colors and breathing colors. You can adjust the color and brightness to personalize your controller's appearance.

The RGB LEDs offer customizable colors and brightness settings.
Programmable M1 & M2 Keys
The controller includes two programmable back buttons, M1 and M2, which can be mapped to various inputs (D-pad directions, ABXY, L, R, ZL, ZR, L3, R3) for quick access during gameplay.

The M1 and M2 keys can be programmed for enhanced control.
Turbo & Auto Functions
The Turbo function allows a button to be pressed repeatedly as long as it is held down. The Auto function allows a button to be pressed repeatedly without holding it down. These functions can be assigned to specific action buttons (A, B, X, Y, L, R, ZL, ZR).

Utilize Turbo and Auto functions for rapid input in games.
Opretholdelse
- Rensning: Brug en blød, tør klud til at rengøre controlleren. Brug ikke slibende rengøringsmidler eller opløsningsmidler.
- Opbevaring: Opbevar controlleren et køligt, tørt sted væk fra direkte sollys og ekstreme temperaturer.
- Batteripleje: For at forlænge batteriets levetid bør du undgå at aflade controlleren helt ofte. Oplad den regelmæssigt, selvom den ikke er i brug i længere perioder.
Fejlfinding
| Problem | Mulig årsag | Løsning |
|---|---|---|
| Controlleren opretter ikke forbindelse/parrer ikke. | Low battery; Out of range; Interference; Incorrect pairing procedure. | Charge the controller; Move closer to the console; Ensure no strong interference sources; Follow pairing steps carefully. |
| Controlleren afbryder ofte forbindelsen. | Lavt batteri; Uden for rækkevidde; Interferens. | Charge the controller; Move closer to the console; Reduce interference. |
| Knapper/sticks reagerer ikke. | Softwarefejl; Fysisk skade. | Reset the controller (use a pin to press the RESET button on the back); If issue persists, contact support. |
| Controlleren oplader ikke. | Faulty cable; Faulty power source; Controller issue. | Try a different USB-C cable and power source; If still no charge, contact support. |
Nulstilling af controlleren
If the controller is unresponsive or behaving erratically, you can perform a reset. Locate the small pinhole RESET button on the back of the controller (refer to the 'Controller Layout' diagram) and use a thin object (like a paperclip) to press it. This will power off and reset the controller.
Specifikationer
- Modelnummer: SA5633-1
- Forbindelse: Trådløs Bluetooth
- Kompatibilitet: Nintendo Switch, Nintendo Switch 2, Nintendo Switch OLED, Nintendo Switch Lite
- Batteri: 1 Lithium Polymer batteri (medfølger)
- Batterikapacitet: 600 mAh (approx. 10 hours playing time)
- Bevægelsessensorer: 6-axis Gyroscope and Accelerometer
- Vibration: Adjustable (3 levels)
- LED: Programmable RGB LED on joysticks
- Dimensioner: 4.53 x 6.3 x 23.62 tommer
- Vægt: 7.2 ounce
- Fabrikant: Subsonisk
Garanti og support
This product is covered by a standard manufacturer's warranty. For specific warranty terms and conditions, please refer to the documentation included with your purchase or contact SUBSONIC customer support.
For technical assistance, troubleshooting, or warranty claims, please contact SUBSONIC customer support:
- Mærkebutik: Besøg SUBSONIC-butikken på Amazon
- Sælger: SUBSONIC INC
Gem venligst din købsbevis af garantihensyn.


