Indledning
This manual provides comprehensive instructions for the PowerA Enhanced Wireless Controller, designed for use with Nintendo Switch, Nintendo Switch Lite, Nintendo Switch – OLED Model, and Nintendo Switch 2. Please read this manual thoroughly before use to ensure proper setup and operation.
Pakkens indhold
- PowerA Enhanced Wireless Controller (Pikachu Vibrant)
- 10 fod (3m) USB-C-ladekabel
- Brugervejledning (dette dokument)
Controller-funktioner
The PowerA Enhanced Wireless Controller offers a range of features for an optimized gaming experience:
- Trådløs forbindelse: Utilizes Bluetooth 5.0 technology for seamless connection.
- Genopladeligt batteri: Internal lithium-ion battery provides up to 30 hours of gameplay per charge.
- Advanced Gaming Buttons: Two mappable buttons for custom control configurations.
- Bevægelseskontrol: Integrated motion sensors for intuitive gameplay.
- Ergonomisk design: Superior ergonomics for extended comfortable gaming sessions.
- Smooth Thumbsticks: Embedded anti-friction rings ensure precise thumbstick control.
Note: This controller does not support HD rumble, IR camera, or Amiibo NFC functionality.
Controller layout
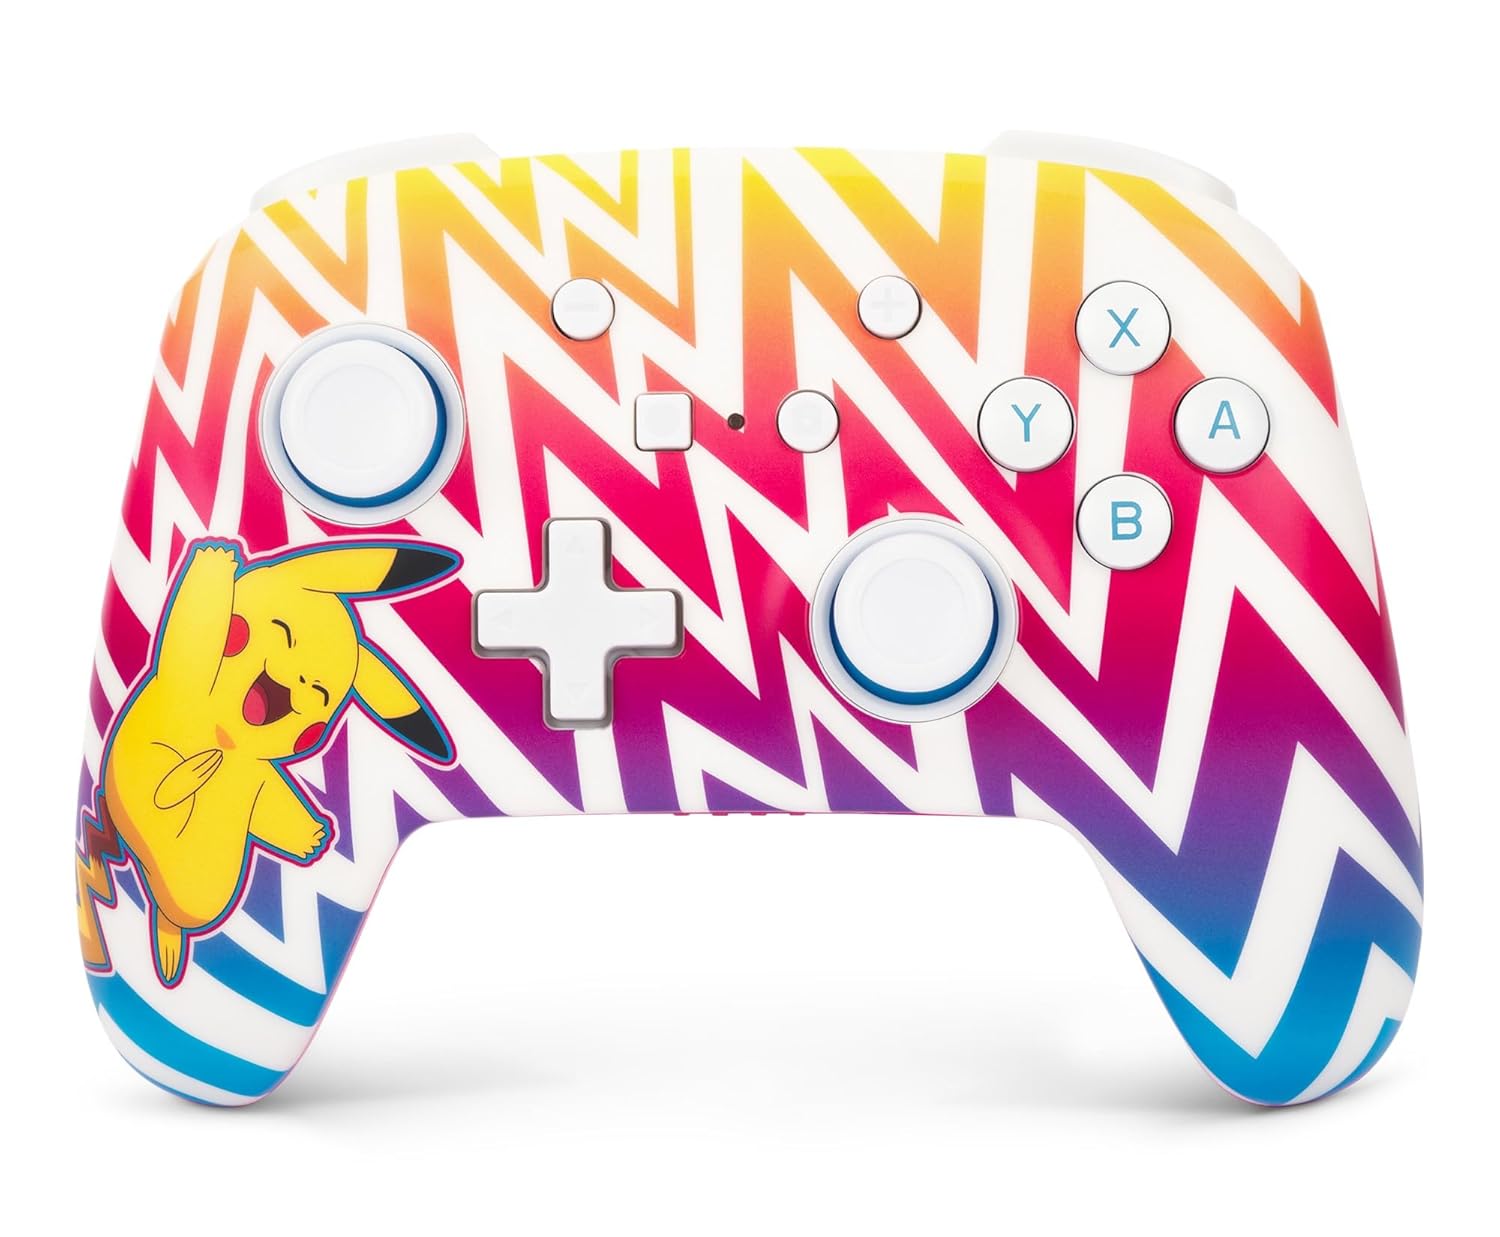
Billede 1: Front view of the PowerA Enhanced Wireless Controller, featuring a vibrant Pikachu design on a zigzag pattern. Shows the left and right analog sticks, D-pad, A/B/X/Y buttons, Home button, Capture button, Plus and Minus buttons, and indicator lights.

Billede 2: Tilbage view of the PowerA Enhanced Wireless Controller. This image highlights the two mappable Advanced Gaming Buttons (AGB) located on the grips, and the program button in the center.

Billede 3: Top view of the PowerA Enhanced Wireless Controller. This perspective shows the L, R, ZL, and ZR shoulder buttons, along with the USB-C charging port located between the ZL and ZR buttons.
Opsætning
Opladning af controlleren
- Connect the small end of the included USB-C cable to the USB-C port on the top of the controller.
- Connect the large end of the USB-C cable to a USB power source (e.g., Nintendo Switch dock, USB wall adapter, computer USB port).
- The LED indicator lights on the front of the controller will illuminate to show charging status. All four LEDs will be solid when fully charged.
- A full charge provides up to 30 hours of gameplay. Actual battery life may vary based on usage.

Billede 4: Side view of the controller with the USB-C charging cable connected to the port on the top edge.
Parring med Nintendo Switch
Follow these steps to pair your PowerA Enhanced Wireless Controller with your Nintendo Switch console:
- Sørg for, at din Nintendo Switch-konsol er tændt og opdateret til den nyeste systemsoftware.
- Vælg HOME-menuen "Kontrollører", så "Skift greb/orden".
- On the PowerA controller, press and hold the SYNC knap (small button next to the USB-C port) for at least three seconds. The LED indicator lights will begin to flash.
- Once the controller is successfully paired, the player LED(s) corresponding to the controller number will remain solid.
- Tryk på Hjem-knap on the controller to return to the HOME Menu and begin playing.
The controller can be used whether the Nintendo Switch is docked or in handheld mode.
Betjeningsvejledning
Programming Advanced Gaming Buttons (AGB)
The controller features two mappable Advanced Gaming Buttons (AGB) on the back. These can be programmed on-the-fly:
- Tryk på Program knap (small white button on the back, between the AGBs). The Program LED will flash, indicating the controller is in programming mode.
- Press the button you wish to map (e.g., A, B, X, Y, L, R, ZL, ZR, D-pad directions, Left Stick Click, Right Stick Click).
- Tryk på Advanced Gaming Button (AGB L or AGB R) you want to assign the function to. The Program LED will stop flashing, indicating the AGB has been successfully programmed.
- To clear an AGB assignment, repeat steps 1-2, but instead of pressing a button to map, press the Program Button again to exit programming mode without assigning a new function.
Bevægelseskontrol
This controller supports motion controls in compatible Nintendo Switch games. No special setup is required; motion controls will function automatically when supported by the game.
Opretholdelse
- Rensning: Brug en blød, tør klud til at rengøre controlleren. Undgå at bruge skrappe kemikalier eller slibende materialer.
- Opbevaring: Opbevar controlleren et køligt, tørt sted væk fra direkte sollys og ekstreme temperaturer.
- Batteripleje: For at forlænge batteriets levetid bør du undgå at aflade controlleren helt ofte. Oplad den regelmæssigt, selvom den ikke er i konstant brug.
Fejlfinding
- Controlleren forbinder ikke:
- Sørg for, at controlleren er fuldt opladet.
- Verify the Nintendo Switch console is powered on and within range.
- Repeat the pairing process as described in the "Pairing with Nintendo Switch" section.
- If issues persist, try restarting both the controller and the Nintendo Switch console.
- Knapper eller joysticks reagerer ikke:
- Check if the controller is properly connected to the console.
- Sørg for, at der ikke er snavs i nærheden af knapperne eller joystickene.
- Test the controller in another game or on the Switch's controller test menu to isolate the issue.
- Kort batterilevetid:
- Sørg for, at controlleren er fuldt opladet før brug.
- Battery life can be affected by game intensity and environmental factors.
- Hvis batteriets levetid forringes betydeligt over tid, skal du kontakte kundesupport.
Specifikationer
| Modelnummer | NSGP0262-01 |
| Forbindelse | Bluetooth 5.0 |
| Batteritype | Genopladelig lithium-ion |
| Batterilevetid | Op til 30 timer pr. opladning (ca.) |
| Dimensioner | 6.02 x 4.41 x 2.48 tommer |
| Vægt | 8 ounce (ca. 227 gram) |
| Kompatibilitet | Nintendo Switch, Switch Lite, Switch – OLED Model, Switch 2 |
| Medfølgende kabel | 10 fod (3m) USB-C-ladekabel |
Garantioplysninger
PowerA backs all products with a 2 års begrænset garanti. For detailed warranty terms and conditions, please refer to the official PowerA webwebsted eller kontakt kundesupport.
Støtte
For further assistance, technical support, or warranty claims, please visit the official PowerA support website or contact their customer service department. Contact information can typically be found on the PowerA webwebsted eller produktemballage.
Online ressourcer: www.powera.com/support


