1. Introduktion
This manual provides detailed instructions for the installation, operation, and maintenance of your DEATTI 8-Channel 5-in-1 Hybrid Digital Video Recorder (DVR) system, model DET-8Dc2M. This DVR is designed for home security applications, offering compatibility with various camera types including AHD, CVI, TVI, IP, and CVBS (Analog) cameras. Please read this manual thoroughly before operating the device to ensure proper setup and functionality.
2. Produktet er slutview
The DEATTI DET-8Dc2M is an 8-channel hybrid DVR system capable of supporting multiple camera technologies. It features 1080P Lite recording and playback, HDMI and VGA outputs, and remote viewing kapaciteter.

Figur 2.1: Front view of the DEATTI 8-Channel 5-in-1 Hybrid DVR. The front panel includes control buttons for playback, menu navigation, search, PTZ control, record, and escape, along with a USB port and status indicators.
2.1. Nøglefunktioner
- 5-in-1 Hybrid Compatibility: Supports Analog, AHD, CVI, TVI, and IP cameras, allowing integration with various existing or new camera systems.
- 8-kanals input: Connect up to 8 cameras for comprehensive surveillance.
- 1080P Lite Recording: Records video at 1080P Lite resolution for clear footage.
- HDMI and VGA Output: Connects to monitors or TVs for local viewing.
- Bevægelsesdetektion: Customizable motion detection zones with email and app push notifications.
- Fjern Viewing: Adgang live view and playback from anywhere via the XMEye app on smartphones or tablets.
- Opbevaring: Supports up to 8TB hard drive (not included).

Figur 2.2: Illustrates the 5-in-1 adaptive capability of the DVR, showing compatibility with AHD, CVI, IP, Analog, and TVI cameras. This allows for flexible integration with different camera technologies.
3. Opsætningsvejledning
3.1. Udpakning og indledende inspektion
Carefully unpack the DVR and all accessories. Verify that all components are present and undamaged. The package typically includes the DVR unit, power adapter, USB mouse, and a quick start guide.
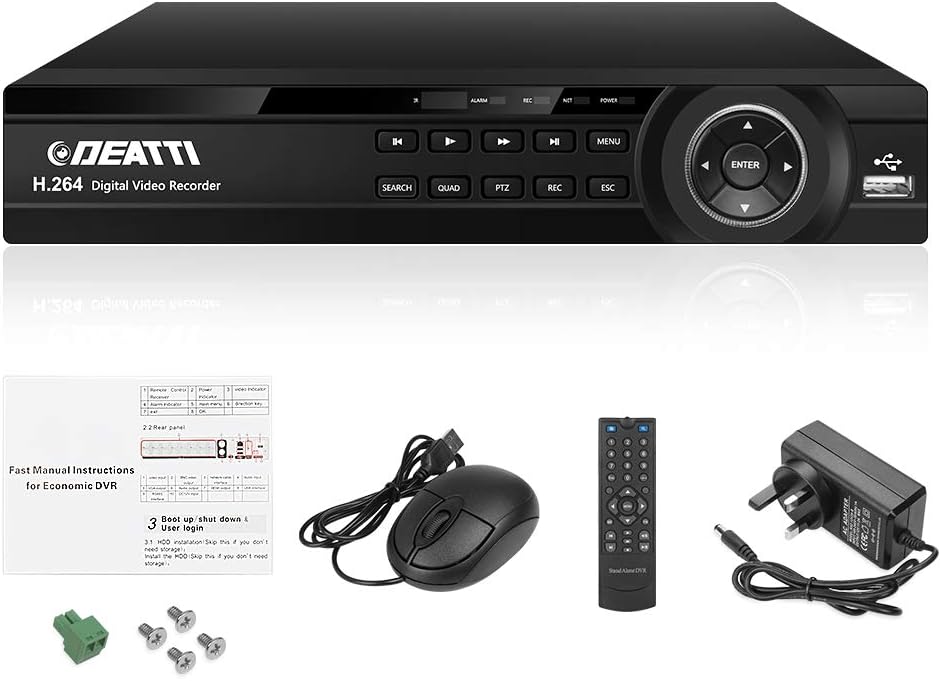
Figur 3.1: Contents of the DEATTI DVR package. This image displays the DVR unit, USB mouse, remote control, power adapter, and various connectors, indicating what is typically included with the product.
3.2. Installation af harddisk (valgfrit)
The DVR does not include a hard drive. A 3.5-inch SATA hard drive (up to 8TB) is required for recording video footage. To install:
- Skru DVR'ens topdæksel af og fjern det.
- Connect the SATA data and power cables from the DVR to the hard drive.
- Fastgør harddisken til DVR-kabinettet med de medfølgende skruer.
- Sæt topdækslet på igen, og fastgør det med skruer.
After installation, the hard drive will need to be formatted through the DVR's system settings.
3.3. Fysiske forbindelser
Følg disse trin for at tilslutte dit DVR-system:
- Tilslut kameraer: Connect your AHD, CVI, TVI, IP, or CVBS (Analog) cameras to the "VIDEO IN" BNC ports on the back of the DVR. Ensure BNC cables with metal locking connectors are used for optimal connection.
- Tilslut skærm: Connect a monitor or TV to the DVR using either the HDMI or VGA port. The DVR supports a maximum resolution of 1920x1080 pixels (minimum 1024x768).
- Tilslut mus: Sæt USB-musen i en af USB-portene på DVR'en.
- Tilslut netværk (valgfrit): Til fjernbetjening viewing and network features, connect an Ethernet cable from the DVR's LAN port to your router.
- Tilslut lyd (valgfrit): If using microphones or speakers, connect them to the "AUDIO IN" and "AUDIO OUT" ports respectively.
- Tænd: Connect the power adapter to the DVR's DC 12V input and then plug it into a power outlet. Ensure the DVR is powered on separately.

Figur 3.2: Detaljeret view of the rear panel connections of the DEATTI DVR. This image labels ports for video input (BNC for CVI, CVBS, TVI, AHD cameras), audio input/output, HDMI, VGA, Ethernet (LAN), USB, RS485, and DC power input.

Figur 3.3: Step-by-step connection diagram for the DEATTI 5-in-1 DVR. It shows how to connect cameras to the DVR, the DVR to a power source and a router, and then how to access the system via smartphone app after scanning QR codes for download.
3.4. Initial Setup Wizard
Upon first power-on, the DVR will typically launch an initial setup wizard. Follow the on-screen prompts to:
- Opret en login-adgangskode.
- Set the correct time zone and date format.
- Format the installed hard drive (if applicable).
- Configure network settings (if connected to a router).
It is recommended to allow the DVR to automatically detect and set up connected cameras initially, then adjust settings as needed.
3.5. Mobile App Setup for Remote Access
Til view your security system remotely on a smartphone or tablet, download the XMEye app:
- Scan the QR code below or visit the provided links to download the XMEye app for your device.
- Installer appen på din smartphone eller tablet.
- Registrer en konto og log ind.
- Add your DVR device to the app using its unique ID (usually found in the DVR's network settings or on a sticker on the device).
- Når du har tilføjet det, kan du view live video and playback recordings from anywhere.
Figur 3.4: QR codes for downloading the XMEye mobile application for both Android and iOS devices. Scanning these codes will direct users to the appropriate app store or download page.

Figur 3.5: Illustrates various devices capable of remote access to the DVR system, including smartphones, tablets, PCs, and local monitors. This highlights the flexibility of monitoring options.
4. Betjeningsvejledning
This section covers the basic operation of your DEATTI DVR system.
4.1. Lev View and Menu Navigation
- Musekontrol: Use the USB mouse to navigate the on-screen interface. Right-click to display the mini-menu.
- Kameradisplay: Left double-click on a camera image to view it in full screen. Use the mouse scroll wheel to cycle through single camera views.
- Zoom: I enkelt kamera view, hold the left mouse button and drag a rectangle to digitally zoom. Double-click to return to normal view.
- Farveindstillinger: From the mini-menu, select "Color Setting" to adjust contrast and saturation for individual cameras.
4.2. Recording Configuration
To set up recording schedules:
- From the mini-menu, select "Main Menu" then "Record".
- Here you can configure all cameras to record continuously or set individual cameras to record at scheduled times.
- For motion-triggered recording, uncheck the "Regular" box and ensure motion detection is enabled (see Section 4.3).
4.3. Bevægelsesdetektion og advarsler
The DVR supports customizable motion detection with alerts:
- From the mini-menu, select "Main Menu" then "Alarm".
- Select the desired channel number. Check the "Enable" box to activate motion detection for that channel.
- Customize motion detection areas and sensitivity (e.g., "Middle" sensitivity is often a good starting point).
- Configure alert actions such as email notifications and app push notifications to your phone.
- Set "Pre-record" and "Post-record" options (e.g., 30 seconds pre-record, 120 seconds post-record) to capture events before and after motion is detected.
4.4. Afspilning
Til review optaget footage:
- From the mini-menu, select "Main Menu" then "Record" then "Playback".
- Select the desired channel and date/time range.
- Use the playback controls (pause, stop, fast/slow forward/backward, frame-by-frame) to navigate through the footage.
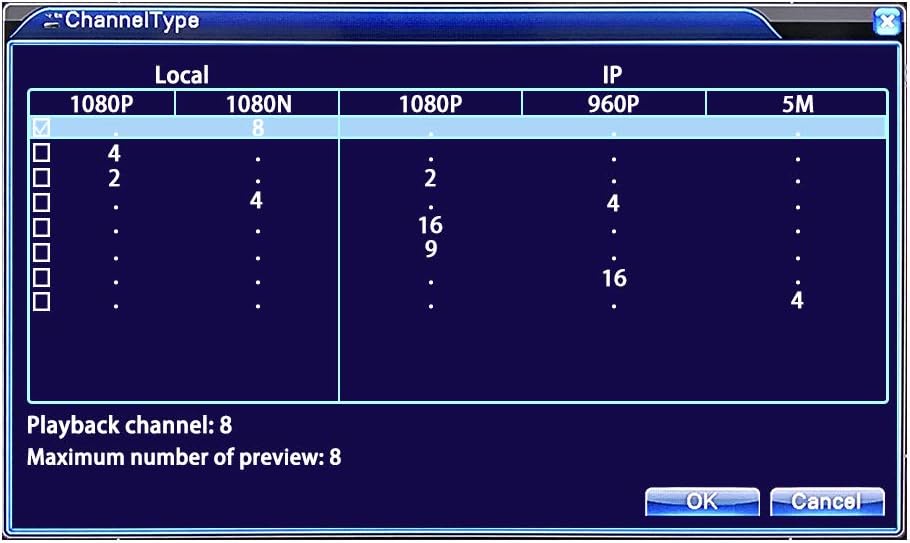
Figur 4.1: Screenshot of the DVR's "ChannelType" configuration screen. This interface allows users to select and configure local (AHD/CVI/TVI/CVBS) and IP camera channels, specifying resolutions like 1080P, 1080N, 960P, and 5M, and indicating the maximum number of preview and playback channels.
4.5. Backup Recorded Material
For at sikkerhedskopiere footage to an external storage device (e.g., USB flash drive):
- Insert the USB storage device into a USB port on the DVR.
- From the mini-menu, select "Main Menu" then "Record" then "Backup".
- Click "Detect" to ensure the storage device is recognized.
- Click "Backup Clear" to remove any existing listed files from previous backups.
- Select the desired channel(s) and right-click on the date/time numbers to set the specific period for backup. Click "Add" to include files på listen.
- Choose the desired backup format (MP4, H264/5, or AVI) and click "Start". Note that MP4 and H264/5 formats may require specific players.
5. Vedligeholdelse
5.1. Harddiskstyring
Regularly check the status of your hard drive through the DVR's system settings to ensure it is functioning correctly and has sufficient space. If the hard drive becomes full, the DVR will typically overwrite the oldest footage. You can also configure the DVR to stop recording when the hard drive is full.
5.2. Time and Date Battery
The DVR uses a CR2032 button battery for maintaining the time and date stamp. This battery is pre-installed but will need to be replaced occasionally to ensure accurate timekeeping, especially after power outages.
5.3. Almen pleje
- Opbevar DVR'en et godt ventileret område for at forhindre overophedning.
- Avoid placing the DVR near strong electromagnetic fields.
- Ensure camera cables are laid neatly and not tangled or crossing over each other. Keep the mouse cable and DVR power cable separate from camera cables to minimize interference.
- Clean the exterior of the DVR with a soft, dry cloth. Do not use liquid cleaners.
6. Fejlfinding
6.1. No Display on Monitor/TV
- Tjek kabler: Ensure HDMI or VGA cables are securely connected to both the DVR and the monitor/TV.
- Skærmkompatibilitet: This DVR may not support older TVs/monitors with very low resolution. Ensure your display supports at least 1024x768 pixels. Do not use a laptop or iMac as a monitor.
- Magt: Verify the DVR is powered on and its power adapter is functioning correctly.
6.2. Intet kamerabillede
- Kamerastrøm: Ensure cameras are powered on and receiving adequate power.
- Kabelforbindelse: Check BNC video cables for secure connections at both the camera and DVR ends.
- Kamerakompatibilitet: Verify that the camera type (AHD, CVI, TVI, IP, CVBS) is compatible with the DVR and correctly configured in the DVR's channel settings.
6.3. Fjernbetjening Viewproblemer
- Netværks forbindelse: Ensure the DVR is connected to your router via an Ethernet cable and has internet access.
- App konfiguration: Double-check that the DVR device has been correctly added to the XMEye app using its unique ID.
- Routerindstillinger: If issues persist, check your router's firewall or port forwarding settings, though P2P functionality often bypasses manual port forwarding.
6.4. Recording Problems
- Harddisk: Verify that a hard drive is installed, formatted, and has sufficient free space. Check its status in the DVR's system settings.
- Optagelsesplan: Ensure recording schedules are correctly configured (continuous, motion-triggered, or scheduled times).
- Bevægelsesdetektion: If using motion detection, confirm it is enabled and configured for the relevant channels.
7. Specifikationer
| Feature | Specifikation |
|---|---|
| Modelnummer | DET-8Dc2M |
| Video input | 8 Channels (AHD, CVI, TVI, IP, CVBS/Analog) |
| Video output | HDMI, VGA (Max 1920x1080) |
| Lydindgang | BNC |
| Optagelsesopløsning | 1080P Lite |
| Harddisk support | 1 x SATA HDD, up to 8TB (HDD not included) |
| Forbindelse | Ethernet (LAN), USB |
| Remote Access App | XMEye |
| Strømforsyning | DC 12V |
| Dimensioner | 32.79 x 31 x 7.9 cm |
| Vægt | 1.31 kg |
| Internt batteri | 1 x CR2032 litiummetalbatteri (inkluderet) |
8. Garanti og support
DEATTI provides a full 2-year warranty for this product and lifetime technical support. For any inquiries or assistance, please contact DEATTI customer support directly. The product holds CE & FCC Certificates and complies with UL standards for power supplies.


