1. Introduktion
MININGEEK GM100 er et kompakt 4.3L Mini PC-kabinet designet til small form factor (SFF)-bygninger, ideelt til HTPC (hjemmebiograf-pc) eller forretningsapplikationer. Dette kabinet understøtter ITX-bundkort og Flex-strømforsyninger og tilbyder en elegant og effektiv løsning til dine computerbehov. Denne manual indeholder detaljerede instruktioner til montering, betjening og vedligeholdelse.

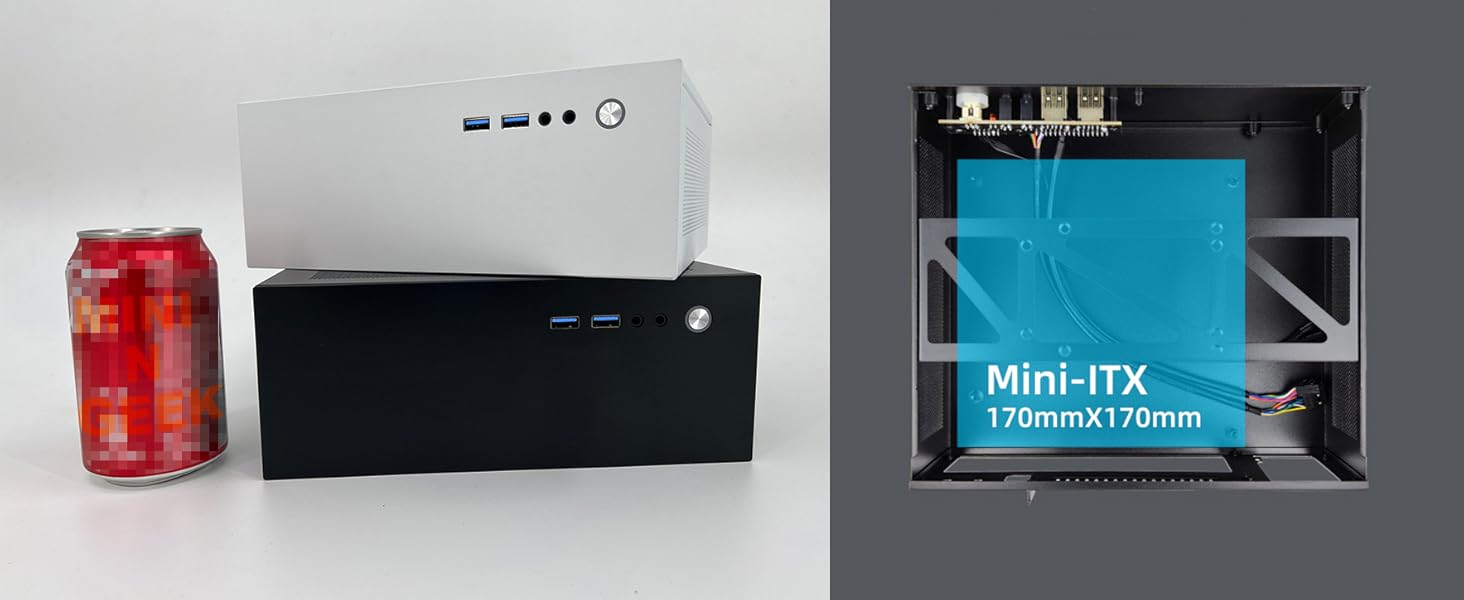
Figur 1: Forside view af MININGEEK GM100 Mini PC-kabinettet.
2. Produktfunktioner
- Kompakt design: Mindre end A4-papir, med dimensioner på 205 x 232 millimeter på siden og 90 millimeter bred for en slank professionelfile.
- Bundkort kompatibilitet: Understøtter ITX bundkort.
- Understøttelse af strømforsyning: Kompatibel med FLEX strømforsyninger.
- Foran I / O: Har 2x USB 3.0-porte på fronten for praktisk tilslutning.
- Grafikkortunderstøttelse: Plads til grafikkort med én blæser på op til 185 mm i længden og 25 mm i tykkelsen (når CPU-kølerens højde er mindre end 45 mm). PCIe-riser medfølger ikke.
- CPU køler clearance: Understøtter CPU-kølere op til 70 mm i højden.
- Optimeret luftstrøm: Netpaneler med 0.8 mm præcisionsbearbejdede huller letter luftcirkulationen og dermed effektiv køling af komponenterne.
3. Specifikationer
| Feature | Specifikation |
|---|---|
| Modelnavn | GM100 |
| Dimensioner (LxBxH) | 3.54 x 8 x 9 tommer (90 x 203 x 229 mm) |
| Bind | 4.3 liter |
| Materiale | Metal |
| Bundkort kompatibilitet | Mini ITX |
| Strømforsyningstype | Flex ATX (bagmontering) |
| Højdegrænse for CPU-køler | Op til 70 mm |
| Grafikkortlængdegrænse | Op til 185 mm (enkelt blæser, tykkelse op til 25 mm, hvis CPU-køler < 45 mm) |
| Front I / O-porte | 2x USB 3.0 |
| Support til opbevaring | 1x 2.5" SSD eller 1x 3.5" HDD (afhængig af konfiguration) |
| Afkølingsmetode | Luft (netpaneler til ventilation) |

Figur 2: GM100 pakkeliste og specifikationsdetaljer.
4. Opsætning og installation
Følg omhyggeligt disse trin for at samle dit MININGEEK GM100 Mini PC-kabinet. Det anbefales at bære en antistatisk håndledsrem under installationen for at forhindre beskadigelse af komponenterne.
4.1 Udpakning og indledende forberedelse
Fjern alle komponenter fra emballagen. Kontroller, at alle dele, der er anført på pakkelisten, er til stede. Placer chassiset på en stabil, plan overflade.

Figur 3: Forside view af GM100-sagen.
4.2 Afmontering af sidepanel
Skru fastgørelsesskruerne på bagsiden af kabinettet af for at fjerne sidepanelerne. Dette giver adgang til det indre for installation af komponenter.

Figur 4: Intern view af GM100-kabinettet med sidepanelet fjernet.
4.3 Installation af bundkort
Installer dit Mini ITX-bundkort i kabinettet. Sørg for korrekt justering med afstandsstykkerne, og fastgør det med de medfølgende skruer. Tilslut frontpanelets I/O-kabler (USB 3.0, tænd/sluk-knap, strøm-LED) til de tilsvarende stiftlister på bundkortet.
Figur 5: Illustreret vejledning til installation af bundkort og strømforsyning.
4.4 Installation af strømforsyning
Installer Flex ATX-strømforsyningen i dens angivne bagmonteringsposition. Fastgør den med skruer. Tilslut 24-bens ATX-strømstikket og 4/8-bens CPU-strømstikket til bundkortet.
4.5 Installation af lagerenhed
Monter din 2.5-tommer SSD eller 3.5-tommer harddisk på det dertil indrettede beslag i kabinettet. Tilslut SATA-strøm- og datakablerne til drevet og bundkortet.

Figur 6: Bagside view af GM100-kabinettet, der illustrerer strømforsyning og I/O-panelområde.
4.6 Installation af grafikkort (valgfrit)
Hvis du installerer et grafikkort med én blæser (op til 185 mm længde, 25 mm tykkelse), skal du forsigtigt sætte det i PCIe-stikket. Sørg for, at det sidder korrekt og er fastgjort. Bemærk, at et PCIe-riserkabel ikke medfølger og kan være påkrævet afhængigt af dit bundkort og din GPU-konfiguration.
4.7 Kabelstyring
Organiser alle interne kabler for at sikre optimal luftgennemstrømning og forhindre interferens med komponenter. Brug kabelbindere om nødvendigt for at fastgøre løse kabler.
4.8 Afslutning af sagen
Når alle komponenter er installeret, og kablerne er styrt, skal du sætte sidepanelerne på igen og fastgøre dem med fastgørelsesskruerne.
4.9 Installationsvideoer
Følgende videoer demonstrerer generelle ITX-kabinetmonteringsprincipper, der kan være nyttige under installationen af din MININGEEK GM100:
Installation af SGPC K39 ITX Mini-kabinet
Video 1: Installationsvejledning til et lignende SGPC K39 ITX mini-kabinet, der demonstrerer generelle monteringstrin.
L300 installationsvejledning
Video 2: Installationsvejledning til L300-kabinettet, vistasing-komponentinstallation i et kompakt chassis.
Mini PC-kabinetmontering overview
Video 3: En kort gennemgangview af samling af mini-pc-kabinet, med fremhævelse af de vigtigste trin.
Mini ITX-kabinet - hurtigt overblik
Video 4: En hurtig demonstration af et mini-ITX-kabinet, nyttigt til visuel reference.
5. Betjeningsvejledning
Når de er samlet, skal du tilslutte din skærm, tastatur, mus og strømkabel til de relevante porte. Tryk på tænd/sluk-knappen på frontpanelet for at starte dit system. Se vejledningen til dit bundkort og operativsystem for specifikke instruktioner til opstart og softwarekonfiguration.
6. Vedligeholdelse
- Rensning: Rengør regelmæssigt ydersiden af kabinettet med en blød, tør klud. Brug trykluft til at fjerne støvophobning på netpaneler. Sørg for, at systemet er slukket og frakoblet, før du rengør det.
- Luftstrøm: Hold netpanelerne fri for forhindringer for at opretholde optimal luftstrøm og køleevne.
- Komponentkontroller: Kontrollér regelmæssigt de interne komponenter for støvophobning, og sørg for, at alle forbindelser er sikre.
7. Fejlfinding
- Systemet tænder ikke: Kontroller, at alle strømtilslutninger (24-bens ATX, 4/8-bens CPU, frontpanelets tænd/sluk-knap) er korrekt isat. Sørg for, at strømforsyningen er tændt og tilsluttet en fungerende stikkontakt.
- Ingen skærmoutput: Kontroller, at skærmen er korrekt tilsluttet grafikkortet eller bundkortet (hvis du bruger integreret grafik), og at skærmen er tændt.
- Overophedning: Sørg for korrekt kabelhåndtering for at undgå at blokere luftstrømmen. Kontroller, at CPU-køleren og eventuelle kabinetblæsere fungerer korrekt. Fjern støv fra mesh-paneler og køleplader.
- Løse forbindelser: Hvis du oplever periodiske problemer, skal du slukke systemet og sætte alle interne kabler i igen (SATA, strøm, frontpanel).
8. Garanti og support
MININGEEK GM100 Mini PC-kabinettet leveres med en standard producentgaranti mod defekter i materialer og udførelse. For specifikke garantivilkår, teknisk support eller serviceforespørgsler, kontakt venligst MININGEEKs officielle webwebstedet eller kontakt din forhandler. Gem din købsbevis til garantikrav.


