1. Introduktion
This user manual provides detailed instructions for the FMOUSE Transparent Wireless Mouse (Model: B0CSPT61TF). This device features a unique transparent design, multi-mode connectivity, and customizable settings for enhanced user experience.
Nøglefunktioner:
- Tri-mode-tilslutning: Supports Dual Bluetooth 5.1 and 2.4GHz wireless connections, allowing connection to up to three devices.
- Transparent Magnetic Shell: Unique design with a removable magnetic cover for easy access to receivers.
- Rechargeable with LED Lighting: Built-in rechargeable battery with Type-C charging port and cool LED light ring.
- Justerbar DPI: Four adjustable DPI levels (800/1200/1600/2400) for precise cursor control.
- Lydløse klik: Designet til stille drift.
- Bred kompatibilitet: Compatible with Windows XP, Vista, 7, 8, 10, 11, Windows ME, Mac OS, and more.
2. Opsætning
2.1 Hvad er der i æsken
Når du åbner pakken, skal du kontrollere, at alle komponenter er til stede:
- 1 x Wireless Bluetooth Tri-mode Mouse
- 1 x USB Receiver (USB-A)
- 1 x Type-C modtager
- 1 x USB-opladningskabel (Type-C)
- 1 x brugermanual
2.2 Opladning af musen
The mouse is equipped with a built-in rechargeable battery. Before first use, or when the battery indicator shows low power, charge the mouse using the provided USB Type-C cable.
- Locate the Type-C charging port on the front of the mouse.
- Connect one end of the USB charging cable to the mouse and the other end to a USB power source (e.g., computer USB port, USB wall adapter).
- The LED lights on the mouse will indicate charging status. A full charge typically takes approximately 2 hours and can provide 5-10 days of heavy use.

Image: The FMOUSE Transparent Wireless Mouse connected to a USB-C charging cable, illustrating the charging process.
Video: Demonstrates the charging process and various features of the FMOUSE Wireless Bluetooth transparent mouse.
2.3 Connecting the Mouse (Tri-mode)
The mouse supports three connection modes: 2.4GHz wireless (via USB-A or Type-C receiver) and two separate Bluetooth 5.1 connections (BT1 and BT2).
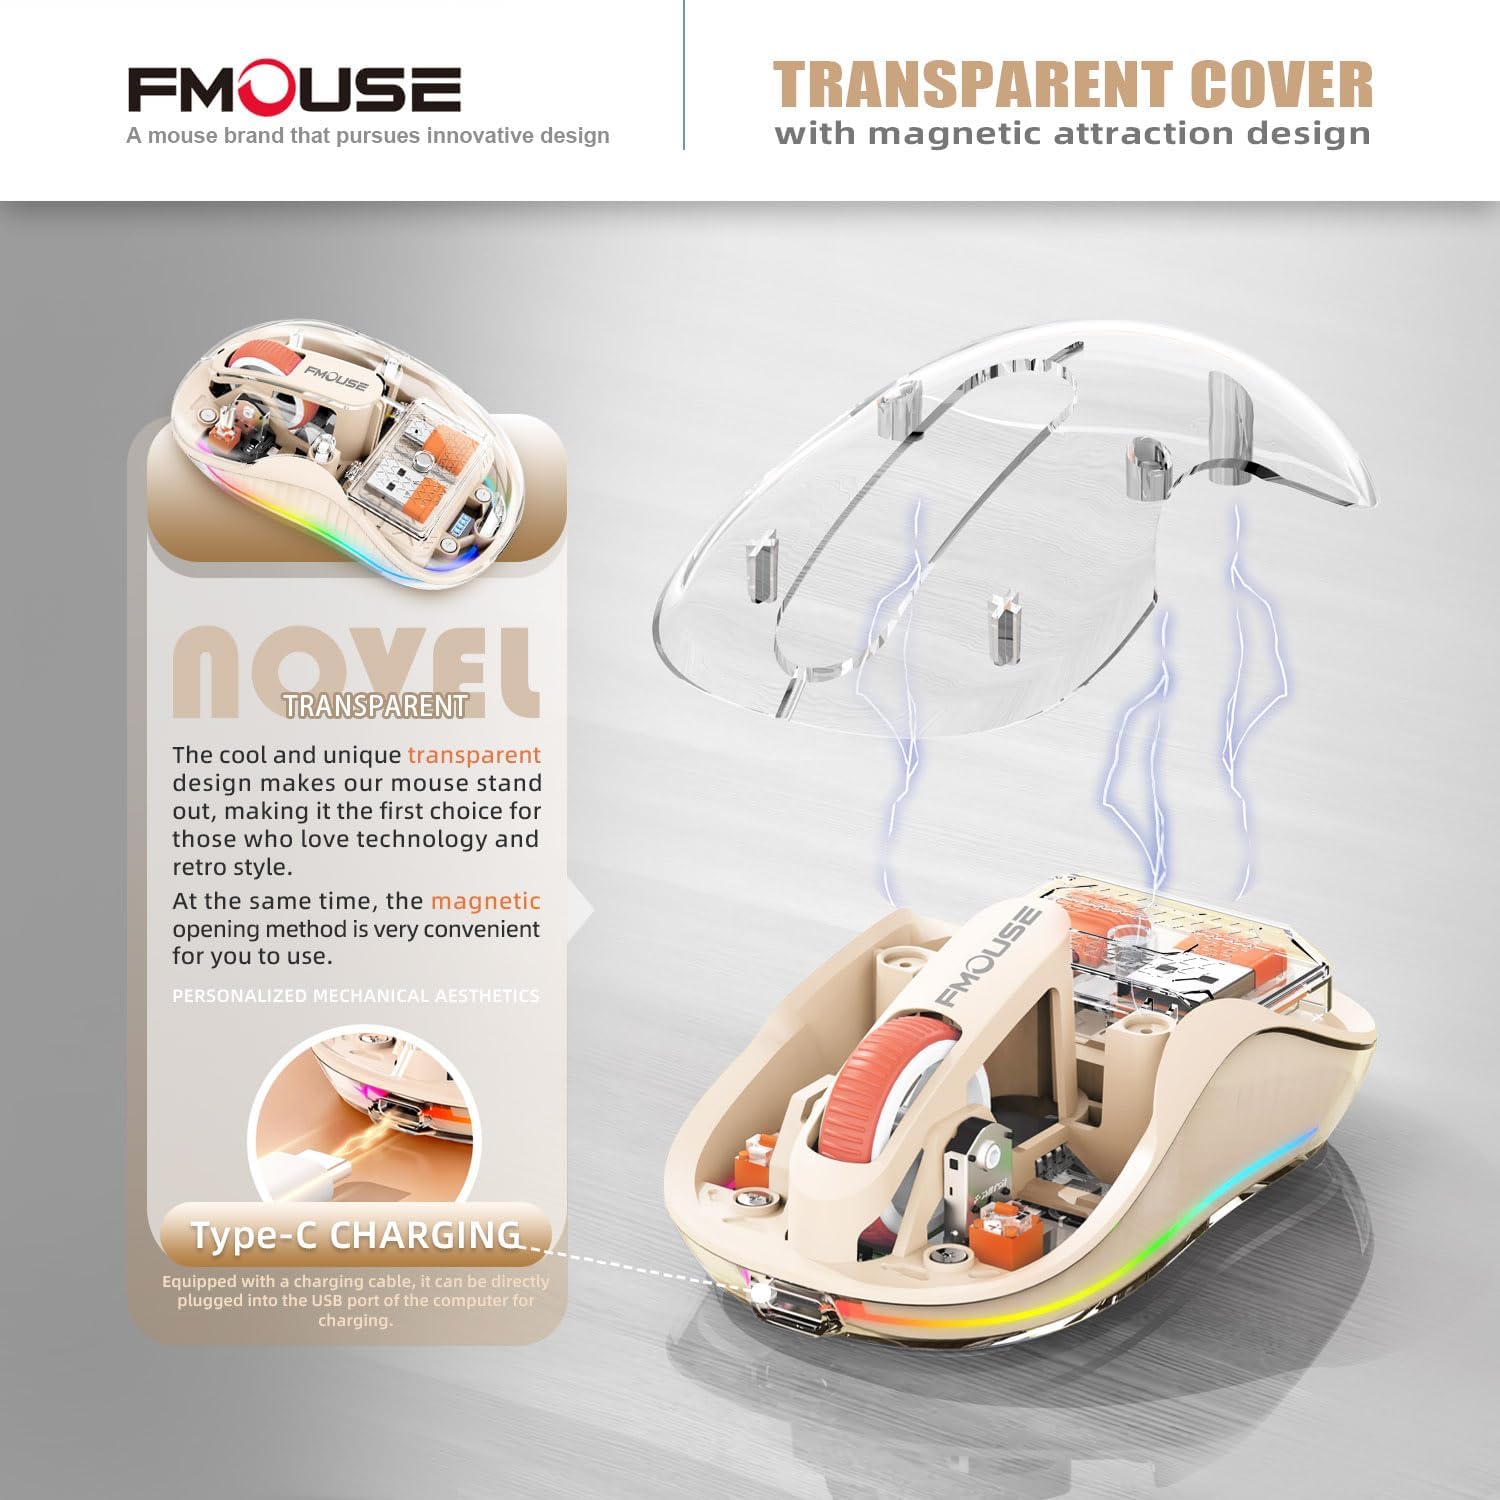
Image: A visual representation of the mouse's tri-mode connectivity, highlighting the USB-A, Type-C, and Bluetooth options for connecting to multiple devices.

Billede: En eksploderet view of the mouse showing the internal storage for the USB-A and Type-C receivers, which are magnetically held under the transparent cover.
2.3.1 2.4 GHz trådløs forbindelse
- Open the magnetic transparent cover of the mouse to access the USB-A and Type-C receivers.
- Select the appropriate receiver (USB-A or Type-C) for your device and plug it into an available port on your computer or laptop.
- Tænd for musen ved hjælp af afbryderknappen i bunden.
- Switch the mode button on the bottom of the mouse to the "2.4G" position. The mouse should automatically connect to your device.
2.3.2 Bluetooth-forbindelse (BT1 / BT2)
- Tænd for musen ved hjælp af afbryderknappen i bunden.
- Switch the mode button on the bottom of the mouse to either "BT1" or "BT2" position.
- For first-time pairing, press and hold the mode button for approximately 3-5 seconds until the LED lights on the mouse start flashing rapidly, indicating pairing mode.
- On your device (computer, laptop, tablet, or smartphone), go to Bluetooth settings and search for new devices.
- Select "FMOUSE" or a similar name from the list of available devices to pair.
- Once paired, the LED lights on the mouse will stop flashing and remain solid.
- To switch between paired Bluetooth devices or the 2.4G connection, simply press the mode button on the bottom of the mouse to cycle through BT1, BT2, and 2.4G.
3. Betjeningsvejledning
3.1 Funktionsknapper ovenforview
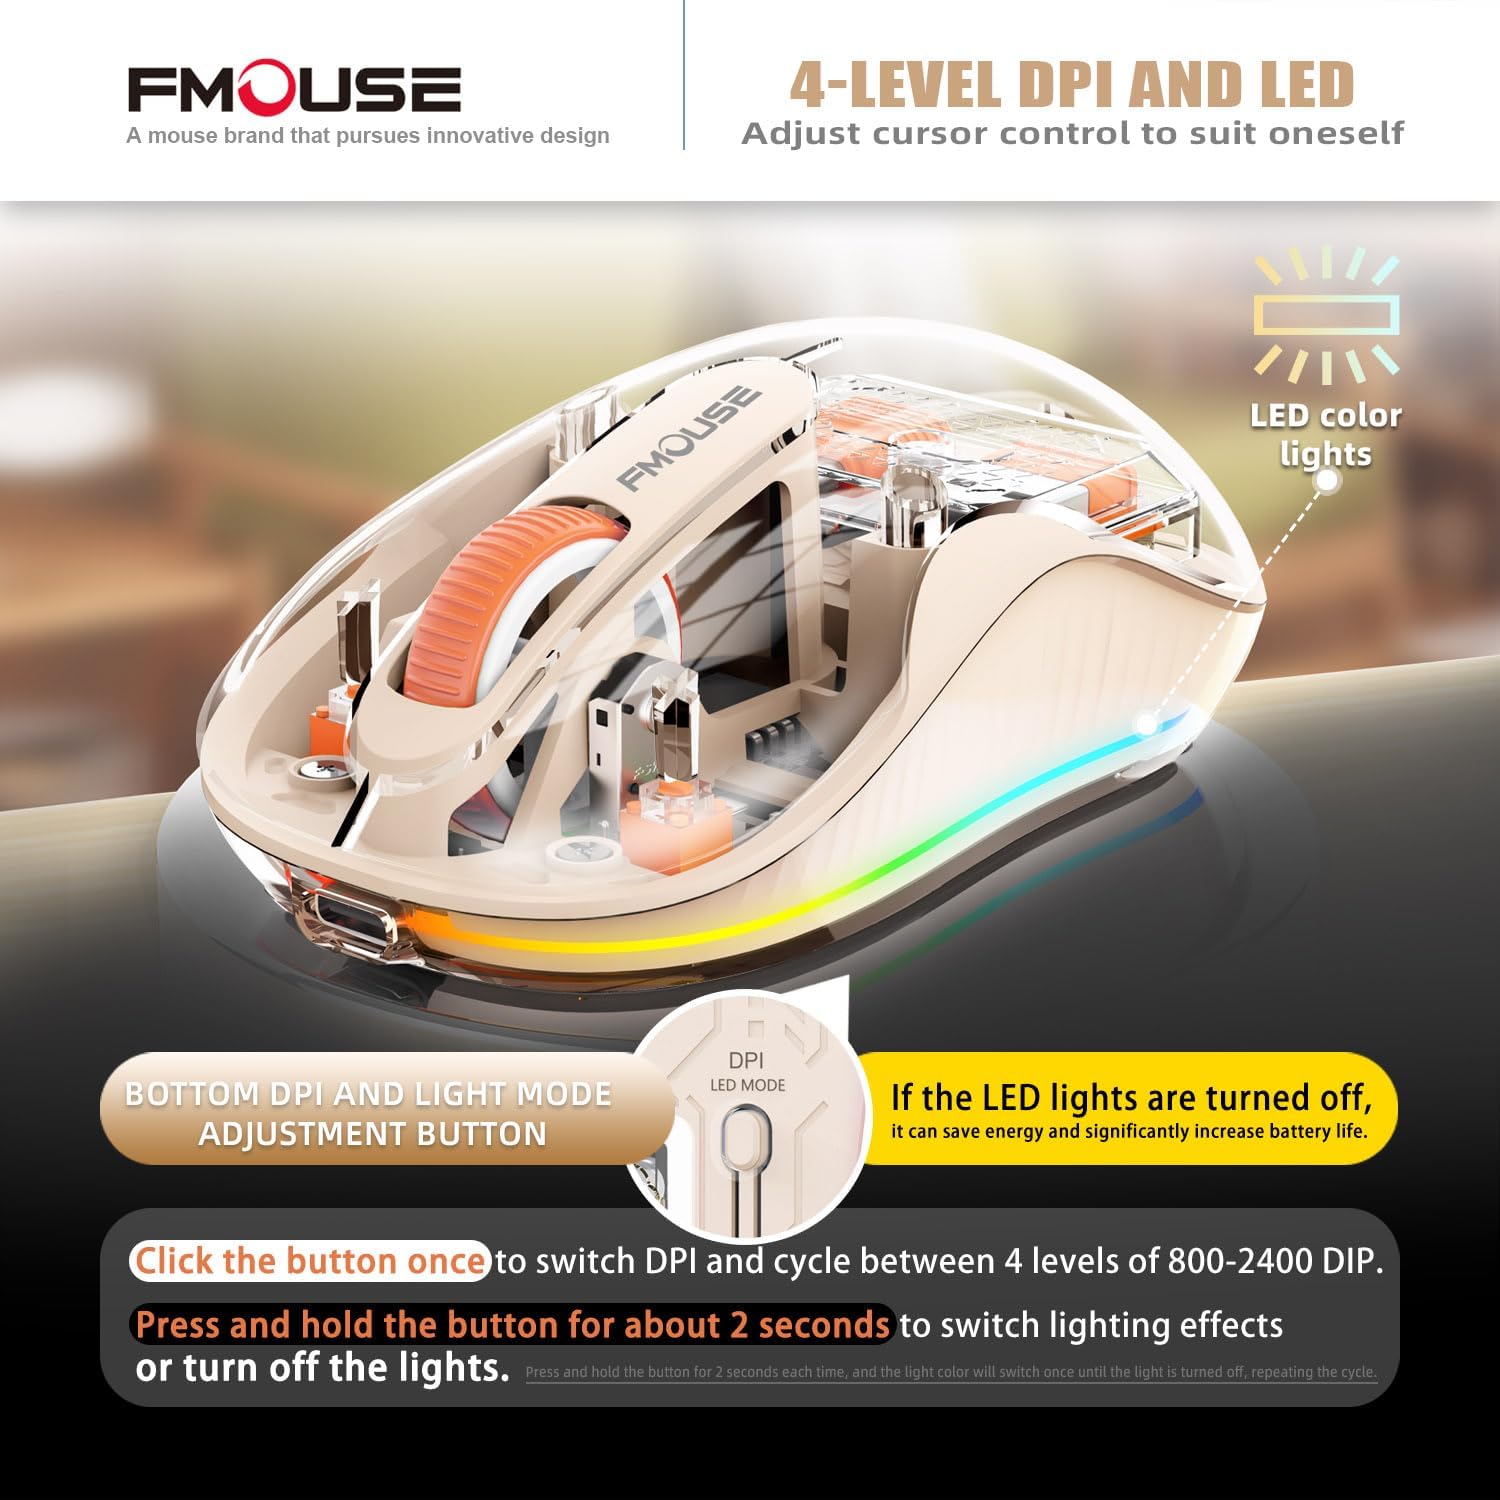
Image: The underside of the mouse, highlighting the power switch, the tri-mode connection switch, and the DPI/LED mode adjustment button.
- Afbryderen: Located on the bottom, slides to ON/OFF.
- Tri-mode Switching Button: Located on the bottom, allows quick switching between 2.4G, BT1, and BT2 connections.
- DPI/LED Mode Adjustment Button: Located on the bottom, near the power indicator.
3.2 Justering af DPI (følsomhed)
The mouse offers four adjustable DPI levels to suit different tasks and preferences.
- Press the DPI/LED Mode Adjustment button once to cycle through the DPI settings: 800, 1200, 1600, and 2400 DPI.
- Each press will change the cursor speed, allowing you to find your preferred sensitivity.
3.3 Styring af LED-lys
The mouse features a cool LED light ring that illuminates when the mouse is stationary and turns off when it moves to conserve battery.
- To turn off the LED lights completely and extend battery life, press and hold the DPI/LED Mode Adjustment button for approximately 2 seconds.
- Repeat the action to turn the LED lights back on.
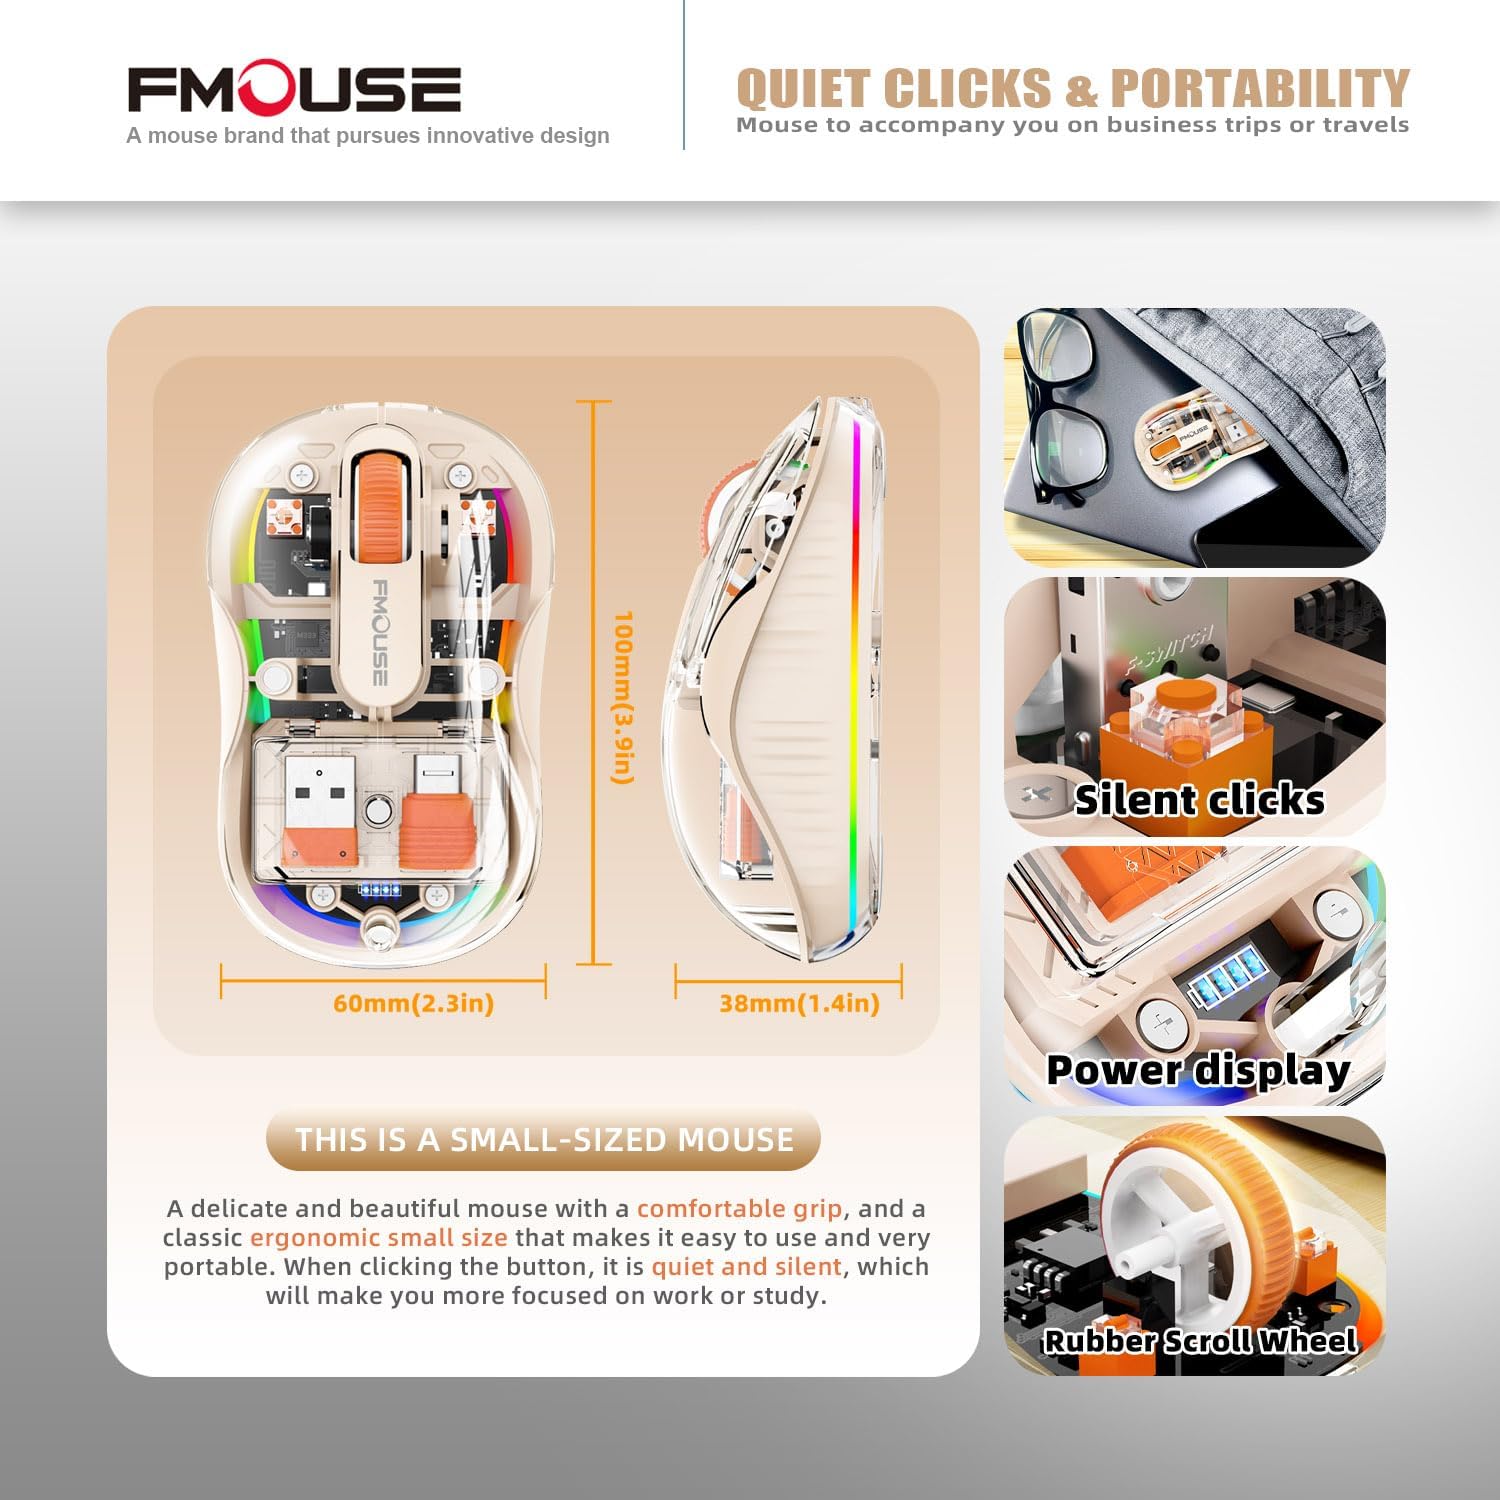
Image: The mouse demonstrating its LED lighting effects and the button used to control them, emphasizing the option to turn lights off for battery saving.
3.4 Silent Clicks
The mouse is designed with silent click technology, minimizing noise during use. This feature is integrated into the mouse's buttons and does not require specific activation.
3.5 Overfladekompatibilitet
The optical sensor technology allows the mouse to operate effectively on a variety of surfaces without the need for a mouse pad.
- Compatible surfaces include wood, metal, leather, glass, and fabric.

Image: The mouse shown on different surfaces (wood, metal, leather, fabric) to illustrate its broad surface compatibility without a mouse pad.
4. Vedligeholdelse
Proper maintenance ensures the longevity and optimal performance of your FMOUSE Transparent Wireless Mouse.
- Rensning: Brug en blød, tør og fnugfri klud til at tørre musens yderside af. Tør musen let af ved genstridigt snavs.ampRengør kluden med vand. Undgå at bruge skrappe kemikalier, opløsningsmidler eller slibende rengøringsmidler.
- Sensorpleje: Hold den optiske sensor i bunden af musen ren og fri for støv eller snavs for at sikre nøjagtig sporing.
- Opbevaring: When not in use for extended periods, store the mouse in a cool, dry place. The included cloth carrying bag is ideal for travel and protection.
- Batteripleje: Avoid fully discharging the battery frequently. Charge the mouse when the power indicator shows low battery.
5. Fejlfinding
If you encounter issues with your mouse, refer to the following common troubleshooting steps:
| Problem | Mulig årsag | Løsning |
|---|---|---|
| Musen reagerer ikke | Low battery; Incorrect connection mode; Receiver not properly plugged in (2.4G); Bluetooth not paired. |
|
| Markørbevægelsen er uregelmæssig eller langsom | Dirty optical sensor; Unsuitable surface; Low battery; Incorrect DPI setting. |
|
| LED-lys virker ikke | LEDs turned off; Low battery. |
|
| Kan ikke oprette forbindelse via Bluetooth | Musen er ikke i parringstilstand; Enhedens Bluetooth er slukket; Interferens. |
|
6. Specifikationer
| Feature | Detalje |
|---|---|
| Produktdimensioner | 3.94 x 2.36 x 0.1 tommer |
| Varens vægt | 2.68 ounce |
| Forbindelsesteknologi | Bluetooth 5.1 (Dual), 2.4GHz Wireless |
| Bevægelsesdetekteringsteknologi | Optisk |
| DPI niveauer | 800 / 1200 / 1600 / 2400 |
| Batteritype | 1 lithium-ion batteri (medfølger) |
| Opladningsport | Type-C |
| Wireless Range | Up to 10m (33ft) for Bluetooth |
| Kompatibilitet | Windows XP/Vista/7/8/10/11, Windows ME, Mac OS, etc. |
| Særlige funktioner | Transparent magnetic shell, Cool LED Lights, Silent Clicks, USB-A & Type-C Receivers |
7. Support og yderligere information
For additional support or detailed documentation, please refer to the official user guide or contact FMOUSE customer service.
- Officiel brugervejledning (PDF): Download PDF
- FMOUSE Store: Visit FMOUSE Store on Amazon


