1. Introduktion
This manual provides comprehensive instructions for the Apera Instruments AI316 PC60 5-in-1 Multi-Parameter Meter. The PC60 is designed for professional and quick measurement of pH, Electrical Conductivity (EC), Total Dissolved Solids (TDS), Salinity, and Temperature. It features a replaceable multi-parameter probe for ease of use and maintenance.
2. Pakkens indhold
The Apera Instruments AI316 PC60 kit includes the following items:
- Apera Instruments PC60 5-in-1 Multi-Parameter Meter
- PC60-E Multi-Parameter Probe (pre-installed)
- pH 4.00 Calibration Buffer Solution (8oz.)
- pH 7.00 Calibration Buffer Solution (8oz.)
- pH 10.01 Calibration Buffer Solution (8oz.)
- 3M KCl Storage Solution (4oz.)
- Lanyards, AAA Batteries, Quick Start Guide, and Carrying Case

Image 2.1: Apera Instruments PC60 5-in-1 Multi-Parameter Meter and Calibration Buffer Solution Kit.

Image 2.2: Contents of the PC60 kit, including the meter, various buffer solutions, and the user guide, neatly organized in a carrying case.
3. Produktet er slutview
3.1 Meter Components
The PC60 meter consists of a main unit with an LCD display and control buttons, and a replaceable multi-parameter probe. The probe is designed for easy installation and replacement.

Billede 3.1: Detaljeret view of the PC60 meter, highlighting its LCD screen, control buttons (Power, Measure, Mode, Calibrate), and the multi-parameter probe.
3.2 LCD-skærm
The meter features a large, clear LCD screen with three backlit colors, indicating different operating modes. It provides a dual display of temperature along with the primary measurement (pH, EC, TDS, or Salinity). Icons for completed calibrations and stable readings are also displayed for user convenience.
4. Opsætning
Before first use, ensure the batteries are correctly installed. Remove the protective cap from the probe. Rinse the probe with distilled water and gently blot dry. It is recommended to perform a calibration before initial measurements to ensure accuracy.
5. Kalibrering
Calibration is crucial for accurate measurements. The PC60 meter supports multi-point calibration. Use the provided Apera Instruments pH buffer solutions (pH 4.00, 7.00, and 10.01) which are color-coded for easy identification and are traceable to NIST Standard Reference Materials (SRMs).
5.1 pH-kalibrering
- Tænd måleren.
- Tryk på CAL knappen for at gå ind i kalibreringstilstand.
- Rinse the probe with distilled water and immerse it in the first buffer solution (e.g., pH 7.00).
- Wait for the reading to stabilize. A 'smiley face' icon will appear on the screen when the reading is stable.
- Confirm the calibration point. The meter will prompt for the next buffer solution.
- Repeat the process for the remaining buffer solutions (e.g., pH 4.00 and pH 10.01).
- Exit calibration mode once all desired points are calibrated.
5.2 EC/TDS/Salinity Calibration
Refer to the detailed instructions in the quick start guide for specific EC/TDS/Salinity calibration procedures, as these may vary based on the desired measurement range.

Image 5.1: The set of Apera Instruments pH calibration buffer solutions (pH 4.00, 7.00, 10.01) and 3M KCl storage solution, essential for accurate meter calibration and maintenance.
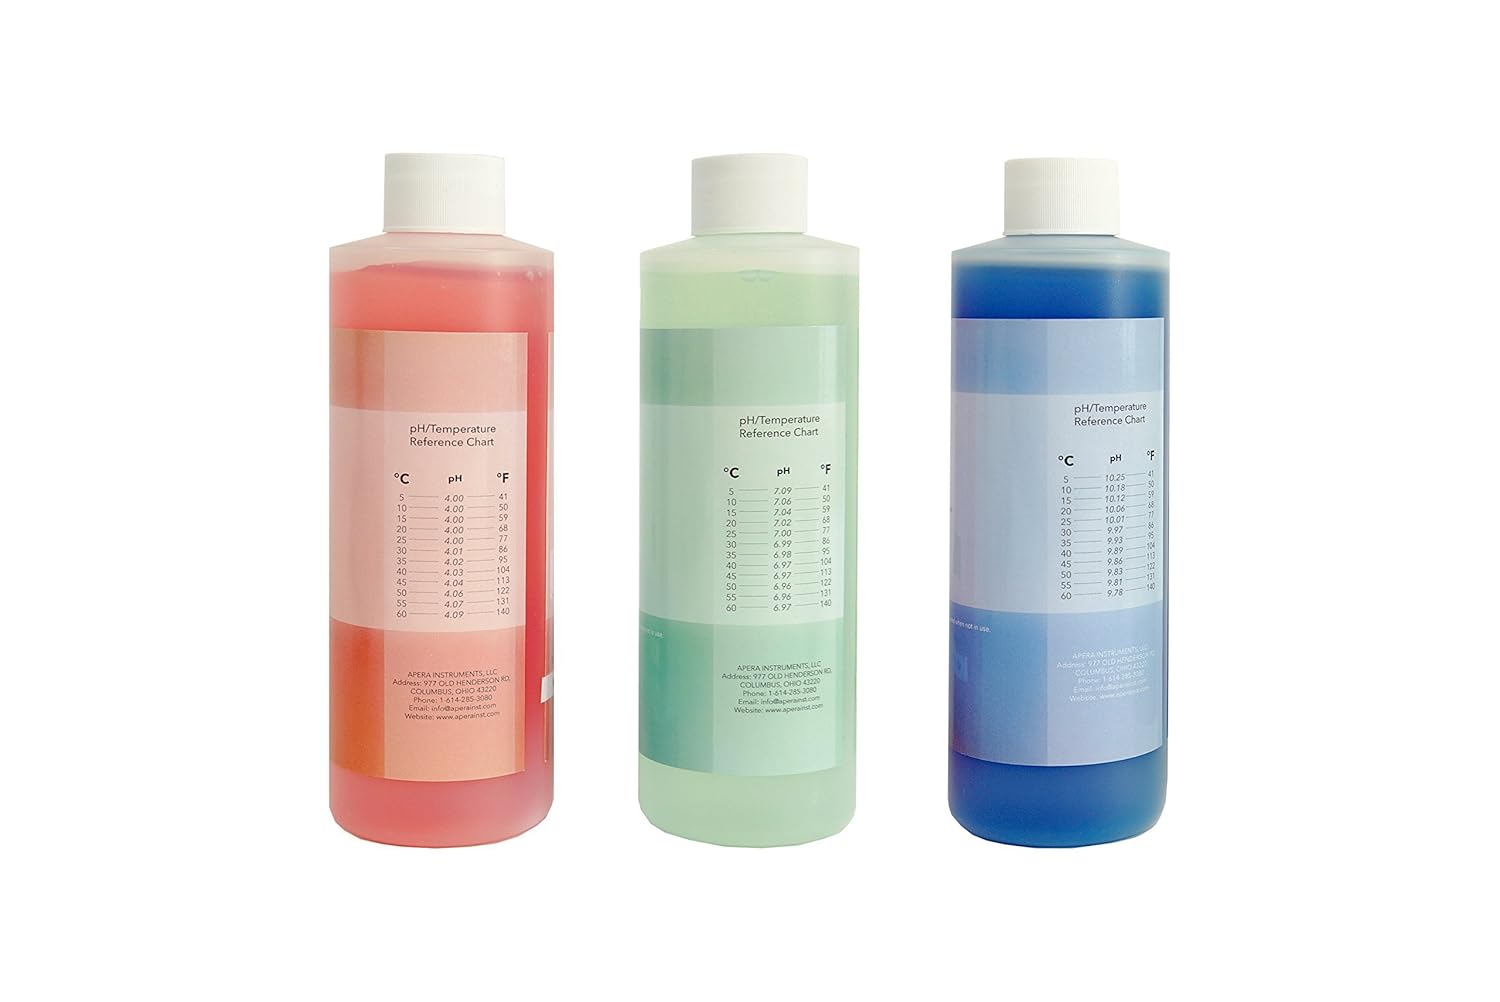
Image 5.2: Apera Instruments pH calibration buffer solutions, each featuring a pH/Temperature Reference Chart on the label for precise calibration adjustments.
6. Betjeningsvejledning
For at tage en måling:
- Turn on the meter by pressing the MAGT knap.
- Tryk på MODE button to switch between pH, EC, TDS, and Salinity measurement modes.
- Rinse the probe with distilled water and immerse it into the sample solution. Ensure the probe tip is fully submerged.
- Gently stir the probe in the solution to remove air bubbles.
- Wait for the reading to stabilize. The 'smiley face' icon will indicate a stable reading, at which point you can record the measurement.
- Efter målingen skylles sonden grundigt med destilleret vand.
7. Vedligeholdelse
7.1 Probe Care and Storage
Proper probe maintenance extends its lifespan and ensures accurate readings.
- Always rinse the probe with distilled or deionized water after each use.
- For long-term storage, immerse the probe in 3M KCl storage solution. Never store the probe dry or in distilled water.
- If the probe becomes dirty, gently clean it with a soft brush and a mild detergent solution, then rinse thoroughly.

Image 7.1: Apera Instruments 3M KCl Storage Solution, recommended for maintaining the pH/ORP electrode when not in use.
7.2 Buffer Solution Storage
The provided buffer solutions are double-sealed and have a 2-year expiration from manufacture for an unopened bottle. Store them at room temperature and keep containers tightly closed when not in use to maintain their accuracy.
8. Fejlfinding
If you encounter issues with your PC60 meter, consider the following common solutions:
- Upræcise læsninger: Recalibrate the meter. Ensure the probe is clean and properly stored. Check the expiration date of buffer solutions.
- Ingen skærm-/strømproblemer: Kontroller batteriinstallationen og udskift batterierne om nødvendigt.
- Slow Response: Clean the probe. Ensure the probe is properly hydrated in storage solution.
- Fejlmeddelelser: Refer to the quick start guide for specific error code interpretations and solutions.
9. Specifikationer
The Apera Instruments PC60 meter is designed for precise measurements across multiple parameters:
- Målte parametre: pH, EC, TDS (ppm), Salinity, Temperature
- pH-nøjagtighed: ±0.01 pH at 25 °C
- Temperaturvisning: Dual display with primary measurement
- Displayfunktioner: Large LCD with 3 backlit colors, stable reading indicator ('smiley face' icon), calibration icons
- Sonde: Replaceable multi-parameter probe
- Vandtæt vurdering: Yes (as indicated by product title)
10. Garanti og support
Apera Instruments products are backed by a manufacturer's warranty. For detailed warranty information, technical support, or service inquiries, please visit the official Apera Instruments website or contact their customer service department. Please have your model number (PC60) and purchase date available when contacting support.


