1. Introduktion
This manual provides detailed instructions for the installation, configuration, and operation of your SODOLA 24 Port 2.5G Smart Web Managed Switch. This device is designed to enhance network performance with its multi-gigabit capabilities, offering 24x 2.5G Base-T ports and 2x 10G SFP+ ports for high-speed data transfer and flexible network expansion. Please read this manual thoroughly before using the product to ensure proper setup and functionality.
2. Sikkerhedsoplysninger
- Sørg for, at enheden er installeret i et godt ventileret område for at forhindre overophedning.
- Brug kun den medfølgende strømadapter.
- Udsæt ikke kontakten for vand eller for høj luftfugtighed.
- Undgå at placere tunge genstande på kontakten.
- Kun til indendørs brug.
3. Pakkens indhold
Bekræft at alle varer er til stede i din pakke:
- 1 x SODOLA 24 Port 2.5G Smart Web Administreret Switch
- 1 x brugermanual
- 1 x strømkabel
4. Produktet er slutview
The SODOLA 24 Port 2.5G Smart Web Managed Switch is designed for robust network environments, offering a combination of high-speed Ethernet and SFP+ ports.

Figur 4.1: Samlet set view of the SODOLA 24 Port 2.5G Smart Web Administreret Switch.
4.1 Frontpanel
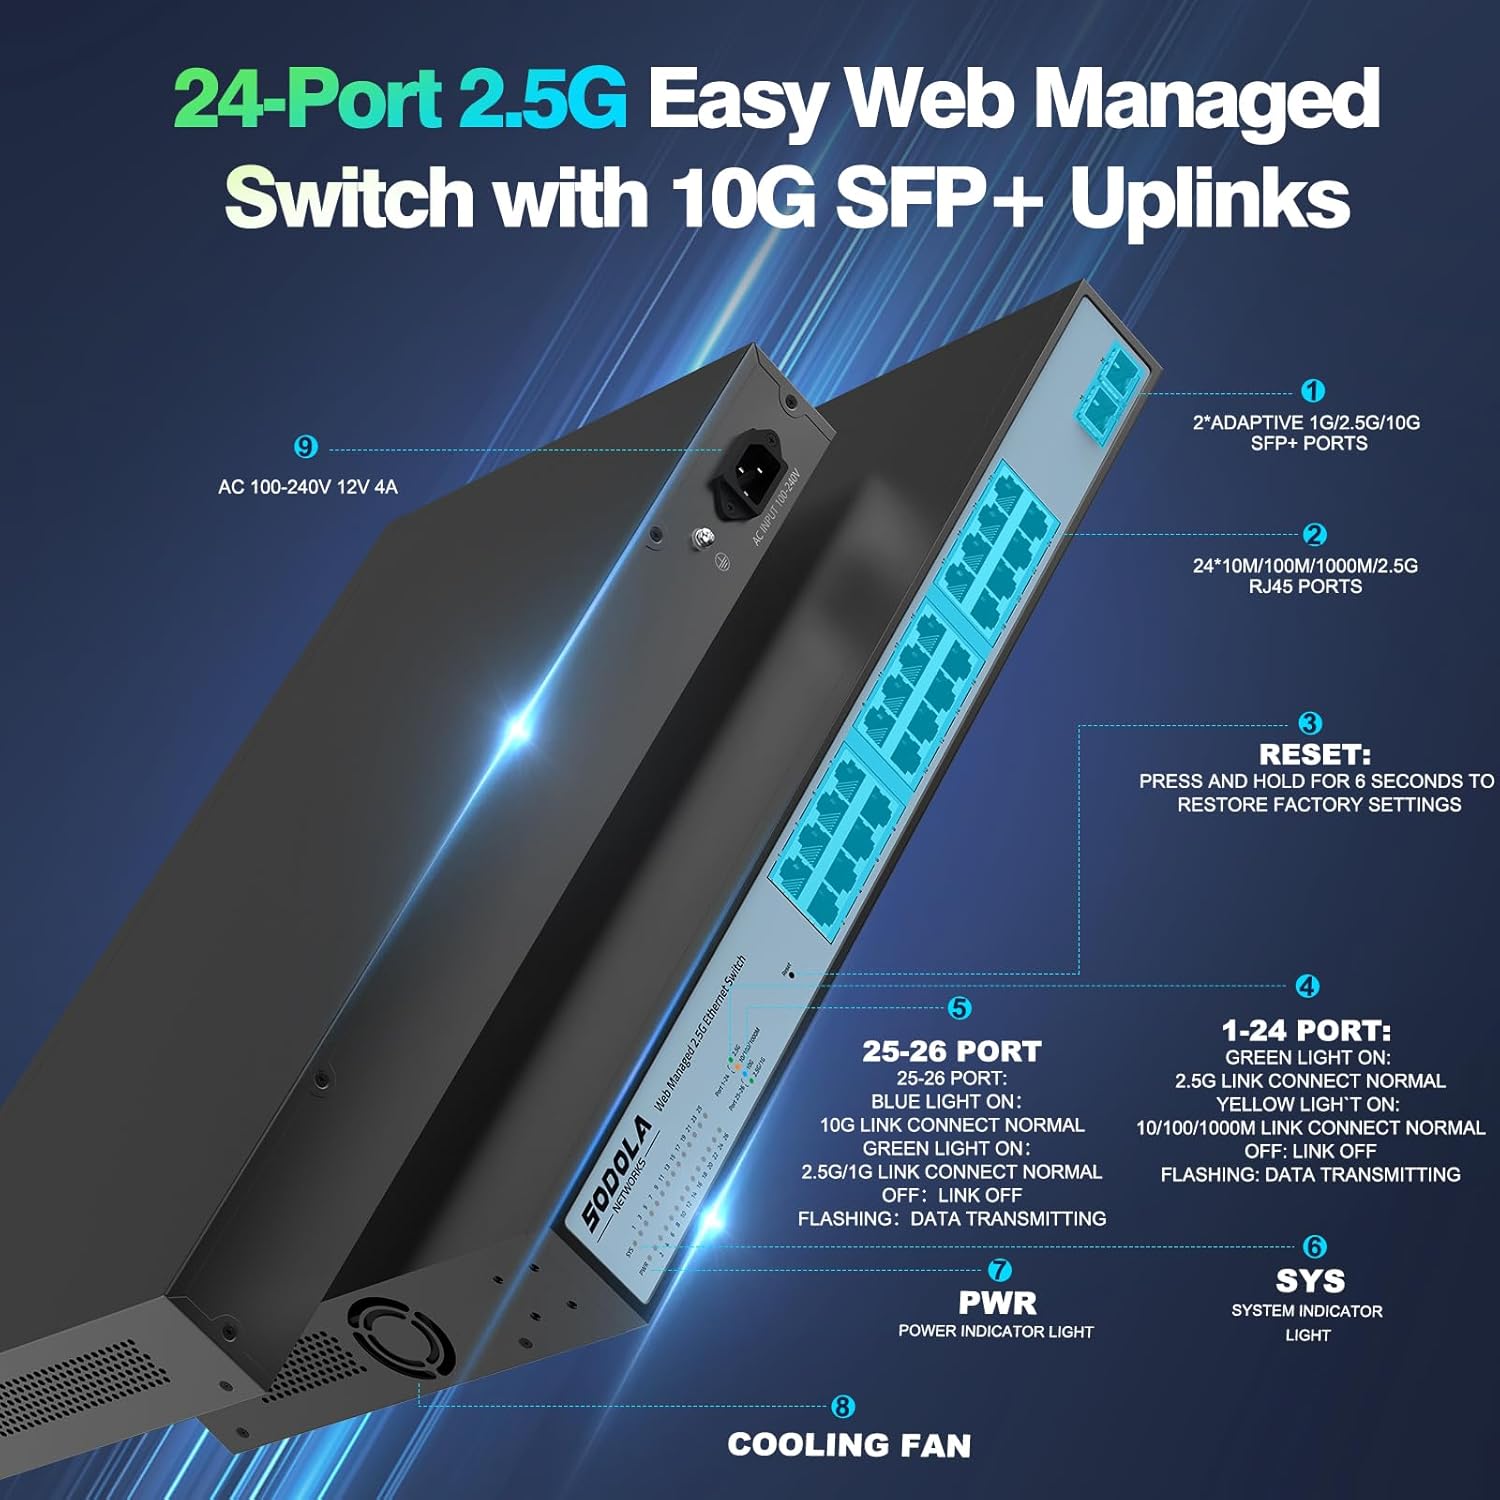
Figur 4.2: Detaljeret view of the switch's front and rear panels, highlighting ports and indicators.
- 24 x 100/1000/2500M RJ45 Ports: These ports support 2.5 Gigabit Ethernet connectivity. Each port has Link/Act LEDs: Green for 2.5G Link/Act, Yellow for 10/100/1000M Link/Act, and flashing for data transmission.
- 2 x 10G SFP+ Ports: These ports provide high-speed 10 Gigabit fiber connectivity for uplinks or connecting to high-bandwidth devices.
- Nulstil knap: Tryk og hold i 6 sekunder for at gendanne fabriksindstillingerne.
- PWR LED: Strømindikatorlys.
- SYS LED: System indicator light.
4.2 Bagpanel
- AC 100-240V Power Input: Connect the provided power cord here.
- Køleventilator: The switch features a bilateral cooling design without a built-in fan for silent operation.
5. Opsætningsvejledning
5.1 Fysisk installation
- Montering: The switch supports 1U rack mounting. Ensure adequate space for ventilation. It can also be placed on a desktop.
- Tilslut enheder: Connect your network devices (computers, servers, NAS, WiFi 6 APs) to the RJ45 ports using Cat5e, Cat6, or Cat6a Ethernet cables.
- Tilslut oplink: Use the 10G SFP+ ports for high-speed connections to your router or other core network devices.
- Tænd: Connect the power cord to the switch and then to a power outlet. The PWR LED should illuminate.
5.2 Indledende Web Administrationsadgang
For at få adgang til web administrationsgrænseflade:
- IP-adressekonfiguration: Before logging in, ensure your computer's IP address is set within the same IPv4 subnet as the switch's default IP address (e.g., if the switch is 192.168.2.1, set your computer to 192.168.2.X, where X is not 1).
- Åben Web Browser: Brug en kompatibel web browser (e.g., IE 9.0+, Chrome 23.0+, Firefox 20.0+).
- Indtast IP-adresse: Type the default IP address of the switch (192.168.2.1) into the browser's address bar and press Enter.
- Login: Indtast standardoplysningerne:
Brugernavn: admin
Adgangskode: admin

Figur 5.1: Skærmbillede af web management interface login page.
6. Brugsanvisning (Web Ledelse)
De web management interface allows for configuration, monitoring, and troubleshooting without requiring command-line interface (CLI) expertise. Key features include:

Figure 6.1: Visual representation of the switch's basic management features.
- Linkaggregering (LACP): Kombinér flere fysiske links til et enkelt logisk link for øget båndbredde og redundans.
- VLAN (virtuelt lokalnetværk): Segmenter dit netværk i mindre, isolerede broadcast-domæner for forbedret sikkerhed og ydeevne.
- QoS (Quality of Service): Prioriter netværkstrafik for at sikre, at kritiske applikationer får tilstrækkelig båndbredde.
- Multicast: Efficiently deliver data to multiple recipients simultaneously.
- MAC-adressehåndtering: Control access to the network based on MAC addresses.
- RSTP (Rapid Spanning Tree Protocol): Prevent network loops and ensure network stability.
- Jumbo rammer: Support larger Ethernet frames for increased data throughput.
- Loopdetektion: Identify and mitigate network loops.
- ERPS (Ethernet Ring Protection Switching): Provide fast protection and recovery switching in Ethernet ring topologies.
6.1 Lagring af konfiguration
Efter at have foretaget ændringer i web interface, naviger til Værktøjer > Gem to ensure your settings are permanently stored and not lost upon power cycling the device.
7. Vedligeholdelse
- Rensning: Use a dry, soft cloth to clean the exterior of the switch. Do not use liquid or aerosol cleaners.
- Ventilation: Ensure the ventilation openings on the sides of the switch are not obstructed. The fanless design relies on natural convection for cooling.
- Firmwareopdateringer: Kontroller jævnligt producentens webwebstedet for tilgængelige firmwareopdateringer for at sikre optimal ydeevne og sikkerhed.
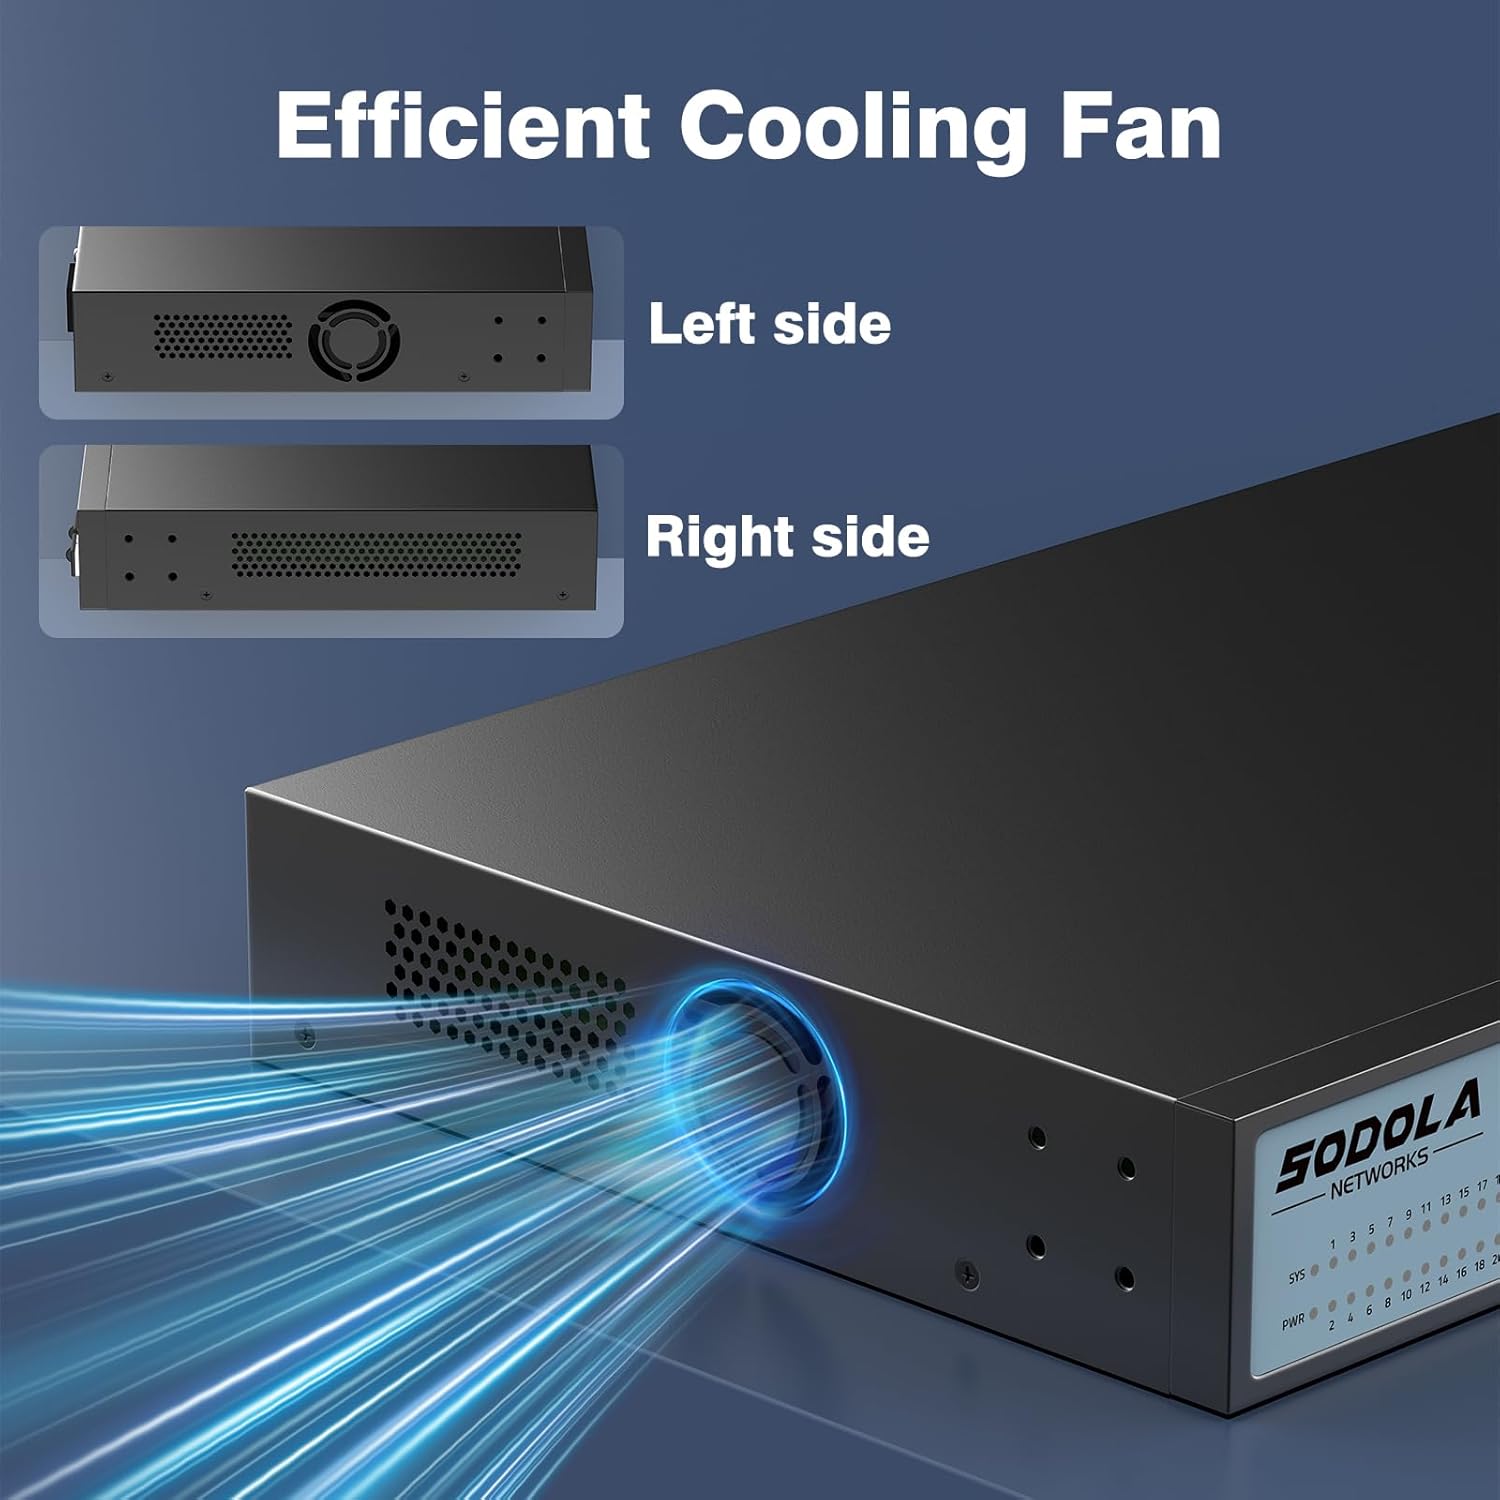
Figure 7.1: Illustration of the switch's efficient fanless cooling design.
8. Fejlfinding
8.1 Almindelige problemer og løsninger
- Ingen strøm: Check if the power cord is securely connected to both the switch and the power outlet. Verify the power outlet is functional.
- Ingen link/aktivitet på porten: Ensure the Ethernet cable is properly connected to both the switch port and the connected device. Verify the connected device is powered on and functioning correctly. Try a different cable or port.
- Langsom netværkshastighed: Ensure all connected devices and cables support 2.5G or 10G speeds for optimal performance. Check for network congestion or duplex mismatches in the web interface.
- Kan ikke få adgang Web Interface:
- Verify your computer's IP address is in the same subnet as the switch's IP.
- Confirm the switch's IP address (default is 192.168.2.1).
- Sørg for web browser is compatible.
- If the management interface becomes unresponsive, a power cycle may resolve the issue.
- Netværksinstabilitet: Ensure Spanning Tree Protocol (STP) or Rapid Spanning Tree Protocol (RSTP) is enabled to prevent network loops, especially in complex network topologies.
- Configuration Loss: Always remember to save your configuration changes via Værktøjer > Gem i web interface.
8.2 Fabriksindstilling
If you encounter persistent issues or forget your login credentials, you can restore the switch to its factory default settings by pressing and holding the Nulstil knappen i 6 sekunder.
9. Specifikationer
| Mærke | Sodola |
| Modelnummer | 24X2.5G+2X10G SFP+(Managed) |
| Antal havne | 26 (24x 2.5G RJ45, 2x 10G SFP+) |
| Interface Type | RJ45, SFP+ |
| Dataoverførselshastighed | 2500 Megabytes Per Second (2.5Gbps per RJ45 port) |
| Skiftekapacitet | 160 Gbps |
| Pakkevideresendelseshastighed | 119.04 MPps |
| MAC-adressetabelstørrelse | 16K |
| Package Cache | 12Mbit |
| Etui materiale | Metal |
| Farve | Sort |
| Produktdimensioner | 17.32 x 8.07 x 1.73 tommer |
| Varens vægt | 5.89 pund |
| Kompatible enheder | Laptop, Server |
10. Garanti og support
SODOLA provides a replacement for any quality issue within one year of purchase. For technical support or warranty claims, please refer to your purchase documentation or the retailer where the product was acquired. Please note that official SODOLA website, phone number, or email for direct support may not be readily available.


