1. Introduktion
This manual provides comprehensive instructions for the installation, operation, and maintenance of your TP-Link VIGI NVR1004H 4 Channel Network Video Recorder. Please read this manual thoroughly before using the device to ensure proper setup and functionality. The VIGI NVR1004H is designed to manage and record video streams from up to 4 IP cameras, offering features such as 4K HDMI video output, H.265+ video compression, and remote monitoring capabilities.
2. Produktet er slutview
2.1 Nøglefunktioner
- 4-kanals live View and 4K HDMI Video Output: Understøtter samtidig viewing of up to 4 camera feeds and outputs video in up to 4K resolution via HDMI.
- 2-ch @ 8MP/ 4-ch @ 4MP Decoding Capability: Efficiently decodes high-resolution video streams.
- 4-Channel Synchronous Playback: Allows simultaneous playback of recorded footage from 4 channels.
- 80 Mbps Incoming Bandwidth and 60 Mbps Outgoing Bandwidth: Ensures smooth recording and remote access.
- 1 SATA Interface (up to 16 TB): Supports a single SATA hard drive for extensive video storage.
- H.265+ videokomprimering: Advanced compression technology to save storage space and bandwidth.
- ONVIF and CGI Compatibility: Ensures broad compatibility with various IP cameras.
- Plug & Play: Simplifies camera setup and integration.
- Tovejs lyd: Supports audio communication through connected cameras.
- Fjernovervågning: Access and manage your NVR via the VIGI app or web interface.
2.2 Pakkens indhold
Pakken skal indeholde følgende varer:
- VIGI Network Video Recorder (NVR1004H)
- Strømadapter
- HDD skruer
- Mus
- Gummi fødder
- Hurtig installationsvejledning
2.3 Enhedslayout

Figure 1: Front Panel of VIGI NVR1004H
This image displays the front panel of the TP-Link VIGI NVR1004H, showing the USB ports for mouse and external storage, and LED indicators for LAN, HDD, and Power status.
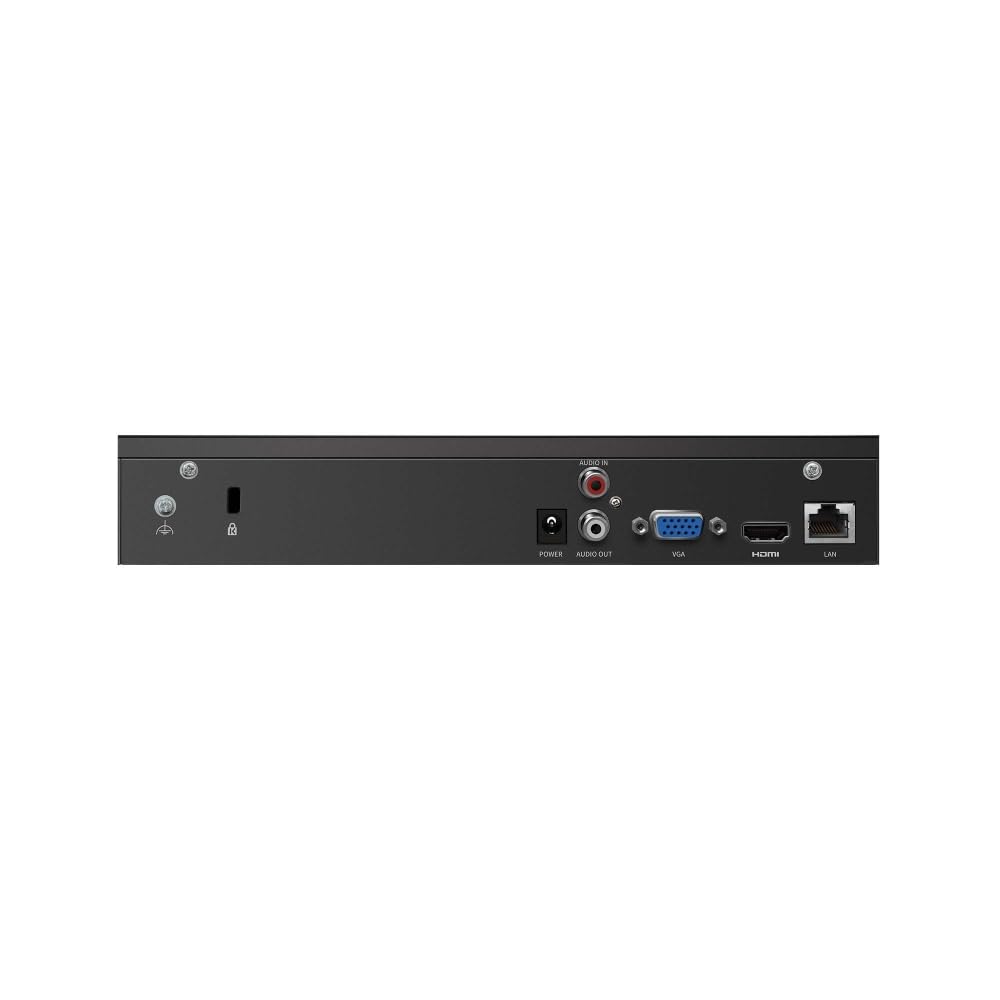
Figure 2: Rear Panel of VIGI NVR1004H
This image illustrates the rear panel connections of the TP-Link VIGI NVR1004H, including the power input, audio input/output, VGA port, HDMI port, and LAN port for network connectivity.
3. Opsætning
3.1 Hardwareinstallation
- Installer harddisk (HDD):
Unscrew the cover of the NVR. Connect a compatible SATA HDD (up to 16 TB) to the SATA data and power cables inside the NVR. Secure the HDD using the provided screws. Replace the cover.
- Tilslut ydre enheder:
- Tilslut en skærm til NVR'ens HDMI- eller VGA-port.
- Connect the included mouse to a USB port on the NVR's front panel.
- Connect the NVR to your network router or switch using an Ethernet cable via the LAN port.
- Tænd:
Tilslut strømadapteren til NVR'ens strømindgang, og sæt den derefter i en stikkontakt. NVR'en tænder automatisk.
3.2 Initial Configuration (Auto Initialize)
Upon the first boot, the NVR will guide you through an initial setup process. This includes setting up basic IPC (IP Camera) and hard disk parameters.

Figure 3: Auto Initialize Process
This image illustrates the three steps of the Auto Initialize process: "Click 'Auto Initialize'", "Initializing", and "Done", showing the on-screen prompts for quick configuration of devices and hard disk settings.
- Follow the on-screen prompts. Click "Auto Initialize" to begin the process.
- The NVR will detect connected devices and configure hard disk settings.
- Once complete, you can proceed to add cameras and further customize settings.
4. Betjeningsvejledning
4.1 Live View
After successful setup, the NVR will display the live feeds from connected cameras on the monitor. You can switch between single-camera view og multikameragitter view ved hjælp af skærmkontrollerne eller musen.
4.2 Afspilning
Til review optaget footage:
- Højreklik på live view skærmen for at få adgang til hovedmenuen.
- Select "Playback".
- Choose the desired camera(s), date, and time range for playback. The NVR supports 4-channel synchronous playback.
4.3 Fjernovervågning
The VIGI NVR1004H supports remote monitoring via the VIGI app (available for smartphones) or a web browser.
- VIGI-appen: Download the TP-Link VIGI app from your device's app store. Follow the in-app instructions to add your NVR by scanning the QR code or manually entering device details.
- Web Browser: Få adgang til NVR'erne web grænseflade ved at indtaste dens IP-adresse i en web browser på en computer, der er tilsluttet det samme netværk.
4.4 Tovejslyd
If your connected cameras support two-way audio and you have an external speaker/microphone connected to the NVR's audio ports, you can enable two-way communication through the NVR interface or the VIGI app.
5. Vedligeholdelse
5.1 Generel pleje
- Opbevar NVR'en et godt ventileret område for at forhindre overophedning.
- Avoid exposing the device to direct sunlight, moisture, or extreme temperatures.
- Rengør ydersiden med en blød, tør klud. Brug ikke flydende rengøringsmidler.
5.2 firmwareopdateringer
Regularly check the TP-Link VIGI webwebsted for firmwareopdateringer. Ved at holde din NVR's firmware opdateret sikrer du optimal ydeevne, sikkerhed og adgang til nye funktioner. Følg instruktionerne, der følger med firmwareopdateringspakken, omhyggeligt.
6. Fejlfinding
6.1 Almindelige problemer og løsninger
- NVR stuck on TP-Link screen during boot:
This can sometimes occur due to a minor software glitch. To resolve, power off the NVR, open the casing, locate the internal reset button (refer to the quick installation guide for exact location), press and hold it for a few seconds, then restart the device. This typically resolves the issue.
- No video output on monitor:
- Sørg for, at HDMI/VGA-kablet er korrekt tilsluttet til både NVR'en og skærmen.
- Kontroller, at skærmen er tændt og indstillet til den korrekte inputkilde.
- Prøv et andet kabel eller en anden skærm, hvis det er muligt.
- Kameraer viser ikke live view:
- Check network connectivity for both the NVR and the cameras.
- Ensure cameras are powered on and properly configured.
- Verify that the cameras are compatible with the NVR (ONVIF/CGI).
- Attempt to re-add the cameras through the NVR's interface.
- Fjernadgang virker ikke:
- Ensure the NVR has an active internet connection.
- Verify that the VIGI app is updated to the latest version.
- Check network settings and port forwarding rules on your router if necessary.
7. Specifikationer
| Model | VIGI NVR1004H |
| Produktdimensioner | 24.6 x 14.8 x 4.5 centimeter |
| Varens vægt | 590 g |
| Forbindelsesteknologi | Kablet |
| Kompatible enheder | Camera, Laptop, Personal Computers, Smartphone, Tablet |
| Hukommelseslagringskapacitet | Up to 16 TB (1 SATA Interface) |
| Indgående båndbredde | 80 Mbps |
| Udgående båndbredde | 60 Mbps |
| Video output | 4K HDMI, VGA |
| Afkodningsevne | 2-ch @ 8MP / 4-ch @ 4MP |
| Videokomprimering | H.265 + |
| Standarder | ONVIF, CGI |
| Fabrikant | TP-Link |
| Oprindelsesland | Indien |
8. Garanti og support
For warranty information and technical support, please contact TP-Link customer service. You can reach them via the following details:
- Importør: TP-link India Private ltd.
- Adresse: Office no 201, 2nd floor A-wing Time Square Building, Marol naka, Andheri Kurla Road, Andheri East, Mumbai, India
- Gratis: 1800 2094 168
- E-mail: support.in@tp-link.com
Gem venligst din købskvittering i tilfælde af garantikrav.


