1. Introduktion
The Radioddity GM-30 is a General Mobile Radio Service (GMRS) handheld radio designed for reliable two-way communication. It features a robust set of functionalities including multiple channels, scanning capabilities, and NOAA weather alerts, making it suitable for various outdoor and professional applications. This manual provides essential information for the proper setup, operation, and maintenance of your GM-30 radio.
2. Opsætning
2.1 Pakkens indhold
The Radioddity GM-30 package includes the following components:
- 1 x GM-30 radio unit
- 1 x 1500mAh batteri
- 1 x 2200mAh batteri
- 1 x Speaker microphone
- 1 x Programming cable
- 1 x Original antenna
- 1 x Ørestykke
- 1 x bælteclips
- 1 x håndledsrem
- 1 x USB-C power cable with adapter

Image: The Radioddity GM-30 GMRS Handheld Radio shown with all included accessories, including the radio unit, two batteries, speaker mic, programming cable, antenna, earpiece, belt clip, wrist strap, and USB-C charging components.
2.2 Batteriinstallation og opladning
To install the battery, align the battery pack with the back of the radio and slide it into place until it clicks securely. The GM-30 supports USB Type-C charging directly on the battery pack or via the radio unit. Use the provided UL-certified adapter and USB-C cable for safe charging.

Image: Two lithium-ion batteries (1500mAh and 2200mAh) provided with the Radioddity GM-30 radio.

Image: The Radioddity GM-30 radio unit connected via its USB Type-C charging port.
2.3 Montering af antenne og tilbehør
Screw the antenna clockwise onto the connector at the top of the radio until it is finger-tight. Attach the belt clip to the rear of the radio using the provided screws. The speaker microphone and earpiece connect to the side port of the radio.

Image: A Radioddity GM-30 radio with a speaker microphone connected, highlighting its K-plug compatibility.
3. Grundlæggende betjening
3.1 Tænd/sluk og lydstyrke
Rotate the top knob clockwise to power on the radio. Continue rotating to adjust the volume. Rotate counter-clockwise until a click is heard to power off the radio.
3.2 Kanalvalg
The GM-30 features 30 default channels (22 GMRS, 8 repeaters) and 24 additional GMRS repeater channels. Use the up/down arrow keys on the keypad to navigate through channels in channel mode. The display sync feature shows channel name, number, and frequency.
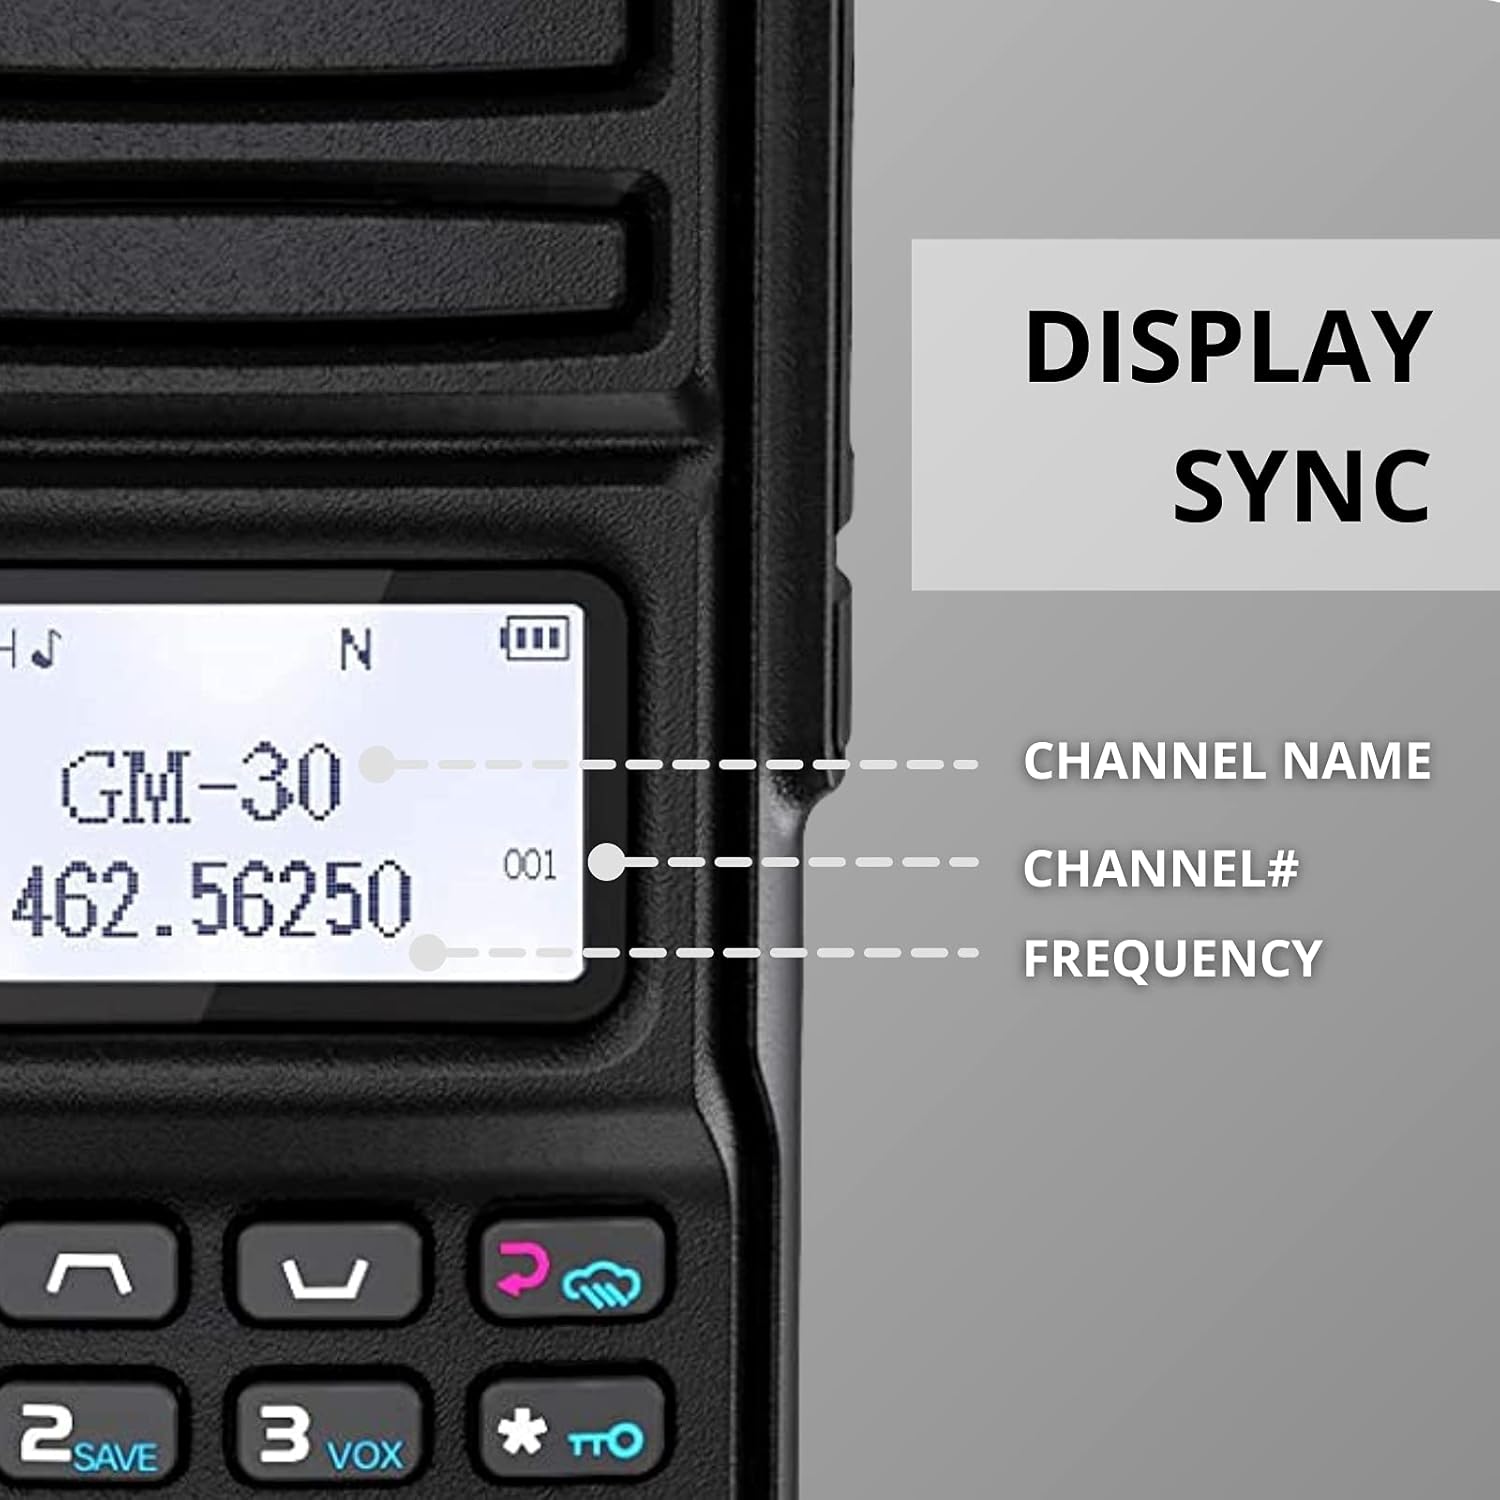
Image: The Radioddity GM-30 radio display showing synchronized information including channel name, channel number, and frequency.
3.3 Afsendelse og modtagelse
To transmit, press and hold the Push-To-Talk (PTT) button on the side of the radio. Speak clearly into the microphone. Release the PTT button to receive. Ensure you are on the same channel as the person you wish to communicate with.
Video: This video demonstrates the range capabilities of the Radioddity GM-30 GMRS radio in comparison to another radio model, highlighting its effective communication distance.
4. Avancerede funktioner
4.1 Dual-Band Scanning & NOAA Weather
The GM-30 supports UHF & VHF monitoring in channel (CH) and VFO modes. It also includes a NOAA weather receiver and scanner for real-time weather alerts. Activate scanning via the menu or designated function buttons.

Image: The Radioddity GM-30 radio display showing the NOAA weather channel, indicating its weather alert capabilities.
4.2 FM-radio og lommelygte
The radio includes an FM radio function for entertainment. A built-in flashlight is available for illumination in low-light conditions or for signaling purposes. The flashlight can be activated via a dedicated button on the radio.
4.3 VOX, Squelch, and TOT
The GM-30 supports Voice Operated Exchange (VOX) for hands-free transmission, Squelch to suppress background noise, and Time-Out Timer (TOT) to prevent accidental continuous transmission.
5. Programmering
The Radioddity GM-30 can be programmed via PC using Chirp-compatible software or directly through the keypad. The programming cable is included for PC connectivity.

Image: The Radioddity GM-30 radio connected to a laptop, illustrating its PC programming capability with Chirp software.
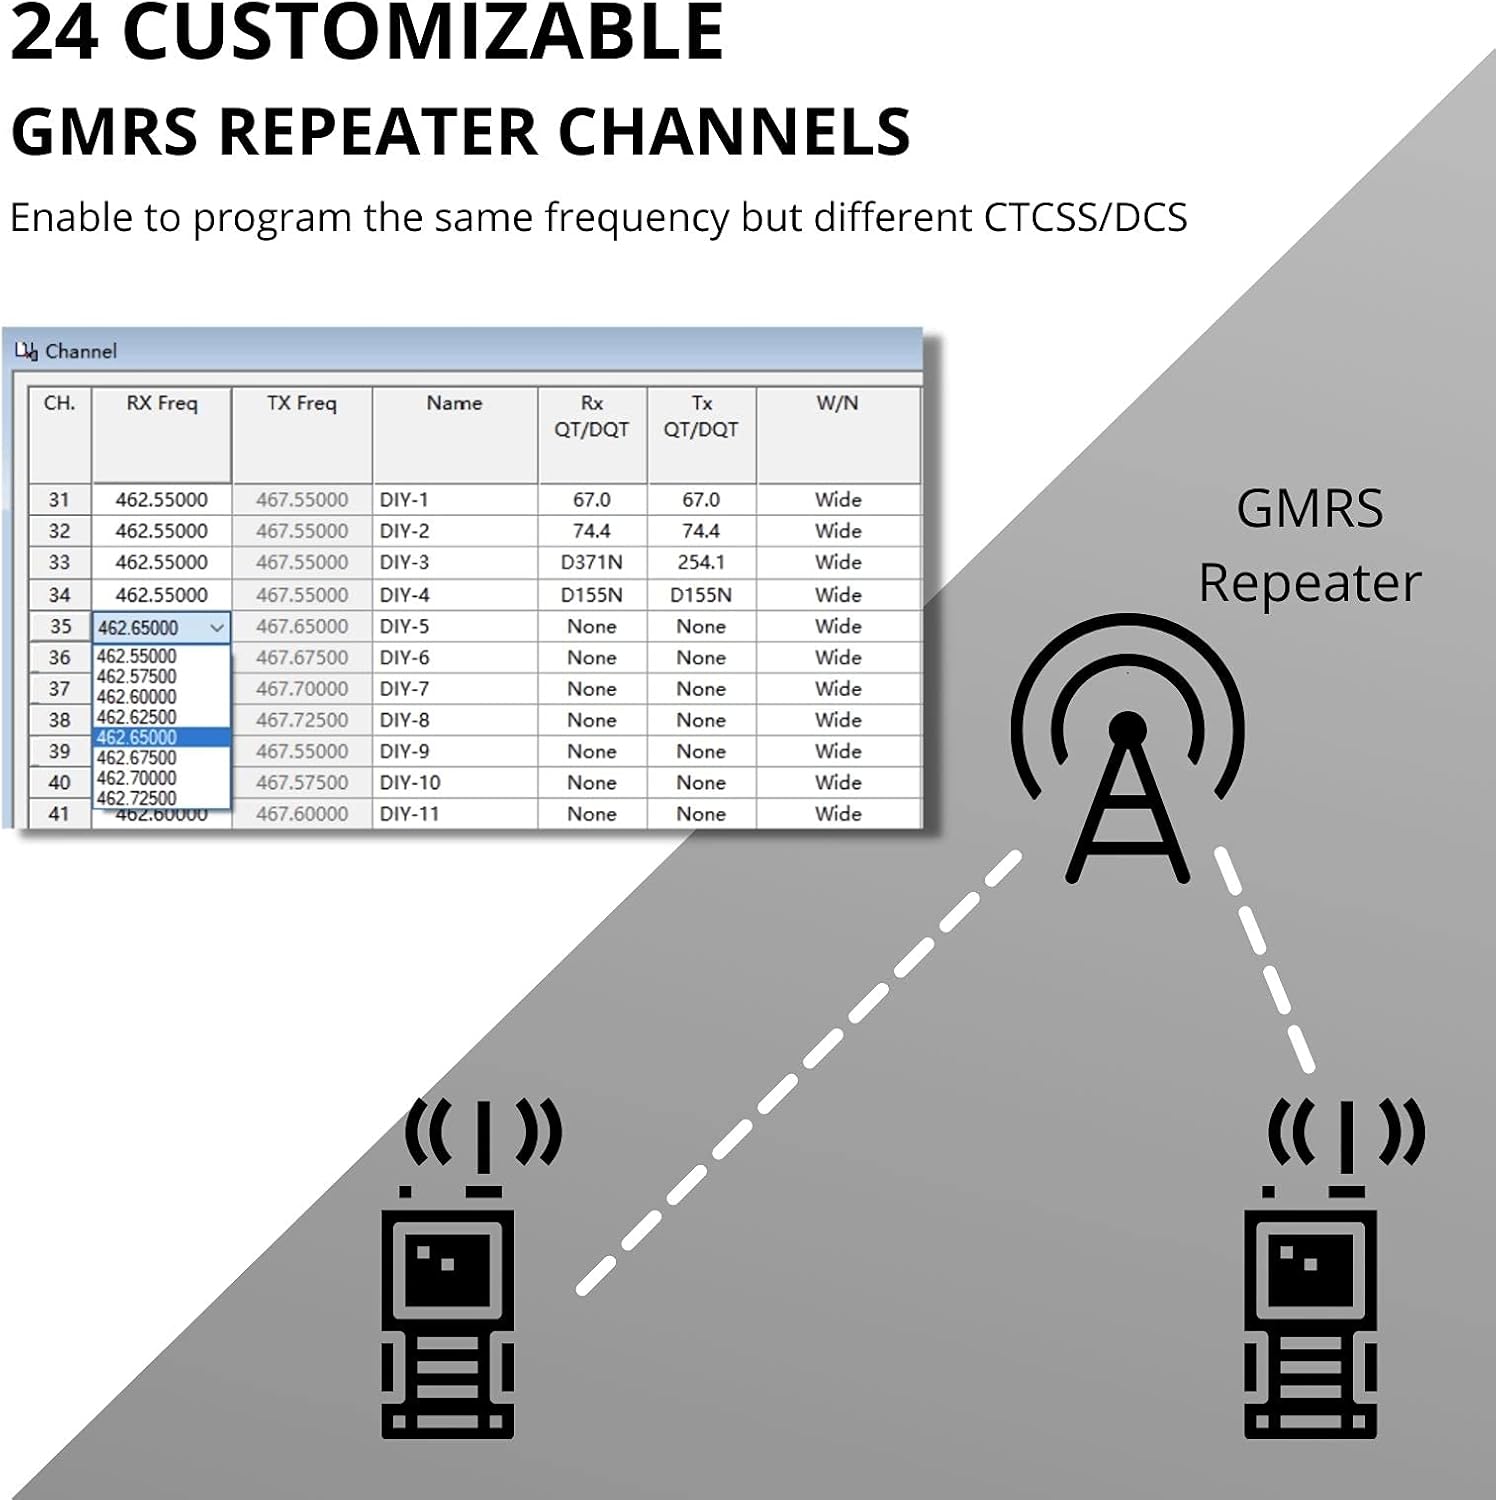
Image: A screenshot of the programming software interface, showing options for customizing GMRS repeater channels with different CTCSS/DCS codes.
Video: This video provides instructions on how to set up DIY repeater channels for the Radioddity GM-30 GMRS radio using CPS software, demonstrating advanced programming capabilities.
6. Vedligeholdelse
6.1 Pleje af batterier
Always use the UL-certified charger and USB-C cable provided to ensure safe and reliable charging. Avoid overcharging and exposing batteries to extreme temperatures. Store batteries in a cool, dry place when not in use.
6.2 Rengøring
Rengør radioens yderside med en blød, tør klud.amp cloth. Do not use harsh chemicals or abrasive cleaners. Ensure all ports are closed when cleaning to prevent moisture ingress.
7. Fejlfinding
If you encounter issues with your Radioddity GM-30, refer to the following common troubleshooting steps:
- Ingen strøm: Sørg for, at batteriet er fuldt opladet og korrekt installeret. Kontroller tænd/sluk-knappen.
- Ingen modtagelse/transmission: Verify that you are on the correct channel and frequency. Check antenna connection. Ensure the squelch level is not set too high.
- Dårlig lydkvalitet: Check volume levels. Ensure the microphone is not obstructed.
- Opladningsproblemer: Verify the USB-C cable and adapter are securely connected. Ensure the power source is active.
For further assistance, contact Radioddity customer support.
8. Specifikationer
| Feature | Detalje |
|---|---|
| Varens vægt | 1.76 pund |
| Pakkedimensioner | 7.95 x 4.72 x 4.29 tommer |
| Varemodelnummer | GM 30 |
| Batterier | 2 Lithium Ion batterier påkrævet (medfølger) |
| Display Type | LCD |
| Frekvensområde | TX: 462.5625-467.7125MHz, RX: 65-108MHz, 136-174MHz, 400-470MHz |
| Maksimal talerækkevidde | 5 Mil |
| Antal kanaler | 250 |
| Voltage | 7.2 volt |
| Vandmodstandsniveau | Vandtæt |
9. Garanti og support
9.1 Garantioplysninger
The Radioddity GM-30 GMRS Handheld Radio comes with an 18-month warranty from the date of purchase. This warranty covers manufacturing defects and ensures the product meets its specified performance standards. Please retain your proof of purchase for warranty claims.
9.2 Kundesupport
For technical support, troubleshooting, or warranty inquiries, please visit the official Radioddity website or contact their customer service team. Additional tutorials and resources may be available online to assist with common questions and advanced programming.


