1. Introduktion
The GVDA GD128PLUS Smart Rechargeable Digital Multimeter is an advanced, versatile tool designed for accurate and reliable electrical measurements. Featuring a 10000-count display, auto-ranging capabilities, and True RMS functionality, it is suitable for professionals and electronics enthusiasts alike. This manual provides essential information for safe and effective operation, setup, maintenance, and troubleshooting of your multimeter.
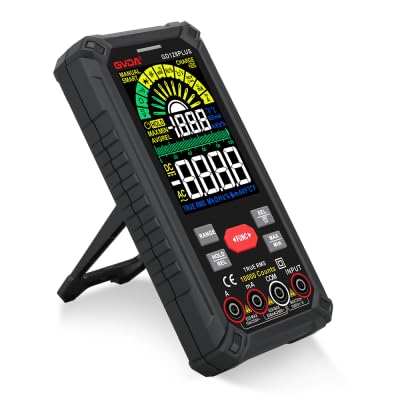
Figure 1.1: GVDA GD128PLUS Digital Multimeter with its integrated kickstand.
2. Sikkerhedsoplysninger
Always adhere to the following safety precautions to prevent personal injury or damage to the multimeter:
- Overskrid ikke de maksimale inputgrænser for noget måleområde.
- Udvis ekstrem forsigtighed, når du arbejder med voltagover 30V AC RMS, 42V peak eller 60V DC. Disse voluminertages udgør en stødfare.
- Afbryd altid strømmen til kredsløbet og aflade alle højspændingsledninger.tage-kondensatorer, før du udfører modstands-, kontinuitets- eller diodetest.
- Ensure the test leads are in good condition, without any damaged insulation.
- Brug ikke multimeteret, hvis det ser beskadiget ud, eller hvis huset er åbent.
- Brug den korrekte funktion og det korrekte område for hver måling.
- Hold fingrene bag fingerbeskytterne på testproberne under målingerne.
- Do not use the multimeter in wet environments or in the presence of explosive gases or dust.
- The Non-Contact Voltage (NCV) function is for indication only; always verify voltage presence with direct measurement.
3. Pakkens indhold
Ved udpakning skal du kontrollere, at alle nedenstående varer er til stede og i god stand:
- 1 x GVDA GD128PLUS Digital Multimeter
- 1 x par testledninger (rød og sort)
- 1 x USB ladekabel
- 1 x K-type termoelementprobe
- 1 x Cloth Carrying Bag
- 1 x Brugermanual (dette dokument)
- 1 x Gaveæske (emballage)
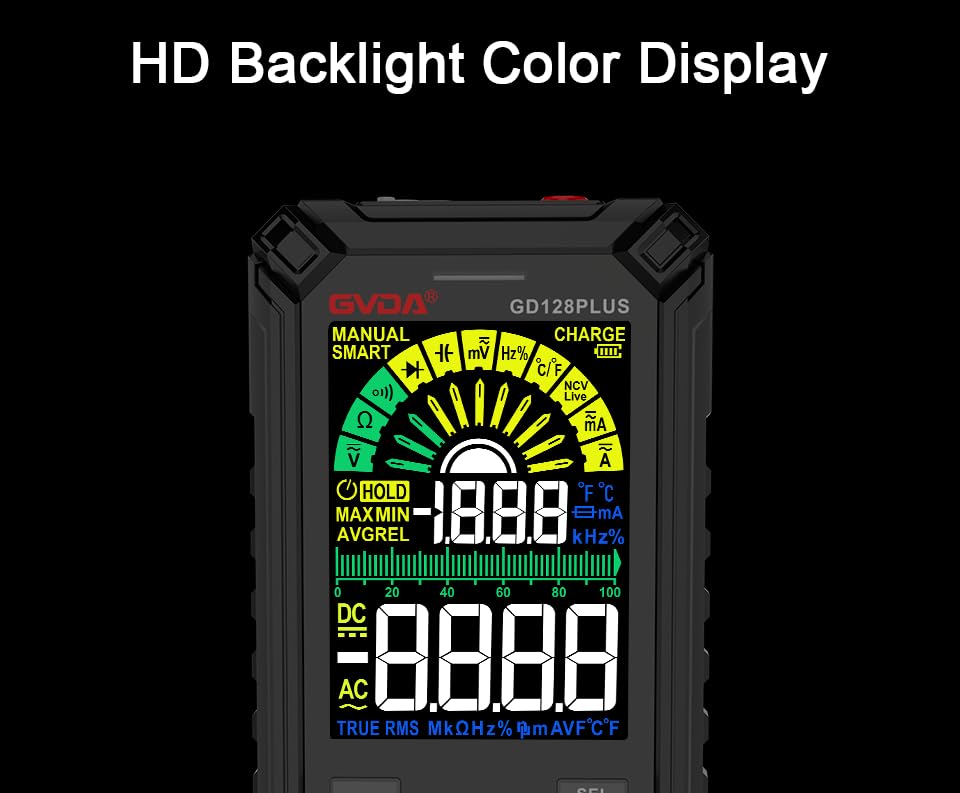
Figure 3.1: All components included in the GVDA GD128PLUS Multimeter package.
4. Produktfunktioner og komponenter
The GD128PLUS multimeter is equipped with a range of features for comprehensive electrical testing:
- Visning af 10000 tal: Giver høj opløsning til præcise målinger.
- Automatisk rækkevidde: Automatically selects the appropriate measurement range, simplifying operation.
- Ægte RMS: Ensures accurate readings for non-sinusoidal AC waveforms.
- Genopladeligt lithiumbatteri: Built-in 3.7V battery for convenience and portability.
- HD Backlight Color Display: Klart og letlæseligt display under forskellige lysforhold.
- Non-Contact Voltage (NCV) Detektion: Registrerer sikkert tilstedeværelsen af AC-volumentage uden direkte kontakt.
- LED lommelygte: Integreret lys til oplysning af mørke arbejdsområder.
- Datahold (HOLD): Fryser den aktuelle aflæsning på displayet.
- Relativ måling (REL): Displays the difference between a stored reference value and the current reading.
- MAX/MIN-måling: Registrerer maksimum- og minimumsværdierne under en målesession.
- Input Jack LED Indication: Guides correct test lead connection for selected function.
- Overbelastningsbeskyttelse: Protects the device from damage due to excessive input.
4.1. Multimeter Layout

Figure 4.1: Key components and input jacks of the GVDA GD128PLUS Multimeter.
Se figur 4.1 for placeringen af følgende komponenter:
- Vise: HD Backlight Color LCD for readings and indicators.
- Funktionsknapper: RANGE, HOLD/REL, FUNC, SEL, MAX/MIN.
- Indgangsstik:
- COM Jack: Fælles (negativ) indgang for alle målinger.
- VΩHzCap°C/°F Jack: Positive input for Voltage, Resistance, Frequency, Capacitance, and Temperature measurements.
- mAμA Jack: Positive input for milliampere og mikroamperestrømsmålinger.
- 10A-stik: Positive input for 10 Amperestrømsmålinger.
- Tænd / sluk-knap: Placeret på den øverste kant.
- Opladningsstik: USB-C-port til genopladning af det interne batteri.
- Lommelygte-nøgle: Button to activate the integrated LED flashlight.
- Advarselsindikator: LED light for safety alerts.
- Beslag: Integrated kickstand on the back for hands-free viewing.
5. Opsætning
5.1. Første opladning
Before first use, it is recommended to fully charge the multimeter's internal lithium battery. Connect the provided USB charging cable to the multimeter's charge jack and to a standard USB power adapter (not included) or a computer USB port. The display will indicate charging status. A full charge typically takes a few hours.

Figure 5.1: The multimeter's rechargeable lithium battery can be charged directly using a USB cable.
5.2. Tilslutning af testledninger
For most measurements, connect the black test lead to the KOM jack and the red test lead to the appropriate positive input jack (VΩHzCap°C/°F, mAμA, or 10A) depending on the desired measurement function. The input jack LED indicators will illuminate to guide correct connection.
6. Betjeningsvejledning
6.1. Tænd/sluk
Tryk og hold på Tænd/sluk button (located on the top edge) to turn the multimeter on or off. The device features an auto-power-off function to conserve battery life after a period of inactivity.
6.2. Måletilstande
The GD128PLUS offers various measurement modes, accessible via the rotary dial and function buttons:
6.2.1. bindtage-måling (AC/DC)
- Drej drejeknappen til V position. The multimeter will automatically detect AC or DC voltage.
- Tilslut den sorte testledning til KOM stik og den røde testledning til VΩHzCap°C/°F stik.
- Tilslut testproberne parallelt til det kredsløb eller den komponent, der testes.
- Læs bindtage -værdi på displayet.
6.2.2. Strømmåling (AC/DC)
- Drej drejeknappen til mA/μA or 10A position depending on the expected current.
- Tilslut den sorte testledning til KOM jack. Connect the red test lead to the mAμA jack for small currents or the 10A jack for larger currents.
- Connect the multimeter in series with the circuit. Ensure the circuit is de-energized before connecting.
- Tilslut strøm til kredsløbet og aflæs strømværdien.
- Forsigtighed: Never connect the multimeter in parallel for current measurement, as this can damage the device and the circuit.
6.2.3. Modstandsmåling (Ω)
- Drej drejeknappen til Ω position.
- Tilslut den sorte testledning til KOM stik og den røde testledning til VΩHzCap°C/°F stik.
- Sørg for, at kredsløbet er spændingsløst, og at alle kondensatorer er afladede, før modstanden måles.
- Tilslut testproberne på tværs af den komponent, der skal måles.
- Aflæs modstandsværdien.
6.2.4. Kapacitansmåling (F)
- Drej drejeknappen til Kasket position.
- Tilslut den sorte testledning til KOM stik og den røde testledning til VΩHzCap°C/°F stik.
- Sørg for, at kondensatoren er helt afladet, før du tilslutter proberne.
- Tilslut testproberne på tværs af kondensatoren.
- Aflæs kapacitansværdien.
6.2.5. Frekvensmåling (Hz)
- Drej drejeknappen til Hz position.
- Tilslut den sorte testledning til KOM stik og den røde testledning til VΩHzCap°C/°F stik.
- Connect the test probes in parallel to the signal source.
- Aflæs frekvensværdien.
6.2.6. Diode Test and Continuity Test
- Drej drejeknappen til Diode/Kontinuitet position. Brug SEL button to toggle between diode test and continuity test.
- Tilslut den sorte testledning til KOM stik og den røde testledning til VΩHzCap°C/°F stik.
- Diode test: Forbind den røde probe til anoden og den sorte probe til katoden på dioden. En fremadrettet voluminiumsspændingtage drop will be displayed. Reverse the probes; an open circuit (OL) should be displayed.
- Kontinuitetstest: Connect the probes across the circuit or component. A continuous beep indicates a low resistance (continuity).
6.2.7. Non-Contact Voltage (NCV) Detektion
- Drej drejeknappen til NCV position.
- Move the top end of the multimeter near the conductor suspected of having AC voltage.
- The multimeter will emit an audible beep and the warning indicator will flash, with the display showing signal strength, if AC voltage er opdaget.
- Note: This function is for preliminary detection only. Always use direct contact measurement for precise voltage verifikation.
6.2.8. Temperaturmåling (°C/°F)
- Drej drejeknappen til ° C / ° F position.
- Connect the K-type thermocouple probe to the KOM og VΩHzCap°C/°F stik, observerer polariteten.
- Placer spidsen af termoelementet på eller i nærheden af det objekt, hvis temperatur skal måles.
- Read the temperature on the display. Use the SEL knappen for at skifte mellem Celsius og Fahrenheit.
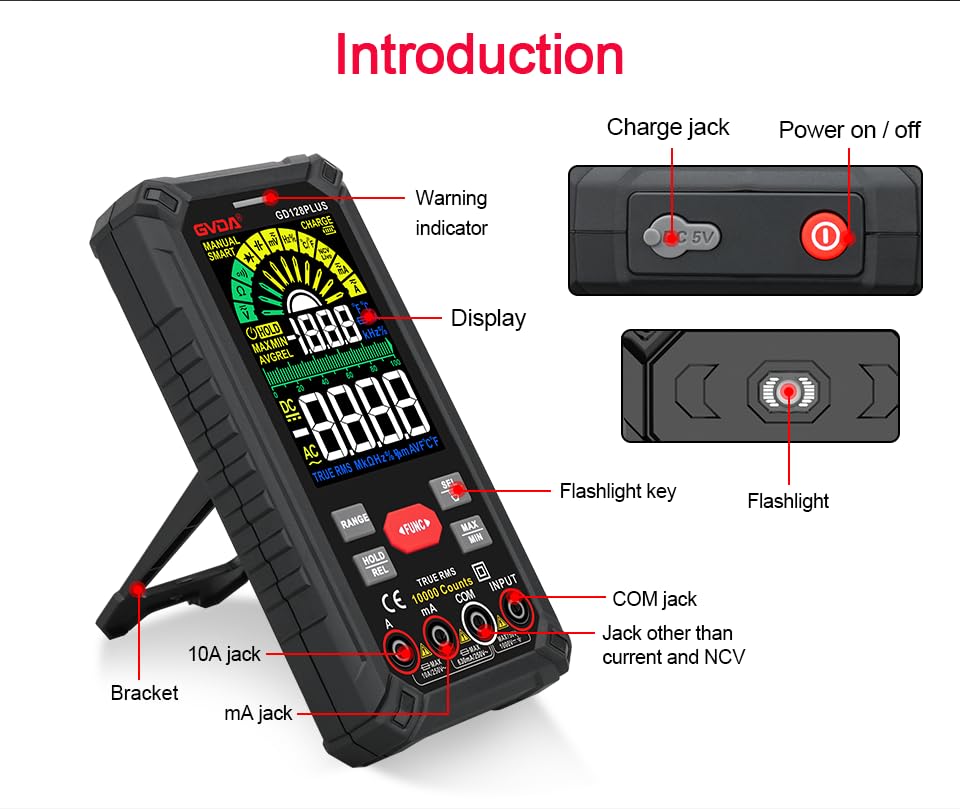
Figure 6.1: The multimeter can perform temperature tests using the included K-type thermocouple probe.
6.3. Særlige funktioner
- RANGE knap: In manual range mode, press to cycle through available ranges. In auto range mode, press to switch to manual range.
- HOLD/REL-knap:
- Short press: Activates Data Hold, freezing the current reading. Press again to release.
- Long press: Activates Relative Measurement (REL). The current reading becomes the reference, and subsequent readings show the difference from this reference. Long press again to exit.
- MAX/MIN knap: Press to enter MAX/MIN recording mode. The display will show the maximum, minimum, and average values detected since activation. Press again to cycle through MAX, MIN, AVG. Long press to exit.
- FUNC-knap: Used to switch between different functions within the same rotary dial position (e.g., AC/DC voltage, Diode/Kontinuitet).
- Lommelygte: Press the dedicated flashlight key on the side to turn the LED flashlight on or off.

Figure 6.2: The multimeter features a convenient LED flashlight for illuminating work areas.
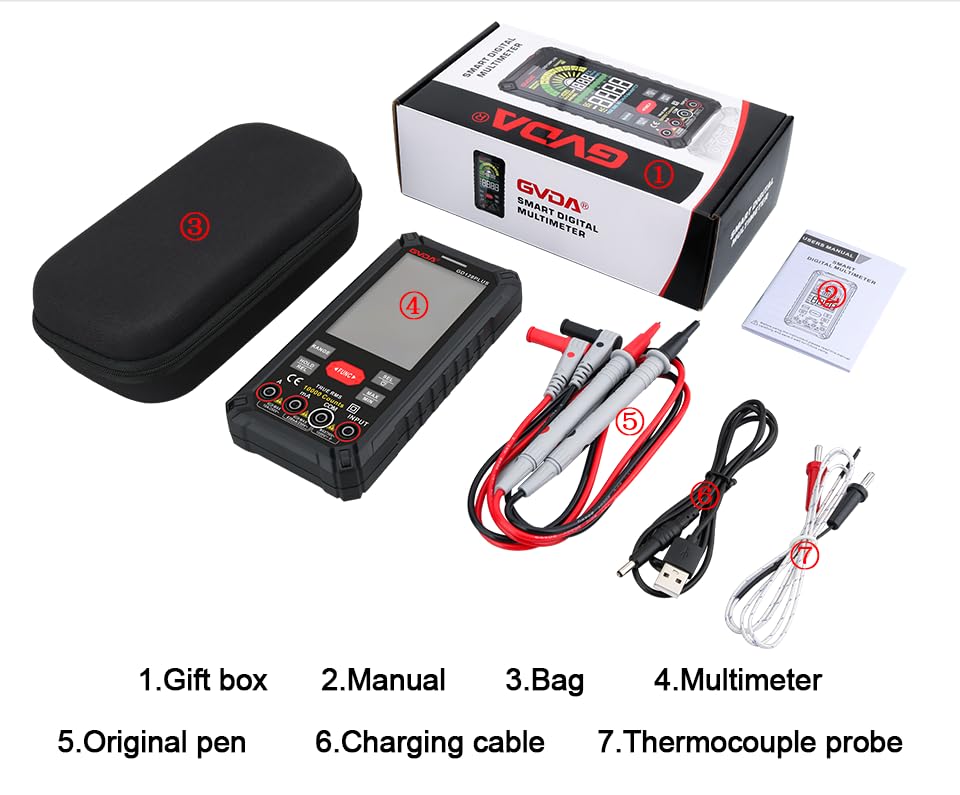
Figure 6.3: The HD Backlight Color Display provides clear and comprehensive measurement information.
7. Vedligeholdelse
7.1. Rensning
Tør sagen af med annonceamp cloth and mild detergent. Do not use abrasives or solvents. Ensure the multimeter is off and disconnected from any circuits before cleaning.
7.2. Batteriopladning
The multimeter is equipped with a rechargeable lithium battery. When the low battery indicator appears on the display, connect the multimeter to a USB power source using the provided charging cable. Avoid fully discharging the battery frequently to prolong its lifespan.
7.3. Opbevaring
When not in use for extended periods, store the multimeter in a cool, dry place, away from direct sunlight and extreme temperatures. It is advisable to charge the battery periodically (e.g., every 3-6 months) to maintain its health.
8. Fejlfinding
| Problem | Mulig årsag | Løsning |
|---|---|---|
| Multimeteret tænder ikke. | Lavt eller afladet batteri. | Charge the multimeter using the USB cable. |
| "OL" (Overbelastning) vises. | Målingen overstiger det valgte område eller målerens maksimale kapacitet. | Switch to a higher range (if in manual range) or ensure the measurement is within the meter's specifications. |
| Upræcise aflæsninger. | Forkert funktion/område valgt; dårlig forbindelse til testledninger; ekstern interferens. | Verify function and range; ensure test leads are securely connected; move away from strong electromagnetic fields. |
| Ingen kontinuitetsbip. | Circuit is open; multimeter not in continuity mode. | Check the circuit for breaks; ensure the multimeter is set to continuity mode (use SEL button if necessary). |
9. Specifikationer
| Parameter | Værdi |
|---|---|
| Vise | 10000 Counts, HD Backlight Color LCD |
| Rangering | Auto/manuel rækkevidde |
| Ægte RMS | Ja |
| DC bindtagRækkevidde | Op til 1000V |
| AC VoltagRækkevidde | Op til 750V |
| DC strømområde | Op til 10A |
| AC nuværende rækkevidde | Op til 10A |
| Modstandsområde | Yes (Ohm) |
| kapacitans Range | Yes (Farad) |
| Frekvensområde | Yes (Hz) |
| Temperaturområde | -40°C til 1000°C / -40°F til 1832°F |
| Diodetest | Ja |
| Kontinuitetstest | Ja (med buzzer) |
| NCV (Non-Contact Voltage) | Ja |
| Strømforsyning | 3.7V genopladeligt lithiumbatteri |
| Sampling Rate | Ca. 3 gange i sekundet |
| Dimensioner | 166 mm x 83 mm x 29 mm (ca. 6.5 x 3.3 x 1.1 tommer) |
| Vægt | Ca. 1.26 pund (0.57 kg) |
| Driftsmiljø | 0-40°C, relative humidity <80% |
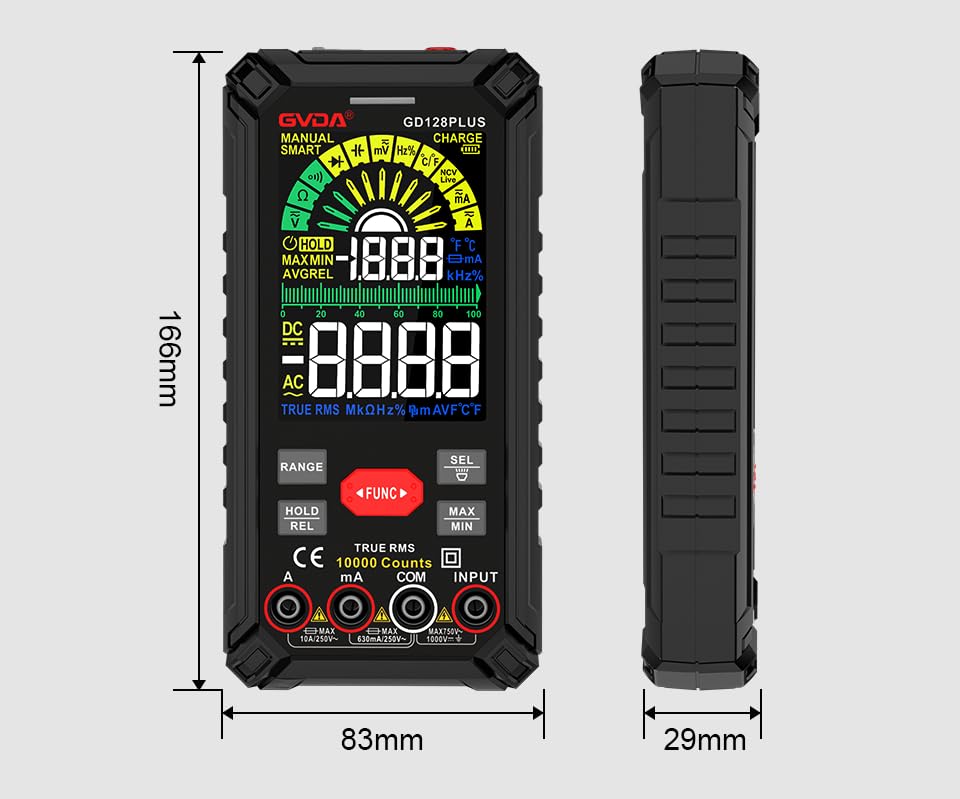
Figure 9.1: Physical dimensions of the GVDA GD128PLUS Multimeter.
10. Garanti og support
This GVDA GD128PLUS Digital Multimeter is designed for reliability and performance. For warranty information, technical support, or service inquiries, please refer to the contact details provided by your retailer or visit the official GVDA webwebsted. Gem venligst din købsbevis til garantikrav.


