1. Sikkerhedsinstruktioner
Please read and understand all safety warnings before operating this pyrography kit. Failure to follow these instructions may result in electric shock, fire, or serious injury.
- Always operate the pyrography kit in a well-ventilated area to avoid inhaling fumes from burning materials.
- The pyrography pen tips reach very high temperatures (up to 700°C). Avoid direct contact with skin or flammable materials.
- Use the included pen stand to safely rest the hot pyrography pen when not in use.
- Sørg for, at netledningen ikke er beskadiget, og at den er korrekt tilsluttet en jordet stikkontakt.
- Do not leave the operating pyrography kit unattended.
- Opbevares utilgængeligt for børn og kæledyr.
- The pyrography pen features an anti-scald handle designed to minimize heat transfer, but caution is still required during prolonged use.
- Always unplug the unit and allow it to cool completely before cleaning or changing tips.
2. Pakkens indhold
Bekræft, at alle nedenstående varer er inkluderet i din pakke:
- 1 x Pyrography Machine (Control Unit)
- 1 x Pyrography Pen (Wire-Nib Pen)
- 23 x Wire Tips
- 1 x Pen Stand
- 1 x skruetrækker
- 4 x Wooden Pieces (for practice)
- 1 x pincet
- 1 x Universalkniv
- 1 x Rengøringssvamp
- 1 x brugermanual
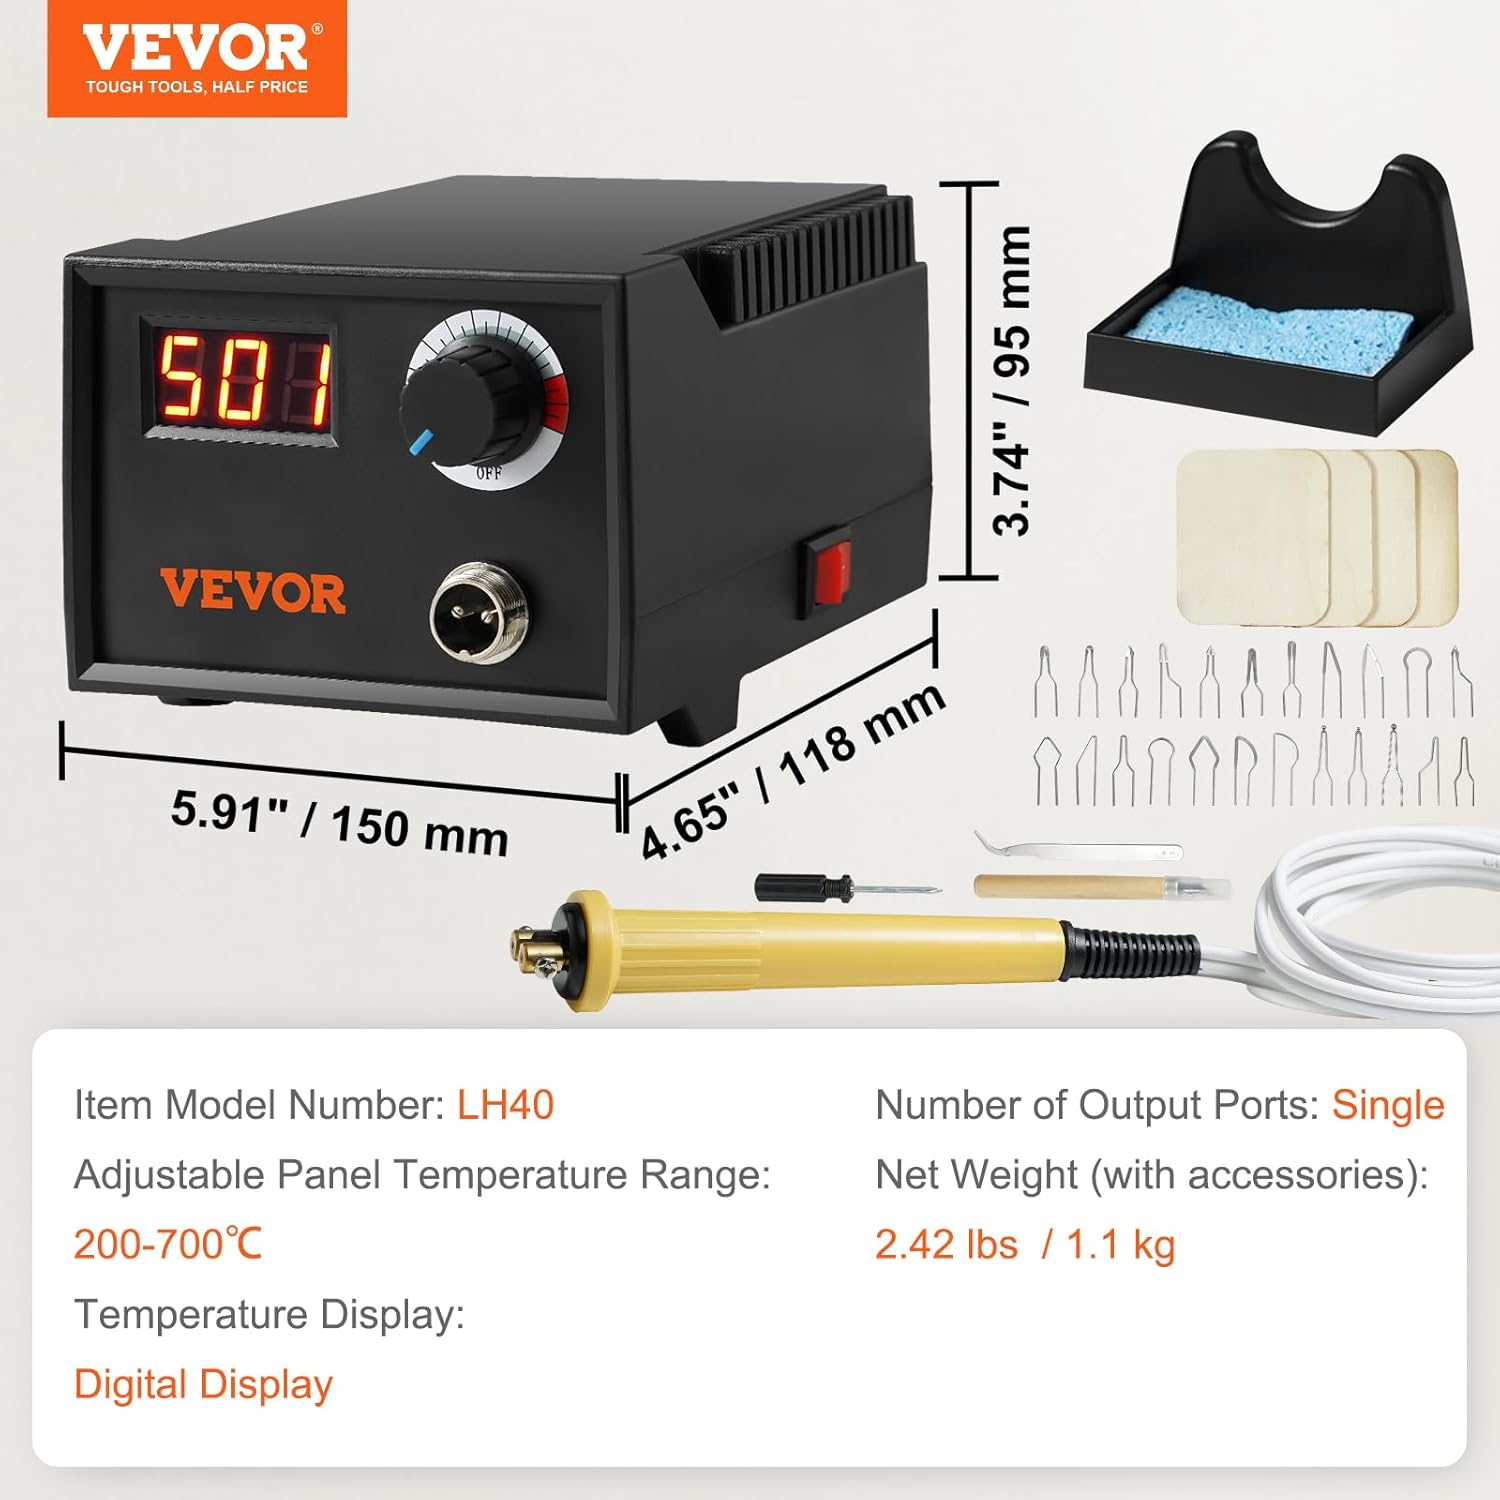
Billede: Overview of the VEVOR Pyrography Kit components and their dimensions.
3. Produktet er slutview
The VEVOR Pyrography Kit (Model LH40) is designed for detailed wood burning, leather crafting, and other pyrography projects. It features precise temperature control and a digital display for optimal performance.
Kontrolenhed
The main control unit houses the power supply, temperature control knob, and digital display. It provides stable power to the pyrography pen, allowing for consistent heat output.

Image: The pyrography machine control unit with a wire-nib pen and various tips.
Pyrography Pen & Tips
The kit includes a lightweight pyrography pen with an anti-scald handle for comfortable and safe use. It comes with 23 different wire tips, allowing for a wide range of artistic effects, including fine lines, shading, feathering, and detailed drawing.
Pen Stand & Cleaning Sponge
A dedicated pen stand is provided for safe and stable storage of the hot pyrography pen during breaks or when cooling down. The cleaning sponge helps maintain tip cleanliness for optimal performance.

Image: The security pen stand for safely holding the heating pen and cleaning sponge.
4. Opsætning
Follow these steps to set up your pyrography kit before first use:
- Pakker ud: Fjern forsigtigt alle komponenter fra emballagen.
- Place the Control Unit: Position the control unit on a stable, heat-resistant surface in a well-ventilated area.
- Connect the Pyrography Pen: Insert the pen's connector securely into the designated port on the control unit.
- Install a Wire Tip:
- Loosen the screws on the pen's tip holder using the provided screwdriver.
- Carefully insert the desired wire tip into the holder. Ensure both ends of the wire tip are properly seated.
- Tighten the screws firmly to secure the tip. Do not overtighten.
- Verify that the tip is secure and stable before proceeding.
- Place Pen Stand: Position the pen stand within easy reach.
- Tilslut strøm: Sæt netledningen i en jordet stikkontakt.

Image: Step-by-step guide for installing a wire tip into the pyrography pen.
5. Betjeningsvejledning
Once the kit is set up, you can begin your pyrography project.
- Tænd: Turn the power knob on the control unit to the 'ON' position. The digital display will illuminate, showing the current temperature.
- Juster temperatur: Rotate the temperature control knob to set the desired temperature. The digital display will show the target temperature, then gradually adjust to the actual tip temperature. The temperature range is 200°C to 700°C.
- Forvarmning: Allow the pen to preheat for a few minutes until the digital display stabilizes at your set temperature.
- Begin Pyrography: Hold the pen like a pencil and apply gentle pressure to the material. Practice on scrap pieces of wood or leather first to get a feel for different temperatures and tip effects.
- Suggested Temperatures:
- Common Wooden Materials: 500-650°C
- Leather: 200-350°C
- Resting the Pen: When not actively burning, always place the hot pen on the pen stand to prevent accidental burns or damage to your workspace.
- Sluk: When finished, turn the power knob to the 'OFF' position and unplug the unit. Allow the pen to cool completely before handling or storing.

Image: Digital display for precise temperature control and suggested temperature ranges for different materials.
6. Vedligeholdelse
Proper maintenance ensures the longevity and optimal performance of your pyrography kit.
- Rengøringstips: Regularly clean the wire tips using the provided cleaning sponge. This removes carbon buildup and ensures consistent heat transfer. Always clean tips when they are hot, but exercise extreme caution.
- Opbevaring: Store the pyrography kit in a dry, cool place away from direct sunlight and moisture. Ensure all components are clean and cool before storage.
- Ledningspleje: Inspect the power cord and pen cable regularly for any signs of damage. Do not use the unit if any cables are frayed or damaged.
- Generel rengøring: Wipe the control unit and pen handle with a soft, dry cloth. Do not use abrasive cleaners or solvents.
7. Fejlfinding
If you encounter issues with your pyrography kit, refer to the following common problems and solutions:
| Problem | Mulig årsag | Løsning |
|---|---|---|
| Pen not heating or heating slowly | Loose tip connection, power issue, faulty tip | Check if the wire tip is securely tightened. Ensure the power cord and pen cable are fully connected. Try a different wire tip. Verify power outlet is functional. |
| Inkonsekvent temperatur | Carbon buildup on tip, loose connection, environmental factors | Clean the wire tip with the sponge. Ensure all connections are secure. Operate in a stable environment away from drafts. |
| Digitalt display virker ikke | Power issue, internal fault | Check power connection. If the unit is powered on but the display is off, contact customer support. |
| Smoke or unusual odor | Burning material, faulty component | Ensure adequate ventilation. If the smoke/odor is from the unit itself and not the material being burned, immediately power off and unplug the unit, then contact customer support. |
Hvis problemet fortsætter efter at have prøvet disse løsninger, bedes du kontakte VEVORs kundesupport for at få hjælp.
8. Specifikationer
| Feature | Specifikation |
|---|---|
| Mærke | VEVOR |
| Modelnummer | LH40 |
| Produktmål (L x B x H) | 15 x 11.8 x 9.5 cm (5.91 x 4.65 x 3.74 tommer) |
| Vægt | 1.1 kg (2.42 lbs) |
| Magt | 220 W |
| Voltage | 220 V |
| Materiale | Metal, Plast |
| Strømkilde | Elektrisk med ledning |
| Temperaturområde | 200 - 700°C (392 - 1292°F) |
| Display Type | Digitalt display |
9. Garanti og support
For warranty information or technical support, please contact VEVOR customer service directly. Refer to the contact details provided with your purchase or visit the official VEVOR webwebsted.
Spare parts availability: Information unavailable. Please contact VEVOR support for inquiries regarding replacement parts.