1. Introduktion
This manual provides essential information for the safe and efficient operation, maintenance, and troubleshooting of your Maksiwa Portable Edgebander, Edge Trimmer, and Workbench Combo. Please read this manual thoroughly before operating the equipment and retain it for future reference.
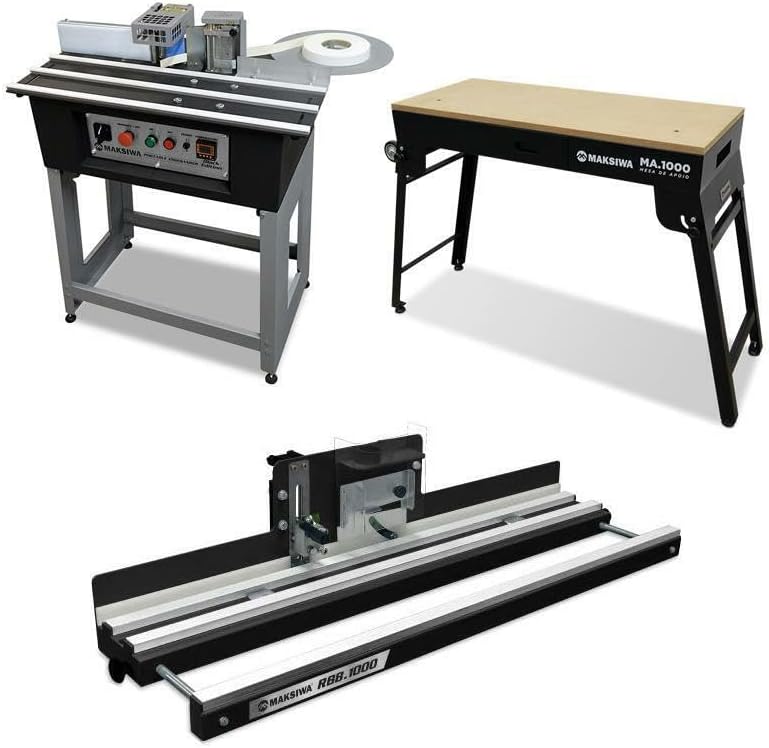
Figure 1: Maksiwa Portable Edgebander, Edge Trimmer, and Workbench Combo. This image displays the complete set, including the main edgebanding unit, the separate edge trimmer, and the sturdy workbench designed to support the equipment.
2. Sikkerhedsinstruktioner
- Brug altid passende personlige værnemidler (PPE), herunder sikkerhedsbriller, høreværn og handsker.
- Sørg for, at arbejdsområdet er rent, godt oplyst og fri for forhindringer.
- Keep children and unauthorized personnel away from the operating machinery.
- Disconnect power before performing any maintenance, adjustments, or when the machine is not in use.
- Brug ikke maskinen, hvis nogen af delene er beskadigede eller mangler.
- Use only Maksiwa-approved accessories and replacement parts.
- Be aware of hot surfaces, especially around the glue pot and heating elements.
- Ensure proper ventilation when using hot melt adhesive.
3. Produktet er slutview og komponenter
The Maksiwa Portable Edgebander Combo is designed for efficient and precise edgebanding applications. It includes a portable edgebander, an edge trimmer, and a dedicated workbench for stable operation.
3.1 Edgebander Unit

Figure 2: Close-up of the Maksiwa Portable Edgebander's control panel. This panel features an emergency stop button, power controls (ON/OFF), a feeder switch, and a digital temperature display for precise control of the hot melt system.
- Kontrolpanel: Features an emergency stop, power buttons, feeder control, and digital temperature display.
- Hot Melt System: Utilizes pellet low-temperature glue for strong, durable bonds.
- Tape Guide: Ensures proper alignment of the edgebanding tape.
- Glue Pot: Holds and heats the hot melt adhesive pellets.
- Back Rolls: Align and press the workpiece after glue application.
3.2 Edge Trimmer
The integrated edge trimmer provides clean and polished edges, enhancing the professional finish of your projects.
3.3 Arbejdsbord
The included workbench offers a stable and supportive surface for operating the edgebander and trimmer, ensuring precision and ease of use.

Figure 3: The sturdy workbench, featuring a convenient storage drawer, provides a stable platform for the edgebanding operations.
4. Opsætning
Follow these steps to set up your Maksiwa Portable Edgebander Combo:
- Udpakning: Fjern forsigtigt alle komponenter fra emballagen. Kontroller, at alle dele, der er anført på pakkelisten, er til stede og ubeskadigede.
- Workbench Assembly: Assemble the workbench according to the provided instructions. Ensure all fasteners are securely tightened for stability.
- Edgebander Placement: Place the edgebander unit securely on the workbench.
- Extension Plates Installation: Attach the left and right extension plates to the edgebander. Secure them with the bracket screws, tightening them after insertion.
- Guide Wheels Installation: Install the two guide wheels on the right extension plate.
- Widening Wheels Installation: Install the widened wheels on both sides of the adjustment rod and fix them with screws. Adjust the height of the screw to ensure the widening wheel is flush with the workbench, adapting to different thicknesses of edge banding boards.
- Edge Banding Tray Installation: Fix the black bracket for the edge banding tray, then place the rotating table.
- Air Pump Connection (Optional): For automatic belt breakage, connect an air pump to the air pump connector.
Video 1: Edge Bander Banding Machine Setup. This video demonstrates the installation of extension plates, guide wheels, and the edge banding tray, along with initial adjustments for the YUCHENGTECH edgebander, which shares similar setup principles with the Maksiwa unit.
5. Betjeningsvejledning
5.1 Edgebanding Operation
- Power On & Temperature Adjustment:
- After powering on, add hot melt adhesive pellets to the glue pot.
- Press the "SET" button on the digital temperature control unit. The "SV" value will flash. Use the up/down arrows to adjust the temperature (recommended around 150°C to avoid overheating the edge banding). Press "SET" again to confirm.
- Allow 5-10 minutes for the machine to preheat and reach the set temperature.
- Hastighedskontrol: Adjust the speed control unit. For straight line sealing, turn left. For curved sealing, turn right. It is recommended to control the speed at 20-30 gears for optimal results, especially for novices.
- Inserting Edge Banding: Insert the edge banding strip into the inlet. If an air pump is connected, the strip will automatically feed. Otherwise, manually push the strip into the black gate.
- Applying Edge Banding:
- Place the workpiece close to the gluing port and press wheel. Wait for the sealing strip to appear, then push the plate to fit the sealing strip.
- For irregular shapes, ensure the pressing wheel is tightly pressed against the edge of the workpiece as you feed it through.
- Trimning: Use the integrated edge trimmer or the manual cutter to trim excess edgebanding.
Video 2: Maksiwa CBC.E Portable Edgebander Features. This video highlights key operational features of the Maksiwa edgebander, including the glue pot, manual cutter, digital temperature control, feeder, glue regulator, mobile glue axis, inner guide, table guide, and back rolls, demonstrating how each component contributes to the edgebanding process.
Video 3: The PEK.1000 Krefeld Portable Edgebander. This video showcases the Krefeld PEK.1000 portable edgebander, demonstrating its ability to glue, cut, and trim edgebanding on various materials like PVC, ABS, paper, and wood, providing a visual guide to the edgebanding process.
5.2 Edge Trimmer Operation
The edge trimmer is designed for precise and clean trimming of edgebanding material. It can trim both sides simultaneously for efficiency.
Video 4: Edge Banding Trimmer. This video demonstrates the use of a manual edge banding trimmer, highlighting its application on various materials and its ergonomic design for achieving perfect edges.
Video 5: Virutex AU-93 Double Edge Manual Banding Trimmer. This video illustrates the operation of the Virutex AU-93, a double edge manual banding trimmer, showing how it effectively trims both sides of a panel simultaneously for a clean finish.
6. Vedligeholdelse
- Rensning: Regularly clean the machine, especially the glue pot and feeding mechanisms, to prevent adhesive buildup. Use appropriate cleaning agents recommended by Maksiwa.
- Klingepleje: Ensure the trimmer blades are sharp and free from debris. Replace dull or damaged blades promptly to maintain cutting quality.
- Smøring: Periodically lubricate moving parts as indicated in the detailed product manual (if available) to ensure smooth operation.
- Opbevaring: Store the edgebander and accessories in a dry, clean environment when not in use.

Figur 4: Nærbillede view of the glue application mechanism, showing the glue roller and regulator. Regular cleaning of this area is crucial for consistent performance.
7. Fejlfinding
| Problem | Mulig årsag | Løsning |
|---|---|---|
| Poor glue adhesion | Incorrect temperature setting, insufficient glue, dirty workpiece. | Verify temperature, add more glue, clean workpiece surface. |
| Uneven edge banding | Improper tape alignment, incorrect pressure from pressing wheel. | Adjust tape guide, ensure pressing wheel is correctly set for workpiece thickness. |
| Machine not feeding | Feeder switch off, motor issue, obstruction. | Check feeder switch, inspect for obstructions, contact tech support if motor issue persists. |
| Trimmer not cutting cleanly | Dull or damaged blade, incorrect trimmer adjustment. | Replace blade, adjust trimmer settings for optimal cut. |
8. Specifikationer
| Feature | Detalje |
|---|---|
| Mærke | Maksiwa |
| Modelnavn | Portable Edgebander Combo |
| Varemodelnummer | Maksiwa[A-Za-z0-9]+ (Refer to product packaging for specific model code) |
| Farve | Sort |
| Strømkilde | Elektrisk med ledning |
| Voltage | 110 volt |
| Varens vægt | 114 pund |
| Produktdimensioner | 21 x 32 x 19 tommer |
| Blade Material (Trimmer) | Højhastighedsstål |
| Handle Material (Trimmer) | Plastik eller nylon |
| Glue Type | Pellet Low Temperature Hot Melt Adhesive |

Figure 5: Diagram illustrating the dimensions of the Maksiwa Portable Edgebander unit.
9. Garanti og support
Your Maksiwa Portable Edgebander Combo comes with a 2 års begrænset garanti. This warranty covers defects in materials and workmanship under normal use. For warranty claims or technical assistance, please contact our dedicated US-based tech support team. Contact information can be found on the official Maksiwa webwebstedet eller din købsdokumentation.
10. Yderligere ressourcer
For further information and visual guides, please refer to the following resources:

Figure 6: Maksiwa's commitment to quality and precision, reflecting decades of experience in manufacturing durable, high-performance tools.

Figure 7: An illustration of the seamless workflow achieved with the Maksiwa Edgebander Combo, streamlining glue application, trimming, and support in a compact setup.


