Vigtige sikkerhedsinstruktioner
Please read these instructions carefully before operating the unit and retain them for future reference.
- Udsæt ikke dette apparat for dryppende eller sprøjtende vand.
- Placer ikke genstande fyldt med væske, såsom vaser, oven på apparatet.
- Sørg for tilstrækkelig ventilation. Bloker ikke ventilationsåbninger.
- Må ikke installeres i nærheden af varmekilder såsom radiatorer, varmeapparater, komfurer eller andre apparater (inklusive ampløftere), der producerer varme.
- Brug kun tilbehør/tilbehør specificeret af producenten.
- Træk stikket ud af apparatet under tordenvejr, eller når det ikke skal bruges i længere perioder.
- Overlad al service til kvalificeret servicepersonale. Service er påkrævet, når apparatet er blevet beskadiget på nogen måde.
Produkt overview
The Muse M17CB is a compact dual PLL FM/MW digital alarm clock radio designed for reliable timekeeping and audio playback. It features a clear 0.9-inch white LED display with a dimmer function and a 24-hour time format. Users can set two independent alarms, choosing to wake up to either the radio or a buzzer. The digital tuner allows for 6 preset stations (3 FM and 3 MW) for quick access to your favorite broadcasts. Additional functions include SNAP, SLEEP, and SNOOZE for enhanced user convenience.
Front View

Billedbeskrivelse: This image displays the front of the Muse M17CB alarm clock radio. It features a prominent 0.9-inch white LED display showing "12:00". Above the display are various control buttons and two rotary knobs. The buttons include P.1, P.2, P.3, DIM., O/SOURCE, and a large SNOOZE button. The left rotary knob is for VOLUME, and the right is for TUNING/SET. A small "muse" logo tag is visible on the left side.
Kontrolpaneler på øverste panel

Billedbeskrivelse: Dette billede viser et set ovenfra og ned view of the Muse M17CB alarm clock radio, highlighting the control panel. It shows two large rotary knobs for Volume and Tuning/Set, along with several push buttons: P.1, P.2, P.3 (for radio presets), DIM. (dimmer), O/SOURCE (power/source selection), and a large circular SNOOZE button. The layout is clear and intuitive.
Bagpaneltilslutninger

Billedbeskrivelse: This image shows the rear panel of the Muse M17CB alarm clock radio. It clearly displays the "AC~" power input socket, the "FM ANT." wire antenna, and an "AUX IN" 3.5mm jack for connecting external audio devices. A speaker grille is also visible on the right side.
Opsætning
Strømtilslutning
- Unpack the Muse M17CB unit and all accessories.
- Connect the AC power cord to the "AC~" input on the rear of the unit.
- Plug the other end of the power cord into a standard wall outlet.
- The LED display will light up, indicating the unit is receiving power.
Antenneopsætning
- For optimal FM reception, fully extend the FM wire antenna located at the back of the unit.
- Adjust the position of the antenna for the best possible signal reception.
Betjeningsvejledning
Indstilling af tid
- Sørg for, at enheden er tændt.
- Tryk og hold på TUNING/SET knob for approximately 2 seconds until the hour digits flash on the display.
- Drej på TUNING/SET knap for at justere timen.
- Tryk på TUNING/SET knob once to confirm the hour; the minute digits will flash.
- Drej på TUNING/SET knob to adjust the minutes.
- Tryk på TUNING/SET knob again to confirm the minutes and exit time setting mode.
- Tiden vises i 24-timers format.
Setting the Alarm (Alarm 1 and Alarm 2)
The unit features two independent alarms (Alarm 1 and Alarm 2).
- Tryk på P.1 knap (for Alarm 1) eller P.2 button (for Alarm 2) once. The alarm icon and hour digits will flash.
- Drej på TUNING/SET knob to adjust the alarm hour.
- Tryk på TUNING/SET knob to confirm the hour; the minute digits will flash.
- Drej på TUNING/SET knob to adjust the alarm minutes.
- Tryk på TUNING/SET knob to confirm the minutes. The alarm source (radio or buzzer) will flash.
- Drej på TUNING/SET knob to select either Radio or Summer as the alarm sound.
- Tryk på TUNING/SET knob to confirm the alarm source. The alarm volume will flash (if radio is selected).
- Drej på BIND knob to set the desired alarm volume (for radio alarm).
- Tryk på TUNING/SET knob to save the alarm settings. The corresponding alarm icon will appear on the display, indicating the alarm is active.
For at deaktivere en alarm skal du trykke på den tilsvarende knap P.1 or P.2 button until the alarm icon disappears from the display.
Radio Operation (FM/MW)
- Tryk på O/SOURCE button to turn on the radio. Press it repeatedly to cycle between FM, MW, and AUX modes.
- Drej på TUNING/SET knob to manually tune to a desired frequency.
- For at automatisk scanne efter stationer skal du trykke på og holde TUNING/SET knob for 2 seconds. The radio will scan and stop at the next available station.
Setting and Recalling Presets (P.1, P.2, P.3)
- To Store a Preset: Tune to the desired station. Press and hold one of the preset buttons (P.1, P.2, eller P.3) for 2 seconds until the display confirms the preset is saved.
- Sådan genkaldes en forudindstilling: Briefly press the desired preset button (P.1, P.2, eller P.3) to tune to the stored station.
Lysdæmper funktion
Tryk på SVAG. button repeatedly to adjust the brightness of the LED display to your preference (e.g., High, Medium, Low, Off).
Snooze funktion
Når en alarm lyder, skal du trykke på den store SLUM knappen for midlertidigt at afbryde alarmen. Alarmen lyder igen efter cirka 9 minutter.
Søvn funktion
The sleep function allows you to fall asleep to the radio, which will automatically turn off after a set period.
- Mens radioen spiller, skal du trykke på P.3 button (often doubles as SLEEP function) repeatedly to cycle through available sleep timer durations (e.g., 90, 60, 30, 15 minutes, or OFF).
- The radio will automatically turn off after the selected duration.
SNAP Function
The specific operation of the SNAP function is not detailed in the provided product description. Please refer to the full printed manual included with your device for instructions on using the SNAP feature.
Aux-indgang (AUX IN)
Tilslut en ekstern lydenhed (f.eks. MP3-afspiller, smartphone) til AUX IN jack on the rear of the unit using a 3.5mm audio cable. Press the O/SOURCE button repeatedly until "AUX" appears on the display to switch to auxiliary input mode. Audio from the connected device will play through the alarm clock's speaker.
Opretholdelse
- Rensning: Brug en blød, tør klud til at rengøre enhedens yderside. Brug ikke slibende rengøringsmidler, voks eller opløsningsmidler.
- Opbevaring: Hvis enheden ikke bruges i længere tid, skal du tage stikket ud af stikkontakten og opbevare den et køligt og tørt sted.
- Undgå fugt: Hold enheden væk fra vand og høj luftfugtighed.
Fejlfinding
| Problem | Mulig årsag | Løsning |
|---|---|---|
| Ingen strøm / Skærm slukket | Netledningen er ikke korrekt tilsluttet. | Sørg for, at netledningen er korrekt tilsluttet enheden og en fungerende stikkontakt. |
| Dårlig radiomodtagelse | FM-antennen er ikke trukket ud eller placeret korrekt. | Fully extend and adjust the position of the FM wire antenna for better reception. Try moving the unit to a different location. |
| Alarmen lyder ikke | Alarmen er ikke aktiveret eller indstillet forkert. | Verify that the alarm icon is displayed. Recheck alarm time and source settings. Ensure alarm volume is not set to minimum if radio alarm is selected. |
| Display too bright/dim | Dæmperindstillingen skal justeres. | Tryk på SVAG. knappen gentagne gange for at skifte mellem lysstyrkeniveauerne. |
Specifikationer
- Model: M17CB
- Vise: 0.9-inch White LED with Dimmer
- Tidsformat: 24 timer
- Tuner: Digital FM/MW PLL
- Presets: 6 (3 FM + 3 MW)
- Alarmer: Dual Alarm (Radio or Buzzer)
- Funktioner: SNAP, SLEEP, SNOOZE
- Strømkilde: AC strøm
- Dimensioner: 13 cm (længde) x 11 cm (bredde) x 6.5 cm (højde)
- Farve: Turkis
- Materiale: Resin or Plastic
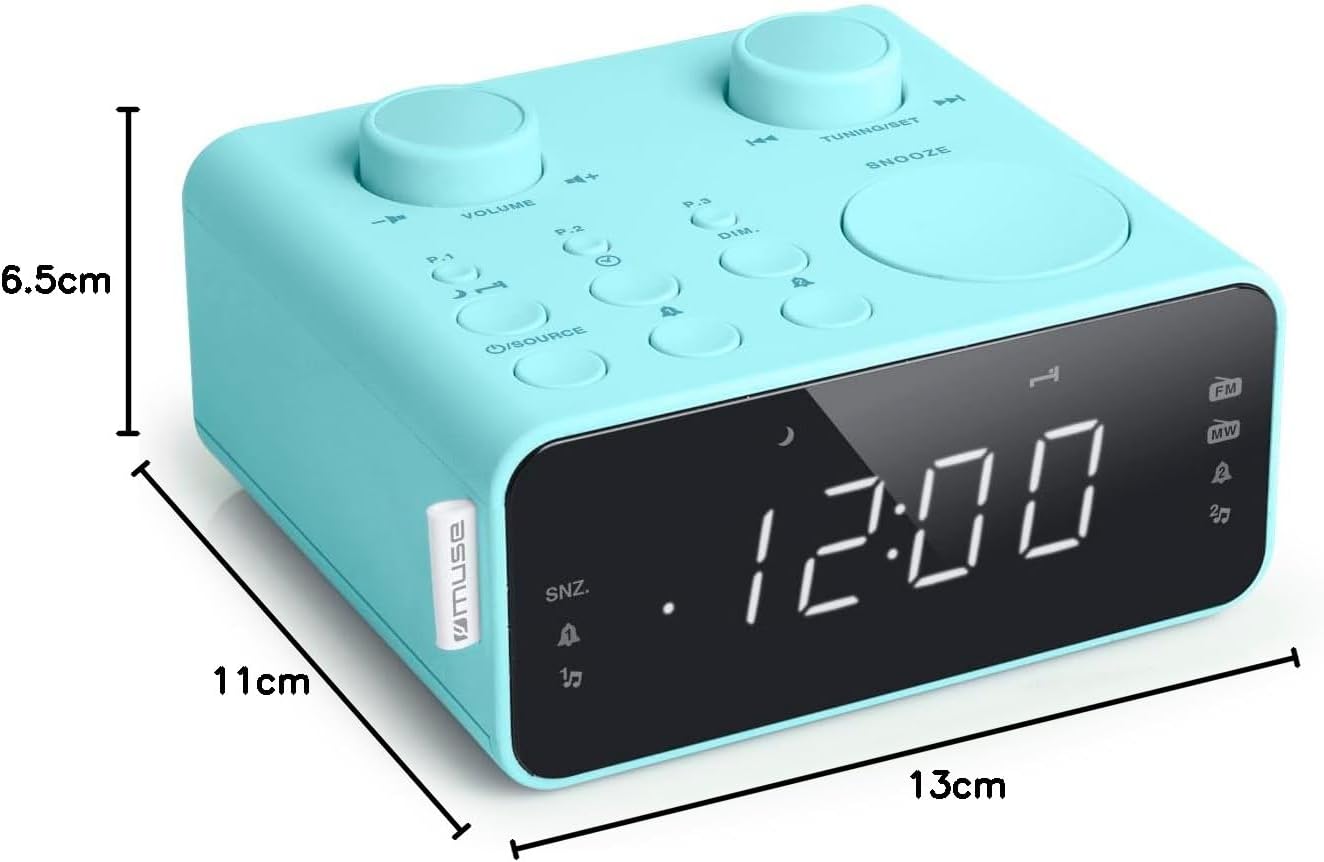
Billedbeskrivelse: This image illustrates the dimensions of the Muse M17CB alarm clock radio. It shows the unit with measurements indicating a length of 13cm, a width of 11cm, and a height of 6.5cm.
Garanti og support
For warranty information and technical support, please refer to the warranty card included with your product or visit the official Muse webwebstedet. Behold din købskvittering som købsbevis.
The product includes a user manual (as indicated by "Pièces incluses: Manuel du propriétaire").


