1. Introduktion
This manual provides detailed instructions for the safe and effective operation of your Wouxun KG-UVD1P FM Transceiver. Please read this manual thoroughly before using the device to ensure proper functionality and to prevent damage.
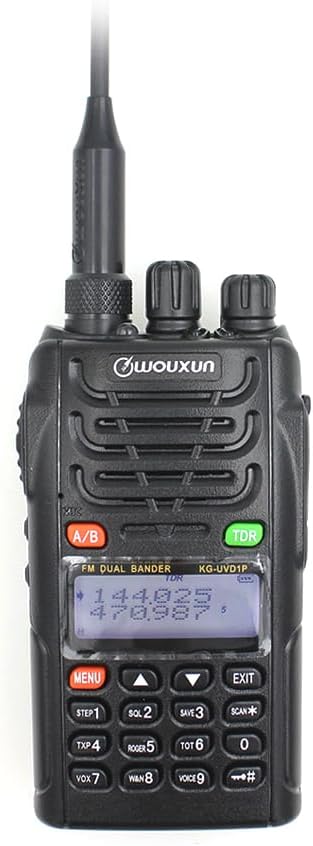
Billedbeskrivelse: En front view of the Wouxun KG-UVD1P FM Transceiver, showcasing det er sort casing, antenna, LCD display, keypad, and control knobs. The display shows frequency information.
2. Pakkens indhold
Bekræft, at alle nedenstående varer er inkluderet i din pakke:
- Radio krop
- Batteri
- Antenne
- Bælteclips
- Charger (Desktop Charger and Power Adaptor)
- Brugermanual
- Håndstrop
- Bil oplader kabel

Billedbeskrivelse: En overhead view displaying all components included in the standard Wouxun KG-UVD1P package. Items are numbered and include the radio, battery, antenna, belt clip, desktop charger, power adaptor, hand strap, and car charger cable.
3. Produktet er slutview
3.1. Radiokomponenter
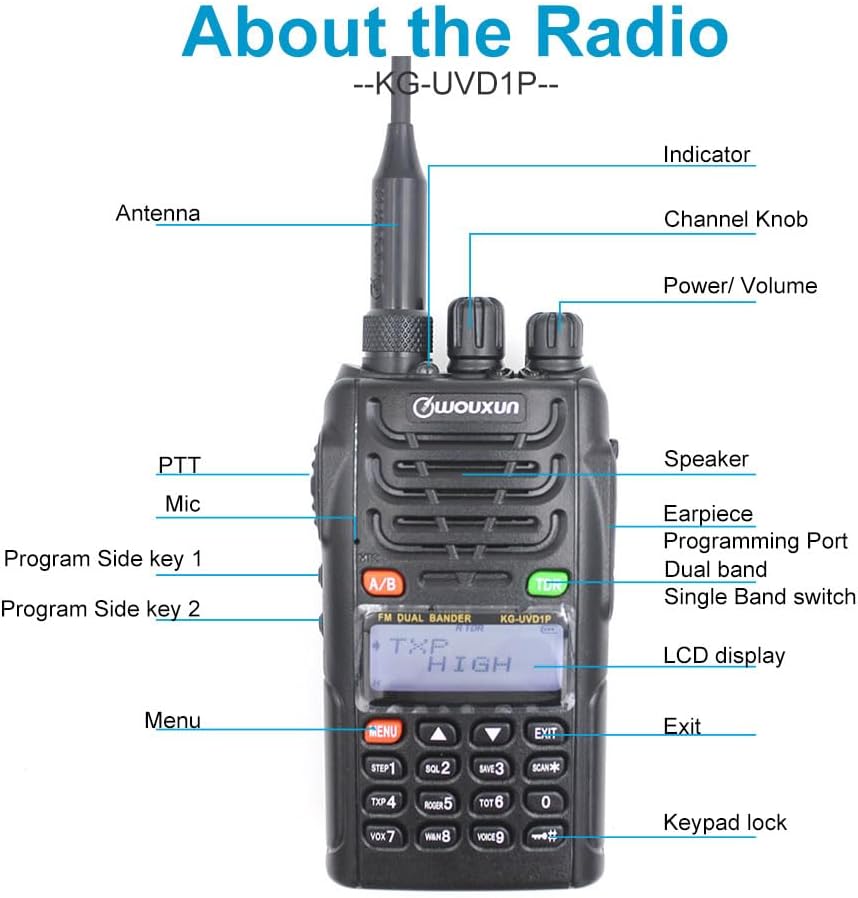
Billedbeskrivelse: A detailed diagram of the Wouxun KG-UVD1P radio with various parts labeled, including the antenna, indicator light, channel knob, power/volume knob, speaker, earpiece, programming port, dual band switch, LCD display, PTT button, microphone, program side keys, Menu button, Exit button, and keypad lock.
- Antenne: Til at sende og modtage radiosignaler.
- Indikator: LED light indicating transmission (red) or reception (green).
- Kanalknap: Used to select channels or adjust settings.
- Strøm/lydstyrke: Drejer for at tænde/slukke radioen og justere lydstyrken.
- Højttaler: Udsender lyd.
- Earpiece/Programming Port: Connects accessories or programming cable.
- Dual Band Switch (A/B): Toggles between VHF and UHF bands or display modes.
- LCD-skærm: Viser oplysninger om frekvens, kanal og status.
- PTT (Push-To-Talk): Tryk og hold nede for at sende.
- Mikrofon: Mikrofon til stemmeinput.
- Program Side Keys: Customizable function buttons.
- Tastatur: For entering frequencies, channels, and accessing menu functions.
3.2. Fysiske dimensioner

Billedbeskrivelse: Flere views of the Wouxun KG-UVD1P radio, including front, left side, right side, and back, illustrating its compact design and the placement of the belt clip and battery pack.
4. Opsætning
4.1. Batteriinstallation
- Juster batteripakken med rillerne på bagsiden af radioen.
- Skub batteripakken opad, indtil den klikker på plads.
- For at fjerne det skal du trykke på batteriets udløserlås (hvis den er til stede) og skubbe batteriet nedad.
4.2. Antennetilslutning
- Skru antennen med uret ind i stikket oven på radioen, indtil den er fingerstram.
- Spænd ikke for meget.
4.3. Opladning af batteriet

Billedbeskrivelse: The Wouxun smart charger in use, showing the radio docked for charging and a separate battery pack being charged simultaneously. The image highlights the 7.4V 1700mAh Lithium-ion battery.
- Connect the power adaptor to the desktop charger and plug it into a power outlet.
- Place the radio with the battery installed, or the battery alone, into the charging slot.
- Opladerens indikatorlampe lyser typisk rødt under opladning og bliver grønt, når den er fuldt opladet.
- En fuld opladning tager typisk flere timer.
5. Betjeningsvejledning
5.1. Tænd/sluk og lydstyrkekontrol
- Tænd: Drej tænd/sluk-/lydstyrkeknappen med uret, indtil der høres et klik, og displayet lyser.
- Sluk: Drej tænd/sluk-/lydstyrkeknappen mod uret, indtil der høres et klik, og skærmen slukkes.
- Lydstyrkejustering: Rotate the Power/Volume knob to increase (clockwise) or decrease (counter-clockwise) the audio output.
5.2. Valg af kanal og frekvens
- Frekvenstilstand: Directly enter frequencies using the keypad.
- Kanaltilstand: Use the Channel knob or keypad to select pre-programmed channels.
- Multi-step Frequency: Supports 5K/6.25K/10K/12.5K/25K/50K/100K steps for precise frequency tuning.
5.3. Transmit and Receive (PTT)
- To transmit, press and hold the PTT button on the side of the radio. Speak clearly into the microphone.
- Slip PTT-knappen for at modtage.
- The indicator light will be red during transmission and green during reception.
5.4. Dual Band, Dual Frequency, Dual Display, and Dual Standby
- The radio supports simultaneous monitoring of two different frequencies (VHF&UHF, UHF&UHF, or VHF&VHF).
- Use the A/B button to switch between the primary and secondary display frequencies.
- The radio will automatically switch to the active frequency when a signal is detected.
5.5. VOX Transmission
- VOX (Voice Operated Transmit) allows hands-free transmission.
- Activate VOX through the menu. The radio will transmit automatically when it detects your voice.
- Adjust VOX sensitivity in the menu to prevent accidental transmissions or missed voice activation.
5.6. Digital FM Radio
- The radio includes a digital FM radio function.
- Access the FM radio through the menu. It supports automatic tuning and storing of radio frequencies.
5.7. Andre funktioner
- Valg af høj/lav effekt: Adjust transmit power via the menu for battery conservation or extended range.
- Bred/smal båndbredde: Select 25KHz (wide) or 12.5KHz (narrow) bandwidth based on channel requirements.
- Rediger kanalnavn: Tilpas kanalnavne for nemmere identifikation.
- D.C.S/CTCSS: Utilize 105 groups of D.C.S (Digital Coded Squelch) and 50 groups of CTCSS (Continuous Tone-Coded Squelch) for selective calling.
- Stopur funktion: Integrated stopwatch utility.
- Lav voltage Voice Prompt: Alerts the user when the battery level is low.
- Spærring af optaget kanal (BCL): Prevents transmission on an already occupied channel.
- Transmit Over Timer (TOT): Limits continuous transmission time to prevent channel hogging and overheating.
- Tastaturlås: Prevents accidental key presses (Auto/Manual options).
- Multiple Scan Modes: Scan channels or frequencies for activity.
- Wire Clone Function: Allows copying settings from one radio to another using a cloning cable.
- Bright Flashlight Illumination: Indbygget LED-lommelygte for nemheds skyld.
- SOS funktion: Aktiverer et nødsignal.
- 1750Hz tone: Used for repeater access.
- DTMF Encoding Function: For sending Dual-Tone Multi-Frequency signals.
- English Voice Guide: Provides audible prompts for menu navigation and settings.
6. Vedligeholdelse
6.1. Rensning
- Rengør radioens overflade med en blød, damp klæde.
- Brug ikke hårde kemikalier eller slibende rengøringsmidler.
- Sørg for, at radioen er slukket, og at batteriet er fjernet, inden rengøring.
6.2. Batteripleje
- Undgå overopladning eller fuldstændig afladelse af batteriet.
- Opbevar batterierne på et køligt, tørt sted, når de ikke er i brug.
- Hvis batteriet opbevares i længere perioder, skal det oplades til cirka 50% kapacitet.
6.3. Opbevaring
- Opbevar radioen et tørt og støvfrit miljø.
- Keep away from direct sunlight and extreme temperatures.
- Remove the battery if the radio will not be used for an extended period.
7. Fejlfinding
| Problem | Mulig årsag | Løsning |
|---|---|---|
| Radioen tændes ikke | Batteri afladet eller forkert installeret | Charge the battery; ensure battery is correctly seated. |
| Kan ikke sende eller modtage | Incorrect frequency/channel; antenna not attached; low battery; Busy Channel Lockout active | Verify frequency/channel; attach antenna securely; charge battery; disable BCL. |
| Dårlig lydkvalitet | Weak signal; incorrect squelch level; antenna issue | Move to an area with better signal; adjust squelch; check antenna connection. |
| Tastaturet reagerer ikke | Tastaturlås er aktiv | Unlock the keypad (refer to operating instructions). |
8. Specifikationer
| Feature | Detalje |
|---|---|
| Modelnummer | KG UVD1P |
| Frekvensområde | 30-300 MHz |
| Antal kanaler | 40 |
| Batteritype | 1700mAh Lithium-ion (1 A battery required, included) |
| Voltage | 1.2 volt (DC) |
| Vandmodstandsniveau | Vandtæt |
| Varens vægt | 1.65 pund |
| Pakkedimensioner | 10.12 x 9.53 x 4.53 tommer |
| Fabrikant | WOUXUN |
| UPC | 781912417284 |
| Kompatible enheder | Two-way radios with compatible frequencies and bandwidths, external antennas |
9. Garanti og support
9.1. Garantioplysninger
The Wouxun KG-UVD1P FM Transceiver comes with a 1 års garanti fra købsdatoen. Denne garanti dækker fabrikationsfejl ved normal brug. Gem venligst din købsbevis i tilfælde af garantikrav.
9.2. Kundesupport
For technical assistance, troubleshooting beyond this manual, or warranty inquiries, please contact your authorized Wouxun dealer or visit the official Wouxun webwebsted for supportressourcer.


