1. Introduktion
This manual provides detailed instructions for the installation, configuration, and operation of the Tuya 2-Channel Wireless Relay Module (Model JGTY02H). This smart switch module enables remote control of two independent electrical devices or appliances via Wi-Fi, Bluetooth, and 433MHz RF. It supports integration with the Smart Life/Tuya app, as well as voice control through Amazon Alexa and Google Home.
2. Pakkens indhold
Bekræft at alle varer er til stede i din pakke:
- 1 x Tuya 2-Channel Wireless Smart Home Switch Module
- 1 x brugsanvisning

Image: The Tuya 2-Channel Wireless Relay Module shown alongside its retail packaging and included instruction manual.
3. Produktspecifikationer
| Modelnummer | JGTY02H |
| Working Voltage | AC / DC 7-32V |
| Strømforbrug | <1W (Quiescent current: 80mA) |
| Maks. Strøm | 10A pr kanal |
| Maks. Voltage | 250V |
| Trådløs forbindelse | Wi-Fi (IEEE 802.11 b/g/n), Bluetooth, 433MHz RF |
| Driftstemperatur | -40°C til 70°C (-40°F til 158°F) |
| Driftsfugtighed | 40% til 80% RH |
| Produktdimensioner | Cirka 5 x 2 x 1 tommer |
| Monteringstype | Vægmontering |
| Kontaktmateriale | Messing |
| Kontakttype | Normalt åben (NEJ) |
4. Produktet er slutview
Familiarize yourself with the components and indicators of the relay module.
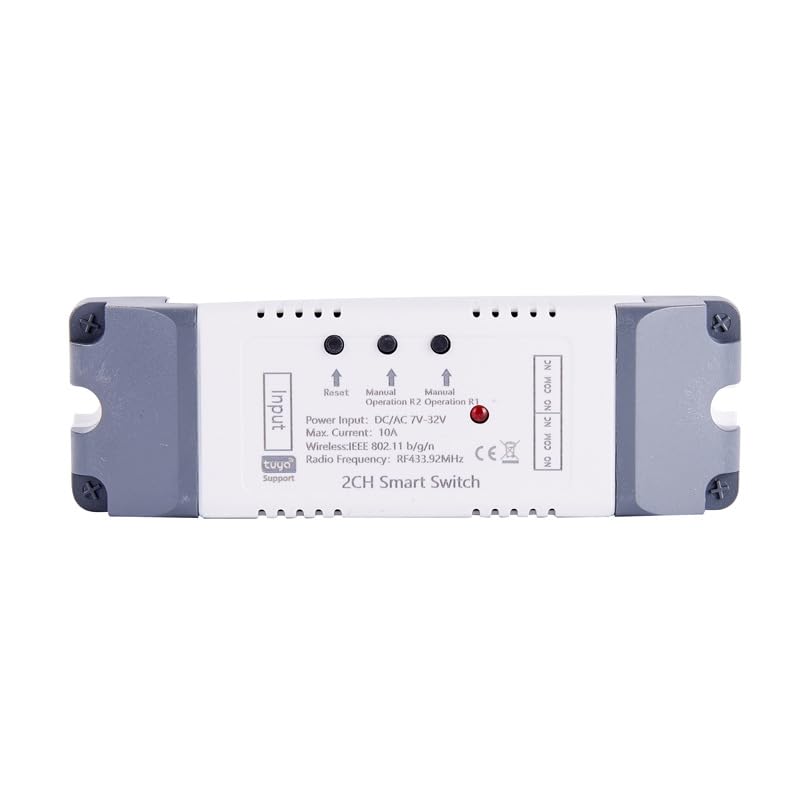
Billede: Top view of the relay module, highlighting input and output terminals, reset button, manual operation buttons for R1 and R2, and status indicators.
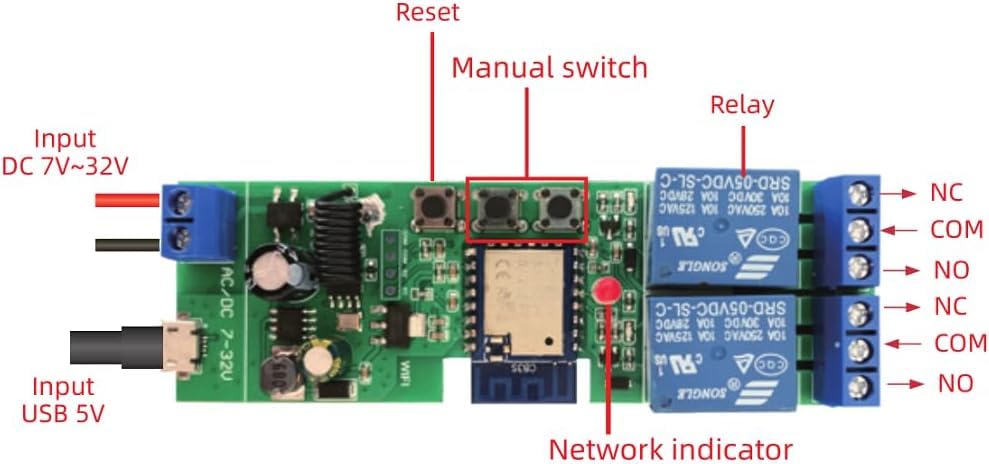
Billede: Detaljeret view of the internal circuit board, showing the reset button, manual switches, relays, network indicator, and input terminals for DC 7-32V and USB 5V.
- Indgangsterminaler: For power supply (DC 7-32V or USB 5V).
- Nulstil knap: Bruges til parring og nulstilling af enheden.
- Manual Switches (R1, R2): Allow manual control of each relay channel.
- Relæer: Two independent relays for controlling connected devices.
- Netværksindikator: LED light indicating network status.
- Output Terminals (NC, COM, NO): Normally Closed, Common, and Normally Open contacts for each relay.
5. Opsætning og installation
5.1 Ledningsinstruktioner
Ensure power is disconnected before performing any wiring. Refer to the diagrams below for common wiring configurations.
5.1.1 General Wiring Diagram (DC/AC 7-32V Input)
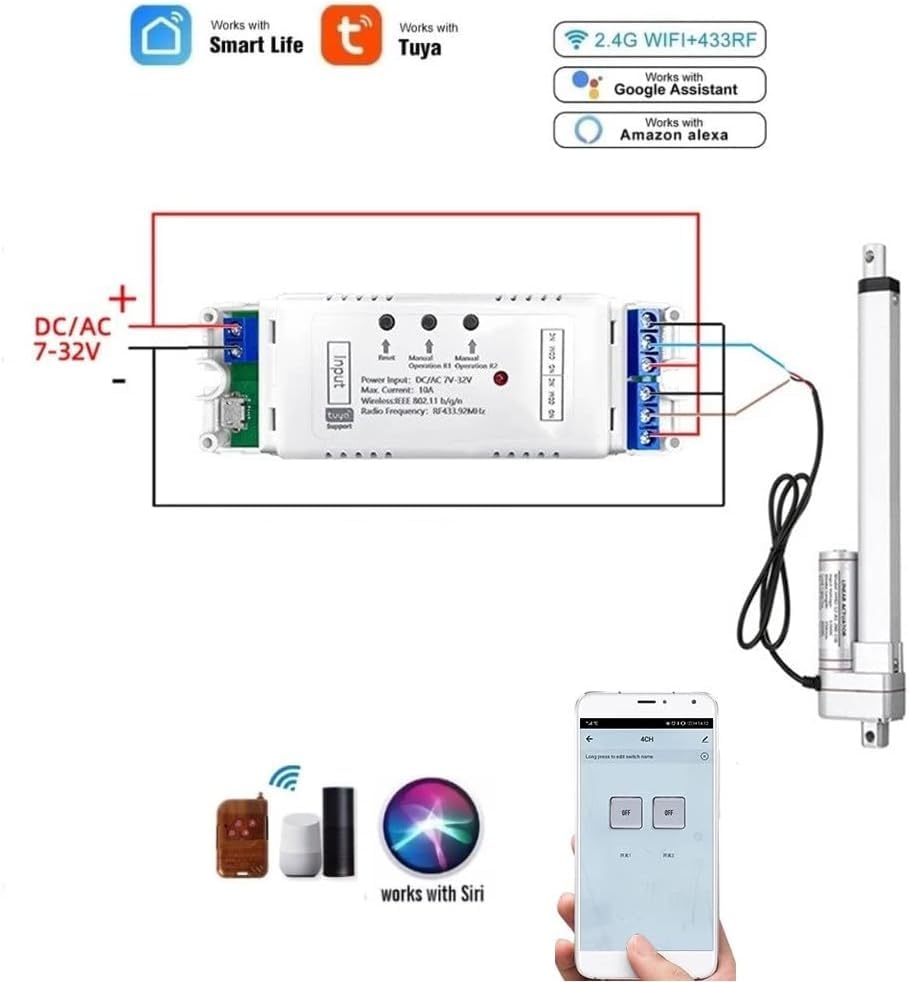
Image: This diagram illustrates connecting the relay module to a DC/AC 7-32V power source and controlling a linear actuator. The module supports both Smart Life/Tuya app control, 2.4G Wi-Fi, 433MHz RF, and voice control via Alexa and Google Assistant.
5.1.2 Automating a DC Motor
To automate a DC motor, connect the motor to the relay outputs as shown. The module's interlock mode can be used for directional control.
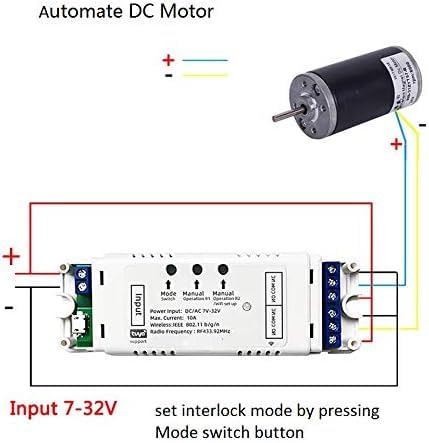
Image: Wiring diagram demonstrating how to connect a DC motor to the relay module. The input power for the module is 7-32V. Interlock mode can be configured by pressing the mode switch button.
5.1.3 Wiring for a 3-Wire AC Motor (e.g., Shutter/Curtain)
For controlling 3-wire AC motors, such as those found in electric shutters or curtains, follow this wiring configuration. Ensure the interlock mode is set in the Tuya Smart app.

Image: Wiring diagram for connecting a 3-wire AC motor (like a shutter motor) to the relay module. The input power is DC/AC 7-32V. The neutral wire, shutter open, and shutter close wires are indicated. Interlock mode should be selected and set in the Tuya Smart app.
5.2 App Pairing (Smart Life/Tuya App)
- Download appen: Download and install the "Smart Life" or "Tuya Smart" app from your mobile device's app store (available for iOS and Android).
- Registrer/Log ind: Opret en konto eller log ind på din eksisterende konto.
- Tænd: Connect the relay module to its power supply (DC 7-32V).
- Gå ind i parringstilstand: Press and hold the "Reset" button on the module until the network indicator LED starts blinking rapidly. This indicates it's in pairing mode.
- Tilføj enhed: Open the Smart Life/Tuya app. The app should automatically discover the device via Bluetooth. If not, tap the "+" icon in the top right corner, then select "Add Device" and choose "Auto Scan" or manually select "Switch (Wi-Fi)".
- Opret forbindelse til Wi-Fi: Follow the in-app instructions to connect the module to your 2.4GHz Wi-Fi network. Enter your Wi-Fi password when prompted.
- Omdøbning af enhed: Once successfully added, you can rename the device and each individual channel within the app for easier identification.
Note: Even if the relay module loses Wi-Fi connection after initial setup, you can still control it via Bluetooth using your phone within range.
6. Driftstilstande
The Tuya 2-Channel Wireless Relay Module supports various operating modes configurable through the Smart Life/Tuya app:
- Momentary (Inching) Function:
When activated, the relay will turn on for a set duration (default 1 second) and then automatically turn off. This is ideal for applications like garage door openers. The inching time can be adjusted from 1 second to 1 hour within the app.

Image: This diagram illustrates how to modify a remote control for use with the relay module in inching mode, often used for momentary actions like opening a garage door.
- Latching (Self-Locking) Mode:
In this mode, each relay acts as a standard on/off switch. Pressing the button (physical or in-app) toggles the relay's state (on or off). This allows independent control of two connected devices.
- Interlock-tilstand:
This mode ensures that only one relay can be active at a time. When one relay is turned on, the other is automatically turned off. This is suitable for applications requiring directional control, such as motor control for shutters or gates, preventing simultaneous activation in opposing directions.
6.1 Planlægning og timere
The app allows you to set up to 8 time schedules for automatic control. You can create single, repeat, or countdown timers to turn devices on or off at specified times. This feature is useful for automating daily routines or security lighting.

Image: A smartphone screen displaying the scheduling interface within the Smart Life/Tuya app, demonstrating how to set up automated control for devices like garage doors. The image also shows a house with two garage doors, implying individual control.
7. Smart Home Integration (Voice Control)
The Tuya 2-Channel Wireless Relay Module is compatible with Amazon Alexa and Google Home for convenient voice control.
7.1 Connecting to Amazon Alexa
- Åbn Amazon Alexa-appen.
- Go to "Skills & Games" and search for "Smart Life" or "Tuya Smart".
- Enable the skill and link your Smart Life/Tuya account using your app credentials.
- Discover devices: Alexa will automatically discover your connected relay module. If not, say "Alexa, discover my devices" or manually initiate discovery in the Alexa app.
- You can now control your devices using voice commands, e.g., "Alexa, turn on the light" or "Alexa, turn on Garage door."
7.2 Connecting to Google Home
- Åbn Google Home-appen.
- Tap the "+" icon, then "Set up device" > "Works with Google".
- Søg efter "Smart Life" or "Tuya Smart".
- Link your Smart Life/Tuya account using your app credentials.
- Your devices will be synchronized. You can now control them with voice commands, e.g., "Hey Google, turn off the bedroom light."
8. Vedligeholdelse
- Opbevar modulet et tørt sted, væk fra fugt og ekstreme temperaturer.
- Do not expose the module to direct sunlight or corrosive substances.
- Rengør ydersiden med en blød, tør klud. Brug ikke skrappe kemikalier eller slibende rengøringsmidler.
- Kontrollér regelmæssigt ledningsforbindelserne for at sikre, at de er sikre.
- Ensure the firmware is updated through the Smart Life/Tuya app for optimal performance and security.
9. Fejlfinding
| Problem | Mulig årsag | Løsning |
|---|---|---|
| Modulet tænder ikke. | Forkert strømforsyning voltage or loose connection. | Verify the power supply is within AC/DC 7-32V. Check all wiring connections for security. |
| Cannot pair with Smart Life/Tuya app. | Module not in pairing mode; incorrect Wi-Fi password; 5GHz Wi-Fi network; weak Wi-Fi signal. | Ensure the network indicator is blinking rapidly. Confirm your Wi-Fi network is 2.4GHz. Re-enter Wi-Fi password carefully. Move the module closer to your Wi-Fi router. Try resetting the module and re-pairing. |
| Stemmestyring virker ikke. | Skill not enabled; account not linked; device not discovered by Alexa/Google Home. | Ensure the "Smart Life" or "Tuya Smart" skill is enabled and your account is linked in the Alexa/Google Home app. Ask Alexa/Google to discover devices again. Check device names for clarity. |
| Relay not responding to app commands. | No Wi-Fi connection; app issue; module malfunction. | Check Wi-Fi connectivity. Restart the app. Power cycle the relay module. If Bluetooth control works, the issue might be with Wi-Fi. |
10. Garanti og support
This product is manufactured by QIANYI. For warranty information and technical support, please refer to the documentation provided with your purchase or contact your retailer. Typically, electronic products come with a standard manufacturer's warranty against defects in materials and workmanship for a period of one year from the date of purchase.
For further assistance, please consult the Smart Life/Tuya app's help section or visit the official Tuya Smart webwebsted for ofte stillede spørgsmål og supportressourcer.


