Indledning
Welcome to the user manual for your new FERMAX Duox Plus Veo 4.3" Monitor. This manual provides essential information for the proper installation, operation, and maintenance of your device. Please read this manual thoroughly before using the product to ensure safe and efficient operation.
Vigtige sikkerhedsoplysninger
- Elektrisk sikkerhed: Ensure all electrical connections are made by a qualified professional and comply with local electrical codes. Disconnect power before installation or maintenance.
- Miljøforhold: Do not expose the monitor to extreme temperatures, humidity, or direct sunlight. Install in a dry, well-ventilated area.
- Håndtering: Handle the monitor with care to avoid damage to the screen or internal components.
- Rensning: Brug en blød, tør klud til rengøring. Brug ikke slibende rengøringsmidler eller opløsningsmidler.
- Bortskaffelse: Dispose of the product and its components according to local electronic waste regulations.
Pakkens indhold
Kontroller venligst, at alle nedenstående varer er inkluderet i din pakke:
- FERMAX Duox Plus Veo 4.3" Monitor Unit
- Monteringsbeslag
- Connection Cables (if applicable)
- Skruer og vægpropper
- Brugervejledning (dette dokument)
Produktegenskaber
The FERMAX Duox Plus Veo 4.3" Monitor offers advanced features for your intercom system:
- 4.3-inch color display for clear video communication.
- Hands-free audio communication.
- Intuitive button interface for call answer, door release, and additional functions.
- Sleek, compact design suitable for modern interiors.
- Compatible with Duox Plus digital systems.
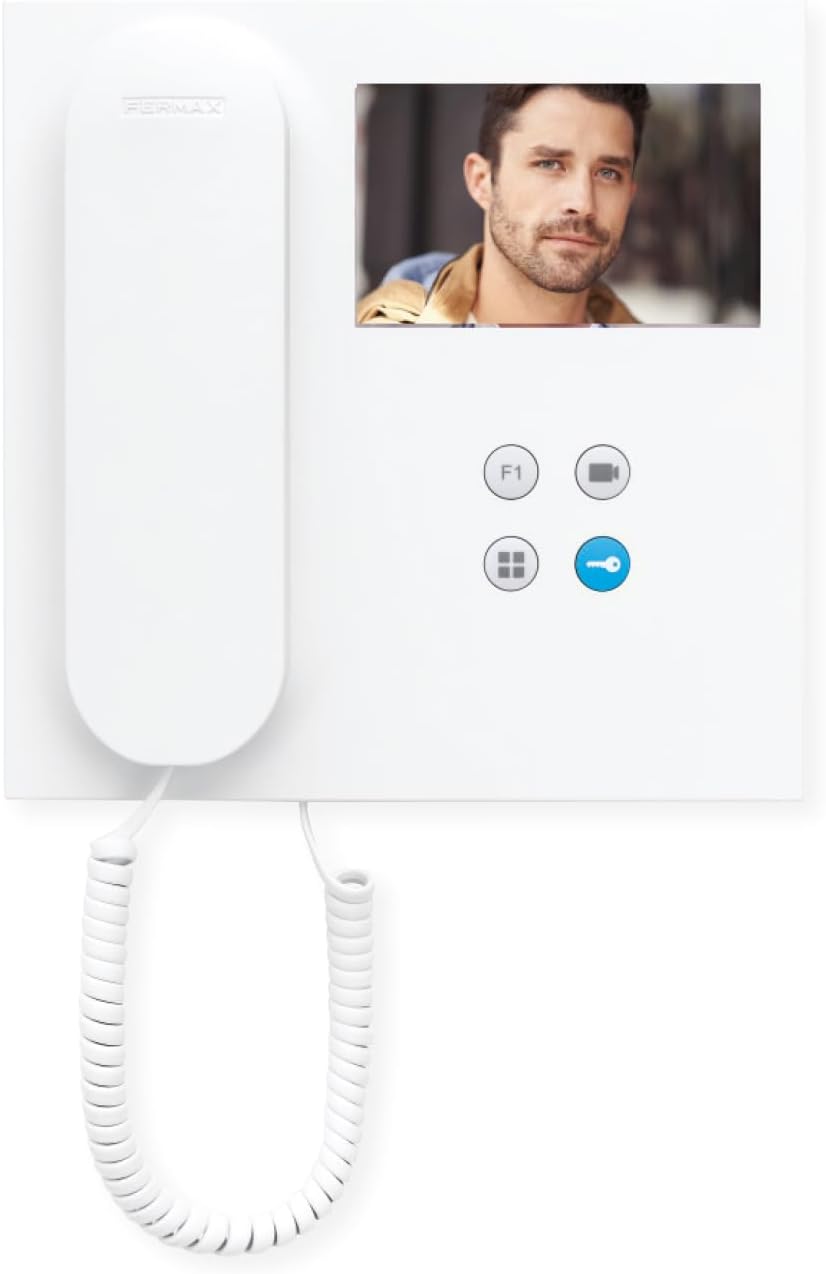
Billede: Forside view of the FERMAX Duox Plus Veo 4.3" Monitor, showing the display, handset, and control buttons.
Opsætning og installation
1. Montering af monitoren
- Vælg placering: Select a suitable indoor location, away from direct heat sources or moisture.
- Markér borepunkter: Brug monteringsbeslaget som skabelon til at markere borepunkterne på væggen.
- Bore huller: Drill holes at the marked points and insert wall plugs.
- Sikkert beslag: Fastgør monteringsbeslaget til væggen med de medfølgende skruer.
2. Ledningsforbindelser
Advarsel: Ensure power is disconnected before making any electrical connections. Refer to your system's wiring diagram for specific connections.
- Connect the Duox Plus bus wires (data and power) to the designated terminals on the monitor.
- Connect any additional wires for auxiliary functions (e.g., second door release, panic button) as per your system's requirements.
- Sørg for, at alle forbindelser er sikre og korrekt isolerede.
3. Montering af skærmen
- Carefully align the monitor with the mounting bracket.
- Skub skærmen på beslaget, indtil den klikker sikkert på plads.
- Gendan strømmen til systemet.
Betjeningsvejledning
Modtagelse af et opkald
- When a visitor calls from the outdoor panel, the monitor will ring and display the visitor's image.
- Tryk på for at besvare opkaldet Svar knap (typically indicated by a phone icon).
- Tryk på for at afslutte opkaldet Afslut opkald-knap (often the same button or a distinct hang-up icon).
Åbning af døren
- During a call, or when monitoring the outdoor panel, press the Dørudløserknap (typically indicated by a key icon) to open the main entrance door.
Monitoring the Outdoor Panel
- Til view the outdoor panel camera without an incoming call, press the Monitor knap (often indicated by a camera icon). The display will show the live feed.
Justering af indstillinger
- Bind: Use the volume controls (if present, or via menu) to adjust the ringtone and conversation volume.
- Lysstyrke/kontrast: Access the monitor's menu (refer to specific button layout) to adjust display settings.
Opretholdelse
- Rensning: Brug en blød, fnugfri klud til forsigtigt at tørre skærmen af ogasing. Do not use liquid cleaners, aerosols, or abrasive materials.
- Inspektion: Kontrollér regelmæssigt alle kabler og forbindelser for tegn på slid eller skader.
- Softwareopdateringer: Hvis det er relevant, skal du kontrollere producentens website for any firmware updates for your Duox Plus system.
Fejlfinding
| Problem | Mulig årsag | Løsning |
|---|---|---|
| Intet billede på skærmen. | Ingen strøm; løs forbindelse; kameraproblem. | Check power supply. Ensure all cables are securely connected. Verify outdoor panel camera is functioning. |
| Ingen lyd under opkald. | Volume too low; faulty connection; microphone/speaker issue. | Increase volume. Check audio cable connections. Contact support if issue persists. |
| Døråbneren virker ikke. | Incorrect wiring; faulty lock mechanism; system error. | Verify wiring to the door strike. Test the lock mechanism independently. Consult system installer. |
| Skærmen ringer ikke. | Ringtone volume off; system not registered; faulty outdoor panel button. | Check ringtone volume. Ensure monitor is properly registered to the system. Test outdoor panel button. |
If the problem persists after attempting these solutions, please contact FERMAX technical support or your installer.
Tekniske specifikationer
| Feature | Detalje |
|---|---|
| Model | 90b61eff-c290-484c-aba5-73e26c52e3da |
| Skærmstørrelse | 4.3 tommer |
| Opløsning | 800 x 600 |
| Aspektforhold | 4:3 |
| Billedkontrastforhold | 2000:1 |
| Skærmoverflade | Blank |
| Fabrikant | FERMAX |
| Pakkedimensioner | 8.74 x 8.15 x 2.01 tommer |
Garanti og support
FERMAX products are designed for durability and reliability. For information regarding warranty terms and conditions, please refer to the warranty card included with your product or visit the official FERMAX webwebsted.
For technical support, installation assistance, or service inquiries, please contact your local FERMAX distributor or visit the support section of the FERMAX webwebsted:

Image: FERMAX brand logo with the slogan "Connectivity for All".


