1. Introduktion
This instruction manual provides essential information for the safe installation, operation, and maintenance of your GROWNSY Baby Gate for Stairs, Model GRYG33. Please read this manual thoroughly before installation and retain it for future reference. This gate is designed to provide a secure barrier for children and pets in doorways, hallways, and stairways.
2. Sikkerhedsoplysninger
ADVARSEL: Improper installation or use can result in serious injury. Always ensure the gate is securely installed and functioning correctly.
- Læs alle instruktioner før installation og brug.
- This gate is intended for use with children from 6 to 24 months.
- Efterlad aldrig børn uden opsyn.
- Always check that the gate is securely closed and latched.
- Do not use this gate if any components are missing or damaged.
- The anti-stumble pedal is designed to reduce tripping hazards. Ensure it is properly positioned and flat against the floor.
- V-shaped screws provide enhanced grip and stability when mounting to stair railings.
- A visible red indicator on the lock mechanism signals when the gate requires tightening. Ensure the lock covers the red mark for security.
- Do not cut the zip tie on the gate before installation is complete. This tie helps maintain the gate's shape during shipping and initial setup.
- A slight gap in the gate frame before installation is normal for pressure-mounted gates. This gap will close as the gate is tightened during installation.

3. Pakkens indhold
Kontroller, at alle komponenter er til stede, før installationen påbegyndes:

- Baby Gate x1
- Anti-snuble pedal x1
- V-shaped Spindle Rods x2 (for banister installation)
- Tension Bolts x4
- Dry Wall Anchors x4
- Wall Cups x4
- Skruer x4
- Wall Anchor x4 (Note: This appears to be a duplicate of Dry Wall Anchors or a general term for wall mounting hardware. Refer to specific instructions for usage.)
4. Opsætning og installation
The GROWNSY baby gate offers both pressure-mounted and drill-mounted installation options. Pressure mounting is suitable for doorways and hallways, while drill mounting with wall cups is recommended for stairways for enhanced safety.
4.1. Før installation
- Measure the opening where the gate will be installed. This gate fits openings from 29.5 to 49.4 inches. Ensure measurements are taken at both the top and bottom of the opening.
- Do not cut the zip tie that holds the gate frame together until instructed. This tie keeps the gate under tension, which is normal for pressure-mounted gates.


4.2. Pressure-Mounted Installation (No-Drill)
This method is ideal for situations where drilling into walls is not desired.
- Insert the four tension bolts into the holes at each corner of the gate frame.
- Position the gate in the desired opening.
- Hand-tighten the tension bolts until the gate is snug against the walls.
- Ensure the anti-stumble pedal is flat on the floor.
- Check the red safety reminder line on the lock mechanism. Continue tightening the tension bolts evenly until the red line is no longer visible. This indicates sufficient pressure for a secure fit.
- Once secure, you may cut the zip tie.

4.3. Drill-Mounted Installation (Recommended for Stairs)
For maximum security, especially at the top of stairs, drill mounting with wall cups is recommended.
- Follow steps 1-3 from pressure-mounted installation to position the gate.
- Mark the locations for the wall cups on the wall or banister.
- For walls: Drill pilot holes, insert dry wall anchors (if needed), and secure the wall cups with screws.
- For banisters: Use the V-shaped spindle rods. Attach the V-shaped rods to the tension bolts and secure them around the banister.
- Place the tension bolts into the secured wall cups or V-shaped rods.
- Tighten the tension bolts evenly until the gate is firmly in place and the red safety reminder line is covered.
- Once secure, you may cut the zip tie.


4.4. Red Safety Reminder Line
The gate features a red safety reminder line on the lock mechanism. This line is a visual indicator of proper tension.
- If the red line is visible, the gate is not sufficiently tightened and is not secure.
- Tighten the tension bolts evenly until the red line is completely covered by the lock button. This indicates the gate is securely installed.

5. Betjeningsvejledning
5.1. Opening the Gate (One-Handed Operation)
The gate is designed for easy one-handed operation by adults, while remaining secure against children.
- Locate the lever on the top of the gate handle.
- Push the lever back with your thumb.
- Simultaneously lift the gate handle to disengage the lower lock.
- Swing the gate open in either direction.


5.2. Dual-Locking System
The gate features a double-locking system to prevent accidental openings by children. Both the top lever and the bottom latch must be engaged simultaneously to open the gate.
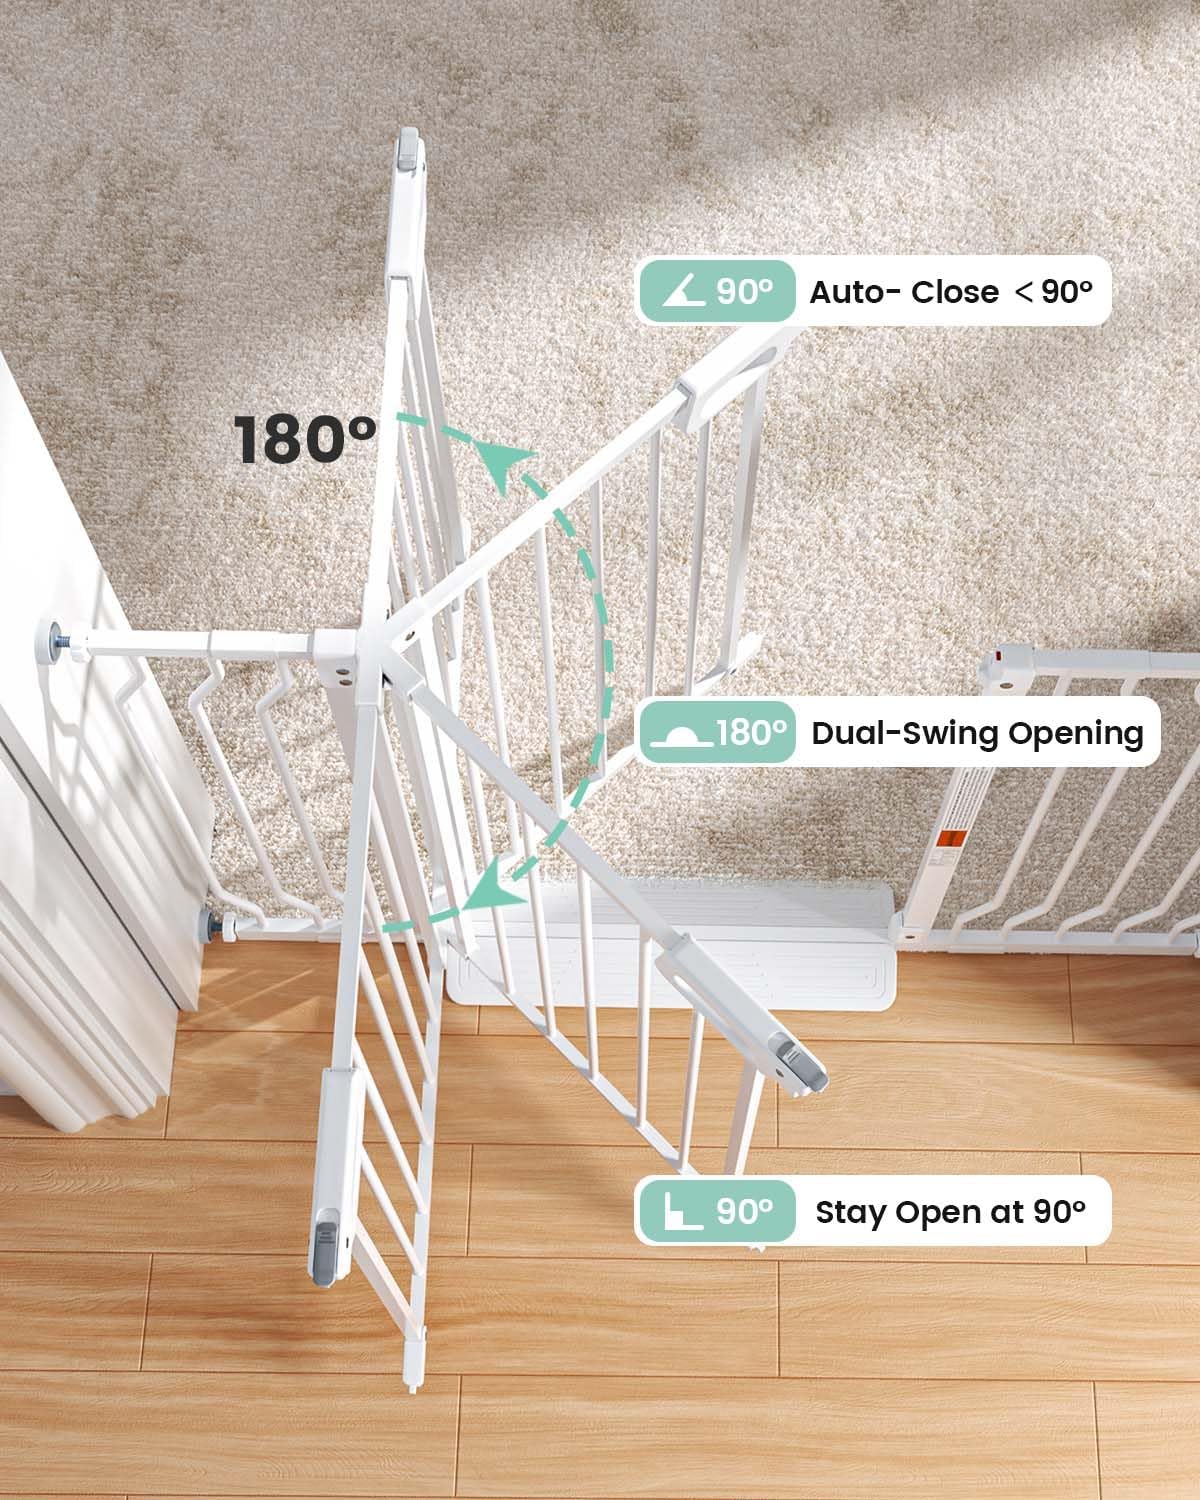
5.3. Auto-Close and Stay-Open Feature
- Auto-Close: If the gate is opened to an angle less than 90 degrees, it will automatically swing shut and lock. This feature helps prevent accidental forgotten closures.
- Stay-Open: If the gate is opened to a full 90-degree angle, it will remain open. This is useful for periods of frequent passage.

6. Vedligeholdelse
- Regularly inspect the gate for any loose parts, damage, or wear.
- Clean the gate with a mild soap and damp klæde. Brug ikke slibende rengøringsmidler eller stærke kemikalier.
- Periodically check the tension bolts to ensure the gate remains securely installed and the red safety reminder line is covered.
7. Fejlfinding
- Gate feels loose or wobbly: Check the red safety reminder line. If visible, tighten all four tension bolts evenly until the line is covered.
- Gate is difficult to open/close: Ensure the gate is level and not overtightened. Loosen the tension bolts slightly and re-adjust until the gate operates smoothly while remaining secure.
- Gate frame appears bent or has a gap: This is normal before installation. Once the gate is properly installed and tensioned, the frame will straighten, and the gap will disappear. If the gap persists after full tightening and the red line is covered, re-evaluate your measurements and installation.
8. Specifikationer
| Mærke | VOKSEN |
| Modelnummer | GRYG33 |
| Monteringstype | Pressure Mount (with optional drill mount for stairs) |
| Materiale | Metal |
| Farve | Hvid |
| Produktdimensioner | 48.4"W x 30"H (Adjustable width 29.5"-49.4") |
| Varens vægt | 13.17 pund (5.99 kilo) |
| Aldersinterval | Baby (6-24 months) |
| Montering påkrævet | Ja |
| Batterier påkrævet | Ingen |
9. Garanti og support
GROWNSY offers a 12-month warranty for this product. For any questions, concerns, or support needs, please refer to the contact information provided with your purchase or visit the official GROWNSY webwebsted.


