1. Introduktion
The AdaLov CPE369 Wireless Bridge Kit is designed to provide robust and reliable long-range network expansion. This kit includes three wireless bridges, offering flexible connectivity options for various applications such as extending network coverage to multiple locations, connecting security cameras, or expanding Starlink internet across properties. Operating on the 5.8GHz band, these bridges ensure high-speed data transfer and low-latency performance, making them ideal for demanding outdoor networking needs.

Image: The AdaLov CPE369 Wireless Bridge Kit, showing three units wirelessly connected.
2. Hvad er der i æsken
Bekræft at alle komponenter er til stede i din pakke:
- 3 x CPE369 Wireless Bridges
- 3 x POE Adapters
- 3 x Metal Cable Ties
- 3 x netværkskabler
- 1 x brugermanual

Image: All components included in the CPE369 Wireless Bridge Kit.
3. Nøglefunktioner
- Three-Piece Kit: Offers flexible point-to-point or point-to-multipoint connections.
- Long-Range Performance: 16dBi high-gain antenna supports connections up to 3KM.
- High-Speed 5.8GHz Frequency: Provides higher speeds and better interference resistance for reliable data transfer.
- Enkel Plug-and-Play installation: LED display for quick configuration of PTP/PTMP connections.
- Robust Outdoor Durability: IP65 waterproof and dustproof rating to withstand harsh weather.
- Power Over Ethernet (PoE) Convenience: Supports 24V PoE for simplified installation.
- Sikre forbindelser: Supports WEP, WPA, WPA2, and 802.1x security protocols.

Image: The CPE369 bridge providing high-speed wireless connectivity in an outdoor environment.
4. Opsætningsvejledning
4.1 Komponent overview
Familiarize yourself with the ports and indicators on the CPE369 unit:
Billede: Detaljeret view of the CPE369 unit's ports and indicators.
4.2 One-Key Operation & Dialing Pairing
The CPE369 supports easy pairing via a dialing switch for Master and Slave configurations.
- Identify Master and Slave Units: One unit will be configured as the Master Bridge, and the others as Slave Bridges.
- Set Dialing Switch: Use the dialing switch on each unit to set its role. The Master Bridge will have a specific setting (e.g., 'A'), and Slave Bridges will have another (e.g., 'B'). Refer to the unit's label for exact settings.
- Connect Power and Network: Connect the PoE adapter to the CPE unit's PoE port and then to a power outlet. Connect your network device (router, switch, camera) to the LAN port of the PoE adapter.
- Tænd: Once powered, the units will automatically attempt to pair based on their Master/Slave settings. The LED display will indicate connection status.

Image: One-key operation and dialing pairing setup for Master and Slave bridges.
4.3 Placement Guidelines for Point-to-Multipoint Connection
For optimal performance in a Point-to-Multipoint setup, adhere to the following guidelines:
- Slave bridges must be positioned in front of the master bridge.
- Master and slave bridges must face each other directly.
- The angle between the master and slave bridges should not exceed 60 degrees.

Image: Guidelines for optimal Point-to-Multipoint bridge placement.
5. Betjeningsvejledning
5.1 Point-to-Point (PTP) Operation
In a PTP setup, two CPE369 units establish a direct wireless link. One unit acts as the Master, connected to your primary network (e.g., router), and the other as the Slave, providing network access at the remote location. This is ideal for extending a single network connection over long distances.
5.2 Point-to-Multipoint (PTMP) Operation
The CPE369 kit supports PTMP configurations, allowing one Master Bridge to connect to two Slave Bridges. This is useful for extending network or video surveillance to multiple remote points.
Network Extension Exampdet:

Image: Point-to-Multipoint setup for network extension, showing connections to routers, computers, and phones.
Video Transmission Exampdet:

Image: Point-to-Multipoint setup for video surveillance, showing connections to cameras and a monitoring system.
Starlink Internet Extension Exampdet:

Image: Extending Starlink internet coverage using the wireless bridge kit.
6. Vedligeholdelse
The AdaLov CPE369 is designed for minimal maintenance due to its robust construction.
- Vejrbestandighed: The IP65 rating ensures protection against dust and water ingress. The units are built to withstand rain, frost, and sunlight.
- Rensning: Periodically inspect the units for any accumulated dirt or debris. Clean the exterior with a soft, damp klæde. Brug ikke skrappe kemikalier eller slibende rengøringsmidler.
- Kabelinspektion: Regularly check all connected network and power cables for any signs of wear, damage, or loose connections.
- Firmwareopdateringer: Tjek producentens webbesøg webstedet regelmæssigt for at se om der er tilgængelige firmwareopdateringer for at sikre optimal ydeevne og sikkerhed.

Image: The CPE369's IP65 outdoor protection features, highlighting its durability in various weather conditions.
7. Fejlfinding
| Problem | Mulig årsag | Løsning |
|---|---|---|
| No signal/connection | Incorrect Master/Slave setting; Obstruction in line of sight; Power issue; Loose cable connection. | Verify Master/Slave settings using the dialing switch. Ensure clear line of sight between units. Check power supply and all cable connections. |
| Langsom netværkshastighed | Interference from other 5.8GHz devices; Excessive distance; Misalignment of units. | Ensure optimal alignment. Minimize sources of interference. Consider reducing distance if possible. |
| Intermitterende forbindelse | Environmental factors (heavy rain, strong winds); Loose connections; Firmware issue. | Secure all connections. Ensure units are firmly mounted. Check for firmware updates. |
| LED-indikatorer lyser ikke | No power; Faulty PoE adapter or unit. | Check power outlet and PoE adapter. Try a different power source or adapter if available. |
8. Specifikationer
| Feature | Detalje |
|---|---|
| Modelnummer | CPE369 |
| Produktdimensioner | 1.89 x 3.54 x 9.58 tommer (4.8 x 9.0 x 24.3 cm) |
| Varens vægt | 10.4 ounces (295 gram) |
| Hardware-interface | Ethernet |
| Farve | Hvid |
| Kompatible enheder | Access Point, Desktop, Router, Surveillance cameras, Switch |
| Data Link Protocol | Gigabit Ethernet, IEEE 802.11a, IEEE 802.11ac, IEEE 802.11n |
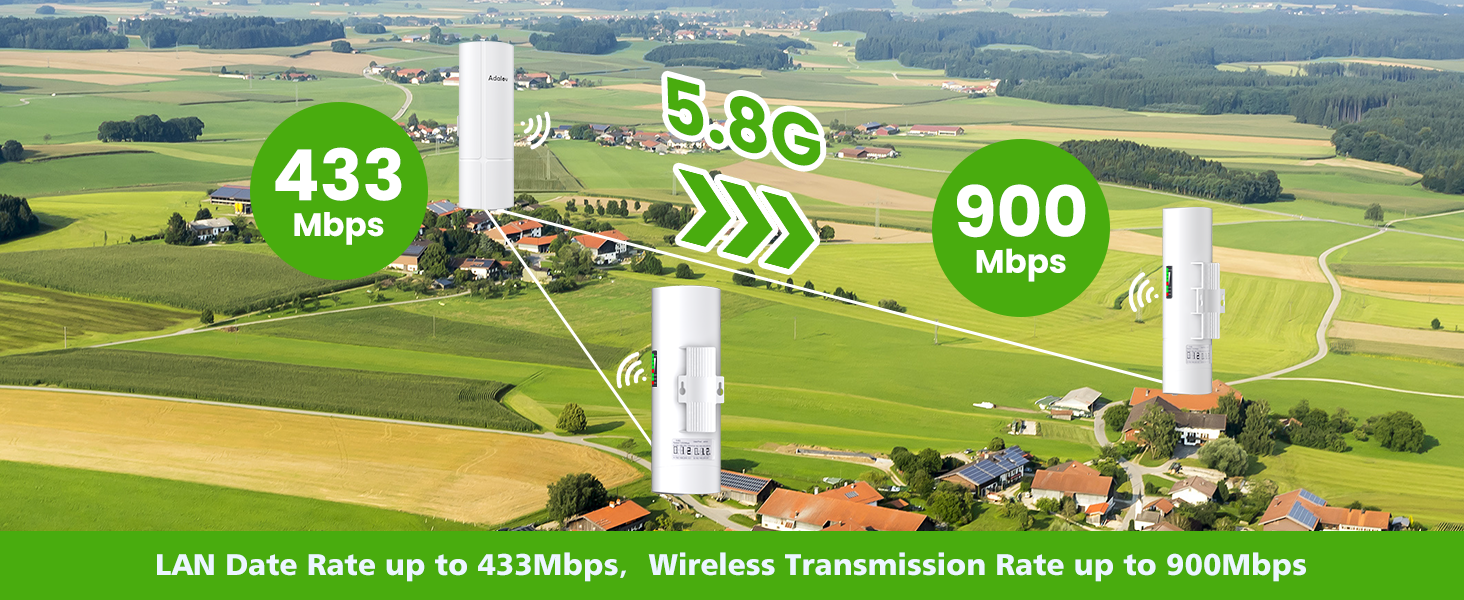
| Dataoverførselshastighed | Up to 900 Megabits Per Second (Wireless), Up to 433 Mbps (LAN) |
| Antenne Gain | 16dBi High-Gain |
| Transmissionsafstand | Up to 3KM (1.9 miles) with non-blocking obstacles |
| Strømforsyning | 24V PoE |
| Vejrbedømmelse | IP65 vandtæt og støvtæt |

Image: Data transfer rates for the CPE369 wireless bridge.
9. Garanti og support
AdaLov products are designed for reliability and performance. For warranty information and technical support, please refer to the official AdaLov webwebstedet eller kontakt deres kundeservice direkte. Gem din købskvittering til garantikrav.

