1. Introduktion
This manual provides comprehensive instructions for the installation, configuration, and operation of your ORICO 4 Bay RAID External Hard Drive Enclosure (Model: WS400RU3). Please read this manual thoroughly before use to ensure proper functionality and data integrity.
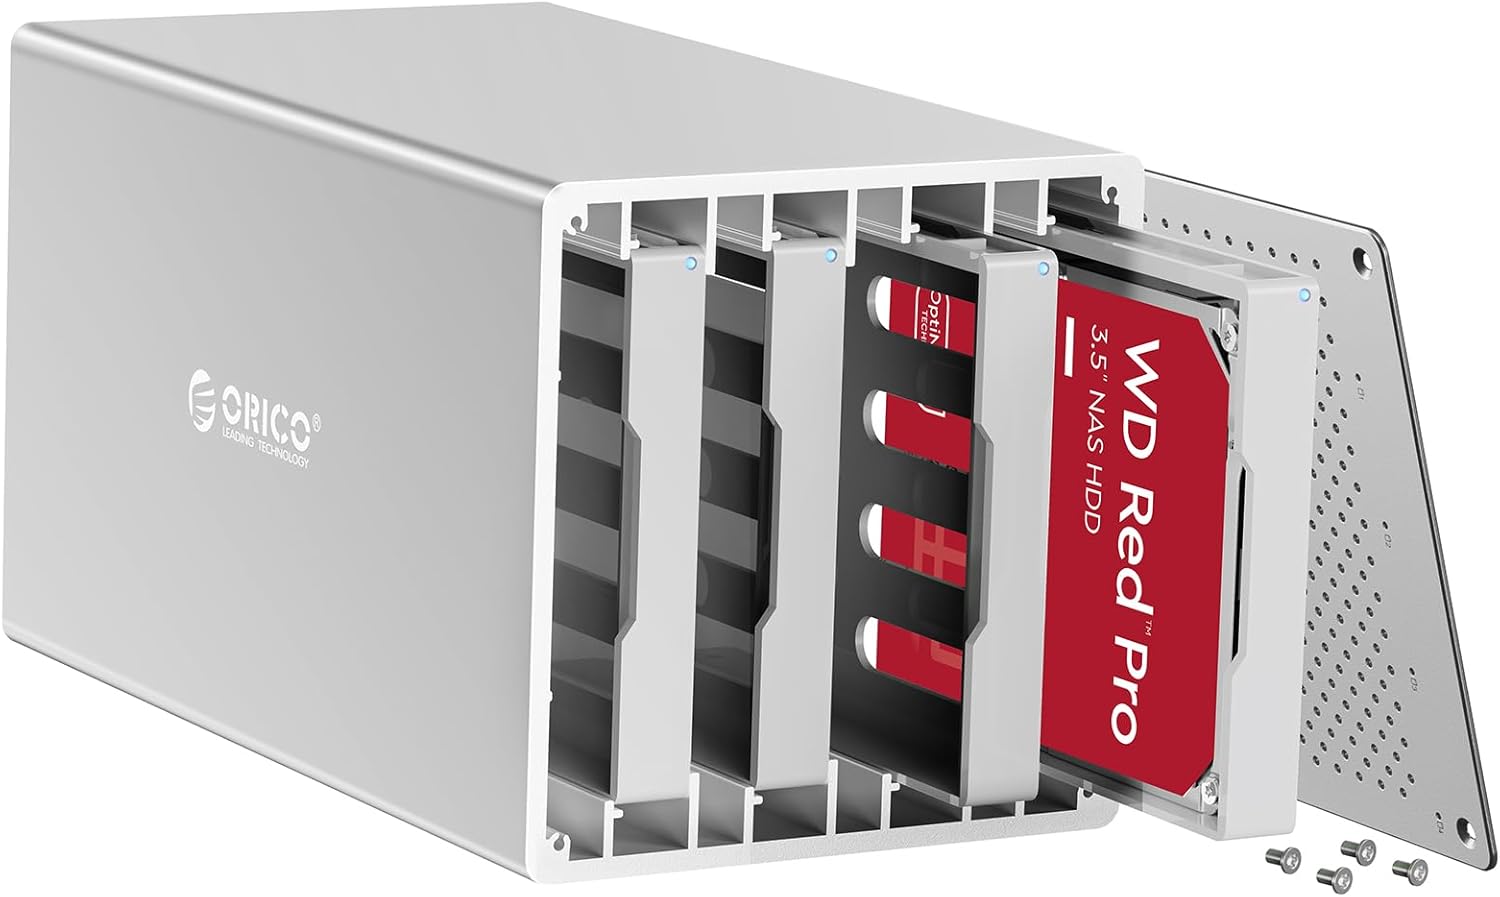
Figure 1: ORICO 4 Bay RAID External Hard Drive Enclosure
2. Produktet er slutview
Nøglefunktioner:
- High Capacity Support: Accommodates up to four 3.5-inch SATA hard disks, with a maximum total capacity of 80TB (4x20TB).
- RAID Functionality: Supports RAID 0, RAID 1, RAID 3, RAID 5, RAID 10, JBOD, CLONE, and Normal modes for flexible data management and protection.
- Effektiv varmeafledning: Features an aluminum alloy casing, an 80mm cooling fan, and honeycomb ventilation holes for optimal thermal performance.
- Secure Drive Installation: Includes separate ABS mounting brackets for 2.5-inch/3.5-inch HDDs/SSDs, utilizing screw mounting for enhanced stability and vibration reduction.
- Hurtig dataoverførsel: Equipped with USB 3.0 interface, providing data transfer rates up to 5Gbps.
- Multibeskyttelsessystem: Incorporates safeguards against over-voltage, over-current, overheating, short-circuits, and leakage.
- Automatisk dvaletilstand: Features a 10-minute automatic sleep mode to conserve energy and extend drive lifespan.
- Bred kompatibilitet: Compatible with Windows XP / Vista / 7 / 8, Mac OS X 10.2 and higher, and Linux operating systems.
Hvad er der i æsken:
- 1x ORICO 4 Bay RAID Hard Drive Enclosure
- 1x 1M USB 3.0 Type-A Data Cable
- 1x 12V strømadapter
- 1x sæt skruer
- 1x brugermanual

Figure 2: Centralized Storage Capability
3. Opsætning og installation
3.1 Installation af harddisk
- Prepare the Enclosure: Unscrew and remove the front panel of the enclosure.
- Install 3.5-inch HDD: Slide a 3.5-inch SATA HDD into an empty drive bay. Ensure it is firmly seated. Secure the drive using the provided screws through the enclosure's side panels.
- Install 2.5-inch HDD/SSD (with bracket): Attach your 2.5-inch SATA HDD or SSD to the provided ABS mounting bracket using screws. Then, slide the bracket with the attached drive into an empty drive bay. Secure the bracket using the provided screws.
- Luk kabinettet: Once all drives are installed, reattach the front panel and secure it with screws.

Figure 3: DIY Hard Drive Installation
3.2 Tilslutning til din computer
- Connect the 12V power adapter to the enclosure's power input and then to a power outlet.
- Connect the USB 3.0 data cable from the enclosure's USB 3.0 Type-B port to an available USB 3.0 Type-A port on your computer.
- Power on the enclosure using the power button. The LED indicators for each drive will illuminate.
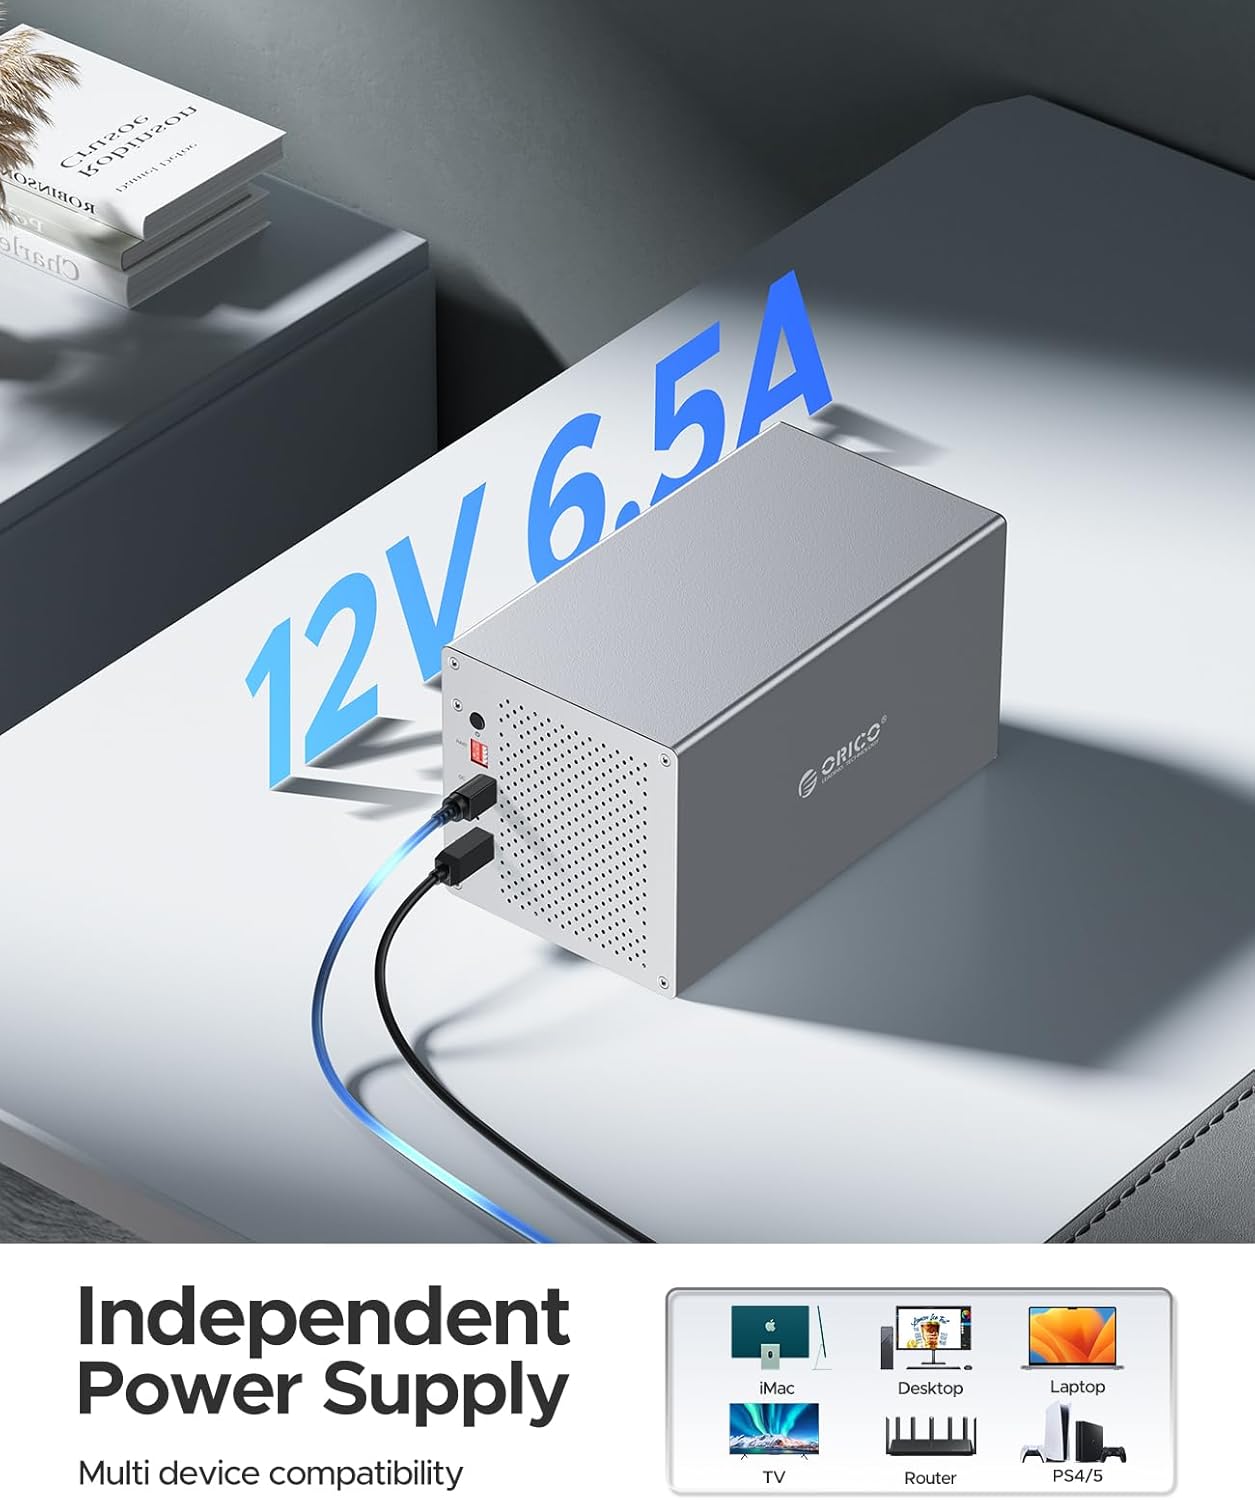
Figure 4: Independent Power Supply and Device Compatibility
3.3 Video Guide: Hard Drive Installation
For a visual guide on installing hard drives with screws, please refer to the video below:
Video 1: How to DIY Install with Screw -WS Series. This video demonstrates the process of installing hard drives into the ORICO WS series enclosure using screws for secure mounting.
4. RAID-konfiguration
WARNING: Always back up all data before changing RAID modes, as this process typically erases all data on the drives.
The ORICO WS400RU3 supports various RAID modes to suit different needs for capacity, performance, and data redundancy. You can configure RAID either via software or manually using the physical switches.
4.1 Available RAID Modes
| RAID-tilstand | Minimum Disks | Beskrivelse |
|---|---|---|
| RAID 0 | 2 | Striping. Offers maximum performance and capacity by combining drives, but no redundancy. Data loss on one drive means total data loss. |
| RAID 1 | 2 | Mirroring. Provides full data redundancy by duplicating data across drives. Capacity is limited to the size of the smallest drive. |
| RAID 3 | 3 | Striping with dedicated parity. Offers good performance for large sequential reads and writes, with single drive redundancy. |
| RAID 5 | 3 | Striping with distributed parity. Balances performance, capacity, and redundancy. Can withstand the loss of one drive. |
| RAID 10 | 4 | Striping and Mirroring. Combines RAID 1 and RAID 0 for high performance and excellent redundancy. Can withstand multiple drive failures, but requires more drives. |
| JBOD (Just a Bunch Of Disks) | 1 | Treats each drive as an independent disk. No striping or mirroring. |
| KLON | 2 | Creates an exact copy of one drive onto another. |
| Normal (Clear-RAID) | 1 | Each drive is recognized as a separate, individual disk. |

Figure 5: Multiple RAID Modes Overview
4.2 Setting RAID Mode
There are two primary methods for configuring RAID on the WS400RU3:
- Softwaredrift: The ORICO HW RAID Manager tool allows for customization of hard disk storage modes. This software can be downloaded from the official ORICO website. Note that the software management tool may not be compatible with Mac OS 11 or above, and Linux systems.
- Manuel betjening: The enclosure features physical array switches on the back panel. To set a RAID mode manually:
- Power off the enclosure.
- Adjust the DIP switches on the back panel to the desired RAID configuration (refer to the diagram on the enclosure or the full user manual for specific switch settings).
- Press and hold the 'SET' button (often recessed, requiring a paperclip or similar tool).
- While holding the 'SET' button, power on the enclosure.
- Continue holding the 'SET' button for approximately 6 seconds, then release. The new RAID mode will be applied.
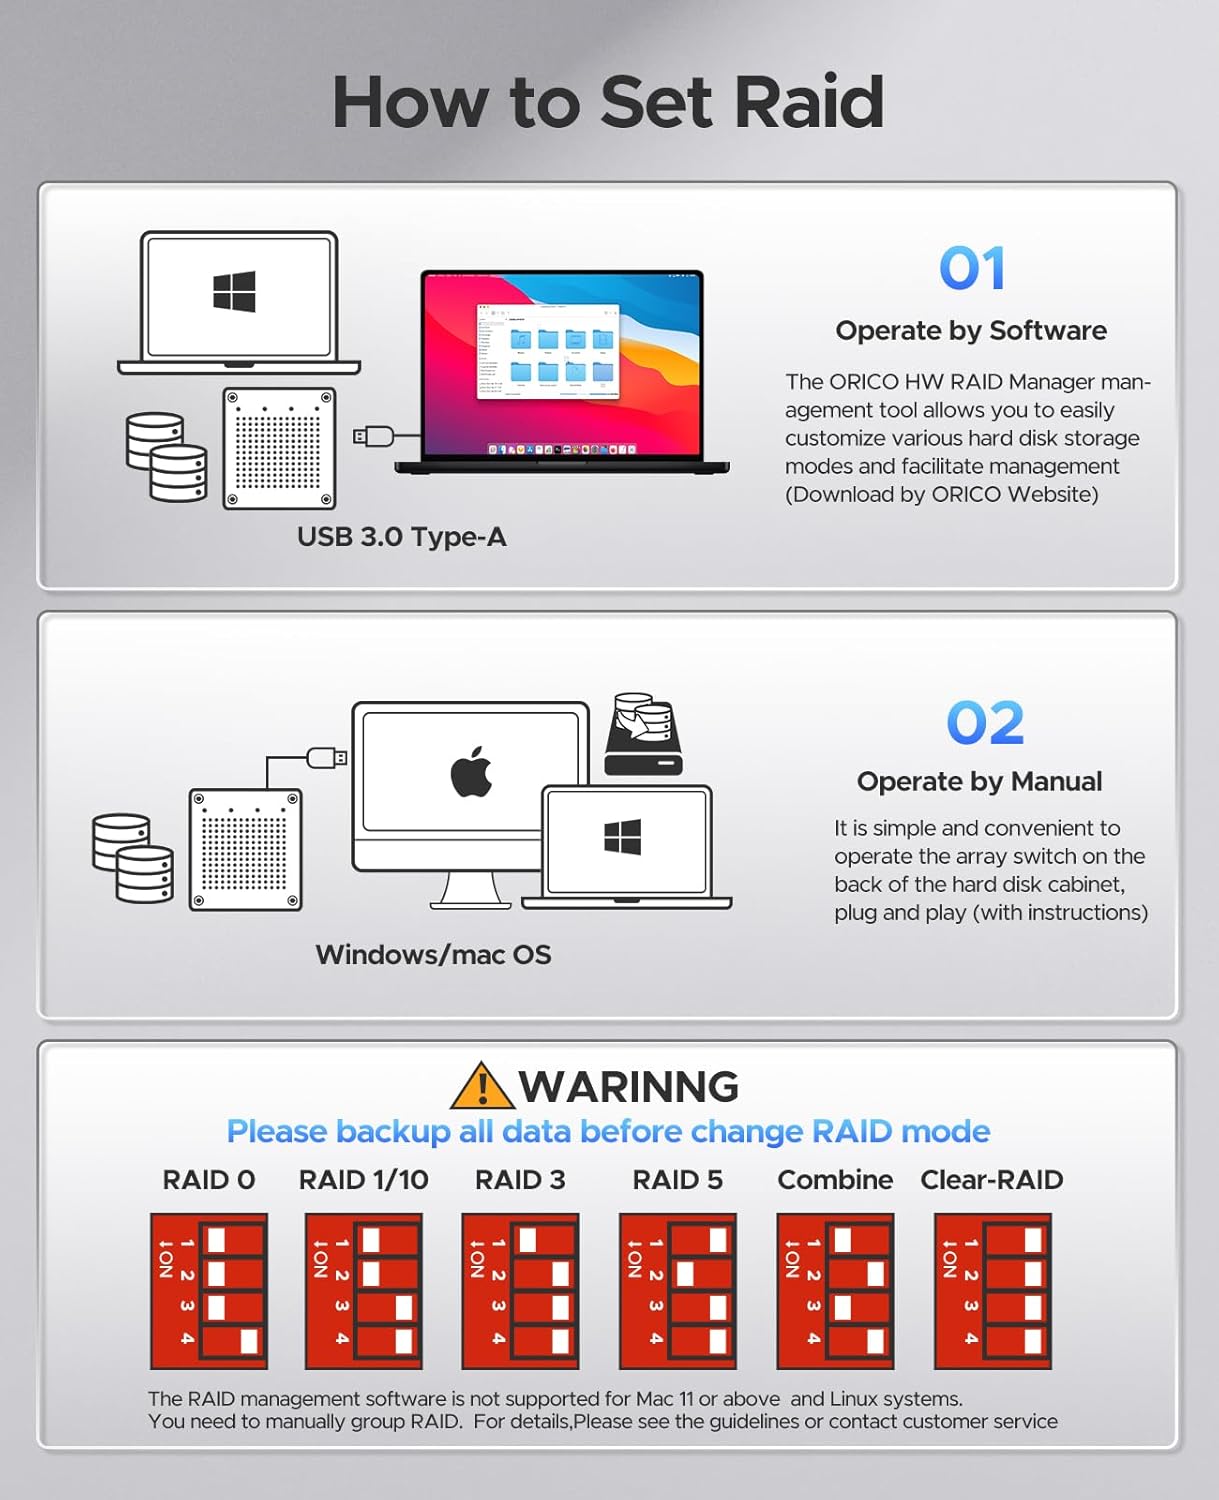
Figure 6: How to Set RAID
5. Betjeningsvejledning
5.1 Initializing and Formatting Hard Drives
After installing the hard drives and configuring the RAID mode (if applicable), the drives will need to be initialized and formatted by your operating system before they can be used. The process varies slightly depending on your OS:
- Windows: Access Disk Management (Right-click 'This PC' -> 'Manage' -> 'Disk Management'). Locate the newly installed disk(s), initialize them (MBR or GPT), create new simple volumes, and format them (NTFS is common for Windows).
- MacOS: Open Disk Utility (Applications -> Utilities -> Disk Utility). Select the disk, click 'Erase', choose a format (e.g., APFS or Mac OS Extended), and a scheme (e.g., GUID Partition Map).
- Linux: Use disk management tools like GParted or command-line utilities (e.g., `fdisk`, `mkfs`) to partition and format the drives.
5.2 Video Guide: Hard Drive Formatting
For detailed steps on how to format hard drives in Windows, Mac, and Linux, please watch the video below:
Video 2: How to format Hard Drive when operating Windows/Mac/Linux. This video provides a step-by-step demonstration of formatting hard drives across different operating systems.
5.3 Dataoverførsel
Once formatted, your drives are ready for data transfer. The USB 3.0 interface supports speeds up to 5Gbps, allowing for quick transfer of large files.

Figure 7: 5Gbps Data Transfer Speed
6. Vedligeholdelse
- Rensning: Brug en blød, tør klud til at rengøre ydersiden af kabinettet. Undgå flydende rengøringsmidler eller slibende materialer.
- Ventilation: Ensure the enclosure's honeycomb ventilation holes are not obstructed to maintain optimal airflow and prevent overheating. The built-in fan assists in heat dissipation.
- Firmwareopdateringer: Periodically check the ORICO official webwebstedet for at se, om der er tilgængelige firmwareopdateringer til din model, for at sikre optimal ydeevne og kompatibilitet.
- Automatisk dvaletilstand: The 10-minute auto sleep mode helps reduce power consumption and prolong drive life. Ensure your system settings do not interfere with this feature if you wish to utilize it.

Figure 8: Heat Dissipation Design
7. Fejlfinding
- Drev ikke genkendt:
- Sørg for, at alle kabler (strøm og USB) er tilsluttet korrekt.
- Verify the enclosure is powered on.
- Check Disk Management (Windows) or Disk Utility (macOS) to see if the drive appears as uninitialized or unformatted. If so, initialize and format it.
- Try connecting the enclosure to a different USB port or computer.
- Ensure hard drives are properly seated in their bays and secured.
- RAID Configuration Issues:
- If manually setting RAID, ensure the DIP switches are correctly set for the desired mode and the 'SET' button procedure is followed precisely.
- Remember to back up data before changing RAID modes, as this will erase existing data.
- For software-based RAID, ensure the ORICO HW RAID Manager is installed and up-to-date.
- Langsom dataoverførsel:
- Ensure you are using a USB 3.0 port on your computer. Connecting to a USB 2.0 port will result in slower speeds.
- Check the quality of the USB cable. Use the provided cable or a high-quality USB 3.0 cable.
- Performance can be affected by the speed of the installed hard drives and the RAID mode selected.
- Overophedning:
- Ensure the enclosure is placed in a well-ventilated area.
- Check that the cooling fan is operating and that the honeycomb ventilation holes are not blocked.
8. Specifikationer
| Feature | Specifikation |
|---|---|
| Modelnummer | WS400RU3 |
| Materiale | Aluminium |
| Drive Bays | 4 bugter |
| Max kapacitet | 80 TB (4 x 20TB) |
| Kompatible drevtyper | 2.5-inch / 3.5-inch SATA HDD/SSD |
| RAID-tilstande | RAID 0, RAID 1, RAID 3, RAID 5, RAID 10, JBOD, CLONE, Normal |
| Hardware-interface | USB 3.0 Type A, USB 3.0 Type B |
| Dataoverførselshastighed | Op til 5 Gbps (USB 3.0) |
| Strømforsyning | 12V 6.5A External Power Adapter |
| Kølesystem | 80mm Cooling Fan, Honeycomb Ventilation |
| Kompatibel OS | Windows XP / Vista / 7 / 8, Mac OS X 10.2+, Linux |
| Produktdimensioner | 9.45 x 5.51 x 5.12 tommer (240 x 140 x 130 mm) |
| Varens vægt | 6.85 pund (3.11 kg) |
9. Sikkerhedsoplysninger
- Brug kun den medfølgende strømadapter. Brug af en forkert adapter kan beskadige enheden og ugyldiggøre garantien.
- Avoid exposing the enclosure to water, moisture, or extreme temperatures.
- Do not open the enclosure or attempt to repair it yourself. Refer to qualified service personnel.
- Handle hard drives with care to prevent damage.
- Ensure proper ventilation around the enclosure to prevent overheating.
- Hold enheden væk fra stærke magnetiske felter.
10. Garanti og support
ORICO products typically come with a limited warranty. For specific warranty terms, duration, and support options, please refer to the warranty card included with your product or visit the official ORICO website. You can also contact ORICO customer service for technical assistance or product inquiries.
ORICO Official Webwebsted: www.oricotech.com


