1. Introduktion
Thank you for choosing the Zanussi ZMC25D59EB Microwave Convection Oven. This manual provides essential information for the safe and efficient operation, installation, and maintenance of your appliance. Please read these instructions thoroughly before using the microwave oven and retain them for future reference.
2. Vigtige sikkerhedsinstruktioner
For at reducere risikoen for brand, elektrisk stød, personskade eller eksponering for for meget mikrobølgeenergi, når du bruger dit apparat, skal du følge grundlæggende forholdsregler, herunder følgende:
- Læs alle instruktioner før brug af apparatet.
- Forsøg ikke at betjene denne ovn med døren åben, da dette kan resultere i skadelig eksponering for mikrobølgeenergi.
- Opvarm ikke væsker eller andre fødevarer i lukkede beholdere, da de er tilbøjelige til at eksplodere.
- Lad kun børn bruge ovnen uden opsyn, når der er givet tilstrækkelige instruktioner, så barnet er i stand til at bruge ovnen på en sikker måde og forstår farerne ved forkert brug.
- Hvis lågen eller dørtætningerne er beskadiget, må ovnen ikke betjenes, før den er blevet repareret af en kompetent person.
- The appliance must be earthed. Connect only to a properly earthed outlet.
- Brug ikke ætsende kemikalier eller dampe i dette apparat.
- Do not use this appliance for commercial purposes. It is intended for household use only.
- Sørg altid for, at drejeskiven og drejeskivens støtte er korrekt placeret før brug.
3. Produktet er slutview
Familiarize yourself with the components of your Zanussi microwave convection oven.
3.1 Appliance Components

Figur 1: Front view of the Zanussi ZMC25D59EB Microwave Convection Oven. This image displays the appliance's exterior, including the digital display, control panel with a copper-colored knob, and the matte black finish with copper trim.
- Dør med håndtag
- Digitalt display
- Kontrolpanel
- Ventilationsåbninger
- Pladespiller
- Pladespillerunderstøttelse
- Grill Rack (for grill/convection use only)
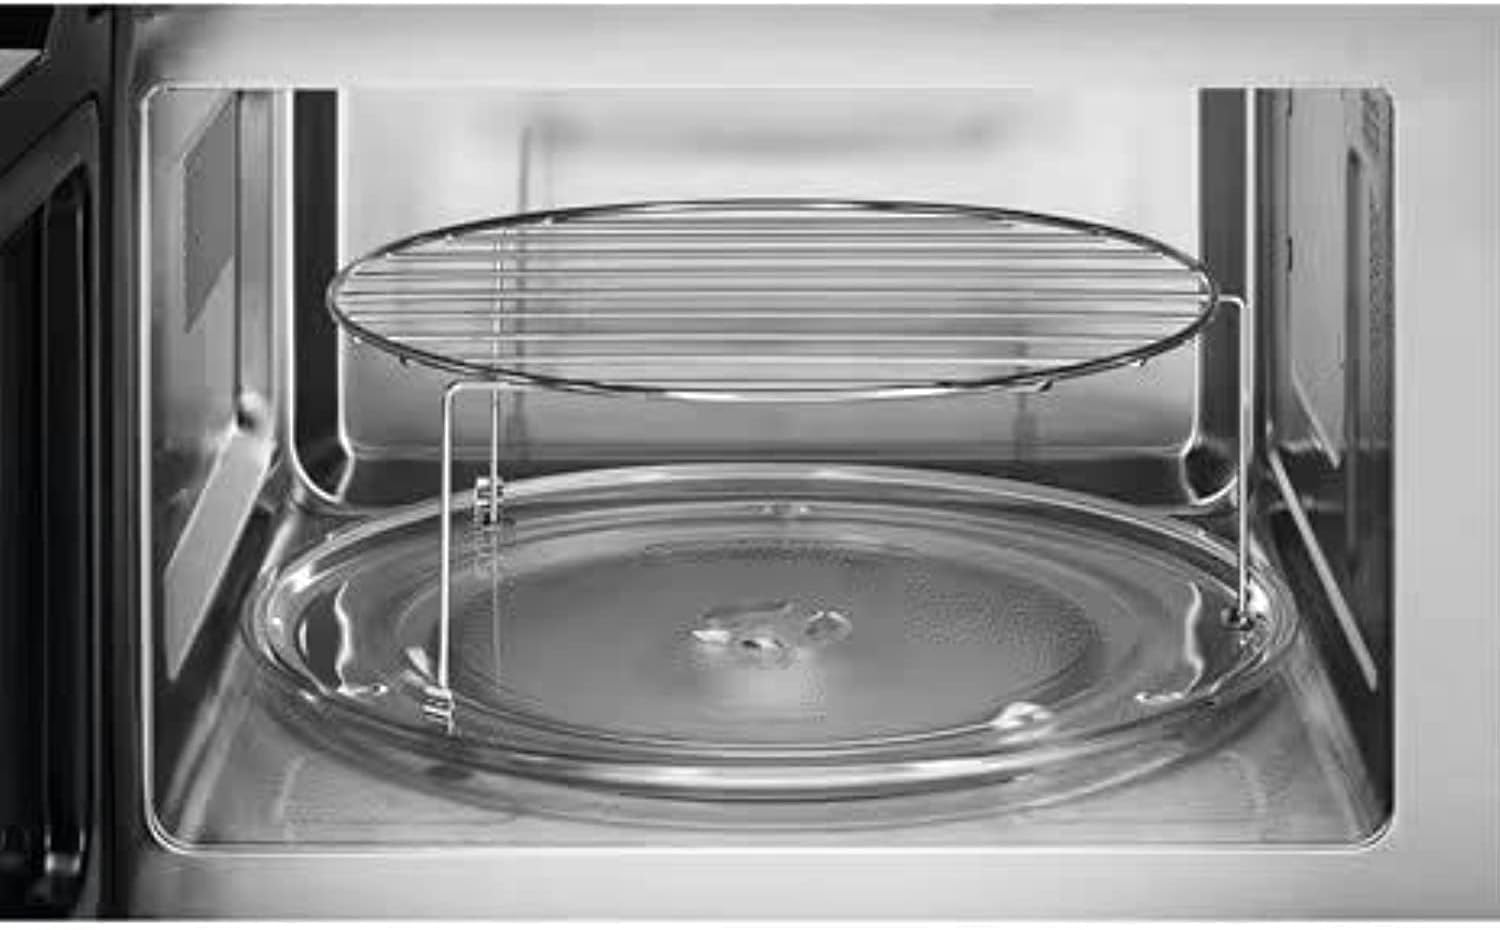
Figur 2: Indre view of the microwave oven, showing the glass turntable and the metal grill rack positioned above it. The interior is made of stainless steel.
3.2 Kontrolpanel
The control panel features a digital display, a central control knob, and various function buttons:
- Digital skærm: Viser tid, tilberedningsindstillinger og indikatorer.
- Betjeningsknap: Used to adjust time, weight, and select menu options.
- Microwave Button: Vælger tilberedningstilstand i mikrobølgeovn.
- Convection/Grill/Combi Button: Selects convection, grill, or combination cooking modes.
- Afrimningsknap: Activates defrost by time or weight.
- Auto Cook/Temp Button: Accesses pre-programmed cooking menus or sets temperature for convection.
- Start knap: Begins cooking or confirms settings.
- Stop/Slet knap: Stops cooking, clears settings, or cancels a program.
- Børnelåsindikator: Illuminates when child lock is active.
4. Opsætning og installation
4.1 Udpakning
Carefully remove the microwave oven and all packing materials from the carton. Check the oven for any damage, such as dents or a misaligned door. Do not operate the oven if it is damaged. Contact customer service.
4.2 Placering
- Placer ovnen på en plan, stabil overflade, der kan bære dens vægt og den tungeste madvare, der sandsynligvis vil blive tilberedt i ovnen.
- Ensure adequate ventilation. Leave a minimum of 20 cm (8 inches) of space above the oven, 10 cm (4 inches) at the rear, and 5 cm (2 inches) on each side.
- Bloker ikke luftåbninger.
- Hold ovnen væk fra varmekilder og stærke magnetfelter.
4.3 Elektrisk tilslutning
Sørg for, at voltage specified on the rating label matches your household power supply. The appliance operates on 220V. Plug the oven into a properly installed and earthed wall socket. Do not use extension cords or adapters.
4.4 Indledende opsætning
- Install the turntable ring and glass tray inside the oven cavity. Ensure the glass tray is securely seated on the turntable support.
- Set the clock: When the oven is plugged in, the display will show "0:00". Rotate the control knob to set the hour, then press the "Start" button. Rotate the control knob again to set the minutes, then press "Start" to confirm.
5. Betjeningsvejledning
5.1 Mikrobølgetilberedning
- Placer maden i en mikrobølgeovnssikker beholder på glasdrejetallerkenen.
- Luk ovndøren.
- Press the "Microwave" button repeatedly to select the desired power level (e.g., P100 for 100% power, P80 for 80%).
- Drej kontrolknappen for at indstille tilberedningstiden.
- Tryk på "Start"-knappen for at begynde tilberedningen.
5.2 Grilltilberedning
Use the metal grill rack provided for grill cooking. Ensure food is placed on the grill rack.
- Placer maden på grillristen.
- Press the "Convection/Grill/Combi" button until "Grill" or "G" appears on the display.
- Drej kontrolknappen for at indstille tilberedningstiden.
- Tryk på knappen "Start" for at begynde.
5.3 Tilberedning med varmluft
Preheating is often required for convection cooking.
- Press the "Convection/Grill/Combi" button until "Convection" or "C" appears.
- Press "Auto Cook/Temp" to set the desired temperature using the control knob.
- Press "Start" to begin preheating. The oven will beep when preheating is complete.
- Place food inside, close the door, rotate the control knob to set cooking time, and press "Start".
5.4 Kombinationstilberedning (Combi)
This mode combines microwave and grill/convection for faster cooking and browning.
- Press the "Convection/Grill/Combi" button to select the desired Combi mode (e.g., Combi 1, Combi 2).
- Drej kontrolknappen for at indstille tilberedningstiden.
- Tryk på knappen "Start" for at begynde.
5.5 Auto Cook Function
The oven has pre-programmed settings for various foods.
- Press the "Auto Cook/Temp" button.
- Rotate the control knob to select the desired auto cook menu (e.g., Pizza, Potato, Meat).
- Press "Auto Cook/Temp" again to confirm the selection.
- Rotate the control knob to select the weight or quantity of the food.
- Tryk på "Start"-knappen for at begynde tilberedningen.
5.6 Afrimningsfunktion
Defrost food by time or weight.
- Afrimning efter vægt:
- Press the "Defrost" button once.
- Rotate the control knob to select the food weight.
- Tryk på "Start" for at begynde.
- Afrimning efter tid:
- Press the "Defrost" button twice.
- Rotate the control knob to set the defrosting time.
- Tryk på "Start" for at begynde.
5.7 Børnelås
To prevent unintended operation, especially by children:
- Aktiver: Press and hold the "Stop/Clear" button for 3 seconds. A lock indicator will appear on the display.
- Deaktiver: Press and hold the "Stop/Clear" button for 3 seconds again. The lock indicator will disappear.
6. Rengøring og vedligeholdelse
Regelmæssig rengøring og korrekt vedligeholdelse vil sikre din mikrobølgeovns levetid og optimale ydeevne.
- Ydre: Tør det udvendige af med adamp klud og mildt rengøringsmiddel. Undgå slibende rengøringsmidler.
- Indre: Clean the interior cavity after each use. For stubborn food splatters, place a bowl of water with lemon slices inside and microwave for 5-10 minutes. This will loosen food particles, making them easier to wipe away.
- Dørtætninger: Hold dørtætningerne rene for at sikre korrekt tætning.
- Pladespiller og support: The glass turntable and turntable support can be washed in warm soapy water or in a dishwasher. Ensure they are completely dry before placing them back in the oven.
- Grillstativ: Wash the metal grill rack in warm soapy water.
- Tag altid stikket ud af ovnen før rengøring.
7. Fejlfinding
Hvis du støder på problemer med din mikrobølgeovn, kan du se følgende tabel for almindelige problemer og løsninger.
| Problem | Mulig årsag | Løsning |
|---|---|---|
| Ovnen starter ikke. | Netledningen er ikke sat i; Døren er ikke lukket ordentligt; Sikringen er sprunget, eller afbryderen er udløst; Børnesikringen er aktiveret. | Ensure power cord is securely plugged in; Close door firmly; Check household fuse/circuit breaker; Deactivate child lock (refer to section 5.7). |
| Maden varmes ikke op. | Forkert effektniveau eller tilberedningstid indstillet; Døren er ikke lukket ordentligt. | Adjust power level and cooking time; Ensure door is fully closed. |
| Drejeskiven roterer ikke. | Turntable not correctly placed; Turntable support dirty or damaged. | Reposition turntable and support; Clean turntable support and rollers. |
| Lys virker ikke. | Pæren skal udskiftes. | Kontakt kvalificeret servicepersonale for udskiftning af pæren. Forsøg ikke at udskifte den selv. |
Hvis problemet fortsætter efter at have gennemgået disse løsninger, bedes du kontakte kundesupport.
8. Specifikationer
Technical specifications for the Zanussi ZMC25D59EB Microwave Convection Oven.

Figur 3: The Zanussi ZMC25D59EB Microwave Convection Oven with approximate external dimensions indicated. Note: The image labels 9cm for all dimensions, which is a placeholder. Actual dimensions are listed below.
| Feature | Detalje |
|---|---|
| Model | ZMC25D59EB |
| Kapacitet | 25 liter |
| Mikrobølgeeffekt | 900 watt |
| Voltage | 220 V |
| Mål (H x B x L) | 28.1 cm x 48.3 cm x 40.9 cm |
| Ovntilberedningstilstande | Microwave, Convection Heat, Grill, Combination |
| Særlige funktioner | Defrost Function, Auto Cooking, Safety Child Lock, Digital Control Knob |
| Farve | Matt Black with Copper Frame |
| Indvendigt materiale | Rustfrit stål |
| Installationstype | Frit stående |
| Inkluderede komponenter | Grill Rack, Glass Turntable |
9. Garanti og support
Your Zanussi ZMC25D59EB Microwave Convection Oven comes with a 3 års producentgarantiDenne garanti dækker materiale- og fabrikationsfejl ved normal brug i husholdningen.
For warranty claims, technical support, or service inquiries, please refer to the contact information provided with your purchase documentation or visit the official Zanussi webwebsted for din region.
Please have your model number (ZMC25D59EB) and proof of purchase ready when contacting support.


