1. Introduktion
The Radiolink CrossFlight Flight Controller V1.1 is a compact and versatile flight control system designed for a wide range of remote-controlled vehicles, including multi-copters (3-8 rotors), fixed-wing aircraft, helicopters, submarines, FPV drones, cars, and boats. It integrates an On-Screen Display (OSD) module and features advanced vibration damping technology for stable performance.
This flight controller offers 10 PWM outputs, enabling advanced functions such as gripper control. It supports extensive waypoint navigation, with capabilities for up to 2617 waypoints for multi-copters and 2623 waypoints for airplanes, cars, and boats. Its design prioritizes stability and ease of setup, making it suitable for various applications including agriculture, education, and hobby use.
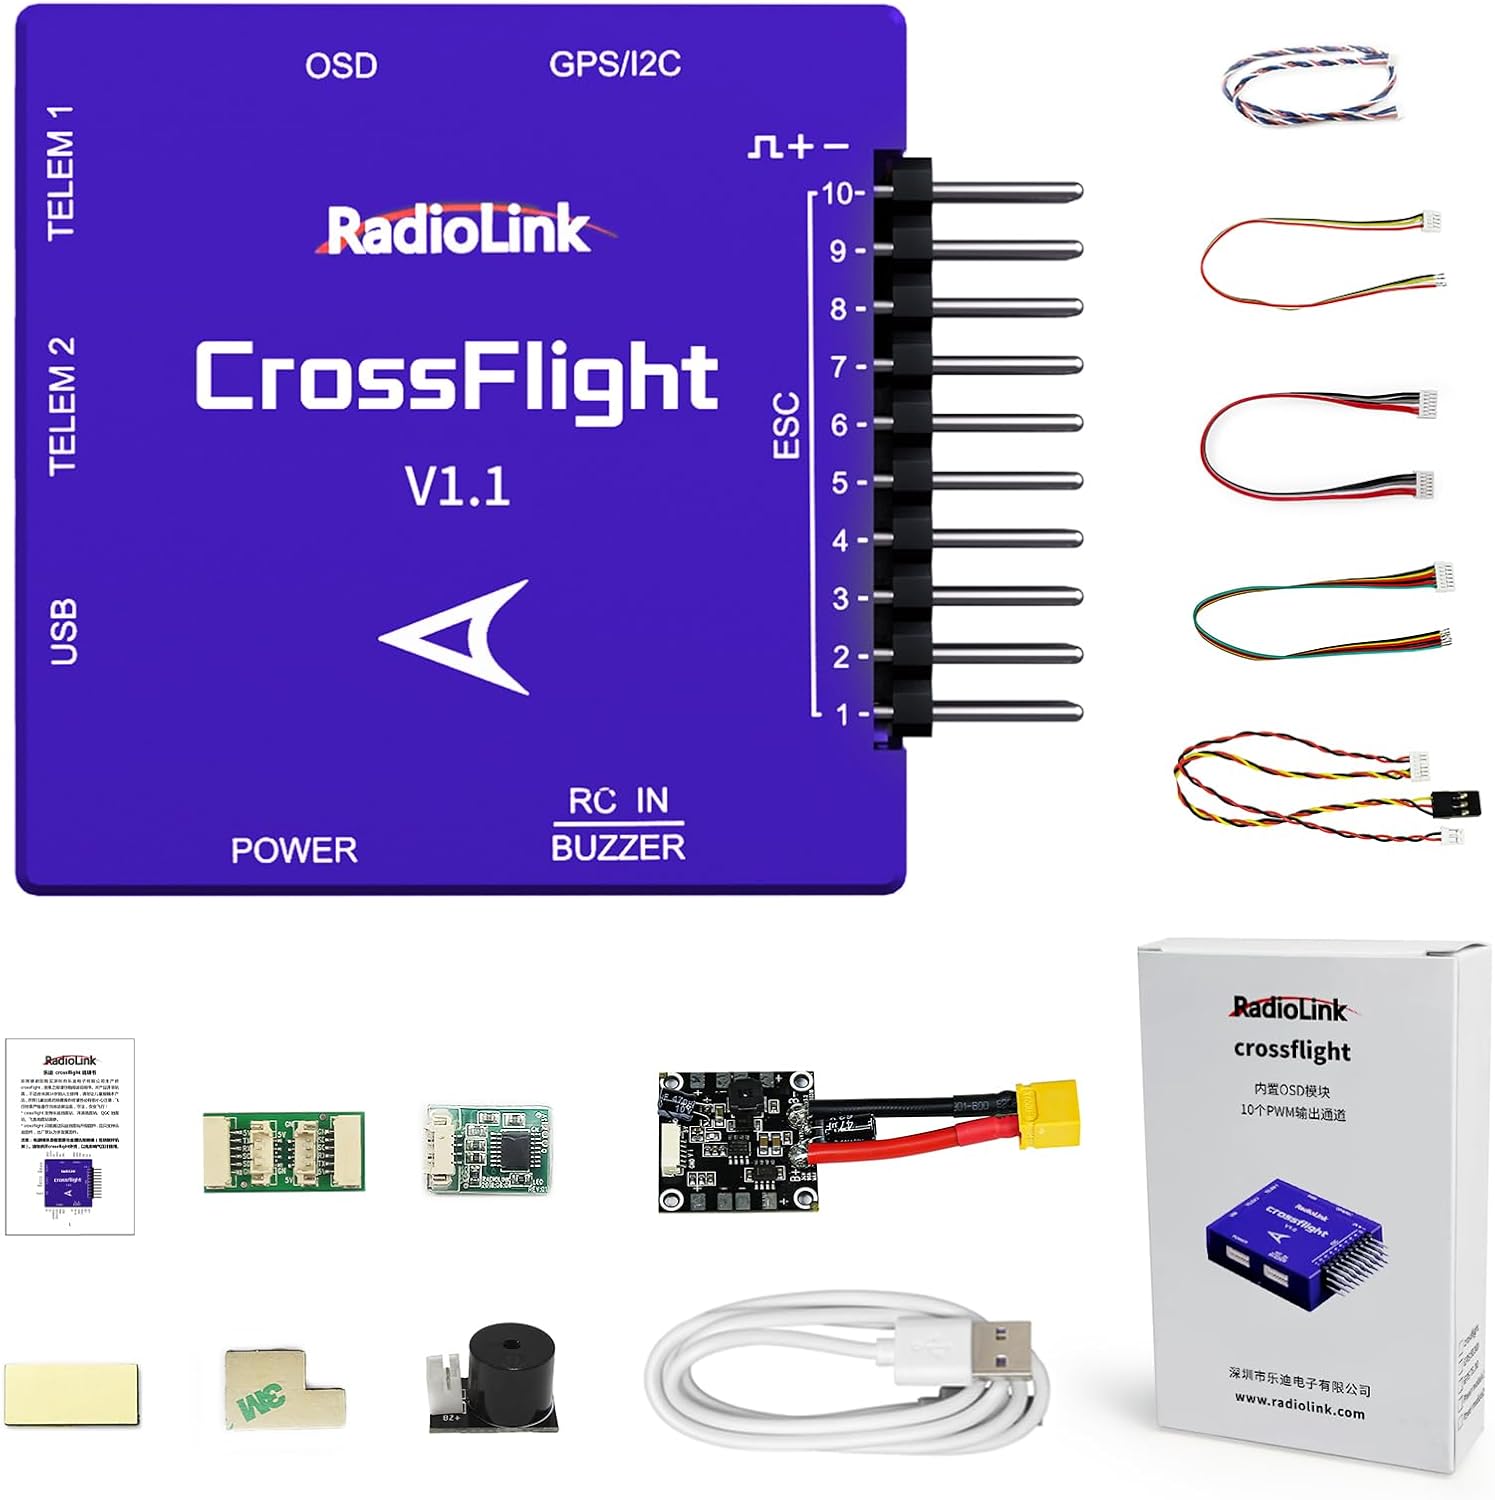
Image 1.1: Radiolink CrossFlight Flight Controller V1.1 with connecting cables, USB cable, and user manual.
2. Nøglefunktioner
- Kompakt design: Measuring only 1.56" x 1.56" x 0.51", the CrossFlight V1.1 is suitable for mini racing drones and other small-scale RC models.
- Forbedret stabilitet: Features a shell designed to reduce airflow interference and an air pressure vent for accurate barometer measurements, contributing to stable altitude hold. Digital filter algorithms are implemented for effective vibration damping.
- Integrated OSD Module: Displays critical flight information directly on your screen without requiring an external OSD module. Information includes flight mode, distance, GPS status, coordinates, speeds, battery voltage, current, wind speed, and return route details.
- Versatile PWM Output: Provides 10 PWM outputs, allowing for a wider range of control options and the implementation of functions like grippers.
- Extensive Waypoint Navigation: Supports up to 2617 waypoints for multi-copters and 2623 waypoints for fixed-wing aircraft, cars, and boats, enabling complex automated flight routes.
- Forenklet opsætning: Compatible with Radiolink Mission Planner, ArduPilot Mission Planner, and QGC Mission Planner for parameter configuration.

Image 2.1: Illustration of software-based vibration damping and improved altitude hold for carrying loads.

Image 2.2: Size comparison highlighting the compact dimensions of the CrossFlight V1.1.
3. Setup and Connection Guide
Proper connection of all components is crucial for the safe and correct operation of the CrossFlight Flight Controller. Refer to the diagram below for typical connection points.
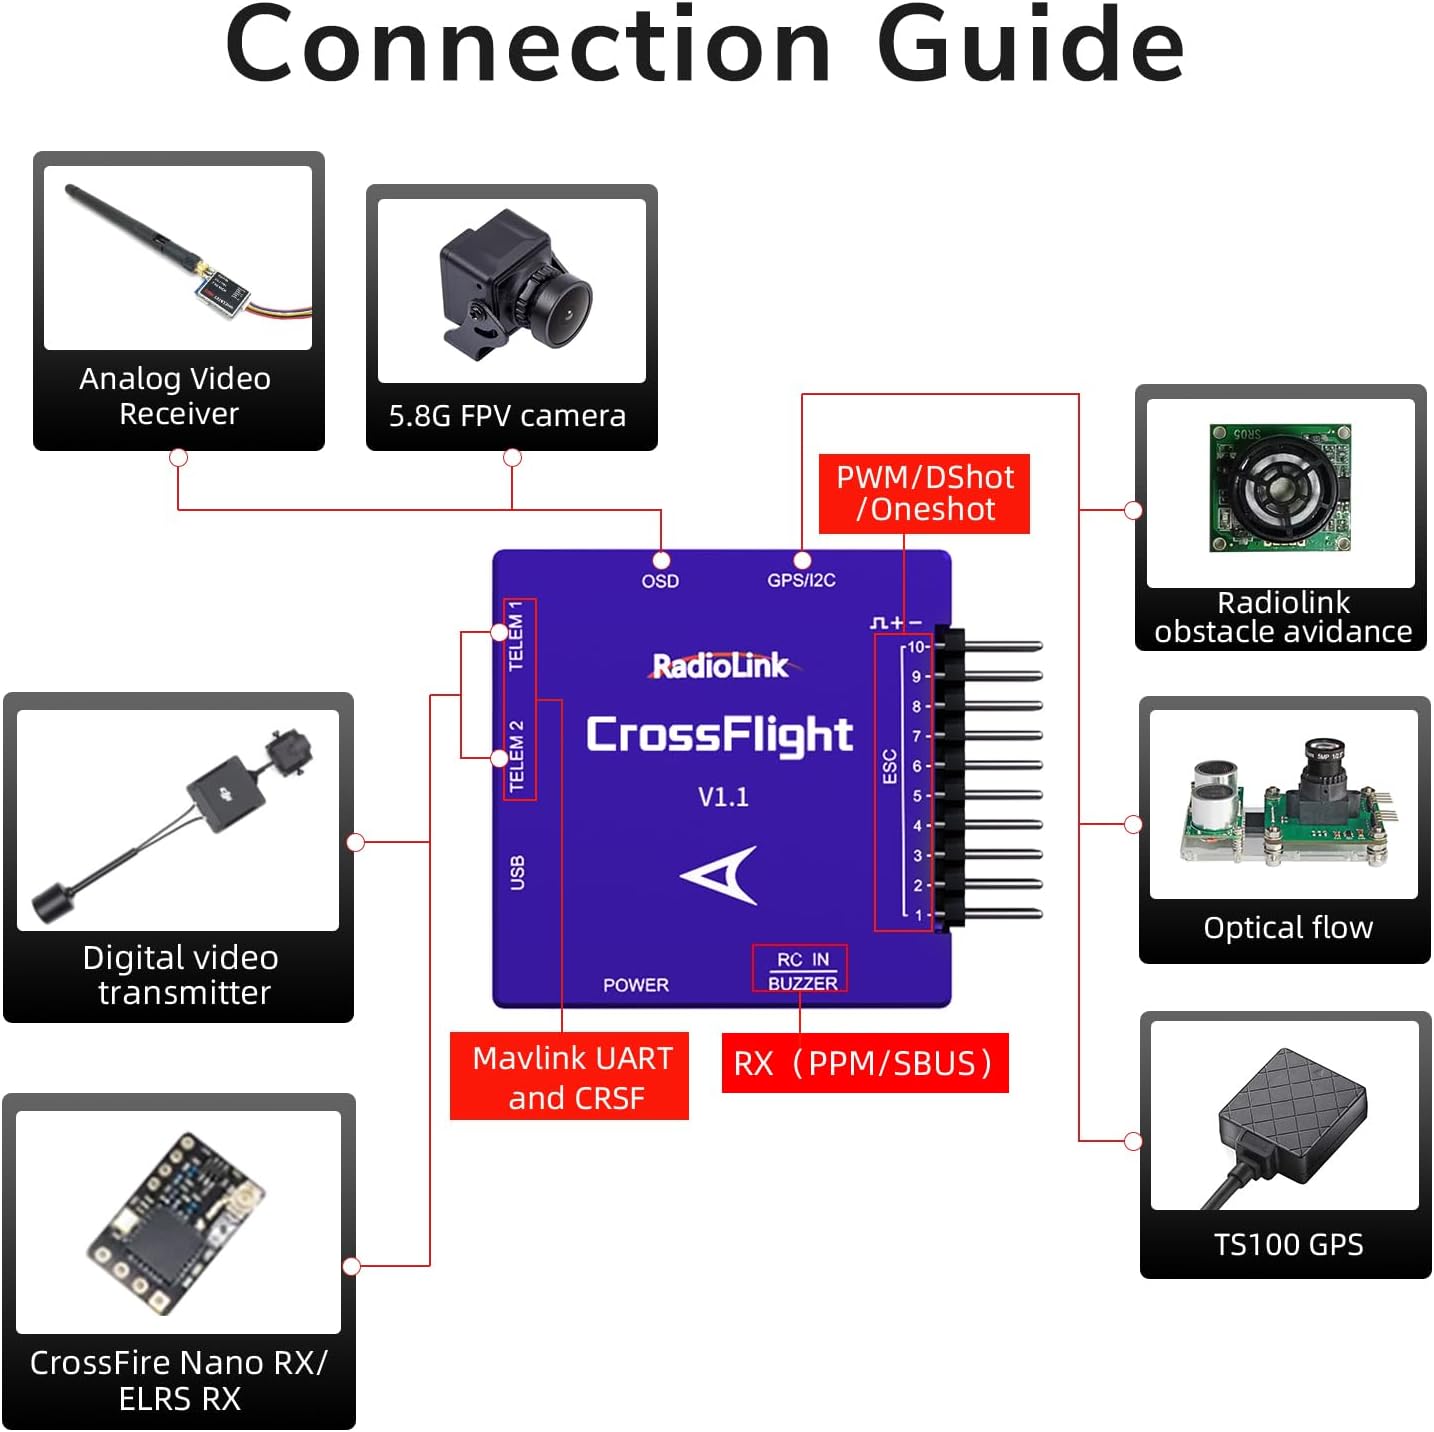
Image 3.1: Connection Guide for the CrossFlight V1.1, illustrating connections for analog video receiver, FPV camera, digital video transmitter, CrossFire Nano RX/ELRS RX, Radiolink obstacle avoidance, optical flow sensor, TS100 GPS, and ESCs.
3.1 Component Connections
- Magt: Connect the main power source to the designated POWER port.
- ESC (Electronic Speed Controller): Connect ESCs to the PWM output pins (1-10) for motor control.
- Receiver (RC IN): Connect your receiver (PPM/SBUS compatible) to the RC IN port.
- GPS/I2C: Connect a GPS module (e.g., TS100 GPS) to the GPS/I2C port for navigation and position hold functions.
- OSD: The OSD module is integrated. No external connection is needed for basic OSD functionality.
- TELEMETRY (TELE1, TELE2): Connect telemetry modules for real-time data transmission.
- USB: Use the USB port for connecting to a computer for configuration and firmware updates.
- Summer: Connect an external buzzer to the BUZZER port for audible alerts.
- Valgfrit periferiudstyr: Connect other sensors such as obstacle avoidance, optical flow, or FPV cameras as per the connection guide.
3.2 Softwarekonfiguration
The CrossFlight V1.1 can be configured using several mission planner software options:
- Radiolink Mission Planner (Recommended for firmware updates)
- ArduPilot Mission Planner
- QGC Mission Planner (QGroundControl)
Connect the flight controller to your computer via the USB port and launch your preferred mission planner software to calibrate sensors, configure flight modes, and set parameters.

Image 3.2: Software options for parameter setting and firmware updates.
4. Betjening
4.1 Flight Modes and Waypoints
The CrossFlight V1.1 supports various flight modes and advanced waypoint navigation. You can program complex flight paths using the mission planner software. For multi-copters, up to 2617 waypoints can be set, while airplanes, cars, and boats can utilize up to 2623 waypoints for automated routes and return functions.

Image 4.1: Illustration of GPS auto-return and custom flight path capabilities.
4.2 Skærmvisning (OSD)
The integrated OSD provides real-time flight data directly on your FPV goggles or ground station monitor. This includes essential information such as flight mode, distance, GPS satellite count, longitude, latitude, vertical speed, magnetic deviation, current time, battery voltage, current draw, wind speed, and return route indicators.

Billede 4.2: Eks.amples of OSD data display on FPV goggles and within Mission Planner software.
4.3 Ansøgninger
The versatility of the CrossFlight V1.1 allows its use in diverse applications:
- Aerial Filming and Photography
- Mapping and Surveying
- Drone Delivery Services
- Fire Rescue Operations
- Agricultural Plant Protection (e.g., spraying)
- Flight Formation Demonstrations
- Vand Sampling with Bait Boats
- Educational and Training Platforms
- Marine Rescue Operations

Billede 4.3: Eks.amples of wide usage scenarios for the CrossFlight V1.1.
5. Vedligeholdelse
5.1 Generel pleje
- Keep the flight controller clean and free from dust and moisture.
- Undgå at udsætte enheden for ekstreme temperaturer eller direkte sollys i længere perioder.
- Regularly inspect all connections for secure fit and signs of wear.
- Ensure proper ventilation when the unit is in operation to prevent overheating.
5.2 firmwareopdateringer
Firmware updates for the CrossFlight V1.1 can only be performed using the Radiolink Mission Planner software and firmware provided directly by Radiolink. Attempting to use other mission planners or unofficial firmware may lead to unexpected behavior or render the device inoperable.
6. Fejlfinding
- Forbindelsesproblemer: If the flight controller is not recognized by the mission planner, ensure the USB cable is securely connected and try a different USB port. Verify that the correct drivers are installed.
- Firmwareopdateringsfejl: Ensure you are using the official Radiolink Mission Planner and the correct firmware file from Radiolink. Do not interrupt the update process. If an update fails, attempt to re-flash the firmware carefully.
- Unstable Flight/Altitude Hold: Check all sensor calibrations (accelerometer, gyroscope, compass, barometer). Ensure the flight controller is securely mounted and isolated from vibrations. Verify that the air pressure vent is clear.
- OSD Not Displaying Data: Confirm that the OSD settings are correctly configured in the mission planner. Check video connections if using an external display.
- ArduPilot Compatibility: Note that while the CrossFlight V1.1 can be configured with ArduPilot Mission Planner, the ArduPilot Development Team has expressed concerns regarding source code compliance. For firmware updates, only use Radiolink's dedicated tools and firmware.
7. Specifikationer
| Feature | Detalje |
|---|---|
| Mærke | Radiolink |
| Modelnummer | CrossFlight |
| Produktdimensioner | 1.56 x 1.56 x 0.51 tommer |
| Varens vægt | 3.52 ounce |
| PWM udgang | 10 kanaler |
| OSD Module | Integreret |
| Vibration Damping | Software-based digital filter algorithm |
| Barometer | Built-in sensor with air pressure vent |
| Understøttede køretøjer | RC Plane, 3-8 Copters, Helicopter, Submarine, FPV Drone, Car, Boat |
| Parameter Setup Software | Radiolink Mission Planner, ArduPilot Mission Planner, QGC Mission Planner |
| Software til opdatering af firmware | Radiolink Mission Planner (Radiolink firmware only) |
| Materiale | Plast |
| Farve | Lilla |
| Voltage | 5100 Millivolts (Input voltage, typical) |
8. Garanti og support
8.1 Produktgaranti
Information regarding specific warranty periods is not provided in this manual. Please refer to your purchase documentation or contact Radiolink customer service for detailed warranty terms.
8.2 Kundesupport
For technical assistance, troubleshooting, or any product-related inquiries, please contact Radiolink's after-sales service. Support can typically be found through the Radiolink Direct store or by referring to the online user instructions and FAQ documents available on product sales pages.
A 30-day return policy is generally applicable for this product. For specific return procedures, please consult the retailer's policy where the product was purchased.
9. Videoressourcer
No official product videos from the seller were provided in the available data for embedding. Please check the product's online listing or the manufacturer's webwebsted for tilgængelige videovejledninger eller demonstrationer.


