1. Produktet er slutview
The Beelink EQ12 Mini PC is a compact and efficient desktop computer powered by the Intel 12th Generation Alder Lake-N100 processor. Designed for various applications including office work, home entertainment, and digital signage, it offers robust performance with low power consumption. This manual provides essential information for setting up, operating, maintaining, and troubleshooting your device.

Figur 1: Forside view of the Beelink EQ12 Mini PC, showcasing its compact design and accessible ports.
2. Produktspecifikationer
| Feature | Detalje |
|---|---|
| Dimension | 126x126x45.5mm (Without Rubber Feet) |
| CPU | Intel Processor Alder Lake-N100, Max Turbo 3.4G (4C/4T) |
| Grafik | Intel UHD Graphics (24 EUs), Supports AV1 Decoding |
| System Disk | M.2 PCIe x1 or SATA3, Max 2TB (Standard 500GB SSD) |
| VÆDDER | 16GB DDR4 (Single-channel support up to 16GB) |
| Interface | USB-C 10Gbps*1, USB3.2 10Gbps*3, HDMI (Max 4K 60Hz)*2, LAN (2.5Gbps)*2, 3.5mm Audio Jack*1 |
| Trådløst netværk | WiFi 6 (Intel AX200), Bluetooth 5.2 |
| AC-kabel | 100V-240V; 50/60Hz; Output 12V/3A DC 5.5*2.5mm |
| Driftsmiljø | 0℃-40℃, Humidity 30%-90% |
| Opbevaringsmiljø | -20°C-60°C, Humidity 10%-90% |
| Yderligere funktioner | Auto Power On, WOL |
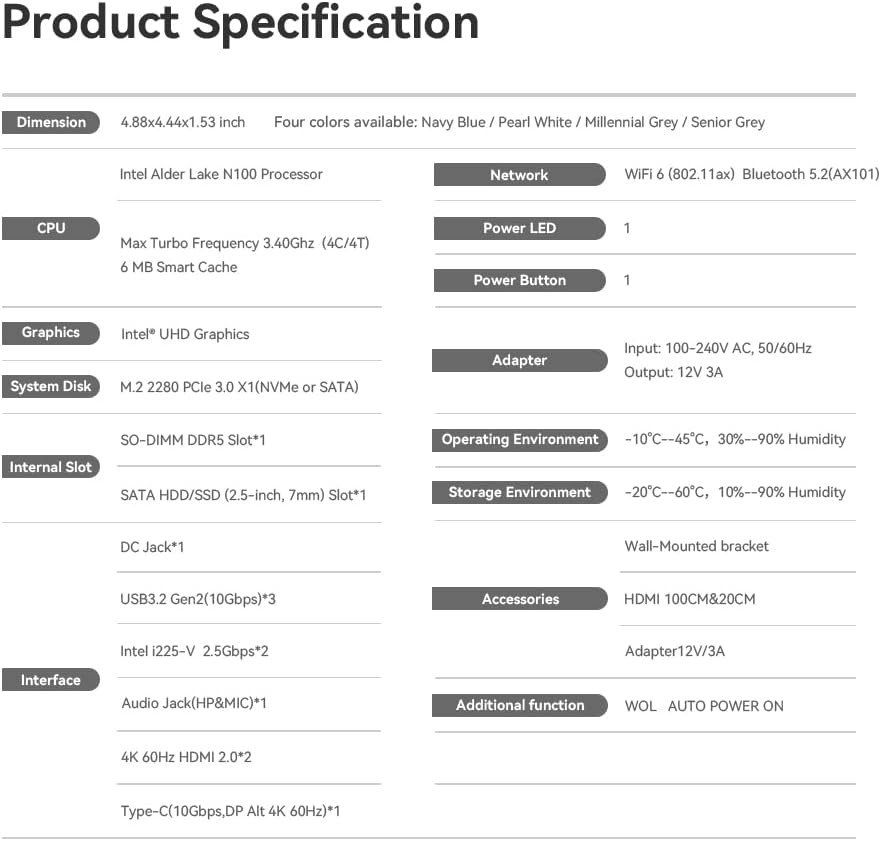
Figure 2: Comprehensive specifications of the Beelink EQ12 Mini PC.
3. Hvad er der i æsken
- 1 x Beelink EQ12 Mini PC
- 1 x HDMI kabel
- 1 x strømadapter
- 1 x brugermanual
4. Indledende opsætning
4.1. Hurtig installationsvejledning
- Connect the device to a monitor using an HDMI cable.
- Connect a keyboard and mouse to the device through the USB ports or via Bluetooth (Mice or keyboards are not included in the retail package).
- Tilslut enheden til en stikkontakt med den medfølgende vekselstrømsledning, og start den op.
- Brug et Ethernet-kabel eller Wi-Fi til at forbinde enheden til internettet.
Note: You need to configure the Wi-Fi settings on the device for wireless network connection.
4.2. Installation Tips for First-Time Use
To avoid initial setup problems, follow these steps the first time you use the Beelink Mini PC:
- Please do not connect to the network or Wi-Fi until your mini computer's operating system is fully functional. Remember not to fill in the email; skip this step to use the machine normally.
- If you only use a wired network to connect the micro PC, please disconnect the wired network directly, restart the machine, and connect to the network after successfully entering the operating system.
- If you have connected to Wi-Fi and the OS cannot load, please turn off the router you are using.
5. Betjeningsvejledning
5.1. Skærmkonfiguration
The Beelink EQ12 Mini PC supports 4K triple screen display, allowing for enhanced productivity and immersive experiences. It features Intel UHD Graphics with AV1 Decoding support for smooth playback of high-resolution video.
Video 1: Instructions on how to connect dual monitors to your Beelink Mini PC.
5.2. Netværksforbindelse
The EQ12 is equipped with dual 2.5Gbps LAN ports for high-speed wired connections and supports WiFi 6 and Bluetooth 5.2 for wireless connectivity. This allows for flexible networking options, including use as a soft router or firewall.
5.3. AV1 Video Decoding
The Intel UHD Graphics in the EQ12 supports AV1 decoding, which provides efficient playback of high-quality video streams. This results in smoother video and potentially lower bandwidth usage compared to other codecs.
Video 2: Demonstration of AV1 decoding capabilities on the Beelink EQ12 Mini PC.
6. Vedligeholdelse og opgraderinger
6.1. SSD Installation/Replacement
The Beelink EQ12 supports M.2 PCIe x1 or SATA3 SSDs up to 2TB. You can upgrade or replace the SSD to expand storage capacity.
Video 3: Tutorial on how to replace the SSD in your Beelink Mini PC.
6.2. RAM Cleaning and Installation
Regular cleaning of RAM modules can prevent boot issues or system instability. The device supports single-channel DDR4 RAM up to 16GB.
Video 4: Guide on how to clean and reinstall RAM modules in a desktop computer.
6.3. Fan Removal and Cleaning
If the fan becomes noisy or the system overheats, cleaning the fan can improve performance and reduce noise. This involves carefully removing the fan for maintenance.
Video 5: Instructions on how to remove the fan from a Beelink Mini PC.
7. Fejlfinding
7.1. How to Enter BIOS
Press the "Delete" key to enter the BIOS settings; press "F7" to enter the boot options menu (click continuously immediately after booting).
7.2. How to Switch Audio Playback Device in Windows
If your Windows Mini PC is connected to multiple audio playback devices (e.g., speakers, headphones, webcams with built-in microphones, and Bluetooth headsets) simultaneously, you will need to choose one of them for audio playback through Windows sound settings.
7.3. Machine Cannot Enter Sleep Mode
- Disable fast startup: In Control Panel, navigate to Power Options, select "Choose what the power buttons do," and uncheck "Turn on fast startup." Click Save changes.
- Restore Default Power Plan Settings: Open Control Panel, go to Power Options, find your current power plan, click "Change plan settings," then "Restore default settings for this plan." Confirm with "Yes."
- Turn Off Hybrid Sleep Mode: Type "Control Panel" into the search bar, navigate to Hardware and Sound > Power Options > Change plan settings, then click "Change advanced power settings." Expand "Sleep," then "Allow Hybrid Sleep." Set both "On battery" and "Plugged in" options to "Off." Click Apply.
7.4. Asking for defaultuser0 Password
- Press "Windows key + R" and type "netplwiz," then type the command OOBE\BYPASSNRO. The PC will reboot.
- Press SHIFT+F10 to open a terminal. Type OOBE\BYPASSNRO. The PC should reboot. When asked about the network, choose "I don't have internet." The setup process should continue, allowing you to create a local account.
7.5. Blue Screen of Death
- After unplugging all cables, insert a pin into the CMOS hole for more than 10 seconds. Reconnect cables and restart.
- Remove and reinsert the SSD and RAM, ensuring they are properly installed. Clean RAM contacts with a rubber eraser. If issues persist, press the Delete key upon startup to enter BIOS and check if the SSD is detected.
- Try reinstalling the operating system.
7.6. Noisy Fan / High Temperature
- Repeatedly press the Delete key upon startup to enter BIOS. Check the Main page for BIOS update recommendations.
- If a BIOS update does not resolve the issue, adjust the fan speed in BIOS.
- Adjust VRAM in BIOS, as this can sometimes help.
- Check for overheating: Ensure the fan spins. Consider turning off turbo boost. Adjust power settings: Go to Control Panel > Power Options > Change to High performance > Change plan settings > Advanced settings > Processor power management. Change both 100% to 99% and click Save.
- Remove the fan, clean it, and apply a small amount of non-conducting lubricant to the shaft before reassembling.
8. Garanti og support
Beelink offers comprehensive support for your EQ12 Mini PC:
- 1-års gratis erstatning
- Livsvarig teknisk support
- 7*24 Hours Online Customer Service
The product has passed FCC, CE, and ROHS safety certificates.
9. Sikkerhedsoplysninger
9.1. Forsigtig
- Do not use harsh chemical solvents or cleaning products. We recommend using a soft cloth to wipe.
- Do not throw the product into fire; avoid fire accidents.
- Please note seepage while cleaning electronics; be careful of electric shock.
- Kontroller, om der er flossede eller beskadigede ledninger eller stik.
- Do not arbitrarily discard the product; we should protect the environment.


