1. Introduktion
Thank you for choosing the ATTACK SHARK X2 Wireless Gaming Mouse. This manual provides detailed instructions for setting up, operating, and maintaining your mouse to ensure optimal performance. The X2 mouse features a transparent shell, 3-mode connectivity (2.4GHz wireless, Bluetooth 5.0, USB-C wired), adjustable DPI, 3D RGB lighting, and a rechargeable battery.

Image 1.1: The ATTACK SHARK X2 Wireless Gaming Mouse, showcasing its transparent design and vibrant RGB lighting. A USB receiver is also visible.
2. Produktet er slutview
2.1 Pakkens indhold
- ATTACK SHARK X2 Trådløs Gamingmus
- USB-C ladekabel
- 2.4 GHz USB-modtager (gemt i musen)
- Brugermanual
2.2 Musens komponenter

Billede 2.1: Bund view of the X2 mouse, highlighting the USB receiver slot, mode switch, and light effect switch.
- Venstre klik knap
- Højreklik knap
- Scrollhjul (also functions as a button)
- DPI knap (below scroll wheel)
- Frem-knap (venstre side)
- Baglæns knap (venstre side)
- Mode switch (bottom of mouse: OFF / 2.4G / Bluetooth)
- Lyseffektkontakt (bottom of mouse)
- USB-modtagerslot (bottom of mouse)
- USB-C opladningsport (front of mouse)
3. Opsætning og tilslutning
3.1 Opladning af musen
The X2 mouse features an 800mAh rechargeable battery. Before first use, or when the battery is low, connect the mouse using the provided USB-C cable.
- Connect the USB-C end of the cable to the mouse's charging port.
- Tilslut USB-A-enden til en strømkilde (f.eks. en computers USB-port eller en USB-vægadapter).
- En fuld opladning tager typisk cirka 4 timer.
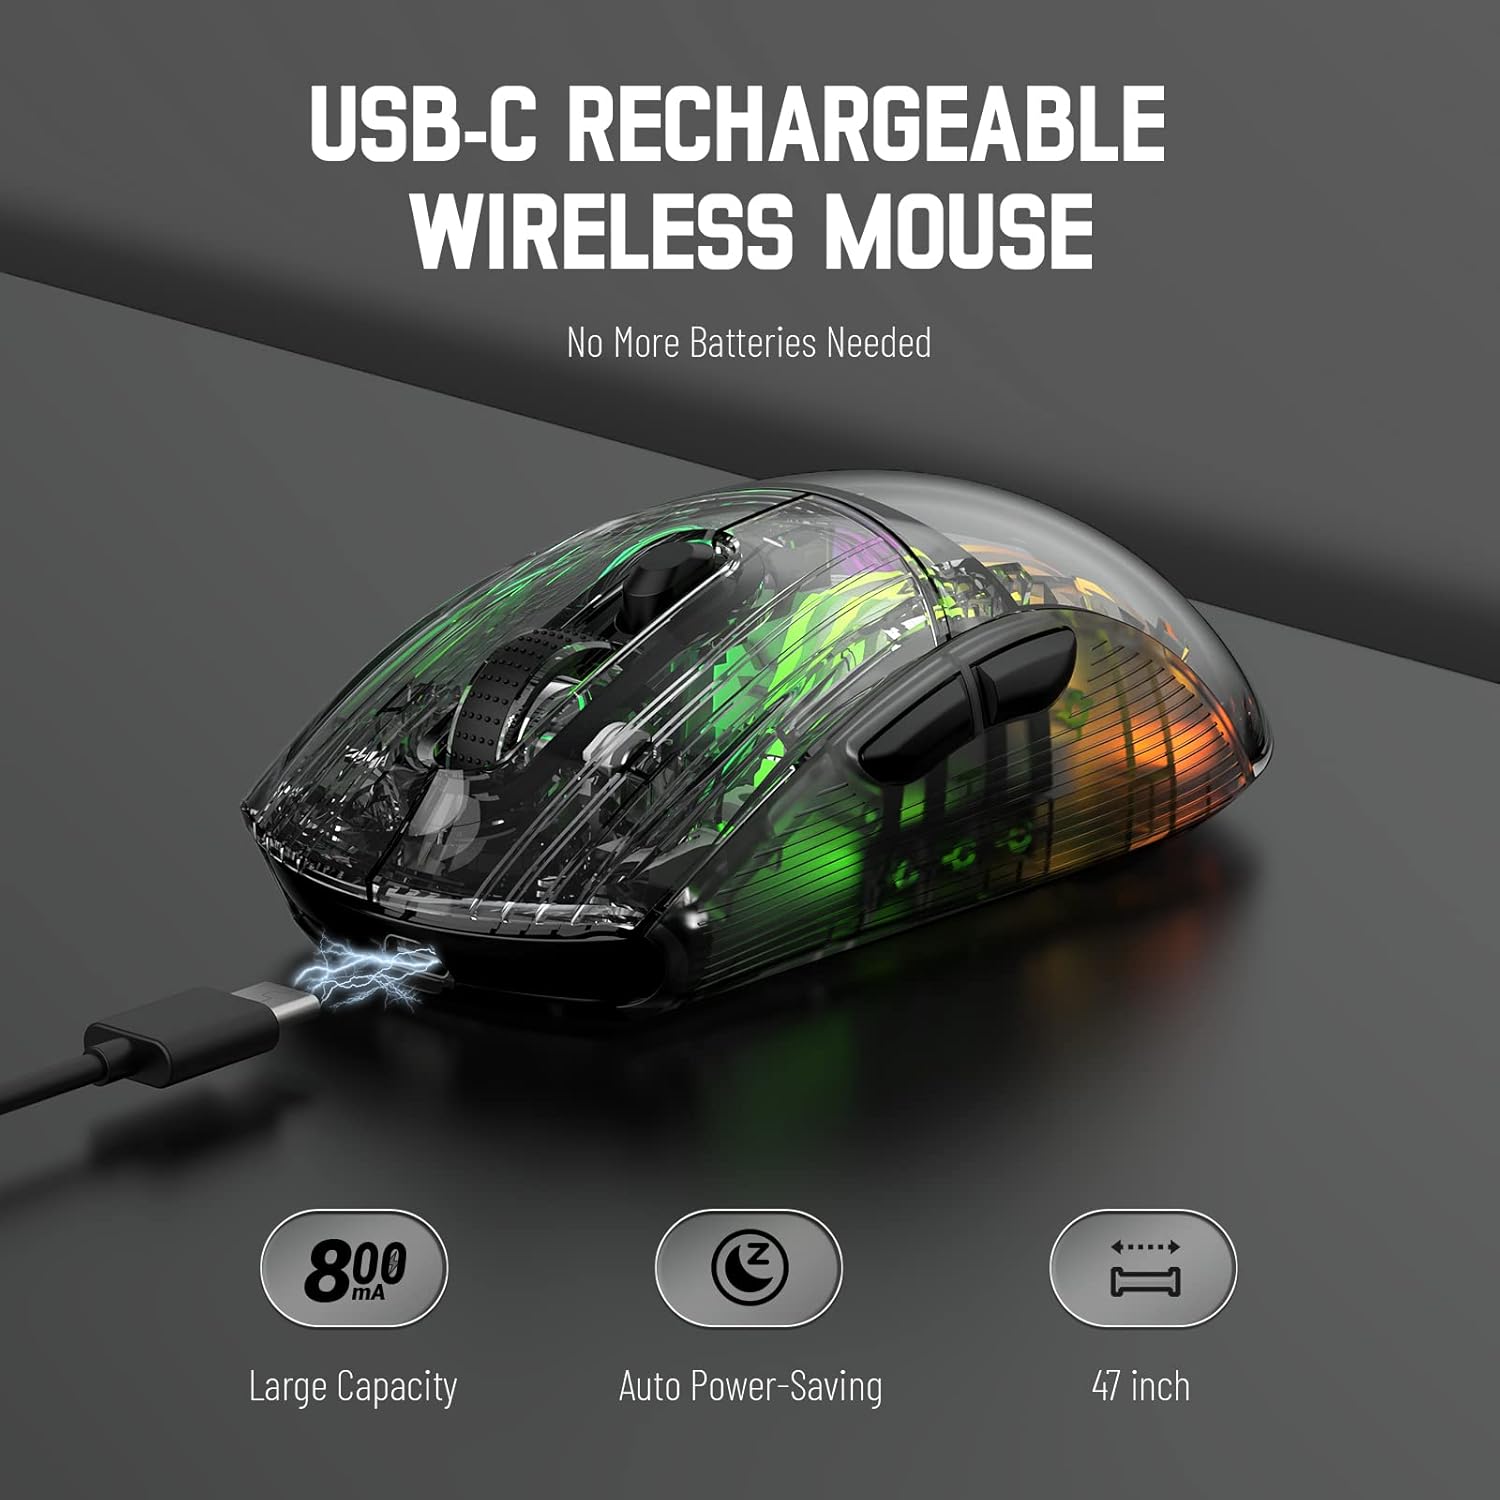
Image 3.1: The X2 mouse connected via its USB-C cable, illustrating the charging process.
3.2 2.4 GHz trådløs forbindelse
For a stable and responsive wireless connection, use the 2.4GHz USB receiver.
- Find USB-modtageren, der er opbevaret i åbningen i bunden af musen.
- Push the mode switch on the bottom of the mouse to the "2.4G" position.
- Sæt USB-modtageren i en ledig USB-port på din computer eller enhed.
- The computer should automatically detect and install the necessary drivers. The mouse is ready for use once installation is complete (typically plug-and-play).
- If the mouse is unresponsive, try plugging the receiver into a different USB port.
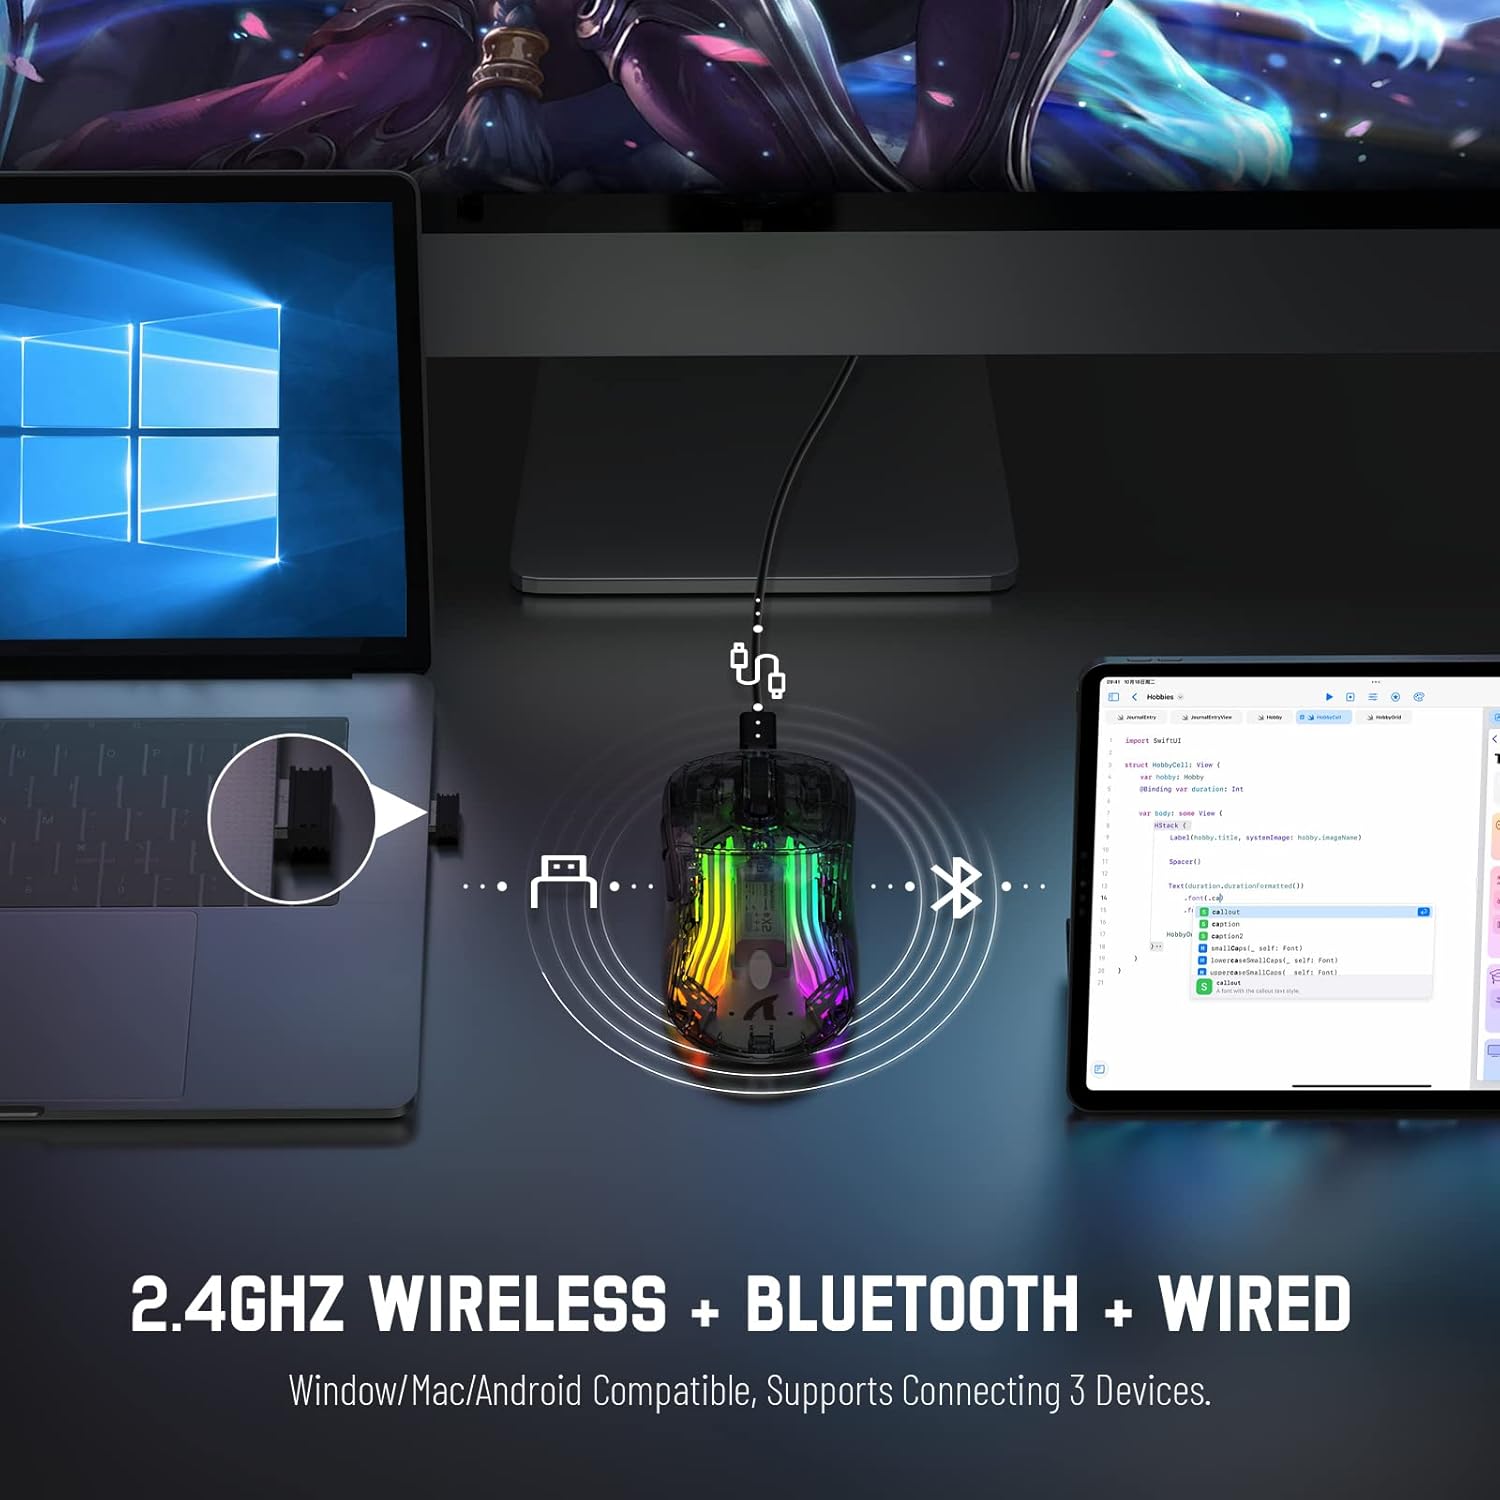
Image 3.2: Illustration of the 2.4GHz wireless connection, showing the USB receiver plugged into a laptop.
3.3 Bluetooth 5.0-forbindelse
Connect your X2 mouse via Bluetooth for devices that support it, such as laptops, tablets, or smartphones.
- Push the mode switch on the bottom of the mouse to the "Bluetooth" position.
- Tryk og hold på Venstre klik knap + Rullehjulsknap + Højreklik knap simultaneously for approximately 3-4 seconds. The blue light on the mouse will flash rapidly, indicating it is in pairing mode.
- Gå til Bluetooth-indstillinger på din enhed, og aktiver Bluetooth.
- Søg efter available devices. Select "X2 Mouse" from the list to connect.
- Once connected, the blue light will stop flashing and remain solid or turn off, depending on the lighting mode.
3.4 USB-C kablet forbindelse
For a direct and reliable connection, use the USB-C cable in wired mode.
- Connect the USB-C end of the cable to the mouse's charging port.
- Connect the USB-A end to an available USB port on your computer or device.
- The mouse will function immediately as a wired mouse (plug-and-play).
4. Betjeningsvejledning
4.1 DPI-justering
The mouse features 5 adjustable DPI levels to suit various tasks and gaming preferences. The game chip used is PixArt 3212.
- Tryk på DPI knap (located below the scroll wheel) to cycle through the available DPI settings.
- Available DPI levels: 800 / 1200 / 1400 / 2000 / 2400.
4.2 RGB-lysstyring
The X2 mouse features 3D RGB lighting with 11 different light colors and various effects.
- Tryk på Lyseffektkontakt (located on the bottom of the mouse) to cycle through the different RGB lighting modes and colors.

Image 4.1: The X2 mouse displaying its 3D RGB lighting, complementing a gaming setup.
4.3 Strømstyring
The mouse is designed with auto power-saving features to conserve battery life.
- The mouse will enter a sleep mode after a period of inactivity.
- To wake the mouse, simply move it or click any button.
- When the battery is low, the mouse's indicator light may flash red.
4.4 Silent Clicks
The X2 mouse features silent click buttons, reducing noise during use.

Billede 4.2: En sideprofile of the X2 mouse, emphasizing its ergonomic shape and silent click functionality.
5. Vedligeholdelse
5.1 Rengøring
- Frakobl musen fra din enhed, før du rengør den.
- Brug en blød, tør og fnugfri klud til at tørre musens overflade af.
- Til genstridigt snavs, let dampRengør kluden med vand eller en mild rengøringsopløsning. Undgå skrappe kemikalier.
- Lad ikke væsker trænge ind i musens indre.
5.2 Opbevaring
- Opbevar musen et køligt, tørt sted væk fra direkte sollys og ekstreme temperaturer.
- When not in use, ensure the mode switch is set to "OFF" to conserve battery life.
- Keep the USB receiver stored in its designated slot on the bottom of the mouse to prevent loss.
6. Fejlfinding
6.1 Musen reagerer ikke
- Tjek batteri: Sørg for, at musen er opladet. Tilslut den via et USB-C-kabel for at oplade.
- Kontroller tilstandsskifter: Verify the mode switch on the bottom of the mouse is set to the correct connection mode (2.4G, Bluetooth, or OFF for wired).
- 2.4 GHz forbindelse: Sørg for, at USB-modtageren er korrekt tilsluttet en fungerende USB-port. Prøv en anden USB-port.
- Bluetooth-forbindelse: Re-enter pairing mode (Left + Scroll + Right buttons for 3-4 seconds) and re-pair with your device. Ensure Bluetooth is enabled on your device.
- Kablet forbindelse: Ensure the USB-C cable is securely connected to both the mouse and the device.
6.2 Intermittent Connection
- Afstand: Ensure the mouse is within the effective range (up to 50ft for 2.4GHz).
- Interferens: Move the mouse and receiver away from other wireless devices or large metal objects that may cause interference.
- Batteriniveau: Low battery can affect connection stability. Charge the mouse.
6.3 RGB-lys virker ikke
- Check Light Switch: Press the Light Effect Switch on the bottom of the mouse to cycle through modes or turn lights on.
- Batteriniveau: Ensure the mouse has sufficient charge, as low battery might disable lighting to conserve power.
7. Specifikationer
| Feature | Specifikation |
|---|---|
| Model | X2 |
| Forbindelse | 2.4 GHz trådløs, Bluetooth 5.0, USB-C kablet |
| DPI niveauer | 800 / 1200 / 1400 / 2000 / 2400 (PixArt 3212 Chip) |
| Knapper | 7 (Left, Right, Scroll Wheel, DPI, Forward, Backward, Light Effect Switch) |
| Belysning | 3D RGB Lighting (11 light colors) |
| Batteri | 800mAh genopladelig |
| Opladningstid | Ca. 4 timer |
| Driftsområde | Up to 50ft (2.4GHz) |
| Kompatibilitet | Windows 7/8/10/XP, Vista 7/8, Mac OS, Linux (PC, Laptop, Tablet, PS4, PS5, Xbox One) |
| Varens vægt | 6.4 ounce |
| Dimensioner | 6.89 x 4.61 x 1.81 tommer (pakke) |
8. Garanti og support
ATTACK SHARK products are designed and manufactured to high-quality standards. For warranty information or technical support, please refer to the warranty card included with your product or contact the seller directly through your purchase platform. Please retain your proof of purchase for any warranty claims.
For further assistance, please visit the official ATTACK SHARK store on Amazon: ATTACK SHARK Butik


