Indledning
The AOLION 3D Joystick Module Replacement Kit is designed to address common issues such as stick drift, creeping, stuttering, blind spots, dead zones, and unresponsive joysticks in your PlayStation 5 DualSense controller. This comprehensive kit provides the necessary components and tools to restore your controller's analog stick functionality, ensuring precise and reliable input for an optimal gaming experience.
This manual provides detailed instructions for the installation, maintenance, and troubleshooting of the joystick modules and accompanying accessories.
Pakkens indhold
Please verify that all items listed below are included in your kit:
- 27 x skruer
- 10 x Protective Rings
- 4 x Joystick Modules
- 4 x Thumb Sticks
- 2 x Joystick Caps (Thumb Grips)
- 1 x pincet
- 1 x Triangular Pry Tool
- 1 x Pry Bar
- 1 x Crossed Screwdriver

Billede: Detaljeret view of all 51 components included in the replacement kit, laid out for clear identification.
Installationsvejledning
Vigtig bemærkning: The installation of the joystick modules requires soldering. If you are not experienced with soldering electronic components, it is highly recommended to seek professional assistance or refer to detailed video tutorials. Improper installation can damage your controller.
Nødvendige værktøjer (ikke inkluderet):
- Loddekolbe
- Loddetråd
- Desoldering Pump or Braid
- Heat Gun (optional, for stubborn solder)
Trin-for-trin installation:
- Afmonter controlleren: Use the provided screwdriver and pry tools to carefully open your PS5 DualSense controller. Refer to online guides or videos for specific disassembly steps for your controller model.
- Locate and Desolder Old Joysticks: Identify the joystick modules on the controller's circuit board. Carefully desolder all pins connecting the faulty joystick module to the board. Ensure all solder is removed to prevent damage to the pads.
- Rengør puderne: Use isopropyl alcohol and a cotton swab to clean any residual flux or solder from the circuit board pads.
- Install New Joystick Module: Align the pins of the new AOLION 3D joystick module with the corresponding holes on the circuit board. Ensure it sits flush against the board.
- Solder New Joystick: Carefully solder each pin of the new joystick module to the circuit board. Ensure strong, clean solder joints without bridging any pins.
- Replace Thumb Sticks and Caps: Once the joystick module is securely soldered, place the new thumb sticks onto the joystick shafts. If desired, add the joystick caps for enhanced grip.
- Reassemble the Controller: Carefully reassemble your controller, ensuring all cables and components are correctly connected and secured. Use the provided screws for reassembly.
- Test funktionalitet: After reassembly, connect your controller to your PS5 console and test the joystick functionality. Verify that there is no stick drift, and all movements are registered accurately.

Image: A user performing the replacement procedure on a PS5 controller, demonstrating the hands-on nature of the installation.
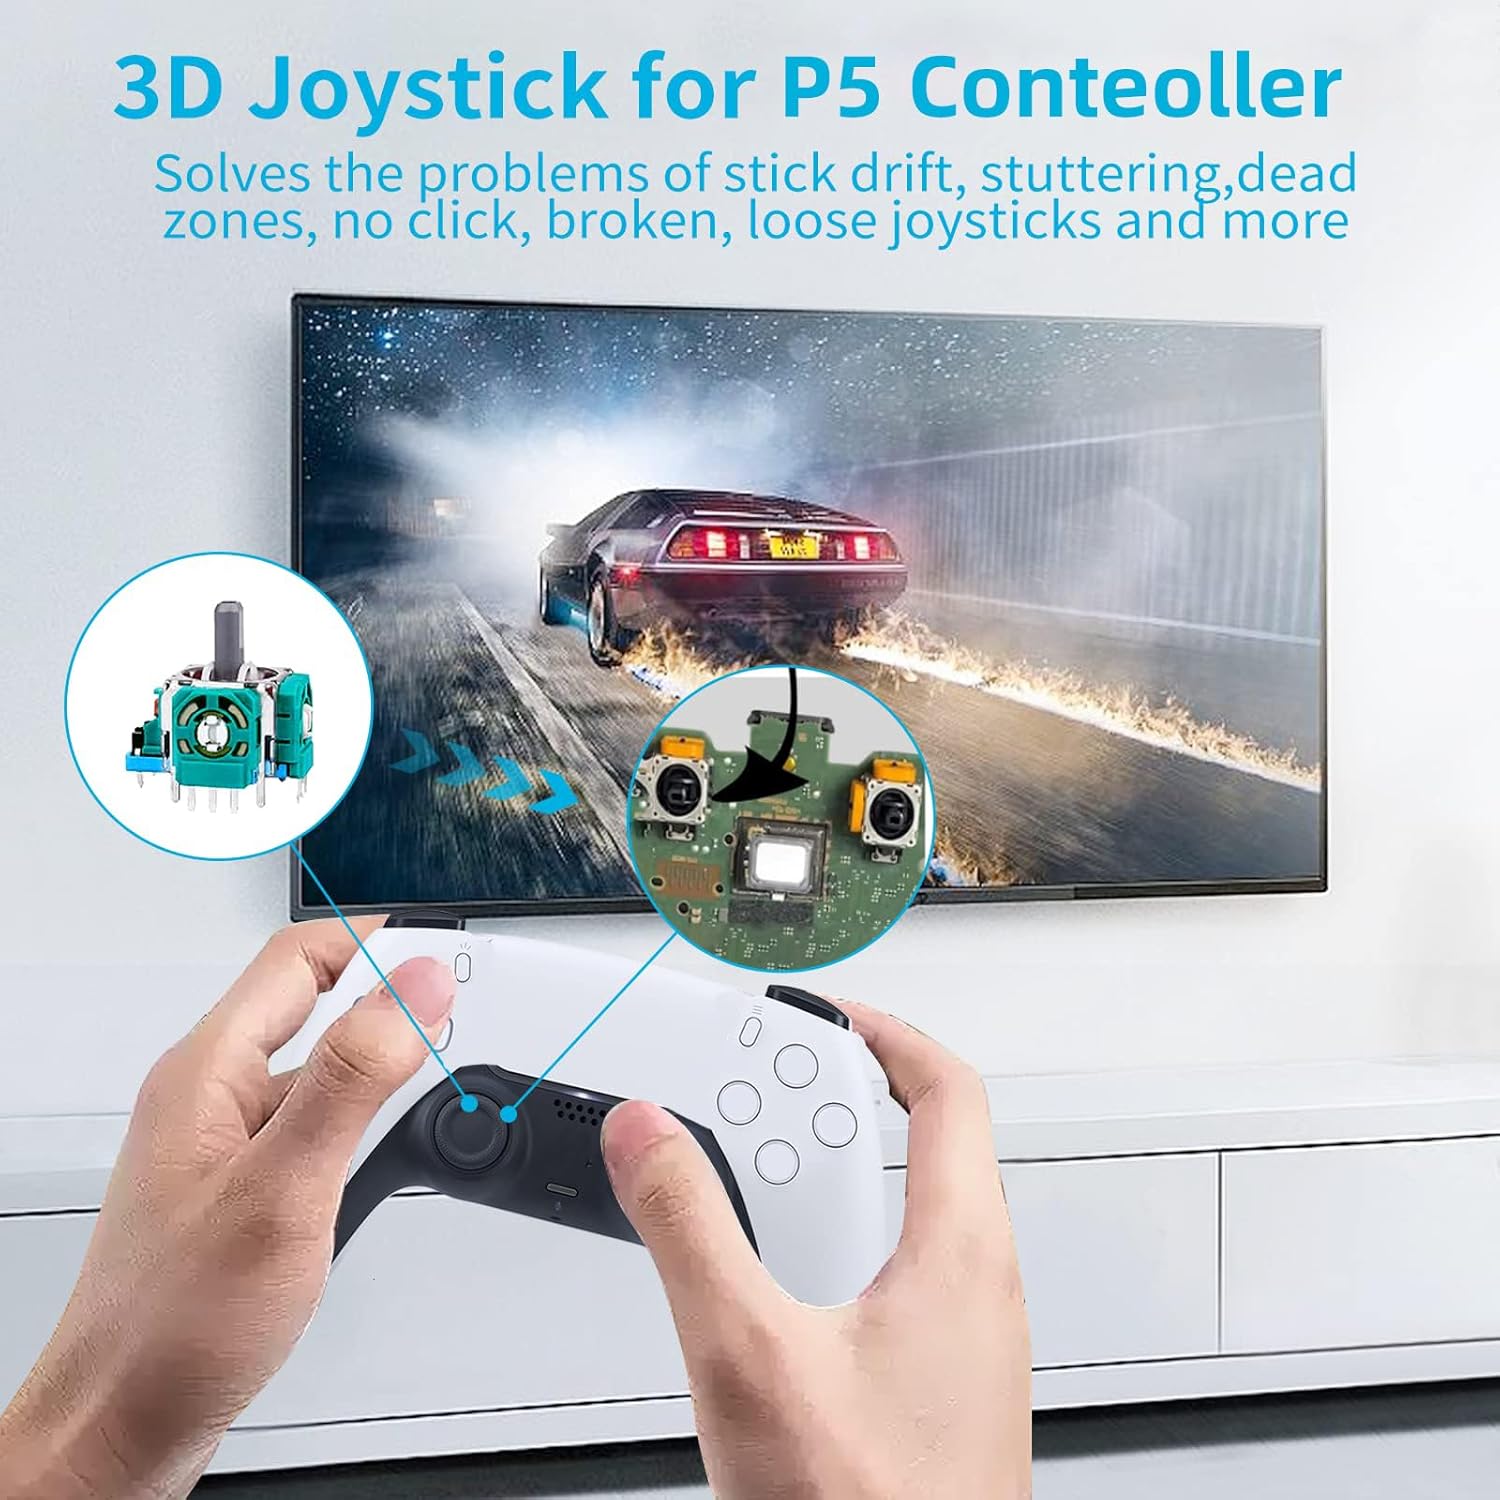
Image: Visual representation of the joystick module's location inside the PS5 controller, aiding in identification during installation.
Opretholdelse
Proper maintenance can extend the lifespan of your controller and the replacement joystick modules.
Beskyttende ringe:
The included 0.1mm ultra-thin protective rings are designed to prevent wear and tear on the joystick shafts and the controller housing. They also help to minimize the accumulation of dust and debris around the joystick base.
- Installation: Gently slide a protective ring onto the base of each thumb stick before attaching the thumb stick to the joystick module.
- Rensning: Periodically remove the thumb sticks and clean the protective rings and the area around the joystick base with a soft, dry cloth to remove any accumulated dust.

Image: The ultra-thin protective ring installed on a PS5 controller, demonstrating how it safeguards the joystick mechanism.

Image: The protective rings are compatible with a range of controllers, including PS5, PS4, Switch, and Xbox, offering versatile protection.
Fejlfinding
If you encounter issues after installing the joystick modules, consider the following troubleshooting steps:
- Stick Drift Persists:
- Ensure all solder joints are solid and free of cold joints or bridges.
- Verify that the joystick module is seated correctly and flush with the circuit board.
- Perform a controller calibration through your console's settings, if available.
- Joystick Not Responding:
- Check for any disconnected ribbon cables or wires during reassembly.
- Inspect the joystick module for any bent or damaged pins.
- Confirm that the correct joystick module orientation was maintained during soldering.
- Tools Missing or Damaged:
- If any accessories are missing or damaged upon arrival, please contact customer support for assistance.
If issues persist after attempting these steps, it may indicate a more complex problem or require further technical assistance.
Specifikationer
| Mærke | AOLION |
| Kompatible enheder | PlayStation 5 DualSense-controller |
| Controller type | Joystick modul |
| Pakkedimensioner | 6.69 x 4.29 x 0.98 tommer |
| Varens vægt | 2.82 ounce |
| Første ledige dato | 9. februar 2023 |
Garanti og support
For any questions regarding the AOLION 3D Joystick Module Replacement Kit, including installation assistance, missing components, or product defects, please contact the seller directly through the platform where the purchase was made. Provide your order details for prompt support.
While specific warranty details are not provided in this manual, most products come with a standard return or replacement policy. Please refer to your purchase receipt or the product listing for applicable warranty terms.


